
소프트웨어 마에스트로 14기 프로젝트에서 Spring Security를 활용한 JWT 도입 방법에 대해 정리하였습니다. 아직 Spring에서 제공하는 Security 방식, 그리고 보안 용어들에 대해 모든 것을 알지는 못해도, 프로젝트를 진행할 때마다 공부하여 추가 및 반영할 예정입니다.
도움 많이 받은 곳 : https://ws-pace.tistory.com/250
<버전>
Spring Security 6.1.2
Spring boot 3.1.0
1. 들어가기에 앞서 알아야 하는 것
1) Spring Security 존재 이유
Spring Security는
- 인증(Authentication)
- 인가(Authorization)
- 보안(Protection against Exploit)
(예를들어 CSRF / https://velog.io/@dong5854/CSRF%EB%9E%80 참고)
을 위해 만든 프레임워크이다.
2) Spring Security의 아키텍쳐
공식문서 : https://docs.spring.io/spring-security/reference/servlet/architecture.html
해당 아키텍쳐를 이해하기 이전에, Spring이 제공하는 Spring Filter와 Spring Interceptor 가 무엇인지 이해하는 것이 필요하다. Spring Security는 Spring Filter를 이용하여 JWT를 쉽게 구현하게 해준다.
1. 일반적인 스프링에서의 Request 처리 방법
먼저 스프링에서, HTTP Request가 어떻게 처리되는지 알아보자.
- HTTP Request
- WAS
- FilterChain (다수의 필터가 doFilter 메서드로 체이닝)
- DispatcherServlet
- Interceptor
- Controller
이 순서대로 Request가 처리된다. 공식문서에는 다음과 같은 사진으로 소개한다.
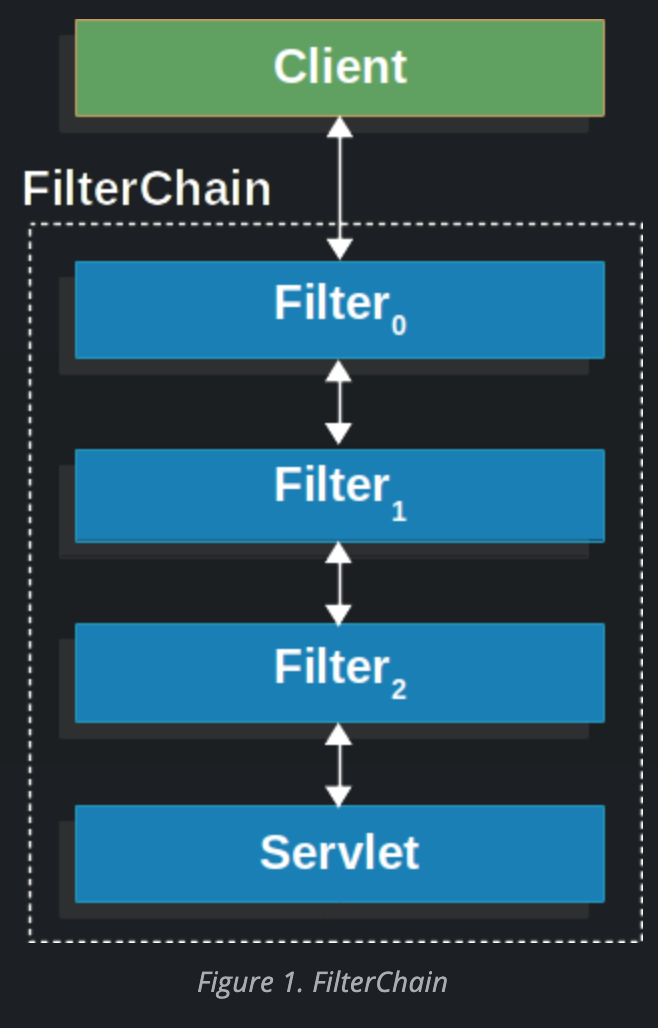
필터는 요청사항들을 말 그대로 필터링 해주기도 하고 HttpServletResponse와 HttpServletRequest를 적절히 변형하여 Servlet 까지 전송시키기도 한다.
그래서 이 필터를 이해하는 것이 중요하다. Request가 여러 필터를 거쳐서 인증,인가의 과정을 거치기 때문이다.
다음은, 필터 하나가 호출하는 doFilter 메서드이다. 여기에서 Request와 Response를 적절히 변형할 수 있다.
public void doFilter(ServletRequest request, ServletResponse response, FilterChain chain) {
	// do something before the rest of the application
    chain.doFilter(request, response); // invoke the rest of the application
    // do something after the rest of the application
}
2. Spring Security가 제공하는 필터
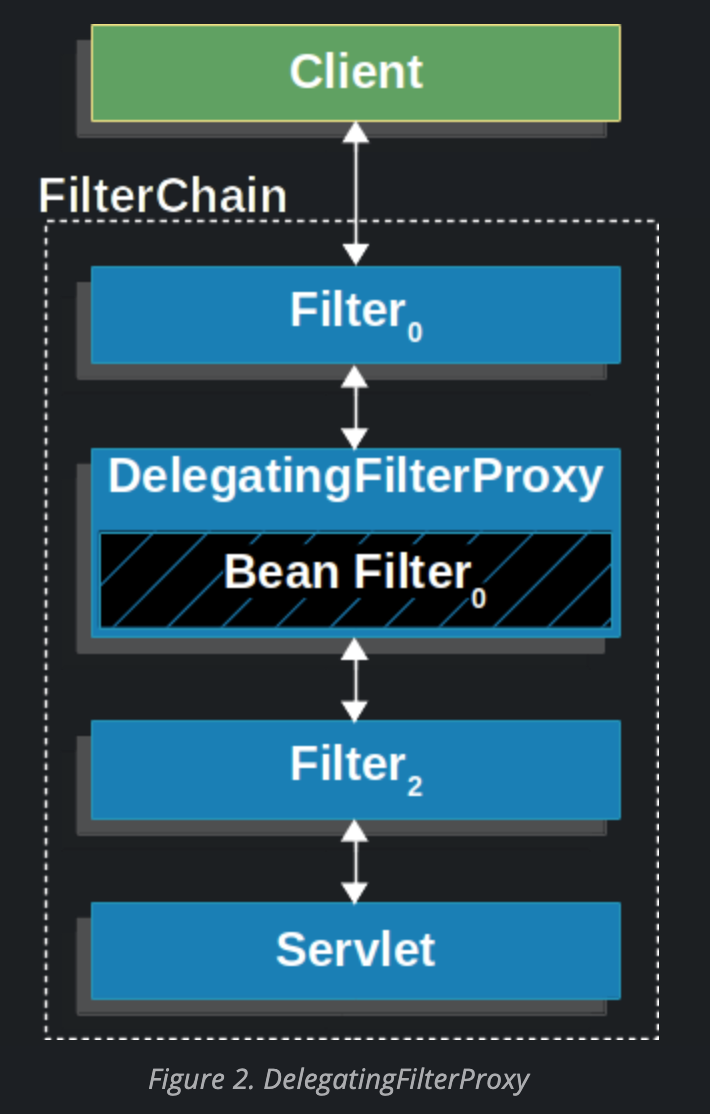
주목해야할 부분이 바로 보일 것이다. 바로 DelegatingFilterProxy 이다. Filter 중계기 역할을 해준다는 이야기인데, 감은 오지 않는다.
이 때, 한가지 짚고 넘어가야 하는 부분은, 스프링 컨테이너가 관리하는 부분은 DispatcherServlet 그 이후부터이다. 즉, WAS와 Filter는 스프링 컨테이너가 관리하는 영역이 아니다. 따라서, Filter를 스프링에서 커스터마이징 하는 것은 불가능하다고 생각할 수 있지만, 이를 가능케 한 것이 DelegatingFilterProxy이다.
덕분에, 우리는 웹 어플리케이션 실행을 담당하는 Servlet Container 와 Spring Container 정확히는, WAS와 Servlet 사이에서 자유롭게 필터를 추가할 수 있다.
You can register DelegatingFilterProxy through the standard Servlet container mechanisms but delegate all the work to a Spring Bean that implements Filter.
위 공식문서 글을 보면, 우리는 그저 Servlet Container에 DelegatingFilterProxy를 등록만하고, 안에서 스프링 빈이 등록되어 필터역할을 해준다는 것을 알 수 있다.
다음은 DelegatingFilterProxy 의 seudo code이다.
public void doFilter(ServletRequest request, ServletResponse response, FilterChain chain) {
	Filter delegate = getFilterBean(someBeanName);
	delegate.doFilter(request, response);
}
아래 코드 블록은 DelegatingFilterProxy의 실제 코드이다. WebApplicationContext를 사용하는 것으로 보아 Bean(FilterChainProxy, 바로 뒤에서 알아볼 것이다) 이 여기서 등록되는 것을 볼 수 있다.
public class DelegatingFilterProxy extends GenericFilterBean {

	@Nullable
	private String contextAttribute;

	@Nullable
	private WebApplicationContext webApplicationContext;

	@Nullable
	private String targetBeanName;

	private boolean targetFilterLifecycle = false;

	@Nullable
	private volatile Filter delegate;

	private final Object delegateMonitor = new Object();
}
3. FilterChainProxy (DelegatingFilterProxy)

아래 코드블록은 FilterChainProxy가 구현된 코드이다.
public class FilterChainProxy extends GenericFilterBean {

	private static final Log logger = LogFactory.getLog(FilterChainProxy.class);

	private static final String FILTER_APPLIED = FilterChainProxy.class.getName().concat(".APPLIED");

	private SecurityContextHolderStrategy securityContextHolderStrategy = SecurityContextHolder
			.getContextHolderStrategy();

	private List<SecurityFilterChain> filterChains;

	private FilterChainValidator filterChainValidator = new NullFilterChainValidator();

	private HttpFirewall firewall = new StrictHttpFirewall();

	private RequestRejectedHandler requestRejectedHandler = new HttpStatusRequestRejectedHandler();

	private ThrowableAnalyzer throwableAnalyzer = new ThrowableAnalyzer();

	private FilterChainDecorator filterChainDecorator = new VirtualFilterChainDecorator();

	public FilterChainProxy() {
	}

	public FilterChainProxy(SecurityFilterChain chain) {
		this(Arrays.asList(chain));
	}

	public FilterChainProxy(List<SecurityFilterChain> filterChains) {
		this.filterChains = filterChains;
	}
중간에 보면, SecurityFIlterChain 이 제너릭타입으로 정의된 것을 볼 수 있다.
그리고 생성자로, SecurityFilterChain를 주입하는 것을 알 수 있다.
	private List<Filter> getFilters(HttpServletRequest request) {
		int count = 0;
		for (SecurityFilterChain chain : this.filterChains) {
			if (logger.isTraceEnabled()) {
				logger.trace(LogMessage.format("Trying to match request against %s (%d/%d)", chain, ++count,
						this.filterChains.size()));
			}
			if (chain.matches(request)) {
				return chain.getFilters();
			}
		}
		return null;
	}
또한, 클래스 내에 getFilters 메서드로 등록된 SecurityFIlterChain 들을 꺼내는 과정이 존재한다.
4. SecurityFilterChain
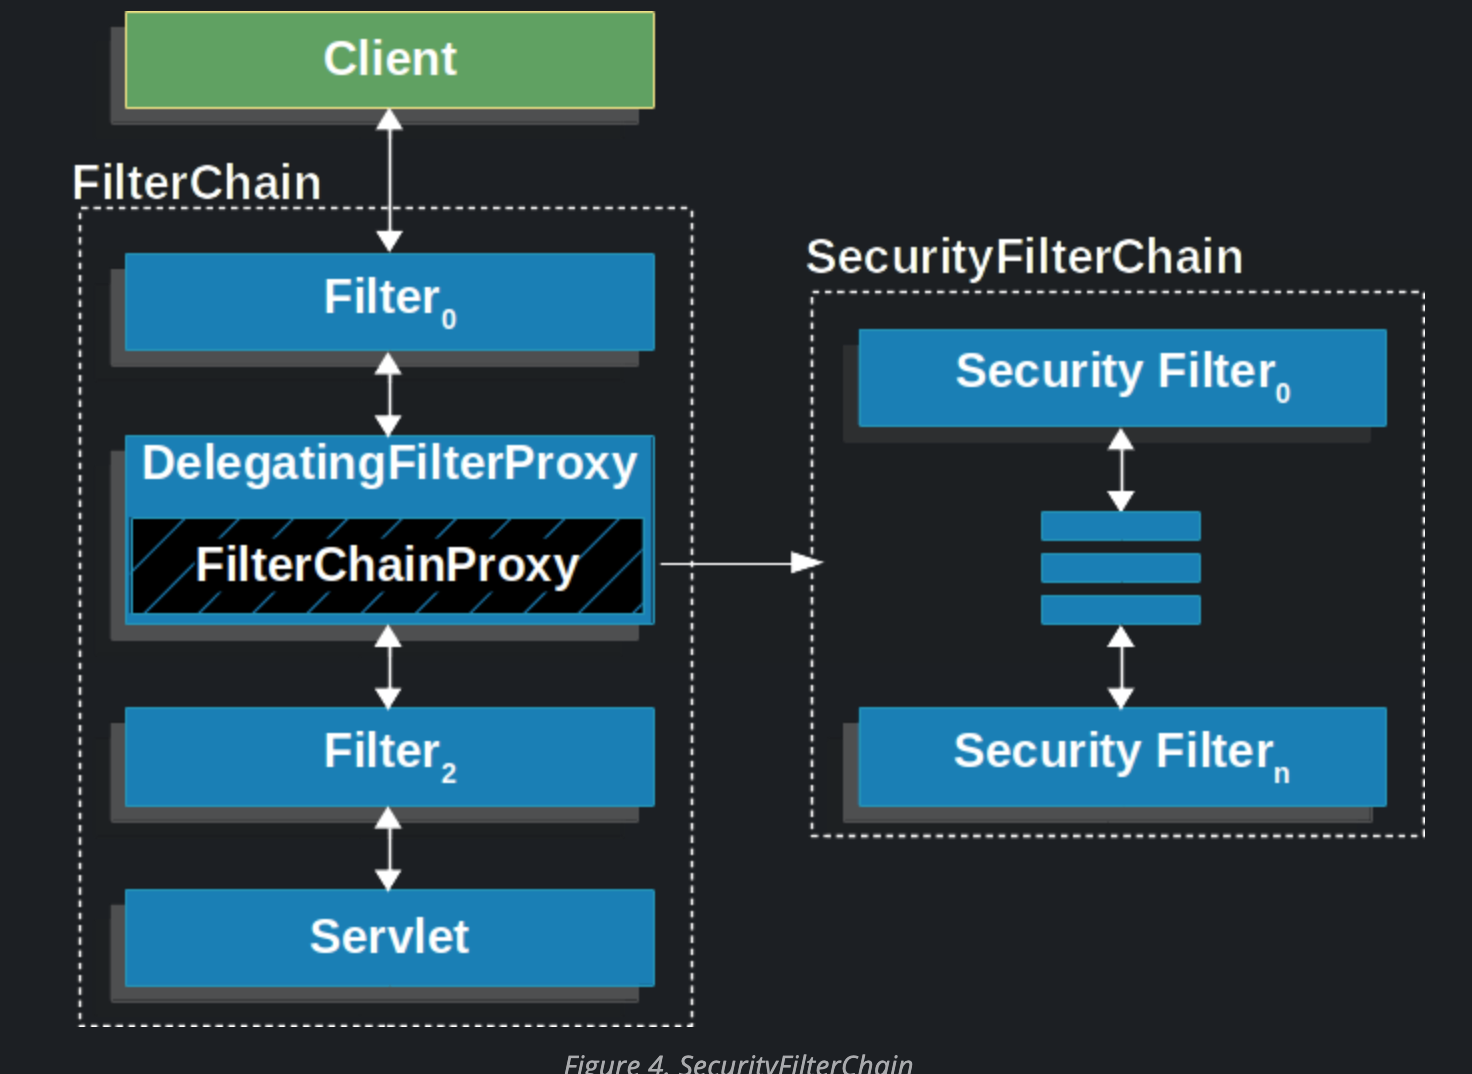
SecurityFilterChain 안에 들어있는 Filter들도 앞서 코드로 살펴봤다시피 Bean으로 FilterChainProxy에 등록된 녀석들이다.
FilterChainProxy provides a number of advantages to registering directly with the Servlet container or DelegatingFilterProxy. First, it provides a starting point for all of Spring Security’s Servlet support. For that reason, if you try to troubleshoot Spring Security’s Servlet support, adding a debug point in FilterChainProxy is a great place to start.
이렇다고 한다. 당연한 말이지만, 좋은 팁이 될 수 있으니 적어놓았다.
잠깐, 프로젝트에 사용한 예시코드를 짚고 넘어가겠다.
@Slf4j
@Configuration
@EnableWebSecurity
@RequiredArgsConstructor
public class SecurityConfig {

    private final TokenProvider tokenProvider;
    private final JwtAuthenticationEntryPoint jwtAuthenticationEntryPoint;
    private final JwtAccessDeniedHandler jwtAccessDeniedHandler;

    // PasswordEncoder는 BCryptPasswordEncoder를 사용
    @Bean
    public PasswordEncoder passwordEncoder() {
        return new BCryptPasswordEncoder();
    }

    //SecurityFilterChain에 Bean으로 등록하는 과정입니다.
    @Bean
    public SecurityFilterChain filterChain(HttpSecurity httpSecurity) throws Exception {
        httpSecurity
                // token을 사용하는 방식이기 때문에 csrf를 disable합니다.
                .csrf(AbstractHttpConfigurer::disable)
                .exceptionHandling((exceptionHandling) -> //컨트롤러의 예외처리를 담당하는 exception handler와는 다름.
                        exceptionHandling
                                .accessDeniedHandler(jwtAccessDeniedHandler)
                                .authenticationEntryPoint(jwtAuthenticationEntryPoint)
                )

                // enable h2-console
                .headers((headers)->
                        headers.contentTypeOptions(contentTypeOptionsConfig ->
                                headers.frameOptions(HeadersConfigurer.FrameOptionsConfig::sameOrigin)))
                // disable session
                .sessionManagement((sessionManagement) ->
                        sessionManagement.sessionCreationPolicy(SessionCreationPolicy.STATELESS)
                )

                .authorizeHttpRequests((authorizeRequests)->
                        authorizeRequests
                                //users 포함한 end point 보안 적용 X
                                .requestMatchers("/users/**").permitAll() // HttpServletRequest를 사용하는 요청들에 대한 접근제한을 설정하겠다.
                                .requestMatchers("/error/**").permitAll()
                                .requestMatchers(PathRequest.toH2Console()).permitAll()// h2-console, favicon.ico 요청 인증 무시
                                .requestMatchers("/favicon.ico").permitAll()
                                .anyRequest().authenticated() // 그 외 인증 없이 접근X
                )
                .exceptionHandling((exceptionHandling)->exceptionHandling
                        .accessDeniedHandler(jwtAccessDeniedHandler)
                        .authenticationEntryPoint(jwtAuthenticationEntryPoint))
                .apply(new JwtSecurityConfig(tokenProvider)); // JwtFilter를 addFilterBefore로 등록했던 JwtSecurityConfig class 적용

        return httpSecurity.build();
    }

}
해당 코드는 SecurityConfig 파일이다.
@Configuration, @EnableWebSecurty로 FilterChainProxy를 적용하였다.
filterChain 메서드를 보면, 기본적으로 적용되는 여러 필터들과 더불어, Bean으로 return 된 SecurityFilterChain을 추가적으로 등록/삭제하는 과정이 존재한다.
예시 코드에는 어떤 엔드포인드에 security filter를 적용할 것인지, (requestMatchers), 어떤 필터는 적용하지 않을 것인지에 관한 관련 URL 및 부가적인 설정을 적용하였다.
다음은 기본적으로 등록되는 SecurityFilter 목록들이다.
이를 참고하면, 예시코드에서 어떤 필터를 거치고, 거치지 않는지 눈치로 알 수 있다.2023-06-14T08:55:22.321-03:00 INFO 76975 --- [ main] o.s.s.web.DefaultSecurityFilterChain : Will secure any request with [ org.springframework.security.web.session.DisableEncodeUrlFilter@404db674, org.springframework.security.web.context.request.async.WebAsyncManagerIntegrationFilter@50f097b5, org.springframework.security.web.context.SecurityContextHolderFilter@6fc6deb7, org.springframework.security.web.header.HeaderWriterFilter@6f76c2cc, org.springframework.security.web.csrf.CsrfFilter@c29fe36, org.springframework.security.web.authentication.logout.LogoutFilter@ef60710, org.springframework.security.web.authentication.UsernamePasswordAuthenticationFilter@7c2dfa2, org.springframework.security.web.authentication.ui.DefaultLoginPageGeneratingFilter@4397a639, org.springframework.security.web.authentication.ui.DefaultLogoutPageGeneratingFilter@7add838c, org.springframework.security.web.authentication.www.BasicAuthenticationFilter@5cc9d3d0, org.springframework.security.web.savedrequest.RequestCacheAwareFilter@7da39774, org.springframework.security.web.servletapi.SecurityContextHolderAwareRequestFilter@32b0876c, org.springframework.security.web.authentication.AnonymousAuthenticationFilter@3662bdff, org.springframework.security.web.access.ExceptionTranslationFilter@77681ce4, org.springframework.security.web.access.intercept.AuthorizationFilter@169268a7]
5. 정리
DelegatingFilterProxy에FilterChainProxy가@Bean으로 등록되고 해당 구현체 안에서SpringFilterChain이 등록된다.
2. 프로젝트 코드
1) SecurityConfig (JWT Filter 적용을 위한 작업)
public class SecurityConfig {

    private final TokenProvider tokenProvider;
    private final JwtAuthenticationEntryPoint jwtAuthenticationEntryPoint;
    private final JwtAccessDeniedHandler jwtAccessDeniedHandler;

    // PasswordEncoder는 BCryptPasswordEncoder를 사용
    @Bean
    public PasswordEncoder passwordEncoder() {
        return new BCryptPasswordEncoder();
    }

    //SecurityFilterChain에 Bean으로 등록하는 과정입니다.
    @Bean
    public SecurityFilterChain filterChain(HttpSecurity httpSecurity) throws Exception {
        httpSecurity
                // token을 사용하는 방식이기 때문에 csrf를 disable합니다.
                .csrf(AbstractHttpConfigurer::disable)
                .exceptionHandling((exceptionHandling) -> //컨트롤러의 예외처리를 담당하는 exception handler와는 다름.
                        exceptionHandling
                                .accessDeniedHandler(jwtAccessDeniedHandler)
                                .authenticationEntryPoint(jwtAuthenticationEntryPoint)
                )

                // enable h2-console
                .headers((headers)->
                        headers.contentTypeOptions(contentTypeOptionsConfig ->
                                headers.frameOptions(HeadersConfigurer.FrameOptionsConfig::sameOrigin)))
                // disable session
                .sessionManagement((sessionManagement) ->
                        sessionManagement.sessionCreationPolicy(SessionCreationPolicy.STATELESS)
                )

                .authorizeHttpRequests((authorizeRequests)->
                        authorizeRequests
                                //users 포함한 end point 보안 적용 X
                                .requestMatchers("/users/**").permitAll() // HttpServletRequest를 사용하는 요청들에 대한 접근제한을 설정하겠다.
                                .requestMatchers("/error/**").permitAll()
                                .requestMatchers("/favicon.ico").permitAll()
                                .anyRequest().authenticated() // 그 외 인증 없이 접근X
                )
                .exceptionHandling((exceptionHandling)->exceptionHandling
                        .accessDeniedHandler(jwtAccessDeniedHandler)
                        .authenticationEntryPoint(jwtAuthenticationEntryPoint))
                .apply(new JwtSecurityConfig(tokenProvider)); // JwtFilter를 addFilterBefore로 등록했던 JwtSecurityConfig class 적용

        return httpSecurity.build();
    }

}
filterChain 에 필터링 정보를 등록할 때, 스프링 시큐리티 내부에서 이미 정해진 Order가 있으므로, customizing한 필터가 아닌 필터(기본적으로 제공하는 필터)를 그냥 등록만하면, 알아서 우선순위를 정해준다. 인증이 되고 인가를 해야지, 인가가 되고 인증이 되는 일은 없어야 하기 때문이다.
또한, 패스워드 인코딩을 위한 메서드도 빈으로 등록하였다.
2) UserDetailsService를 구현한 Member Service
@Slf4j
@Service
public class MemberService implements UserDetailsService {
    private final NonSocialMemberRepository nonSocialmemberRepository;
    private final SocialMemberRepository socialMemberRepository;

    public MemberService(NonSocialMemberRepository nonSocialmemberRepository, SocialMemberRepository socialMemberRepository) {
        this.nonSocialmemberRepository = nonSocialmemberRepository;
        this.socialMemberRepository = socialMemberRepository;
    }

    public Long join (NonSocialMemberSaveForm nonSocialMemberSaveForm) throws NoSuchAlgorithmException {
        int login_type = nonSocialMemberSaveForm.getLogin_type();
        //중복 처리 한번더 검증
        validateDuplicateEmail(nonSocialMemberSaveForm,login_type);
        validateDuplicateName(nonSocialMemberSaveForm,login_type);
        Long user_id = -1L;

        //로그인 타입별 다른 회원가입 로직
        switch(login_type) {
            case 0: // non-social 회원가입의 경우
            {
                NonSocialMember member = new NonSocialMember(); // DAO (Entity)로 바꾸는 작업
                member.setUser_name(nonSocialMemberSaveForm.getUser_name());
                member.setUser_email(nonSocialMemberSaveForm.getUser_email());
                member.setUser_pw(nonSocialMemberSaveForm.getUser_pw());
                NonSocialMember saveMember = nonSocialmemberRepository.save(member);
                user_id = saveMember.getUser_id();
                return user_id;
            }
            case 1: //social 회원가입의 경우 -> 요청 필요
            {
                throw new NotYetImplementException("해당 요청은 아직 구현되지 않았습니다.");
            }
        }
        return user_id; // non valid request, return -1
    }

    public void validateDuplicateName(NonSocialMemberSaveForm memberForm, Integer login_type){
        MemberRepository memberRepository = null;
        switch(login_type){
            case 0: {
                memberRepository = nonSocialmemberRepository;
                break;
            }
            case 1: {
                memberRepository = socialMemberRepository;
                break;
            }
        }
        log.info("check = {}",memberRepository.findByName("hi"));
        memberRepository.findByName(memberForm.getUser_name()).ifPresent(m->{
            log.info("name check");
            throw new IllegalStateException("이미 존재하는 회원 닉네임입니다.");
        });
    }

    public void validateDuplicateEmail(NonSocialMemberSaveForm memberForm, Integer login_type){
        MemberRepository memberRepository = null;
        switch(login_type){
            case 0: {
                memberRepository = nonSocialmemberRepository;
                break;
            }
            case 1: {
                memberRepository = socialMemberRepository;
                break;
            }
        }
        memberRepository.findByEmail(memberForm.getUser_email()).ifPresent(m->{
            throw new IllegalStateException("이미 존재하는 회원 이메일입니다.");
        });
    }

    @Override
    public UserDetails loadUserByUsername(String userEmail) throws UsernameNotFoundException {
        Optional<NonSocialMember> nonSocialMember = nonSocialmemberRepository.findByEmail(userEmail);

        if (nonSocialMember.isPresent()) {
            NonSocialMember member = nonSocialMember.get();
            log.info("member info in loadByUsername method = {}", member.getAuth_id());
            return new CustomUserDetails(member.getAuth_id(),member.getUser_email(),member.getUser_pw(),true,false );
        } else {
            throw new UsernameNotFoundException("User not found with userEmail: " + userEmail);
        }
    }

}
기본적인 MemberService 로직 관련 코드에, UserDetailsService를 implement 하게 되면, loadUserByUsername 메서드를 override 하게 된다. (물론 따로 구현체를 두는것이 좋을 것 같긴 하다만.. 그냥 합쳐놓았다)
UserDetailsService는 DaoAuthenticationProvider에 의해서 사용되어진다. 이는 스프링 시큐리티에서 유저정보를 가져오는데 활용된다.
3) CustomUserDetails
스프링 시큐리티에서 사용자 정보를 담는 기본 UserDetails를 그대로 사용해도 되지만, 나는 경험해보는 겸, 새로 하나 만들어 동작원리를 살펴보았다.
public class CustomUserDetails implements UserDetails, Serializable {
    private static final long serialVersionUID = 174726374856727L;
    private String id;	// DB에서 PK 값
    private String loginId;		// 로그인용 ID 값
    private String password;	// 비밀번호
    private String email;	//이메일
    private boolean emailVerified;	//이메일 인증 여부
    private boolean locked;	//계정 잠김 여부
    private String nickname;	//닉네임
    private Collection<GrantedAuthority> authorities;	//권한 목록
    public CustomUserDetails(Long authId, String userEmail, String userPw, boolean emailVerified,boolean locked) {
        this.id = String.valueOf(authId);
        this.email = userEmail;
        this.password = userPw;
        this.emailVerified = emailVerified;
        this.locked = !locked;
    }
    /**
     * 해당 유저의 권한 목록
     */
    @Override
    public Collection<? extends GrantedAuthority> getAuthorities() {
        return Collections.emptyList();
    }
    /**
     * 비밀번호
     */
    @Override
    public String getPassword() {
        return password;
    }
    /**
     * PK값
     */
    @Override
    public String getUsername() {
        return id;
    }
    /**
     * 계정 만료 여부
     * true : 만료 안됨
     * false : 만료
     * @return
     */
    @Override
    public boolean isAccountNonExpired() {
        return true;
    }
    /**
     * 계정 잠김 여부
     * true : 잠기지 않음
     * false : 잠김
     * @return
     */
    @Override
    public boolean isAccountNonLocked() {
        return locked;
    }
    /**
     * 비밀번호 만료 여부
     * true : 만료 안됨
     * false : 만료
     * @return
     */
    @Override
    public boolean isCredentialsNonExpired() {
        return true;
    }
    /**
     * 사용자 활성화 여부
     * ture : 활성화
     * false : 비활성화
     * @return
     */
    @Override
    public boolean isEnabled() {
        //이메일이 인증되어 있고 계정이 잠겨있지 않으면 true
        //상식과 조금 벗어나서, Customizing 하였음
        return (emailVerified && locked);
    }
}
은근 상식과 벗어나는 부분이 있어서, isEnabled() 메서드를 약간 수정, 그리고 아직 프로젝트에는 Authoritiy관련한 작업이 이루어지고 있지 않으므로, 빈 리스트를 반환하였다.
4) DaoAuthenticationProvider
다음은 Spring Security의 DaoAuthenticationProvider 코드이다.
public class DaoAuthenticationProvider extends AbstractUserDetailsAuthenticationProvider {
	//..생략된 변수 많음
	private PasswordEncoder passwordEncoder;
	private UserDetailsService userDetailsService;
	private UserDetailsPasswordService userDetailsPasswordService;
	public DaoAuthenticationProvider() {	this(PasswordEncoderFactories.createDelegatingPasswordEncoder());
	}
	public DaoAuthenticationProvider(PasswordEncoder passwordEncoder) {
		setPasswordEncoder(passwordEncoder);
	}
	//생략..
    @Override
    protected void additionalAuthenticationChecks(UserDetails userDetails,
			UsernamePasswordAuthenticationToken authentication) throws AuthenticationException {
		if (authentication.getCredentials() == null) {
			this.logger.debug("Failed to authenticate since no credentials provided");
			throw new BadCredentialsException(this.messages
					.getMessage("AbstractUserDetailsAuthenticationProvider.badCredentials", "Bad credentials"));
		}
		String presentedPassword = authentication.getCredentials().toString();
		if (!this.passwordEncoder.matches(presentedPassword, userDetails.getPassword())) {
			this.logger.debug("Failed to authenticate since password does not match stored value");
			throw new BadCredentialsException(this.messages
					.getMessage("AbstractUserDetailsAuthenticationProvider.badCredentials", "Bad credentials"));
		}
	}
	@Override
	protected final UserDetails retrieveUser(String username, UsernamePasswordAuthenticationToken authentication)
			throws AuthenticationException {
		prepareTimingAttackProtection();
		try {
			UserDetails loadedUser = this.getUserDetailsService().loadUserByUsername(username);
			if (loadedUser == null) {
				throw new InternalAuthenticationServiceException(
						"UserDetailsService returned null, which is an interface contract violation");
			}
			return loadedUser;
		}
		catch (UsernameNotFoundException ex) {
			mitigateAgainstTimingAttack(authentication);
			throw ex;
		}
		catch (InternalAuthenticationServiceException ex) {
			throw ex;
		}
		catch (Exception ex) {
			throw new InternalAuthenticationServiceException(ex.getMessage(), ex);
		}
	}
	@Override
	protected Authentication createSuccessAuthentication(Object principal, Authentication authentication,
			UserDetails user) {
		boolean upgradeEncoding = this.userDetailsPasswordService != null
				&& this.passwordEncoder.upgradeEncoding(user.getPassword());
		if (upgradeEncoding) {
			String presentedPassword = authentication.getCredentials().toString();
			String newPassword = this.passwordEncoder.encode(presentedPassword);
			user = this.userDetailsPasswordService.updatePassword(user, newPassword);
		}
		return super.createSuccessAuthentication(principal, authentication, user);
	}
}
다음 코드를 보면, PasswordEncoder, userDetailsSerivce 를 주입받는 것을 볼 수 있다.
여기서 주목해야할 메서드는 두가지이다.
retrieveUser
이 부분에서, UserDetailsService를 가져와서 loadByUserName으로 유저 정보를 꺼내는 것(CustomUserDetails)을 볼 수 있다. 나의 경우에는 당연히 MemberService가 UserDetailsService가 되고, UserDetails는 CustomUserDetails가 된다. DB에서 유저정보(username, password)를 꺼내고, 찾을 수 없다면 Exception이 발생된다.
additionalAuthenticationChecks
authentication에서 credential을 가져오는 것을 볼 수 있다. 이는 request로 온 login 정보(username(principal),password(credential))을 가져오는 과정이다.
그 후에, 이를loadByUserName로 실제 DB에서 가져온, 즉DaoAuthenticationProvider의retrieveUser에서 가져온 UserDetails 정보와 비교하여 인증여부를 확인한다.인증여부 확인은 가장 먼저 ProviderManager에게 위임한다.
이는AuthController에서 찍은 로그정보로, 다음 섹션에서 구현내용을 알 수 있다.
다음은 ProviderManager에 구현된 authenticate 메서드이다.@Override public Authentication authenticate(Authentication authentication) throws AuthenticationException { Class<? extends Authentication> toTest = authentication.getClass(); AuthenticationException lastException = null; AuthenticationException parentException = null; Authentication result = null; Authentication parentResult = null; int currentPosition = 0; int size = this.providers.size(); for (AuthenticationProvider provider : getProviders()) { if (!provider.supports(toTest)) { continue; } if (logger.isTraceEnabled()) { logger.trace(LogMessage.format("Authenticating request with %s (%d/%d)", provider.getClass().getSimpleName(), ++currentPosition, size)); } try { result = provider.authenticate(authentication); if (result != null) { copyDetails(authentication, result); break; } } catch (AccountStatusException | InternalAuthenticationServiceException ex) { prepareException(ex, authentication); // SEC-546: Avoid polling additional providers if auth failure is due to // invalid account status throw ex; } catch (AuthenticationException ex) { lastException = ex; } } if (result == null && this.parent != null) { // Allow the parent to try. try { parentResult = this.parent.authenticate(authentication); result = parentResult; } catch (ProviderNotFoundException ex) { // ignore as we will throw below if no other exception occurred prior to // calling parent and the parent // may throw ProviderNotFound even though a provider in the child already // handled the request } catch (AuthenticationException ex) { parentException = ex; lastException = ex; } } if (result != null) { if (this.eraseCredentialsAfterAuthentication && (result instanceof CredentialsContainer)) { // Authentication is complete. Remove credentials and other secret data // from authentication ((CredentialsContainer) result).eraseCredentials(); } // If the parent AuthenticationManager was attempted and successful then it // will publish an AuthenticationSuccessEvent // This check prevents a duplicate AuthenticationSuccessEvent if the parent // AuthenticationManager already published it if (parentResult == null) { this.eventPublisher.publishAuthenticationSuccess(result); } return result; } // Parent was null, or didn't authenticate (or throw an exception). if (lastException == null) { lastException = new ProviderNotFoundException(this.messages.getMessage("ProviderManager.providerNotFound", new Object[] { toTest.getName() }, "No AuthenticationProvider found for {0}")); } // If the parent AuthenticationManager was attempted and failed then it will // publish an AbstractAuthenticationFailureEvent // This check prevents a duplicate AbstractAuthenticationFailureEvent if the // parent AuthenticationManager already published it if (parentException == null) { prepareException(lastException, authentication); } throw lastException; }
ProviderManager에서authenticate메서드를 실행하면, for문을 돌면서 Authentication 정보를 처리할 수 있는 Provider들을 순회하고, 찾게 되면(이번 경우는 DaoAuthenticationProvider),authenticate메서드를 실행한다. DaoAuthenticationProvider는 AbstractUserDetailsAuthenticationProvider를 상속받으므로, 결국 AbstractUserDetailsAuthenticationProvider의authenticate메서드가 실행된다.다음은 AbstractUserDetailsAuthenticationProvider 에서 실제 구현되는
authenticate코드이다.@Override public Authentication authenticate(Authentication authentication) throws AuthenticationException { Assert.isInstanceOf(UsernamePasswordAuthenticationToken.class, authentication, () -> this.messages.getMessage("AbstractUserDetailsAuthenticationProvider.onlySupports", "Only UsernamePasswordAuthenticationToken is supported")); String username = determineUsername(authentication); boolean cacheWasUsed = true; UserDetails user = this.userCache.getUserFromCache(username); if (user == null) { cacheWasUsed = false; try { user = retrieveUser(username, (UsernamePasswordAuthenticationToken) authentication); } catch (UsernameNotFoundException ex) { this.logger.debug("Failed to find user '" + username + "'"); if (!this.hideUserNotFoundExceptions) { throw ex; } throw new BadCredentialsException(this.messages .getMessage("AbstractUserDetailsAuthenticationProvider.badCredentials", "Bad credentials")); } Assert.notNull(user, "retrieveUser returned null - a violation of the interface contract"); } try { this.preAuthenticationChecks.check(user); additionalAuthenticationChecks(user, (UsernamePasswordAuthenticationToken) authentication); } catch (AuthenticationException ex) { if (!cacheWasUsed) { throw ex; } // There was a problem, so try again after checking // we're using latest data (i.e. not from the cache) cacheWasUsed = false; user = retrieveUser(username, (UsernamePasswordAuthenticationToken) authentication); this.preAuthenticationChecks.check(user); additionalAuthenticationChecks(user, (UsernamePasswordAuthenticationToken) authentication); } this.postAuthenticationChecks.check(user); if (!cacheWasUsed) { this.userCache.putUserInCache(user); } Object principalToReturn = user; if (this.forcePrincipalAsString) { principalToReturn = user.getUsername(); } return createSuccessAuthentication(principalToReturn, authentication, user); }이정도면 이해가 충분히 된것 같다.
AuthenticationToken에서 username을 꺼내고(우리의 경우는 email), DaoAuthenticationProvider에서 override된retrieveUser메서드를 호출한다. 그후 이를 이용하여 preAuthenticationChecks 를 이용하여 user 인증을 한 후에, 최종적으로 인증이 된 토큰 정보를 반납한다.protected Authentication createSuccessAuthentication(Object principal, Authentication authentication, UserDetails user) { // Ensure we return the original credentials the user supplied, // so subsequent attempts are successful even with encoded passwords. // Also ensure we return the original getDetails(), so that future // authentication events after cache expiry contain the details UsernamePasswordAuthenticationToken result = UsernamePasswordAuthenticationToken.authenticated(principal, authentication.getCredentials(), this.authoritiesMapper.mapAuthorities(user.getAuthorities())); result.setDetails(authentication.getDetails()); this.logger.debug("Authenticated user"); return result; }UsernamePasswordAuthenticationToken 은 두가지 생성자가 있는데,
request에서 들어온 정보로 만든 Token은 유효성 검사가 안되었고,
유효성검사가 마친 토큰은 위 코드와 같이 Authorites 파라미터가 하나 더 추가되었다.
아래는 두가지 생성자가 구현된 실제 코드이다.public UsernamePasswordAuthenticationToken(Object principal, Object credentials) { super(null); this.principal = principal; this.credentials = credentials; setAuthenticated(false); } /** * This constructor should only be used by <code>AuthenticationManager</code> or * <code>AuthenticationProvider</code> implementations that are satisfied with * producing a trusted (i.e. {@link #isAuthenticated()} = <code>true</code>) * authentication token. * @param principal * @param credentials * @param authorities */ public UsernamePasswordAuthenticationToken(Object principal, Object credentials, Collection<? extends GrantedAuthority> authorities) { super(authorities); this.principal = principal; this.credentials = credentials; super.setAuthenticated(true); // must use super, as we override }
createSuccessAuthentication
retrieveUser()로 받은 UserDetails 정보를 토대로 성공적인 암호화작업을 했으면 Authentication 을 return한다.
이때, 실제 db에 사용자 암호를 암호화한 방식과 SecurityConfig에서 Bean으로 등록한 암호화 방식이 같아야만, 검증이 가능하다는 점을 잊지 말자.

여기서 Authentication이란 무엇일까? 이전에 작성한 포스트를 참고해보자.
Authentication 정리 포스트
DaoAuthenticationProvider는 AuthenticationProvider를 구현한 것으로(이전 포스트에 다 있는 내용!) username, password가 담긴 authentication을 인증하는데 사용된다.
Spring Security가 기본적으로 Security Filter에 적용하는 필터중 하나인 UsernamePasswordAuthenticationFilter에서 아이디와 비밀번호를 입력을 했는지 체크한 후(알맞은 정보인지는 모름), DaoAuthenticationProvider가 동작한다. (한가지 궁금한점은 "username", "password"의 상수값으로 UsernamePasswordAuthenticationFilter 에서 정보를 받아오는데, request는 그런형식이 아닌데 어떻게 받아오는지 궁금하다..
이 부분은 AuthController에서 비밀이 밝혀진다.)
정리하면, UsernamePasswordAuthenticationFilter에서 만들어준 Authentication 정보를 토대로, AuthenticationManager에게 작업을 위임하여, AuthenticationManager에 구현된 authenticate 메서드로 유효한 유저 정보인지 확인한다.

다음은 UsernamePasswordAuthenticationFilter 코드이다.
AuthenticationManager를 주입받는 것을 볼 수 있다.
주목해야할 부분은attemptAuthentication메서드이다.public class UsernamePasswordAuthenticationFilter extends AbstractAuthenticationProcessingFilter { //....생략 UsernamePasswordAuthenticationFilter(AuthenticationManager authenticationManager) { super(DEFAULT_ANT_PATH_REQUEST_MATCHER, authenticationManager); } @Override public Authentication attemptAuthentication(HttpServletRequest request, HttpServletResponse response) throws AuthenticationException { if (this.postOnly && !request.getMethod().equals("POST")) { throw new AuthenticationServiceException("Authentication method not supported: " + request.getMethod()); } String username = obtainUsername(request); username = (username != null) ? username.trim() : ""; String password = obtainPassword(request); password = (password != null) ? password : ""; UsernamePasswordAuthenticationToken authRequest = UsernamePasswordAuthenticationToken.unauthenticated(username, password); // Allow subclasses to set the "details" property setDetails(request, authRequest); return this.getAuthenticationManager().authenticate(authRequest); } //..생략 }
5) AuthController
먼저 로그인 요청이 오는 부분을 처리하는 AuthController 를 살펴보자
@Slf4j
@RestController
@RequiredArgsConstructor
public class AuthController {
private final TokenProvider tokenProvider;
private final AuthenticationManagerBuilder authenticationManagerBuilder;
@PostMapping("/users/login")
public ResponseEntity<TokenDto> login(@Valid @RequestBody NonSocialMemberLoginForm nonSocialMemberLoginForm) {
UsernamePasswordAuthenticationToken authenticationToken =
new UsernamePasswordAuthenticationToken(nonSocialMemberLoginForm.getUser_email(), nonSocialMemberLoginForm.getUser_pw());
log.info("authetntication manager builder get object = {}",authenticationManagerBuilder.getObject());
// authenticate 메소드가 실행이 될 때 CustomUserDetailsService class의 loadUserByUsername 메소드가 실행 및 db와 대조하여 인증
Authentication authentication = authenticationManagerBuilder.getObject().authenticate(authenticationToken);
log.info("authentication info = {}",authentication);
// 해당 객체를 SecurityContextHolder에 저장하고
SecurityContextHolder.getContext().setAuthentication(authentication);
// 인증받은 새로운 authentication 객체를 createToken 메소드를 통해서 JWT Token을 생성
String jwt = tokenProvider.createToken(authentication);
HttpHeaders httpHeaders = new HttpHeaders();
// response header에 jwt token에 넣어줌
httpHeaders.add(JwtFilter.AUTHORIZATION_HEADER, "Bearer " + jwt);
httpHeaders.add("location","http://localhost:3000");
// tokenDto를 이용해 response body에도 넣어서 리턴
return new ResponseEntity<>(new TokenDto(jwt), httpHeaders, HttpStatus.OK);
}
}컨트롤러에 비즈니스 로직이 조금 많이 포함되어 있는 것에 대한 찝찝함을 뒤로한채로 살펴보자면,
컨트롤러는 기본적으로 모든 필터링을 거치고 난 후에 작동하는 것이다.
이제, 앞에서 UsernamePasswordAuthenticationFilter 에서 request한 필드명이 달라도, 정상작동하는 이유 를 소개해줄 차례이다.
우리는 이 Controller에서 이미 UsernamePasswordAuthenticationToken을 세팅하였기 때문이다. 즉, UsernamePasswordAuthenticationFilter가 없어도 된다는 의미이다. 이미 AuthenticationManager에 필요한 토큰을 만들고, 이를 AuthenticationManager에 직접 주었기 때문이다.
그리고 이 토큰은 타고타고 올라가면 결국 Authorization이 부모클래스이다.따라서 추후에 인증이 끝나도, SecurityContextHolder에 존재한다.
이후, builder들을 통해 authentication을 생성후, authenticate() 메서드로 CustomUserDetailsService에 override된 loadUserByUsername() 를 실행한다. 그러면 UserDetails (여기서는 CustomUserDetails)가 나오고, 이를 활용하여 AuthenticationManger가 내부적으로 알아서, UsernamePasswordAuthenticationToken 정보 (결국 Authentication을 상속받았으므로 Authentication과 동일하게 생각해도 무방)와 UserDetails 정보를 비교하여 타당한 유저 정보인지 확인한다. 앞선 섹션에서 인증관련 메서드와 클래스들은 설명이 끝났으니, 가볍게 정리만 했다.
원래 같으면 (일반적으로 올바르게 필터를 거치는 상황)
필드값과 엔드포인트(/login) 가 일치하는 로그인 요청이 왔을 때,
1. UsernamePasswordAuthentication 필터에서 UsernamePasswordAuthenticationToken을 발급 하고,
2. AuthenticationManager (AuthenticatinProvider ~= DaoAuthenticationProvider) 에서 유효한 정보인지 authenticate() 메서드로 확인.
3. 그 후, authentication 정보를 SecurityContextHolder 에 담고, jwt토큰을 만들어서, 응답한다.
하지만 우리는 1의 과정을 생략, 2에서 authenticate() 메서드만 불러주었다.
6) JwtSecurityConfig
@RequiredArgsConstructor
public class JwtSecurityConfig extends SecurityConfigurerAdapter<DefaultSecurityFilterChain, HttpSecurity> {
private final TokenProvider tokenProvider;
@Override
public void configure(HttpSecurity http) {
// security 로직에 JwtFilter 등록
http.addFilterBefore(
new JwtFilter(tokenProvider),
UsernamePasswordAuthenticationFilter.class
);
}
}security로직에 jwt filter를 추가하였는데, UsernamePasswordAuthenticationFilter 앞에, tokenProvider가 주입된 JwtFilter를 먼저 두었다. 그래서 클라이언트에서 전송한 token정보가 유효한지 확인한다.
7) Token Provider
@Slf4j
@Component
public class TokenProvider implements InitializingBean {
private final Logger logger = LoggerFactory.getLogger(TokenProvider.class);
private static final String AUTHORITIES_KEY = "auth";
private final String secret;
private final long tokenValidityInMilliseconds;
private Key key;
public TokenProvider(
@Value("${jwt.secret}") String secret,
@Value("${jwt.token-validity-in-seconds}") long tokenValidityInSeconds) {
this.secret = secret;
this.tokenValidityInMilliseconds = tokenValidityInSeconds * 1000;
}
// 빈이 생성되고 주입을 받은 후에 secret값을 Base64 Decode해서 key 변수에 할당하기 위해
@Override
public void afterPropertiesSet() {
byte[] keyBytes = Decoders.BASE64.decode(secret);
this.key = Keys.hmacShaKeyFor(keyBytes);
}
public String createToken(Authentication authentication) {
String authorities = authentication.getAuthorities().stream()
.map(GrantedAuthority::getAuthority)
.collect(Collectors.joining(","));
// 토큰의 expire 시간을 설정
long now = (new Date()).getTime();
Date validity = new Date(now + this.tokenValidityInMilliseconds);
return Jwts.builder()
.setSubject(authentication.getName())
.claim(AUTHORITIES_KEY, authorities) // 정보 저장
.signWith(key, SignatureAlgorithm.HS512) // 사용할 암호화 알고리즘과 , signature 에 들어갈 secret값 세팅
.setExpiration(validity) // set Expire Time 해당 옵션 안넣으면 expire안함
.compact();
}
// 토큰으로 클레임을 만들고 이를 이용해 유저 객체를 만들어서 최종적으로 authentication 객체를 리턴
public Authentication getAuthentication(String token) {
Claims claims = Jwts
.parserBuilder()
.setSigningKey(key)
.build()
.parseClaimsJws(token)
.getBody();
log.info("authorites = {}", claims.get(AUTHORITIES_KEY).toString().split(","));
Collection<? extends GrantedAuthority> authorities = Collections.emptyList(); //authorities를 빈 리스트로 설정했으므로, 그대로 대입.
// Arrays.stream(claims.get(AUTHORITIES_KEY).toString().split(","))
// .map(SimpleGrantedAuthority::new)
// .collect(Collectors.toList());
User principal = new User(claims.getSubject(), "", authorities);
return new UsernamePasswordAuthenticationToken(principal, token, authorities);
}
// 토큰의 유효성 검증을 수행
public boolean validateToken(String token) {
try {
Jwts.parserBuilder().setSigningKey(key).build().parseClaimsJws(token);
return true;
} catch (io.jsonwebtoken.security.SecurityException | MalformedJwtException e) {
logger.info("잘못된 JWT 서명입니다.");
} catch (ExpiredJwtException e) {
logger.info("만료된 JWT 토큰입니다.");
} catch (UnsupportedJwtException e) {
logger.info("지원되지 않는 JWT 토큰입니다.");
} catch (IllegalArgumentException e) {
logger.info("JWT 토큰이 잘못되었습니다.");
}
return false;
}
}1) Constructor
Constructor 부분을 보면, jwt secret 키를 properties 파일로 따로 빼서 저장하였다. 그러면 @Value 어노테이션으로 가져올 수 있다.
application.properties 파일에서
spring.profiles.include=jwt,db문장을 추가하여 application-jwt.properties, applicaton-db.properties 파일에서 환경변수 설정을 통해 application.properties에서 두 정보를 얻어왔다. 그 후에 jwt 설정 값들을
@Value어노테이션으로 가져온다.
2) afterPropertiesSet
TokenProvider는 InitializingBean을 구현한 구현체로써, afterPropertiesSet() 메서드를 override한다. 이를 통해, TokenProvider 생성에 필요한 의존성 주입 이후에, JWT 토큰을 만들기 위한 암호화 함수인HMAC 해시함수를 이용하여 properties 파일에서 정의한 JWT secret키를 암호화한 값을 멤버 변수인 key에 주입한다.
3) createToken
authentication 을 뒤져서, jwt 토큰에 담을 정보들을 parsing한 후, token값에 넣어서 반환한다.
4) getAuthentication
토큰 정보, 권한정보는 쓰이지 않으므로 empty list로 반환하였다.
여기서 반환하는 정보는 header로 온 토큰정보를 확인하여, 유저의 정보를 확인하는데 사용된다.
8) Jwt Filter
@RequiredArgsConstructor
public class JwtFilter extends OncePerRequestFilter {
private static final Logger logger = LoggerFactory.getLogger(JwtFilter.class);
public static final String AUTHORIZATION_HEADER = "Authorization";
private final TokenProvider tokenProvider;
// 실제 필터링 로직
// 토큰의 인증정보를 SecurityContext에 저장하는 역할 수행
@Override
protected void doFilterInternal(HttpServletRequest request, HttpServletResponse response, FilterChain filterChain) throws ServletException, IOException {
HttpServletRequest httpServletRequest = (HttpServletRequest) request;
String jwt = resolveToken(httpServletRequest);
String requestURI = httpServletRequest.getRequestURI();
if (StringUtils.hasText(jwt) && tokenProvider.validateToken(jwt)) {
Authentication authentication = tokenProvider.getAuthentication(jwt);
SecurityContextHolder.getContext().setAuthentication(authentication);
logger.debug("Security Context에 '{}' 인증 정보를 저장했습니다, uri: {}", authentication.getName(), requestURI);
} else {
logger.debug("유효한 JWT 토큰이 없습니다, uri: {}", requestURI);
}
filterChain.doFilter(request, response);
}
// Request Header 에서 토큰 정보를 꺼내오기 위한 메소드
private String resolveToken(HttpServletRequest request) {
String bearerToken = request.getHeader(AUTHORIZATION_HEADER);
if (StringUtils.hasText(bearerToken) && bearerToken.startsWith("Bearer ")) {
return bearerToken.substring(7);
}
return null;
}
}OncePerRequestFilter를 상속하였다.
DispatcherServlet을 이미 한번 거쳤으면, 해당 필터가 작동되지 않게하기 위함이다. 해당 정보는 다음 포스팅에서 참고하면 될 것이다.
해당 클래스에서 Jwt를 적용시킨 필터를 만들었고, 이를 등록하기 위한 절차가 필요하다.
9) JwtSecurityConfig
@RequiredArgsConstructor
public class JwtSecurityConfig extends SecurityConfigurerAdapter<DefaultSecurityFilterChain, HttpSecurity> {
private final TokenProvider tokenProvider;
@Override
public void configure(HttpSecurity http) {
// security 로직에 JwtFilter 등록
http.addFilterBefore(
new JwtFilter(tokenProvider),
UsernamePasswordAuthenticationFilter.class
);
}
}JwtFilter가 먼저, 그 후에 UsernamePassword 가 후겠죠?
한가지 더 유의할 점은, UsernamePasswordAuthenticationFilter는 /login과 같이 정해진 로그인을 위한 URL Path에 동작하여 Authentication객체를 생성하므로, 로그인정보를 확인후 Authentication객체를 만들어 SecurityContextHolder에 저장한다. 그 외의 경우 인증,인가가 필요한 경우에 JwtFilter에서 JWT토큰을 확인후, Authentication Token을 만들고 SecurityContextHolder에 저장하면 인증,인가를 위한 처리는 끝이다. 어차피 UsernamePasswordAuthenticationFilter는 거치지도 않지만 말이다.
3. 정리
마지막으로, 토큰 값에 들어가는 값을 확인해보면
public String createToken(Authentication authentication) {
String authorities = authentication.getAuthorities().stream()
.map(GrantedAuthority::getAuthority)
.collect(Collectors.joining(","));
// 토큰의 expire 시간을 설정
long now = (new Date()).getTime();
Date validity = new Date(now + this.tokenValidityInMilliseconds);
log.info("authentication name = {}",authentication.getCredentials());
return Jwts.builder()
.setSubject(authentication.getName())
.claim(AUTHORITIES_KEY, authorities) // 정보 저장
.signWith(key, SignatureAlgorithm.HS512) // 사용할 암호화 알고리즘과 , signature 에 들어갈 secret값 세팅
.setExpiration(validity) // set Expire Time 해당 옵션 안넣으면 expire안함
.compact();
}authentication.getName()
에서 들어가는 값은 UserDetails의 id가 들어가게 된다.
이유는, AbstractUserDetailsAuthenticationProvider에서 db에 저장된 유저정보와 request 유저정보가 일치하는지 확인하는 authenticate 메서드 에서 return되는 authentication 정보에 있다.
@Override
	public Authentication authenticate(Authentication authentication) throws AuthenticationException {
		Assert.isInstanceOf(UsernamePasswordAuthenticationToken.class, authentication,
				() -> this.messages.getMessage("AbstractUserDetailsAuthenticationProvider.onlySupports",
						"Only UsernamePasswordAuthenticationToken is supported"));
		String username = determineUsername(authentication);
		boolean cacheWasUsed = true;
		UserDetails user = this.userCache.getUserFromCache(username);
		if (user == null) {
			cacheWasUsed = false;
			try {
				user = retrieveUser(username, (UsernamePasswordAuthenticationToken) authentication);
			}
			catch (UsernameNotFoundException ex) {
				this.logger.debug("Failed to find user '" + username + "'");
				if (!this.hideUserNotFoundExceptions) {
					throw ex;
				}
				throw new BadCredentialsException(this.messages
						.getMessage("AbstractUserDetailsAuthenticationProvider.badCredentials", "Bad credentials"));
			}
			Assert.notNull(user, "retrieveUser returned null - a violation of the interface contract");
		}
		try {
			this.preAuthenticationChecks.check(user);
			additionalAuthenticationChecks(user, (UsernamePasswordAuthenticationToken) authentication);
		}
		catch (AuthenticationException ex) {
			if (!cacheWasUsed) {
				throw ex;
			}
			// There was a problem, so try again after checking
			// we're using latest data (i.e. not from the cache)
			cacheWasUsed = false;
			user = retrieveUser(username, (UsernamePasswordAuthenticationToken) authentication);
			this.preAuthenticationChecks.check(user);
			additionalAuthenticationChecks(user, (UsernamePasswordAuthenticationToken) authentication);
		}
		this.postAuthenticationChecks.check(user);
		if (!cacheWasUsed) {
			this.userCache.putUserInCache(user);
		}
		Object principalToReturn = user;
		if (this.forcePrincipalAsString) {
			principalToReturn = user.getUsername();
		}
		return createSuccessAuthentication(principalToReturn, authentication, user);
}principalToReturn을 보면 user.getUsername()으로 받는데, user로 직접 구현한 CustomUserDetails를 보면 이는 id를 리턴하고 있기 때문이다.
public class CustomUserDetails implements UserDetails, Serializable {
    private static final long serialVersionUID = 174726374856727L;
    private String id;	// DB에서 PK 값
    private String loginId;		// 로그인용 ID 값
    private String password;	// 비밀번호
    private String email;	//이메일
    private boolean emailVerified;	//이메일 인증 여부
    private boolean locked;	//계정 잠김 여부
    private String nickname;	//닉네임
    private Collection<GrantedAuthority> authorities;	//권한 목록
    public CustomUserDetails(Long authId, String userEmail, String userPw, boolean emailVerified,boolean locked) {
        this.id = String.valueOf(authId);
        this.email = userEmail;
        this.password = userPw;
        this.emailVerified = emailVerified;
        this.locked = !locked;
    }
    @Override
    public Collection<? extends GrantedAuthority> getAuthorities() {
        return Collections.emptyList();
    }
    @Override
    public String getPassword() {
        return password;
    }
    @Override
    public String getUsername() {
        return id;
    }
    @Override
    public boolean isAccountNonExpired() {
        return true;
    }
    @Override
    public boolean isAccountNonLocked() {
        return locked;
    }
    @Override
    public boolean isCredentialsNonExpired() {
        return true;
    }
    @Override
    public boolean isEnabled() {
        //이메일이 인증되어 있고 계정이 잠겨있지 않으면 true
        //상식과 조금 벗어나서, Customizing 하였음
        return (emailVerified && locked);
    }
}