this 키워드
1. 그냥 찍어보기
console.log(this);
를 찍게되면, 그냥
‘window’ 의 글로벌 Object인 ‘window’ 가 콘솔창에 나온다.
2. Function 속 this
그냥 this를 콘솔창에 찍는것과 동일하게
‘window’가 등장한다.
3. 오브젝트 속 this
오브젝트를 선언해보자.
그리고, “함수” 또한 오브젝트 안에 원소로써 정의할 수 있다.
또한, 같은 오브젝트 안에서 필요한 원소들을 “this”를 이용하여 가져온다.
이는 객체지향언어인 Python과 비슷한 느낌이다.
var Person = {
    firstName: "Jonh",
    lastName: "Doe",
    fullName: function () {
        return this.firstName + this.lastName;
    }
};
console.log(Person.fullName());
결과 :
JohnDoe
4. HTML element속 this는 element 그 자체를 의미함
<button type="button" onclick="this.style.backgroundColor='red'">클릭</button>
<button type="button" onclick="callFunc(this);">클릭2</button>
<select onchange="changeSelect(this);">
  <option value="1">1</option>
  <option value="2">2</option>
  <option value="3">3</option>
</select>

function callFunc(obj) {
  console.log(obj)
}

function changeSelect(obj){
  console.log(obj.value);
}
자바스크립트의 해석 순서 (호이스팅)
화살표 함수와 비교하면서
자바스크립트에서
someFunction();

function someFunction(){
	carName = "porche";
	console.log(carName);
}
이렇게 해도 정상적으로 실행이 된다.
이는 자바스크립트에서는 (function으로 정의된) 함수 정의된 부분을 먼저 읽고, 코드를 실행하기 때문이다.
하지만, 함수를 변수에 저장하는 식이라면, 에러가 난다는 것에 유의하자.
myFunction3(); //에러임 !

var myFunction3 = function () {
    console.log(carName2);
}
REST PARAMETER
파라미터의 수가 늘어날 때, 간편하게 함수를 정의하는 방법을 알아보자.
function sum(...args){

}
sum(1,2,3,4,5,6);
// sum의 파라미터로 전달된 "1,2,3,4,5,6"이 배열로 들어가게 된다.
function sum(...args) {
var total = 0;
// for(var x of args) {
// total += x;
// }
args.forEach(function (x, index) {
console.log(index);
total += x;
});
console.log(total);
return total;
}
sum(3, 2, 5, 7, 4, 23);간단한 forEach 함수 설명
이 함수는, 파이썬의 enumerate와 동일하다고 생각하면 된다.
배열의 원소를 하나씩 방문하면서, 값과 인덱스를 가져올 수 있다.
Template Literals
파라미터와 연관된 String을 손쉽게 처리할 수 있게 함
//template literal 미적용
function hello(name) {
    console.log("Hello " + name + ". Welcome!");
}
//template literal 적용
function hello2(name) {
    var name2 = "John";
    console.log(`Hello ${name2}. Welcome! ${name}`);
}
Object Literal Syntax Extension
ES6 이전
ES6 이전에는 Object의 value 값만 동적으로 변화할 수 있었다.
var firstName = "John";
var lastName = "Doe";

var person = {
    firstName: firstName,
    lastName: lastName
};
ES6 이후
이제는 Object의 Key 값도 동적으로 변화할 수 있게 되었다.
var type = "student";

var score = {
    [type]: "John",
    score: 95
};

console.log(score.student);
결과 :
John
Spread Operator
분해하는 느낌의 operator이다.
concat과의 차이점
var arr1 = [1,2,3];
var arr2 = [4,5,6];
console.log(arr1.concat(arr2));
concat은 무조건 arr1 뒤에 arr2가 붙어진다.
하지만, Spread 연산자를 사용한다면,
var arr1 = [1,2,3];
var arr2 = [4,5,...arr1,6];
console.log(arr2);
결과 :
[4,5,1,2,3,6]
문자열도 분해가 가능하다.
var alpha = "FGH";
var combine_alpha = ['A','B','C','D','E',...alpha];
console.log(combine_alpha);
결과 :
[’A’,’B’,’C’,’D’,’E’,’F’,’G’,’H’]
Object Destructuring
ES6 이전
정의된 Object를 꺼낼 때,
function getPerson() {
    return {
        firstName: "John",
        lastName: "Doe",
        age: 37,
        email: "john@gmail.com",
        city: "New York",
        country: "USA"
    };
}

var person = getPerson();
console.log(person.firstName);
console.log(person.lastName);
이렇게 했어야 했다.
ES6 이후
하지만 이제는 다음과 같이 한다.
var { firstName, lastName } = getPerson();
console.log(firstName);
console.log(lastName);
손쉽게 Obejct에서 firstName과 lastName을 꺼낼 수 있다.
Array Destructuring
Object Destructuring과 비슷하다.
하지만 Object에서는 { } (중괄호) 를 이용했지만
function getScores() {
    return [1, 2, 3];
}

[x, y, z] = getScores();
console.log(x);
Promise
비동기 처리를 위한 함수이다.
예를들어, 반드시 서버로부터 데이터를 받아오고 난 후에 처리해야할 코드가 있다면, Promise를 사용한다.
Promise 처리를 하지 않으면…?
axios.get(URL) 프로미스 객체
const axios = require('axios');
var URL = "https://1c41e2f9-20ad-471a-9dbb-0629e45e12cd.mock.pstmn.io/productList";
//Postman 의 Mock(가짜) 서버 사용하여 클라이언트에서 GET메소드로 데이터 요청함.
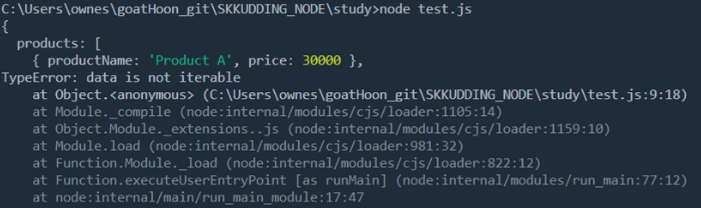
var data = axios.get(URL).then(function (response) {
console.log(response.data);
return response.data;
});
var total = 0;
for (var item of data) {
total += item.price;
}
console.log(total);이렇게 되면, 오류가 뜬다.
클라이언트에서는 서버에서 어떤 일이 일어나는지 모른다. 따라서, 서버와의 통신이 구동이 되면 자바스크립트(웹 브라우저는) 이를 기다리지 않고 다음 코드를 진행하게 되어 오류가 발생하는 것이다.
Promise 처리
const axios = require('axios');
var URL = "https://1c41e2f9-20ad-471a-9dbb-0629e45e12cd.mock.pstmn.io/productList";
//Postman 의 Mock(가짜) 서버 사용하여 클라이언트에서 GET메소드로 데이터 요청함.
function getData() {
//promise
return new Promise(function (resolve, reject) {
axios.get(URL).then(function (response) {
console.log(response.data);
resolve(response.data);
});
});
}
var total = 0;
//resolve로 넘겨온 것이 data 파라미터에 들어감
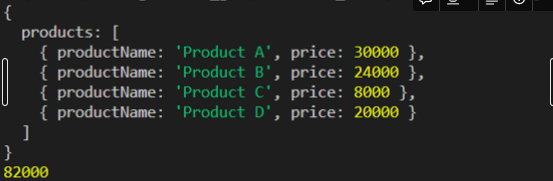
getData().then(function (data) {
for (var item of data.products) {
total += item.price;
}
console.log(total);
});- Promise 의 resolve ⇒ 정상적으로 처리가 되었을때 동작하는 코드
- Promise 의 reject ⇒ 실패했을 때 동작하는 코드
Async / Await
Promise와의 차이점?
Promise는 다 끝날 때 까지 기다려줄게 ~
Async / Awiat은 Async(비동기 통신)을 Await (기다려줄게) ~ 라는 좀 구체적인 느낌이다.
방법
함수선언 앞에 async 를 붙이고,
서버에 요청하는 상황에는 await을 붙인다. ⇒ await은 Promise 객체를 반환.
이 때, Data를 가져오는 getData2() 함수에도 await 을 붙여야 한다.
const axios = require('axios');
var URL = "https://1c41e2f9-20ad-471a-9dbb-0629e45e12cd.mock.pstmn.io/productList";
//Postman 의 Mock(가짜) 서버 사용하여 클라이언트에서 GET메소드로 데이터 요청함.

async function getData2() {
    return (await axios.get(URL)).data;
}

var data = await getData2();

var total = 0;
for (var item of data) {
    total += item.price;
}
console.log(total);
하지만 이렇게 해도 오류가 나는데, 그 이유는,
await 을 사용할 때, 반드시 async 함수 안에서 써야하기 때문이다.
따라서 다음과 같이 바꾼다.
const axios = require('axios');
var URL = "https://1c41e2f9-20ad-471a-9dbb-0629e45e12cd.mock.pstmn.io/productList";
//Postman 의 Mock(가짜) 서버 사용하여 클라이언트에서 GET메소드로 데이터 요청함.

async function getData2() {
    return (await axios.get(URL)).data;
}

async function calculateSum() {
    var data = await getData2();
    var total = 0;
    for (var item of data) {
        total += item.price;
    }
    console.log(total);
}

calculateSum();
이 때, calculateSum() 을 실행할 때, 왜 await을 하지 않아도 되는가? 에 관한 대답은
해당 함수는 직접적으로 서버와의 의사소통을 하지 않기 때문이다.
직접 의사소통 하는 함수는 getData2() 함수이다.
Module
장점
1. 자바스크립트 파일내에서 구현되어 있는 다양한 함수, 변수들 중 필요한 것만 import해서 사용할 수 있다. (무거워 지지 않는다)
2. 자바스크립트 파일에서 다른 자바스크립트 파일을 import해서 사용할 수 있는 기능이 없었다. 따라서, 만약 html에서 두개의 자바스크립트 파일을 쓰려면 <script> 태그를 두개를 사용해야만 했다.
HTML 파일 내에서 모듈 불러오기
1. 일부분만 불러오기
<script type="module">
	import {---임포트 함수 들---} from "path/file.js";
	func~
	func~
	func~
</script>
이 때, file.js 파일내에서 export된 함수와 변수들만 사용이 가능하다.
2. 다 불러오기
<script src="/path/file.js" type="module"></script>이렇게 하면 /path/file.js 의 자바스크립트 파일을 바로 실행한다.
자바스크립트 파일에서 다른 자바스크립트 파일 import하기
ref.js 파일
import {
	log
} from "/path/module.js";
log("다른 js에서 로그 출력");
이렇게 하고, 만일 HTML에서 이를 사용하고자 한다면,
<script src="/path/ref.js" type="module"></script>처럼 사용하면 된다. 이는 당연히, 이미 ref.js에서 함수호출을 했으므로, module이지만 import할 필요는 없는 것이다.
유의해야할 사항
예를들어 module.js 에 다음과 같은 기능이 있다고 하자.
export function log(message){
	console.log(message);
}
export function error(message){
	console.error(message);
}
이를 HTML 파일에서 받아오려면
//----------------에러 코드 ----------------//

<script src="/path/module.js" type="module"></script>
<script>
	log("로그");
	error("에러");
</script>
이렇게하면 에러가 발생한다. 이렇게 하지말아야한다.
모듈안에서 export된 함수들을 import 하는 과정이 반드시 필요하다.
<script type="module">
	import  {log,error} from "path/module.js"";
	log("로그");
	error("에러");
</script>
클래스 (Object)
자바(객채지향언어)와 굉장히 비슷함
extends도 사용이 가능하다
class Car {
    constructor(modelName, modelYear, type, price) {
        this.modelName = modelName;
        this.modelYear = modelYear;
        this.type = type;
        this.price = price;
    }

    getModelName() {
        return this.modelName;
    }

    getModelYear() {
        return this.modelYear;
    }

    getPrice() {
        return this.price;
    }

    setPrice(price) {
        this.price = price;
    }
}

let car = new Car("ionic", "2021", "e", 4000);

console.log(car.getModelName());
console.log(car.getModelYear());
console.log(car.getPrice());

car.setPrice(4100);
console.log(car.getPrice());

let car2 = new Car("genesis", "2021", "g", 6500);
console.log(car2.getModelName());
console.log(car2.getModelYear());
console.log(car2.getPrice());

class ElectronicCar extends Car {
    constructor(modelName, modelYear, price) {
        super(modelName, modelYear, "e", price); //super로 부모 생성자 호출.
        // this.chargeTime = chargeTime;
    }

    setChargeTime(time) { //함수 추가
        this.chargeTime = time;
    }

    getChargeTime() {
        return this.chargeTime;
    }
}

let eleCar1 = new ElectronicCar("ionic5", "2021", 4000); //super 생성자에서 알아서 type="e"
eleCar1.setChargeTime(60);
console.log(eleCar1.getModelName());
console.log(eleCar1.getChargeTime());- 자바 클래스
public class Car{
	Car(String modelName, String modelYear, String type, float price){
		this.modelName = modelName;
		this.modelYear = modelYear;
		this.type = type;
		this.price = price;
	}
};
Car myCar = new Car("현대","1997","SUV",1000);
try, catch
try {
    consol.log("log메시지");
} catch (err) {
    console.log(err.name);
    console.log(err.message);
}

console.log("log 정상 메시지");

var x = "";

try {
    if (x == "") throw "empty"; //throw 로 강제 에러 발생 =>아래 코드 실행 x하기위

    var y = x + 3;
    console.log(y);
} catch (err) {
    console.log(`x is ${err}`);
} finally {
    console.log("try/catch문 제일 마지막에 반드시 실행");
}
Strict Mode
"use strict";를 사용하여, 부적합한 변수선언 (var, let, const 없이 변수에 값을 저장하는 방식등…) 을 막는다.