
리액트 프로젝트에서 비동기 작업을 하게 될 상황이 많다. 주로 다루는 비동기 작업 중에는 API 서버 연동이 있으며 서버에 요청을 보냈을 때 받아온 응답의 성공과 에러의 상태 또한 관리를 해줘야 한다. 이를 효율적으로 다루기 위해 리덕스 미들웨어라는 것을 사용해보고 어떤 구조를 가지고 있는지 알아보고자 한다.
미들웨어는 액션과 리듀서의 중간자 역할이라고 보면 된다. 액션의 디스패치가 되기 전에 먼저 지정한 작업들을 실행해준다. 미들웨어의 구조를 알아보자 다음과 같은 코드를 작성하였다.
lib/loggerMiddleware.js
const loggerMiddleware = (store) => (next) => (action) => {
  console.group(action && action.type);
  console.log("이전 상태", store.getState());
  console.log("액션", action);
  next(action);
  console.log("다음 상태", store.getState());
  console.groupEnd();
};

export default loggerMiddleware;
loggerMiddleware함수는 액션이 디스패치될 때마다 액션의 정보와 함께 전 후에 발생하는 상태를 콘솔에서 확인할 수 있게 만들었다. 스토어 인스턴스에서 액션으로 넘어가기 전 next함수를 거친다. **next**는 말 그대로 다음의 미들웨어에게 action을 넘겨준다는 것인데, 다음에 해당하는 미들웨어가 없다면 리듀서에서 action을 넘겨준다. 그리고 미들웨어에서 next를 사용하지 않으면 액션이 리듀서에게 전달되지 않는다. (액션 무시, 넘겨주지 않는다)
위에 작성된 코드 중 next(action)이 이제 다음 미들웨어에 전달되거나 미들웨어가 없는 경우에는 리듀서로 전달하게 된다. 작성한 미들웨어를 스토어에 적용하고 그 전에 작성한 카운트 스토어의 상태를 알아보고자 한다.
미들웨어는 조건에 따라서 리듀서에 가기 전에
1. 액션을 무시해준다. (리듀서에 전달되지 않음)
2. 액션 정보를 중간에 변경해서 리듀서에게 전달해준다.
3. 특정 액션에 기반해 새로운 액션을 여러 번 디스패치할 수 있다.
위와 같이 실행될 수 있다.
redux-logger
위에서 작성한 코드를 보다 알아보기 쉽게 만들어진 라이브러리다.
npm i redux-logger를 하여 카운터를 눌렀을 때 어떻게 콘솔이 찍히는지
확인해보자.
import React from "react";
import { createStore, applyMiddleware } from "redux";
import { Provider } from "react-redux";
import rootReducer from "./modules";
import ReactDOM from "react-dom";
import App from "./App";
// import loggerMiddleware from "./lib/loggerMiddleware";
import { createLogger } from "redux-logger";
import ReduxThunk from "redux-thunk";

const logger = createLogger();
const store = createStore(rootReducer, applyMiddleware(logger, ReduxThunk));

ReactDOM.render(
  <Provider store={store}>
    <App />
  </Provider>,
  document.getElementById("root")
);
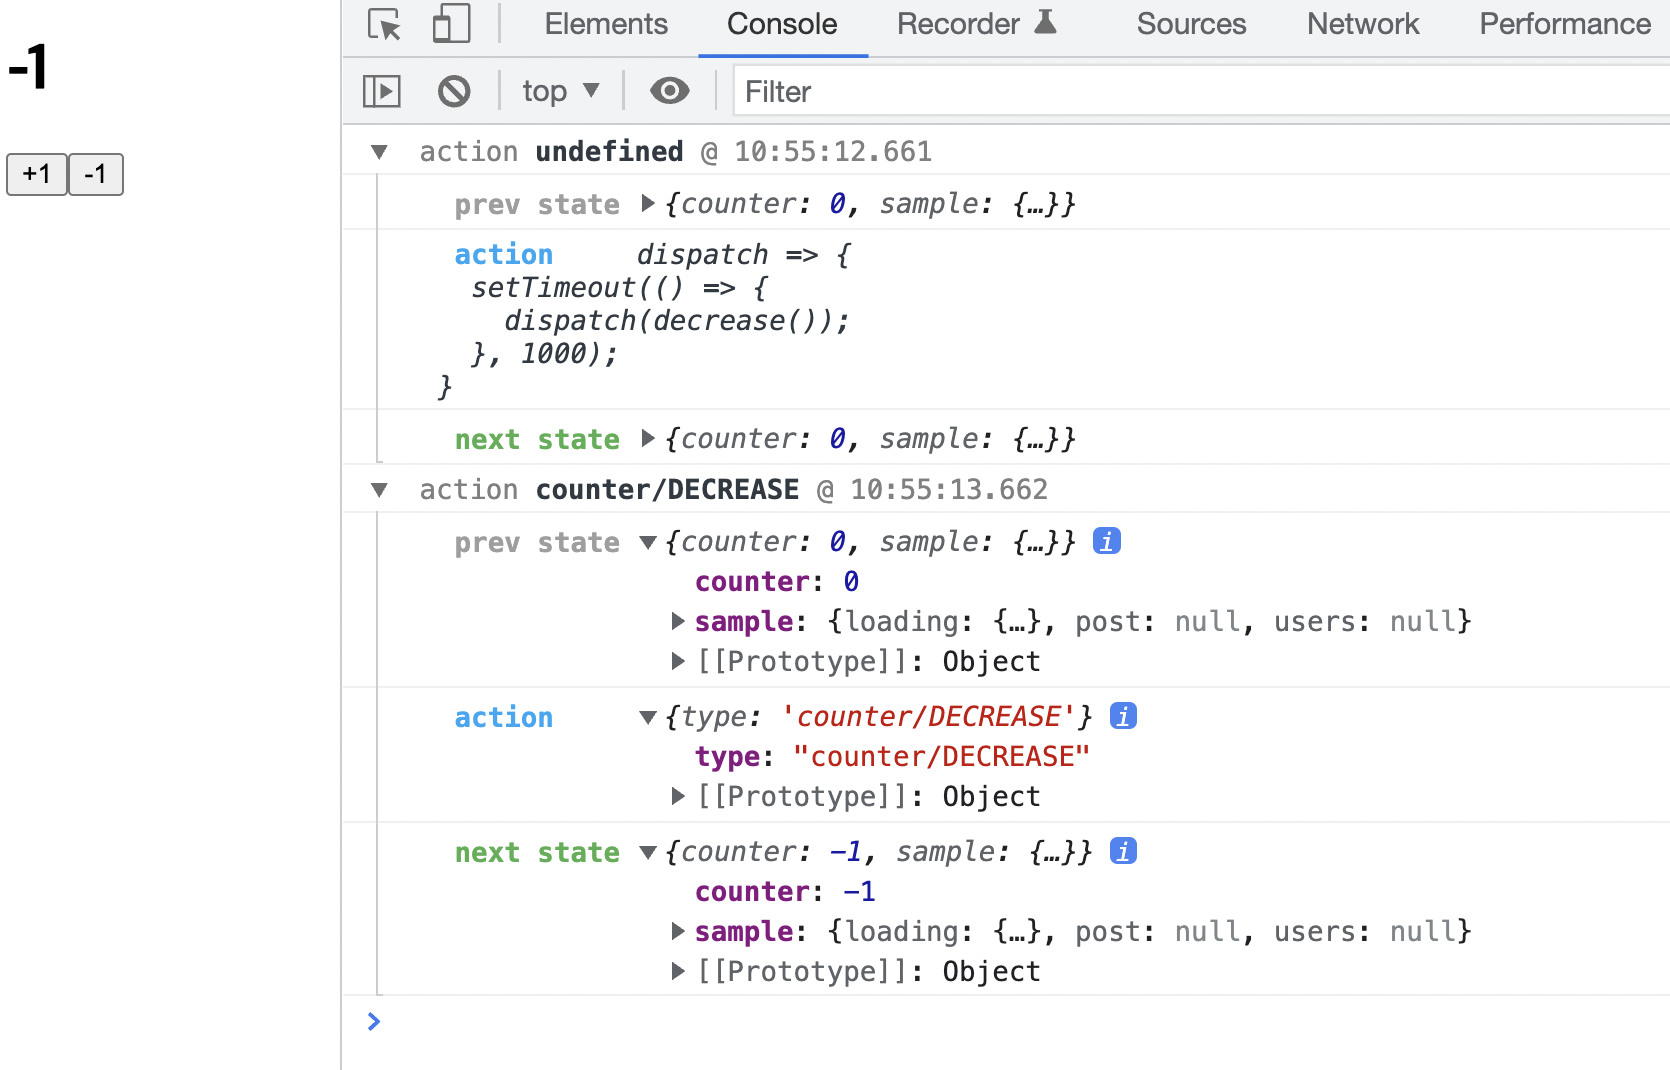
아래와 같이 액션의 undefined일 때의 상황과 상태가 변경된 액션의 상황을 알아 볼 수 있다.
미들웨어가 어떤 방식으로 작동하는지 확인하였고 이제 비동기 작업에서 어떻게 관리하는지 살펴보고자 한다.
일단 비동기 작업을 처리해주는 미들웨어 중 thunk와 saga를 알아보고자 한다.
- redux-thunk: 객체가 아닌 함수 형태의 액션을 디스패치할 수 있게 해준다.
- redux-saga: 특정 액션이 디스패치할 때 다른 로직에 따라 다른 액션을 디스패치시키는 규칙을 작성해서 비동기 작업을 처리하게 해준다.
Thunk 미들웨어 사용하기
Thunk는 작업을 나중에 할 수 있게 하려고 함수 형태로 감싼 형태를 말한다.
redux-thunk 라이브러리를 설치한 다음 비동기의 과정을 살펴보도록 하자.
npm i redux-thunkindex.js
설치한 후에 스토어에 적용하자.
import ReduxThunk from "redux-thunk";

const logger = createLogger();
const store = createStore(rootReducer, applyMiddleware(logger, ReduxThunk));
redux-thunk는 일반 액션 객체를 받지 않고 함수를 반환한다. 여기서 증가, 감소 함수를 만들어 비동기적으로 작동하는 것을 시험하려고 한다.
modules/counter.js
import { createAction, handleActions } from "redux-actions";

const INCREASE = "counter/INCREASE";
const DECREASE = "counter/DECREASE";

export const increase = createAction(INCREASE);
export const decrease = createAction(DECREASE);

// increaseAsync, decreaseAsync는 1초 뒤에 실행하게 한다.
export const increaseAsync = () => (dispatch) => {
  setTimeout(() => {
    dispatch(increase());
  }, 1000);
};
export const decreaseAsync = () => (dispatch) => {
  setTimeout(() => {
    dispatch(decrease());
  }, 1000);
};

const initialState = 0;

const counter = handleActions(
  {
    [INCREASE]: (state) => state + 1,
    [DECREASE]: (state) => state - 1,
  },
  initialState
);

export default counter;
다음은 container에서도 액션 생성 함수를 바꿔준다.
mport { connect } from "react-redux";
import { increaseAsync, decreaseAsync } from "../modules/counter";
import Counter from "../components/Counter";

const CounterContainer = ({ number, increaseAsync, decreaseAsync }) => {
  return (
    <Counter
      number={number}
      onIncrease={increaseAsync}
      onDecresae={decreaseAsync}
    />
  );
};

export default connect(
  (state) => ({
    number: state.counter,
  }),
  {
    increaseAsync,
    decreaseAsync,
  }
)(CounterContainer);
그럼 이제 버튼을 누를 때마다 1초 뒤에 상태가 변경되는 것을 확인할 수 있다.
웹 요청 비동기로 작동하기
이제 thunk를 사용해서 API를 통해 웹 요청을 발생시키고자 한다. 사용한 API는 https://jsonplaceholder.typicode.com이다.
(GET) https://jsonplaceholder.typicode.com/users
(GET) https://jsonplaceholder.typicode.com/posts/:id
먼저 API를 호출하기 위해서 axios를 설치한다.
npm i axioslib/api.js
import axios from "axios";

export const getPost = (id) =>
  axios.get(`https://jsonplaceholder.typicode.com/posts/${id}`);

export const getUsers = (id) =>
  axios.get(`https://jsonplaceholder.typicode.com/users`);
API 호출 함수를 이제 모듈에서 불러와 리듀서를 생성한다.
modules/samples.js
import { handleActions } from "redux-actions";
import * as api from "../lib/api";

const GET_POST = "sample/GET_POST";
const GET_POST_SUCCESS = "sample/GET_POST_SUCCESS";
const GET_POST_FAILURE = "sample/GET_POST_FAILURE";

const GET_USERS = "sample/GET_USERS";
const GET_USERS_SUCCESS = "sample/GET_USERS_SUCCESS";
const GET_USERS_FAILURE = "sample/GET_USERS_FAILURE";

//thunk 함수 내부에서는 시작, 성공, 에러에 대한 각각의 액션을 디스패치한다.

export const getPost = (id) => async (dispatch) => {
  dispatch({ type: GET_POST }); //시작
  try {
    const res = await api.getPost(id); //성공
    dispatch({
      type: GET_POST_SUCCESS,
      payload: res.data,
    });
  } catch (e) { //에러
    dispatch({
      type: GET_POST_FAILURE,
      payload: e,
      error: true,
    });
    throw e;
  }
};

export const getUsers = () => async (dispatch) => {
  dispatch({ type: GET_USERS });
  try {
    const res = await api.getUsers();
    // console.log(res.data, "데이터 몇번");
    dispatch({
      type: GET_USERS_SUCCESS,
      payload: res.data,
    });
  } catch (e) {
    dispatch({
      type: GET_USERS_FAILURE,
      payload: e,
      error: true,
    });
    throw e;
  }
};


//===========================================================================

const initialState = {
  loading: { // 로딩 상태
    GET_POST: false,
    GET_USERS: false,
  },
  post: null,
  users: null,
};

const sample = handleActions(
  {
    [GET_POST]: (state) => ({
      ...state,
      loading: {
        ...state.loading,
        GET_POST: true,
      },
    }),
    [GET_POST_SUCCESS]: (state, action) => ({
      ...state,
      loading: {
        ...state.loading,
        GET_USERS: false,
      },
      post: action.payload,
    }),
    [GET_POST_FAILURE]: (state, action) => ({
      ...state,
      loading: {
        ...state.loading,
        GET_USERS: false,
      },
    }),
    [GET_USERS]: (state) => ({
      ...state,
      loading: {
        ...state.loading,
        GET_USERS: true,
      },
    }),
    [GET_USERS_SUCCESS]: (state, action) => ({
      ...state,
      loading: {
        ...state.loading,
        GET_POST: false,
      },
      users: action.payload,
    }),
    [GET_USERS_FAILURE]: (state, action) => ({
      ...state,
      loading: {
        ...state.loading,
        GET_POST: false,
      },
    }),
  },
  initialState
);

export default sample;
containers/SampleContainer.js
import { connect } from "react-redux";
import Sample from "../components/Sample";
import { getPost, getUsers } from "../modules/samples";
import { useEffect } from "react";

const SampleContainer = ({
  getPost,
  getUsers,
  post,
  users,
  loadingPost,
  loadingUsers,
}) => {
  useEffect(() => {
    getPost(1);
    getUsers(1);
  }, [getPost, getUsers]);

  return (
    <Sample
      post={post}
      users={users}
      loadingPost={loadingPost}
      loadingUsers={loadingUsers}
    />
  );
};

export default connect(
  ({ sample }) => ({
    post: sample.post,
    users: sample.users,
    loadingPost: sample.loading.GET_POST,
    loadingUsers: sample.loading.GET_USERS,
  }),
  {
    getPost,
    getUsers,
  }
)(SampleContainer);
components/Sample.js
const sample = ({ loadingPost, loadingUsers, post, users }) => {
return (
<div>
<section>
<h1>포스트</h1>
{loadingPost && "로딩 중...!"}
{!loadingPost && post && (
<div>
<h3>{post.title}</h3>
<h3>{post.body}</h3>
</div>
)}
</section>
<hr />
<section>
<h1>사용자 목록</h1>
{loadingUsers && "로딩 중...!"}
{!loadingUsers && users && (
<div>
<ul>
{users.map((user) => (
<li key={user.id}>
{user.username}({user.email})
</li>
))}
</ul>
</div>
)}
</section>
</div>
);
};
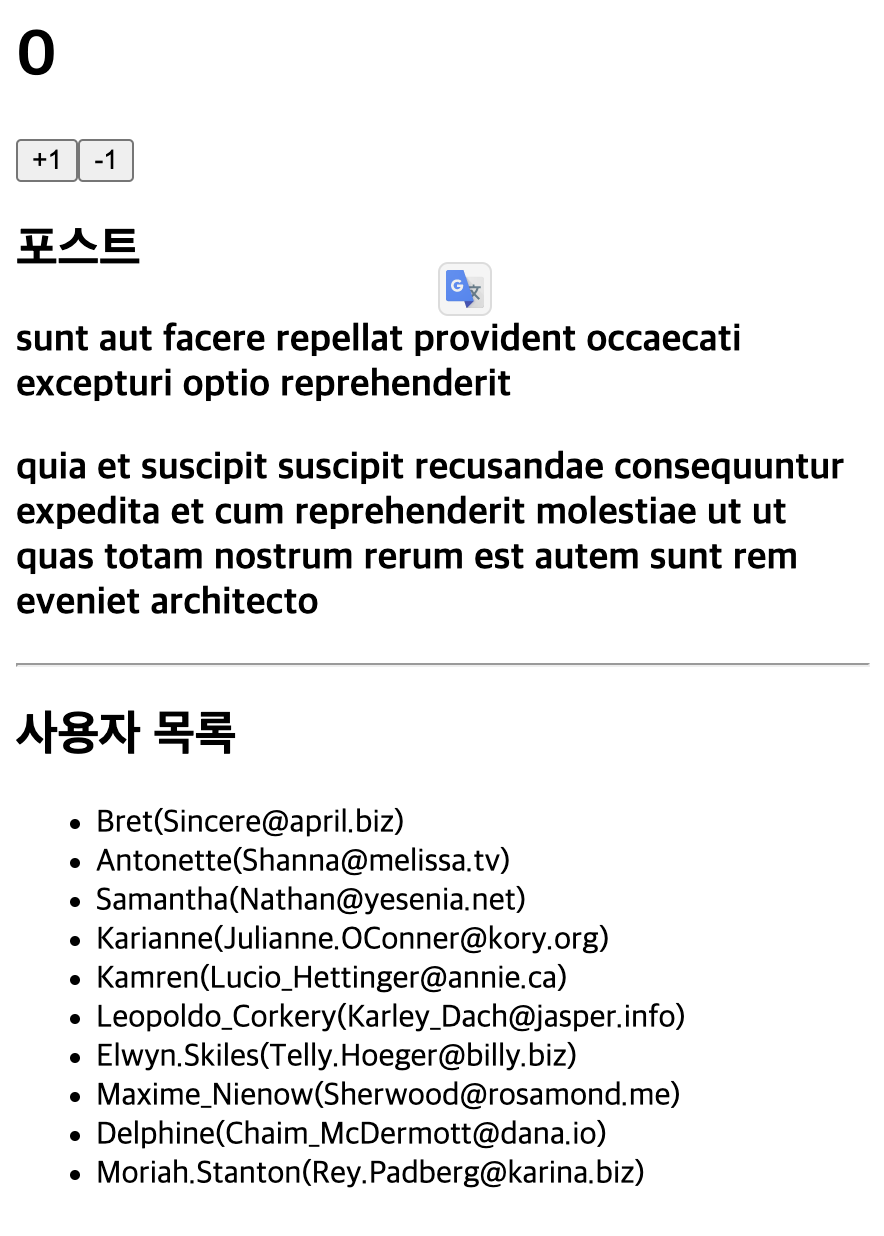
export default sample;위와 같이 작성하면 다음과 같은 화면이 나온다. api요청에는 성공했지만 thunk함수와 로딩 상태의 작업이 길거어져 다음에는 로직을 분리하여 코드를 줄이고자 한다.
발체: 리액트를 다루는 기술, 김민준