
목표 :
1) 페이지 업로드가 되지 않는 cli 환경에서 curl 사용하여 redis server 에 값 저장
2) 저장한 redis 값 불러오기 test
test 환경
▶️ VPC : sns-app (동일 VPC에서 작업) ▶️ server-0S : ubuntu 20.x
▶️ Spring-private-server : 172.16.2.7 (port 4000, private-subnet, Mongo DB)
▶️ Node-private-server : 172.16.2.6 (port 3001,private-subnet, MYSQL DB)
▶️ Redis DB server version : 4.0.14 (port 6379,private-subnet )
▶️ test할 server들은 모두 NCP(Naver Cloud Platform)
▶️ private-server들은 모두 VPC의 NAT Gateway를 통해 외부 통신 가능
Redis DB test 플로우
1) 세션 생성 및 확인: Spring 서버에서 로그인 요청을 보내 세션을 생성하고, Redis를 이용해 세션 정보를 저장 및 조회
2) 세션 사용: Node 서버로 세션 ID를 이용하여 보호된 리소스에 접근 요청
3) 서버 설정: 필요한 패키지를 설치하여 Node 서버에서 세션을 처리하도록 설정
4) curl command 사용 : command Line에서 URL을 사용하여 데이터를 전송하고 웹 리소스를 요청하기 위한 명령어
✅ 1. Spring 서버 로그인 (POST) 요청
- command 구성
curl -i -L -X POST http://your-server-ip:port /Path pattern
-H HTTP 요청 헤더를 추가(전화번호와 비밀번호를 포함하는 JSON 객체)
-d "userphonenum=testuserphonenum&password=testpass"
-i: HTTP 응답 헤더를 출력(Session ID 확인을 위해!)
-L: 리다이렉션을 따르라는 옵션(서버에서 리다이렉션 응답이 오면 curl은 해당 리다이렉션을 따라감)
-X POST: -X 플래그는 HTTP 메서드를 지정, POST 메서드를 사용(서버에 데이터를 전송하기 위한 POST 요청을 보낸다는 것을 의미)
- 사용 code
# curl -i -L -X POST http://localhost:4000/spring/auth/login \
-H "Content-Type: application/json" \
-d '{"phoneNumber":"01044444444","password":"1111"}'

  >> login 성공! <<

HTTP/1.1 200
Vary: Origin
Vary: Access-Control-Request-Method
Vary: Access-Control-Request-Headers
Set-Cookie: sessionId=bd30d06b-2723-440c-b428-27ba97e7b5a3; Path=/
Content-Type: application/json
Transfer-Encoding: chunked
Date: Fri, 13 Oct 2023 11:10:15 GMT

{"no":4,"nick":"호빵맨","name":"김호일","phoneNumber":"01044444444","email":null,"password":null,"photo":null,"followMemberSet":[5],"likeBoardSet":[],"likedGuestBookSet":[],"visitedMyPages":[]}
✅ 2.spring >> Redis server에 세션 정보 저장
- command 구성
./redis-cli -c -h [yout-redis-DNS] -p [your-server-port]]
SET session:[Your-Session-ID] '{"username": "testuser"}'
- Redis에 세션 정보 저장 성공!
./redis-cli -c -h redisc-j2h4f.vpc-cdb.ntruss.com -p 6379 SET session:bd30d06b-2723-440c-b428-27ba97e7b5a3 '{"no":4,"nick":"호빵맨","name":"김호일", "phoneNumber":"01044444444","email":null,"password":null,"photo":null,"followMemberSet":[5],"likeBoardSet":[],"likedGuestBookSet":[],"visitedMyPages":[]}'
OK
✅ 3. Redis에서 세션 정보 조회
- command 구성
redis-cli ./redis-cli -c -h [yout-redis-DNS] -p [your-server-port]] / GET session:[Your-Session-ID]
- 사용 code
# ./redis-cli -c -h redisc-j2h4f.vpc-cdb.ntruss.com -p 6379 GET session:bd30d06b-2723-440c-b428-27sba97e7b5a3

  >> 정상 저장 && 조회 성공! <<

  "{\"no\":4,\"nick\":\"\xed\x98\xb8\xeb\xb9\xb5\xeb\xa7\xa8\",s\"name\":\"\xea\xb9\x80\xed\x98\xb8\xec\x9d\xbc\",\"phoneNumber\":\"01044444444\",\"email\":null,\"password\":null,\"photo\":null,\"followMemberSet\":[5],\"likeBoardSet\":[],\"likedGuestBookSet\":[],\"visitedMyPages\":[]}
  "
✅ Node 서버에서 세션 정보 사용을 위해 redis server에서 값을 들고오는 명령어 순서
curl -b cookies.txt http://your-node-server/protected-resource🚨 Node 서버에서 Redis 서버에서 세션 정보를 가져오는 작업은 주로 서버의 코드 로직에서 처리되며, 명령어로 단순하게 처리할 수 있는 작업이 아님!
Node.js 서버에서 Redis를 사용하여 세션 정보를 가져오기 위해, 일반적으로 express-session과 connect-redis 라이브러리를 사용
- node-server에 express, express-session, connect-redis 설치
npm install express express-session connect-redis redis✅ 서버 정상 작동!
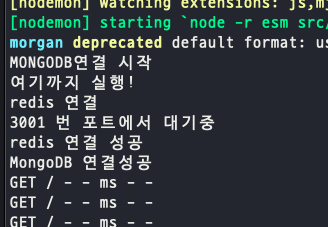 \
\
✅ 노드 서버에서 redis db의 값을 불러오는 main code
import { createClient } from 'redis';

export let redisClient;
const redisConnect = async () => {
console.log('redis 연결');
redisClient = createClient({
  url: process.env.REDIS_URL,
});
await redisClient.connect();
redisClient.on('error', (err) => console.log('Redis Client Error', err));
await redisClient.set('test key', 'redis 연결 성공');
console.log(await redisClient.get('test key'));
};

export default redisConnect;
✅ spring에서 연결한 redis db 주소와 동일한 env 파일 생성
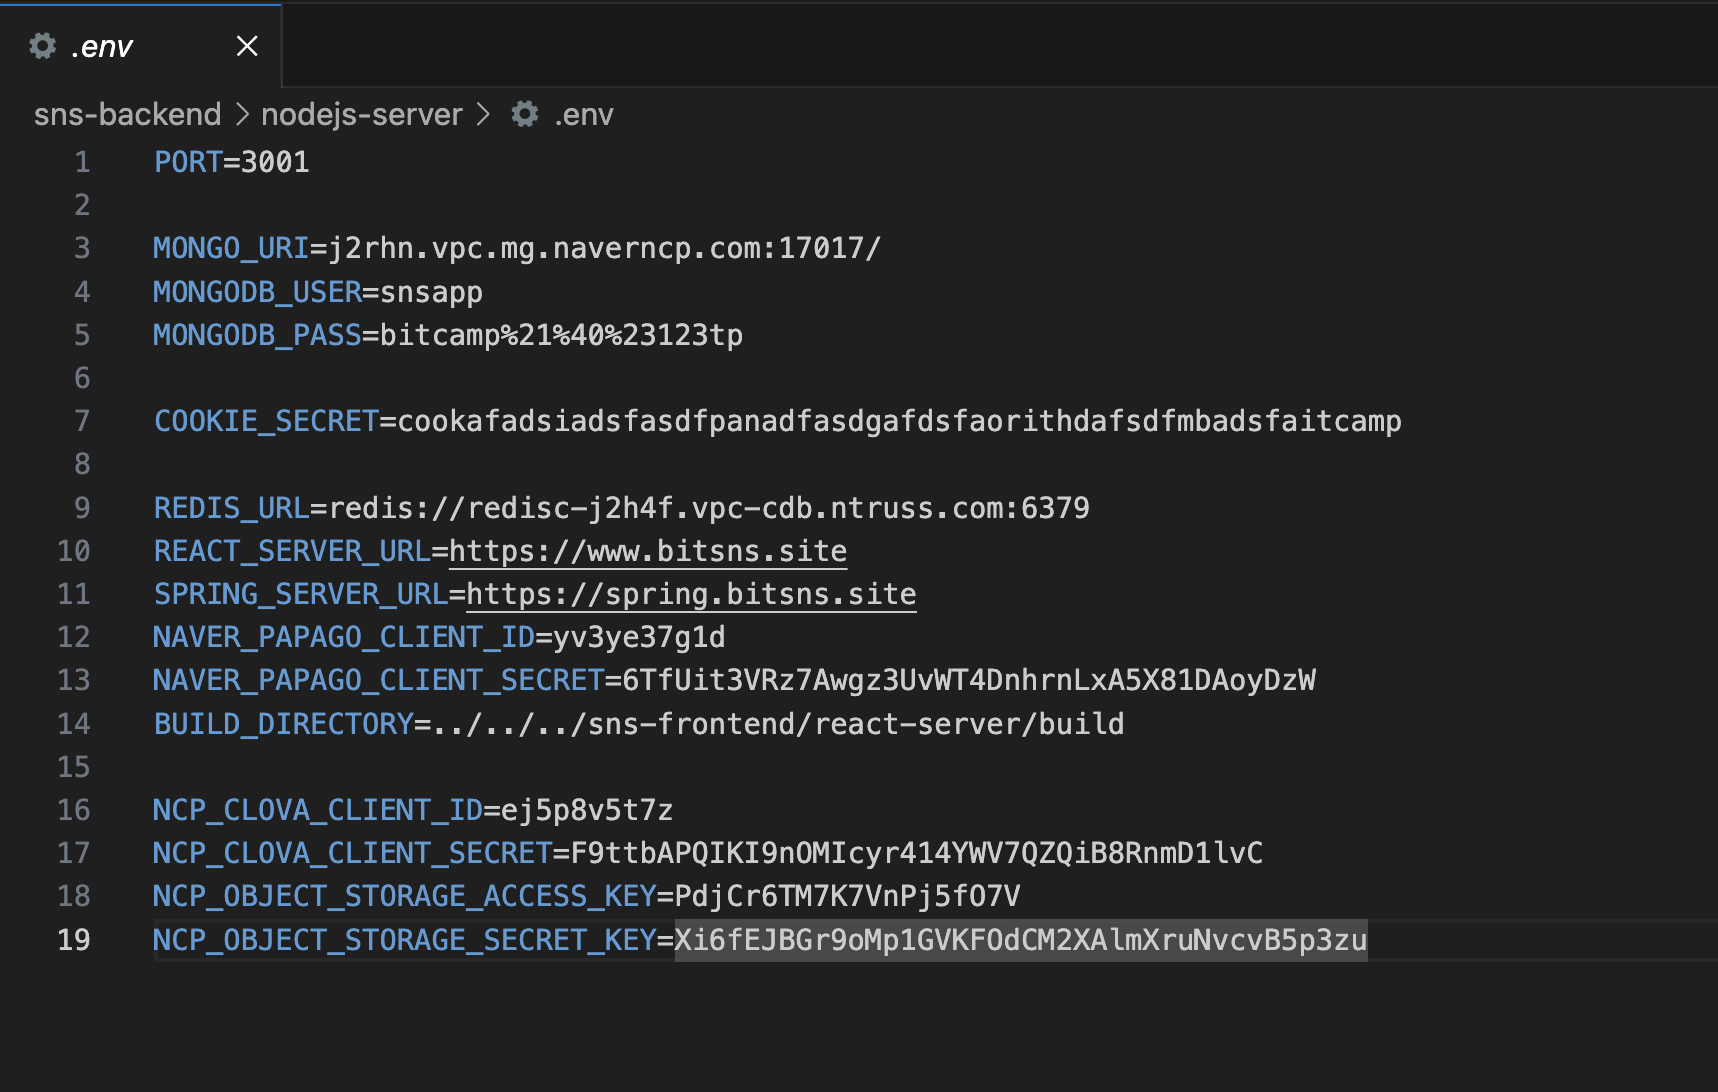
- 참고🚨) redis 값을 불러오는 env 파일속 db의 링크가 정상적이지 않다면 노드 서버에서
redis 연결 성공을 불러올 수 없다!
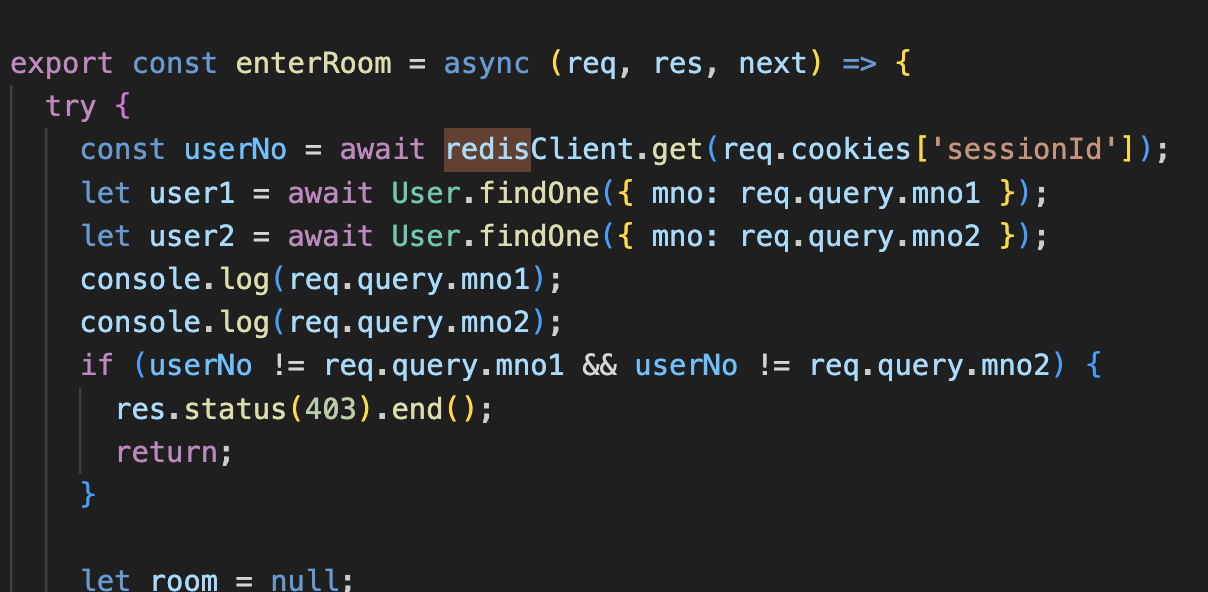
✅ node code에서 redis를 응용
- redis의 값을 불러와 chating 방을 생성하는 code
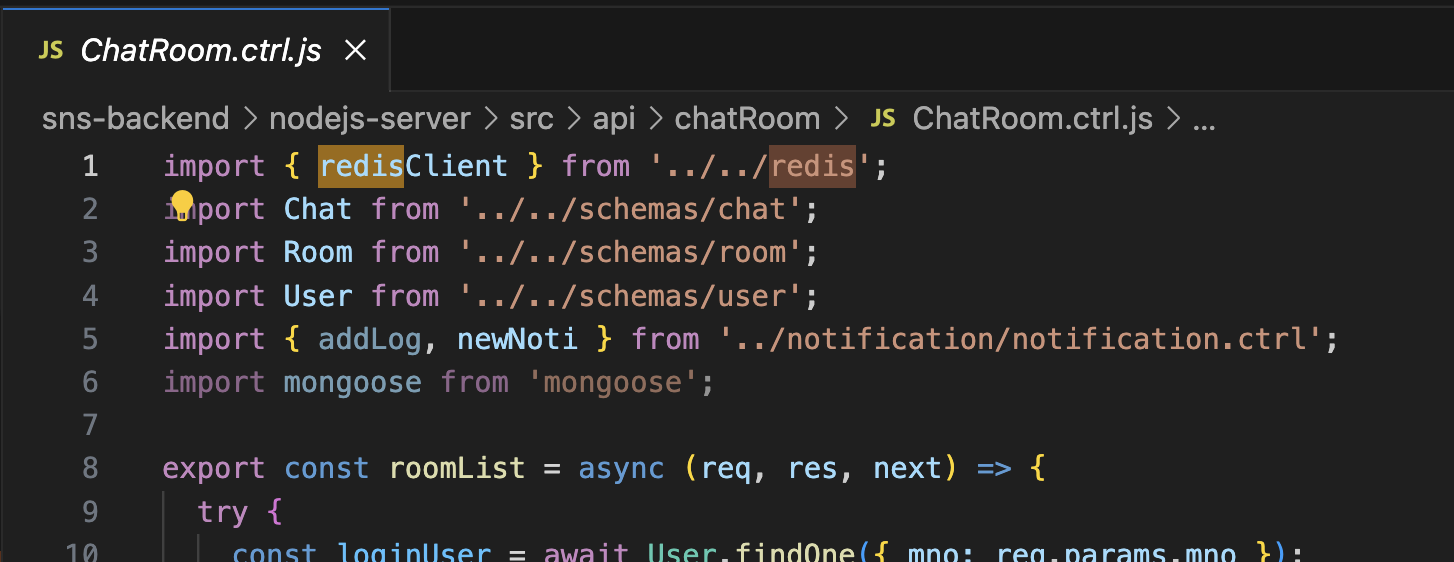
- redis의 값을 불러와 web push 알림을 위한 code

번외 log
✅ error log
1) curl: (7) Failed to connect to localhost port 80: Connection refused
-
오류 메시지 분석 :
curl이 지정된 포트(80)와 주소(localhost)로 연결을 시도하지만 연결이 거부되었다는 것을 의미 -
찾게된 요인
# curl -i -L -X POST http://localhost:4000/spring \
> -H "Content-Type: application/json" \
> -d '{"phoneNumber":"01044444444","password":"1111"}'
HTTP/1.1 302
Location: http://localhost:4000/spring/
Transfer-Encoding: chunked
Date: Fri, 13 Oct 2023 10:30:12 GMT
HTTP/1.1 200
Content-Type: text/html;charset=UTF-8
Content-Language: en-US
Content-Length: 404
Date: Fri, 13 Oct 2023 10:30:12 GMT
<html><body><h1>Whitelabel Error Page</h1><p>This application has no explicit mapping for /error, so you are seeing this as a fallback.</p><div id='created'>null</div><div>There was an unexpected error (type=org.springframework.web.HttpRequestMethodNotSupportedException: Request method 'POST' not supported, status=null).</div><div>Request method 'POST' not supported</div></body></html>이 메시지는 /error 경로에 대한 명확한 매핑(에러 핸들러나 에러 페이지)이 없어, 기본 에러 페이지가 표시되고 있다는 것을 확인!
-
해결 방안
URL 형식: Spring의 @PostMapping 애너테이션이 사용되었다면 경로와 메서드가 올바르게 매핑되었는지 확인
(localhost/spring/auth/login/:4000 정상 접속)
2) Note: further occurrences of HTTP request parsing errors will be logged at DEBUG level.
-
오류 메시지 분석 :
HTTP 요청 메서드 이름에서 유효하지 않은 문자가 발견했다는 뜻으로, 서버에 유효하지 않은 HTTP 요청을 보냈을 가능성을 염두 -
해결 방안 :
HTTP 요청을 수정함 (기억상엔 https를 http로 변경했었음!)
3)
  % Total    % Received % Xferd  Average Speed   Time    Time     Time  Current
                                 Dload  Upload   Total   Spent    Left  Speed
100   702  100   702    0     0    97k      0 --:--:-- --:--:-- --:--:--   97k
curl: (3) Port number ended with ' '

[1/2]: "phoneNumber":"01044444444" --> <stdout>
curl: (3) Port number ended with '"'

[2/2]: "password":"1111" --> <stdout>
curl: (3) Port number ended with '"'
오류 메시지 분석 :
리다이렉션을 위한 명령어 라인에 추가적인 문자로 인한 에러
(curl 에러 메시지)
curl: (3) Port number ended with ' ' : 이 메시지는 명령어 구문에 어떤 문제가 있다는 것을 나타냅니다.
[1/2]: "phoneNumber":"01044444444" --> : 이 부분도 비정상
- 해결 방안 :
리다이렉션을 위한 명령어 수정 (여분의 문자 제거 = 명령어 라인에 추가적인 ">" 문자제거)