"리눅스"
윈도우와 맥 OS, iOS, Android 등은 모두 개발자가 아닌 사람들 즉, 사용자를 위해 만들어진 것으로, 가능한 어려운 조작없이 사용할 수 있는 거에 초점이 맞춰져 있다.
그렇기 때문에 위와 같은 OS들은 개발자가 프로그래밍을 하기에 제한적인 부분이 많을 수 밖에 없다. (이미 다 만들어놓은 상태에서 사용자들이 사용할 수 있는 환경이기 때문 : GUI)
리눅스로는 좀 더 개발자들이 이것저것 만져보며 조립할 수 있는 구조이다. 다시 말해보면 리눅스는 오픈소스 운영체제(공짜)로 소스도 볼 수 있고, 소스를 수정하여 개조도 할 수 있다는 말이다.
그렇기 때문에 단순히 서버 역할을 하는 컴퓨터가 필요하다고 했을 때, 굳이 비용을 줘서 윈도우나 비싼 맥OS을 사는 것은 비용적으로 비효율적인이다! => 즉 리눅스를 사용하여 서버 전용 컴퓨터를 만들어 돌리는 게 효율적이다!!(서버 외에도 IoT, 모바일 등 개조해서 사용할 수 있다.)
"말이 길어졌지만 아무튼! 리눅스를 써야만 하는 상황이 발생하여 리눅스 환경에서 명령어를 내리는 경우가 빈번하게 일어난다. 그래서 리눅스 기본 명령어들을 정리해보고자 한다."
기본 명령어들
1. ls - 현재 위치의 파일 목록 조회
- ls -l : 파일의 상세정보 보기
root@goorm:/workspace/Linux_study# ls -l
합계 12
-rw-r--r-- 1 root root 2000  1월 12  2021 README.md
-rw-rw-r-- 1 root root  592  9월 17 09:10 goorm.manifest
drwxrwxr-x 3 root root 4096  9월 15 08:54 practice

=> 권한, 생성 시간, 생성자, 파일 이름 등을 확인할 수 있다.- ls -a : 숨김 파일 표시
root@goorm:/workspace/Linux_study# ls -a
.  ..  .temp  README.md  goorm.manifest  practice

=> 숨겨진 파일을 볼 수 있다.- ls -t : 파일들을 생성시간순(제일 최신 것부터)으로 표시
root@goorm:/workspace/Linux_study# ls -t
goorm.manifest  practice  README.md

=> 가장 먼저 생성된 것부터 표시- ls -rt : 파일들을 생성시간순(제일 오래된 것부터)으로 표시
root@goorm:/workspace/Linux_study# ls -rt
README.md  practice  goorm.manifest

=> 가장 오래된 것(생성된지)부터 표시
2. cd - 디렉터리 이동
- cd (디렉터리 경로) : 이동하려는 디렉터리로 이동
root@goorm:/workspace/Linux_study# cd practice/sample
root@goorm:/workspace/Linux_study/practice/sample- cd . : 현재 디렉터리
oot@goorm:/workspace/Linux_study/practice/sample# cd .
root@goorm:/workspace/Linux_study/practice/sample#- cd .. : 상위 디렉터리로 이동
root@goorm:/workspace/Linux_study/practice/sample# cd ..
root@goorm:/workspace/Linux_study/practice#- cd - : 이전 경로로 이동
root@goorm:/workspace/Linux_study/practice# cd -
/workspace/Linux_study/practice/sample <= 이전 경로
root@goorm:/workspace/Linux_study/practice/sample#- cd / : 최상위 디렉터리로 이동
root@goorm:/workspace/Linux_study/practice/sample# cd /
root@goorm:/#- cd ~ : 홈 디렉터리로 이동
root@goorm:/workspace/Linux_study/practice# cd ~
root@goorm:~#
3. touch - 0바이트 파일 생성, 파일의 날짜와 시간을 수정
- touch 파일이름 : 파일(파일이름 동일)을 생성
root@goorm:/workspace/Linux_study/practice/sample# ls
text001.txt <= 기존 목록

root@goorm:/workspace/Linux_study/practice/sample# touch text002.txt
=> 파일 생성
root@goorm:/workspace/Linux_study/practice/sample# ls
text001.txt  text002.txt
=> 생성됨- touch -c 파일이름 : 파일을(파일이름 동일) 시간을 현재시간으로 갱신
root@goorm:/workspace/Linux_study/practice/sample# ls -l
합계 4
-rw-rw-r-- 1 root root 27  9월 15 08:53 text001.txt
-rw-rw-r-- 1 root root  0  9월 17 10:07 text002.txt
=> 기존 파일 목록

root@goorm:/workspace/Linux_study/practice/sample# touch -c text001.txt
=> 시간 갱신

root@goorm:/workspace/Linux_study/practice/sample# ls -l
합계 4
-rw-rw-r-- 1 root root 27  9월 17 10:09 text001.txt
-rw-rw-r-- 1 root root  0  9월 17 10:07 text002.txt
=> 갱신된 파일 목록- touch -t 202309171939 파일이름 : 파일(파일이름 동일)의 시간을 날짜 정보(YYYYMMDDhhmm)로 갱신
root@goorm:/workspace/Linux_study/practice/sample# ls -l
합계 4
-rw-rw-r-- 1 root root 27  9월 17 10:09 text001.txt
-rw-rw-r-- 1 root root  0  9월 17 10:07 text002.txt
=> 기존 파일 목록

root@goorm:/workspace/Linux_study/practice/sample# touch -t 202309101939 text002.txt
=> 원하는 날짜/시간으로 갱신

root@goorm:/workspace/Linux_study/practice/sample# ls -l
합계 4
-rw-rw-r-- 1 root root 27  9월 17 10:09 text001.txt
-rw-rw-r-- 1 root root  0  9월 10 19:39 text002.txt
=> 변경된 파일 목록- touch -r 기존파일 새로운파일 : 새로운파일의 날짜 정보를 기존파일의 날짜 정보와 동일하게 변경
root@goorm:/workspace/Linux_study/practice/sample# ls -l
합계 4
-rw-rw-r-- 1 root root 27  9월 17 10:09 text001.txt
-rw-rw-r-- 1 root root  0  9월 10 19:39 text002.txt
=> 기존 파일 목록

root@goorm:/workspace/Linux_study/practice/sample# touch -r text002.txt text003.txt
=> text003.txt = text002.txt(시간 동일하도록)
root@goorm:/workspace/Linux_study/practice/sample# ls -l
합계 4
-rw-rw-r-- 1 root root 27  9월 17 10:09 text001.txt
-rw-rw-r-- 1 root root  0  9월 10 19:39 text002.txt
-rw-rw-r-- 1 root root  0  9월 10 19:39 text003.txt
=> 변경된 파일 목록
4. mkdir - 디렉터리 생성
- mkdir dirname : dirname이라는 디렉터리 생성
root@goorm:/workspace/Linux_study/practice/sample# ls
text001.txt  text002.txt  text003.txt
=> 기존 목록

root@goorm:/workspace/Linux_study/practice/sample# mkdir tmpfile
=> 디렉터리 생성

root@goorm:/workspace/Linux_study/practice/sample# ls
text001.txt  text002.txt  text003.txt  tmpfile
=> 변경된 목록- mkdir dir1 dir2 : 한 번에 여러 개의 디렉터리 생성
root@goorm:/workspace/Linux_study/practice/sample# ls
text001.txt  text002.txt  text003.txt  tmpfile
=> 기존 목록

root@goorm:/workspace/Linux_study/practice/sample# mkdir tmp01 tmp02
=> 파일 여러개 생성

root@goorm:/workspace/Linux_study/practice/sample# ls
text001.txt  text002.txt  text003.txt  tmp01  tmp02  tmpfile
=> 변경된 목록

root@goorm:/workspace/Linux_study/practice/sample# mkdir tmp03 tmp04 tmp05
root@goorm:/workspace/Linux_study/practice/sample# ls
text001.txt  text002.txt  text003.txt  tmp01  tmp02  tmp03  tmp04  tmp05  tmpfile
- mkdir -p dirname/sub_dirname : dirname이라는 디렉터리 생성, sub_dirname이라는 하위 디렉터리도 생성
root@goorm:/workspace/Linux_study/practice/sample# ls
text001.txt  text002.txt  text003.txt  tmp01  tmp02  tmp03  tmp04  tmp05  tmpfile
=> 기존 파일 목록

root@goorm:/workspace/Linux_study/practice/sample# mkdir tmpfile/itfile01
=> 있는 디렉토리에 하위 디렉토리 추가(-p를 안쓸 경우 기존 디렉토리에 하위디렉토리 추가밖에 안됨.)

root@goorm:/workspace/Linux_study/practice/sample# ls
text001.txt  text002.txt  text003.txt  tmp01  tmp02  tmp03  tmp04  tmp05  tmpfile
root@goorm:/workspace/Linux_study/practice/sample# cd tmpfile
root@goorm:/workspace/Linux_study/practice/sample/tmpfile# ls
itfile01
=> 변경된 파일 목록

root@goorm:/workspace/Linux_study/practice/sample/tmpfile# mkdir -p itdir/itfile02
=> -p를 쓰면 없는 상위 디렉토리/하위 디렉토리 다 같이 생성된다.

root@goorm:/workspace/Linux_study/practice/sample/tmpfile# ls
itdir  itfile01
root@goorm:/workspace/Linux_study/practice/sample/tmpfile# cd itdir
root@goorm:/workspace/Linux_study/practice/sample/tmpfile/itdir# ls
itfile02
=> 변경된 파일 목록

root@goorm:/workspace/Linux_study/practice/sample/tmpfile# mkdir -p itdir2/itfile03
root@goorm:/workspace/Linux_study/practice/sample/tmpfile# mkdir -p itdir3/itfile03.txt
root@goorm:/workspace/Linux_study/practice/sample/tmpfile# ls
itdir  itdir2  itdir3  itfile01
root@goorm:/workspace/Linux_study/practice/sample/tmpfile# cd itdir3
root@goorm:/workspace/Linux_study/practice/sample/tmpfile/itdir3# ls
itfile03.txt
=> 디렉토리가 아니라 파일이여도 생성된다.
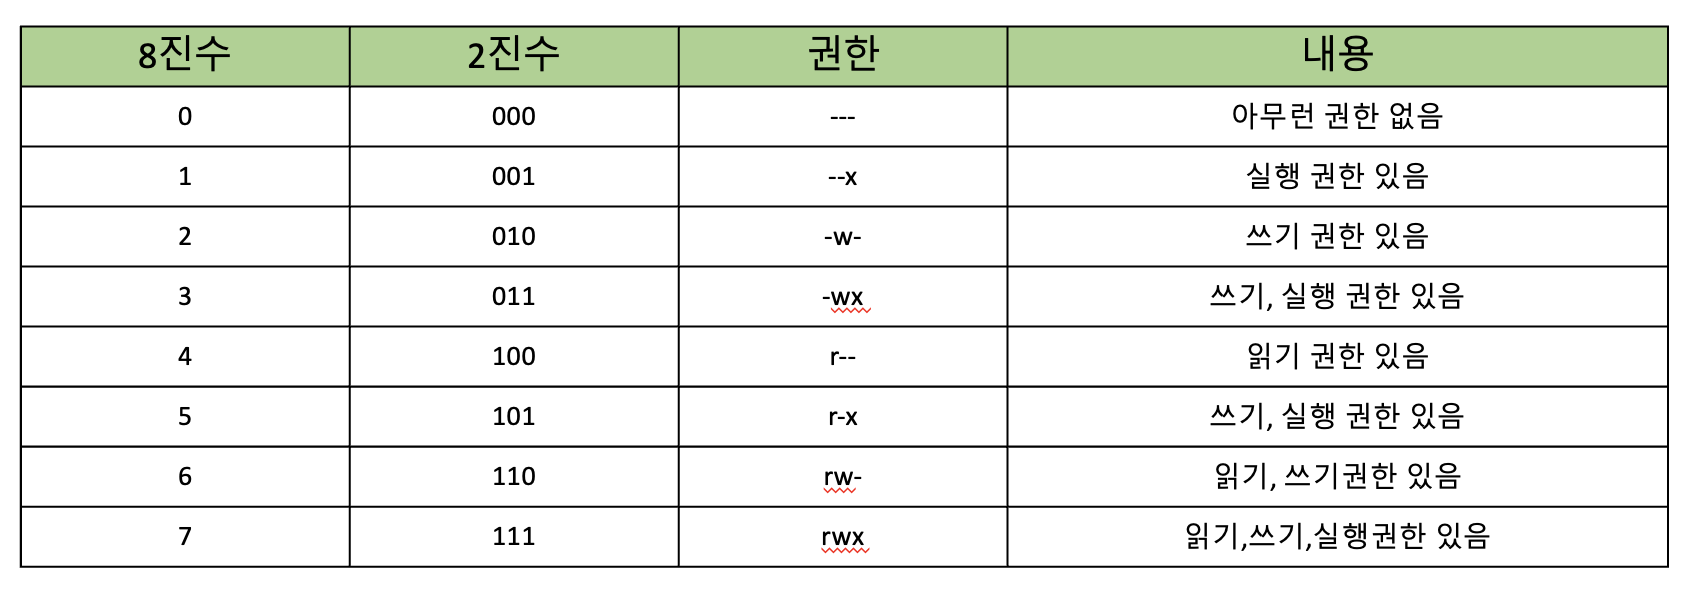
- mkdir -m 700 dirname : 특정 퍼미션(권한)을 갖는 디렉터리 생성
root@goorm:/workspace/Linux_study/practice/sample/tmpfile# ls -l
합계 16
drwxrwxr-x 3 root root 4096  9월 17 10:27 itdir
drwxrwxr-x 3 root root 4096  9월 17 10:28 itdir2
drwxrwxr-x 3 root root 4096  9월 17 10:28 itdir3
drwxrwxr-x 2 root root 4096  9월 17 10:25 itfile01
=> 기존 파일 목록

root@goorm:/workspace/Linux_study/practice/sample/tmpfile# mkdir -m 700 itdir4
=> 권한 부여

root@goorm:/workspace/Linux_study/practice/sample/tmpfile# ls -l
합계 20
drwxrwxr-x 3 root root 4096  9월 17 10:27 itdir
drwxrwxr-x 3 root root 4096  9월 17 10:28 itdir2
drwxrwxr-x 3 root root 4096  9월 17 10:28 itdir3
drwx------ 2 root root 4096  9월 17 10:30 itdir4
drwxrwxr-x 2 root root 4096  9월 17 10:25 itfile01
=> 변경된 파일 목록
권한
5. cp - 파일 복사
- cp 파일이름1(복사할) 파일이름2(생성할) : 파일이름1(복사할)의 파일을 파일이름2(생성할)의 파일로 복사
root@goorm:/workspace/Linux_study/practice/sample/tmpfile/itfile01# ls
practice01.txt
=> 기존 파일 목록

root@goorm:/workspace/Linux_study/practice/sample/tmpfile/itfile01# cp practice01.txt practice02.txt
=> 파일 복사

root@goorm:/workspace/Linux_study/practice/sample/tmpfile/itfile01# ls
practice01.txt  practice02.txt
=> 변경된 파일 목록- cp -f 파일이름1 파일이름2 : 강제 복사(파일이름2라는 파일이 이미 있을 경우 강제로 기존 파일이름2를 지우고 복사 진행)
root@goorm:/workspace/Linux_study/practice/sample/tmpfile/itfile01# ls -l
합계 0
-rw-rw-r-- 1 root root 0  9월 17 10:34 practice01.txt
-rw-rw-r-- 1 root root 0  9월 17 10:57 practice02.txt
=> 기본 파일 목록

root@goorm:/workspace/Linux_study/practice/sample/tmpfile/itfile01# cp practice01.txt practice02.txt
=> -f없이 파일 복사

root@goorm:/workspace/Linux_study/practice/sample/tmpfile/itfile01# ls -l
합계 0
-rw-rw-r-- 1 root root 0  9월 17 10:34 practice01.txt
-rw-rw-r-- 1 root root 0  9월 17 10:57 practice02.txt
=> 기본 파일 목록(변경이 안된 것을 볼 수 있다)

root@goorm:/workspace/Linux_study/practice/sample/tmpfile/itfile01# cp -f practice01.txt practice02.txt
=> -f 추가 파일 복사

root@goorm:/workspace/Linux_study/practice/sample/tmpfile/itfile01# ls -l
합계 0
-rw-rw-r-- 1 root root 0  9월 17 10:34 practice01.txt
-rw-rw-r-- 1 root root 0  9월 17 10:58 practice02.txt
=> 변경된 파일 목록- cp -r dir1 dir2 : 디렉터리 복사. 폴더 안의 모든 하위 경로와 파일들을 복사
root@goorm:/workspace/Linux_study/practice/sample/tmpfile/itfile01# ls
practice01.txt  practice02.txt
=> itfile01 디렉토리 파일 목록

root@goorm:/workspace/Linux_study/practice/sample/tmpfile/itfile01# cd ..
root@goorm:/workspace/Linux_study/practice/sample/tmpfile# cp -r itfile01 itfile02
=> 경로와 하위 파일들도 같이 복사

root@goorm:/workspace/Linux_study/practice/sample/tmpfile# ls
itdir  itdir2  itdir3  itdir4  itfile01  itfile02
root@goorm:/workspace/Linux_study/practice/sample/tmpfile# cd itfile02
root@goorm:/workspace/Linux_study/practice/sample/tmpfile/itfile02# ls
practice01.txt  practice02.txt
=> 변경된 파일 목록
6. mv - 파일 이동
- mv file1 file2 : file1 파일을 file2 파일로 변경
root@goorm:/workspace/Linux_study/practice# ls
sample  text01.txt  text02.txt
=> 기존 파일 목록

root@goorm:/workspace/Linux_study/practice# mv sample tmp
=> 파일 이동

root@goorm:/workspace/Linux_study/practice# ls
text01.txt  text02.txt  tmp
=> 변경된 파일 목록- mv file1 ./dir : file1 파일을 dir 디렉터리로 이동
root@goorm:/workspace/Linux_study/practice/tmpdir# ls

root@goorm:/workspace/Linux_study/practice/tmpdir# cd ..

root@goorm:/workspace/Linux_study/practice# ls
text02.txt text01.txt tmpdir

root@goorm:/workspace/Linux_study/practice# mv text01.txt ./tmpdir
=> 이동

root@goorm:/workspace/Linux_study/practice# cd tmpdir

root@goorm:/workspace/Linux_study/practice/tmpdir# ls
text01.txt- mv file1 file2 ./dir : 여러 개의 파일을 dir 디렉터리로 이동
root@goorm:/workspace/Linux_study/practice/tmpdir# ls
text01.txt
=> 기존 목록

root@goorm:/workspace/Linux_study/practice/tmpdir# cd ..

root@goorm:/workspace/Linux_study/practice# ls
text02.txt  text03.txt  tmpdir

root@goorm:/workspace/Linux_study/practice# mv text02.txt text03.txt ./tmpdir
=> 파일 이동 tmpdir 디렉토리에

root@goorm:/workspace/Linux_study/practice# ls
tmpdir
root@goorm:/workspace/Linux_study/practice# cd tmpdir
root@goorm:/workspace/Linux_study/practice/tmpdir# ls
text01.txt  text02.txt  text03.txt
=> 이동 완료 확인- mv /dir1 /dir2 : dir1 디렉터리를 dir2 디렉터리로 이름 변경
root@goorm:/workspace/Linux_study/practice# ls
tmpdir  tmpdir2
=> 기존 디렉토리 목록

root@goorm:/workspace/Linux_study/practice# mv ./tmpdir ./tmpdir2
=> 이동

root@goorm:/workspace/Linux_study/practice# ls
tmpdir2

root@goorm:/workspace/Linux_study/practice# cd tmpdir2

root@goorm:/workspace/Linux_study/practice/tmpdir2# ls
tmpdir

root@goorm:/workspace/Linux_study/practice/tmpdir2# cd tmpdir

root@goorm:/workspace/Linux_study/practice/tmpdir2/tmpdir# ls
text01.txt  text02.txt  text03.txt
=> 이동 확인
7. rm - 파일 삭제
- rm -r dir : dir 디렉터리 삭제 (디렉터리는 -r 옵션 없이 삭제 불가)
root@goorm:/workspace/Linux_study/practice# ls
text01.txt  text02.txt  tmp

root@goorm:/workspace/Linux_study/practice# rm tmp
rm: 'tmp'를 지울 수 없음: 디렉터리입니다

root@goorm:/workspace/Linux_study/practice# rm -r tmp

root@goorm:/workspace/Linux_study/practice# ls
text01.txt text02.txt- rm file1 : file1을 삭제
root@goorm:/workspace/Linux_study/practice# ls
text01.txt  text02.txt

root@goorm:/workspace/Linux_study/practice# rm text01.txt- rm -f file1 : file1을 강제 삭제
root@goorm:/workspace/Linux_study/practice# ls
text02.txt
root@goorm:/workspace/Linux_study/practice# rm -f text02.txt
root@goorm:/workspace/Linux_study/practice# ls
8. cat - 파일의 내용을 화면에 출력, 리다이렉션 기호('>')를 사용하여 새로운 파일 생성
- cat file1 : file1의 내용을 출력
root@goorm:/workspace/Linux_study/practice/tmp# cat text01.txt
호호호호
호호홓-
cat file1 file2 : file1과 file2의 내용을 출력
-
cat file1 file2 | more : file1과 file2의 내용을 페이지별로 출력
-
cat file1 file2 | head : file1과 file2의 내용을 처음부터 10번째 줄까지만 출력
-
cat file1 file2 | tail : file1과 file2의 내용을 끝에서부터 10번째 줄까지만 출력
9. redirection - 화면의 출력 결과를 파일로 저장
- '>' 기호 : 기존에 있는 파일 내용을 지우고 저장
root@goorm:/workspace/Linux_study/practice/tmp# cat >  text01.txt
호호호호
호호홓
=> 내용 작성

root@goorm:/workspace/Linux_study/practice/tmp# cat text01.txt
호호호호
호호홓
=> 기존 내용

root@goorm:/workspace/Linux_study/practice/tmp# cat > text01.txt
안녕
=> 내용 변경

root@goorm:/workspace/Linux_study/practice/tmp# cat text01.txt
안녕
=> 변경된 내용
- '>>' 기호 : 기존 파일 내용 뒤에 덧붙여서 저장
root@goorm:/workspace/Linux_study/practice/tmp# cat text01.txt
안녕
=> 기존 내용

root@goorm:/workspace/Linux_study/practice/tmp# cat >> text01.txt
하이
=> 추가할 내용

root@goorm:/workspace/Linux_study/practice/tmp# cat text01.txt
안녕
하이
=> 기존 내용 + 추가한 내용- '<' 기호 : 파일의 데이터를 명령에 입력
+ cat file1 file2 > file3 : file1, file2의 명령 결과를 합쳐서 file3라는 파일에 저장

root@goorm:/workspace/Linux_study/practice/tmp# cat text01.txt text02.txt > text03.txt
root@goorm:/workspace/Linux_study/practice/tmp# ls
sample  text01.txt  text02.txt  text03.txt  tmpdir
root@goorm:/workspace/Linux_study/practice/tmp# cat text01.txt
안녕
하이
root@goorm:/workspace/Linux_study/practice/tmp# cat text02.txt
내용입니다.
root@goorm:/workspace/Linux_study/practice/tmp# cat text03.txt
안녕
하이
내용입니다.

+ cat file4 >> file3 : file3에 file4의 내용 추가
oot@goorm:/workspace/Linux_study/practice/tmp# cat text04.txt
내용ㅇㄹ
아아아
root@goorm:/workspace/Linux_study/practice/tmp# cat text04.txt >>  text03.txt
=> 내용 추가(text04 내용을 text03 내용에 추가)

root@goorm:/workspace/Linux_study/practice/tmp# cat text03.txt
안녕
하이
내용입니다.
내용ㅇㄹ
아아아

+ cat < file1 : file1의 결과 출력
root@goorm:/workspace/Linux_study/practice/tmp# cat < text03.txt
안녕
하이
내용입니다.
내용ㅇㄹ
아아아

+ cat < file1 > file2 : file1의 출력 결과를 file2에 저장
root@goorm:/workspace/Linux_study/practice# cat text01.txt
우우우
아아아
root@goorm:/workspace/Linux_study/practice# cat text02.txt
아아아아아아ㅏㅇ
=> 기존 내용

root@goorm:/workspace/Linux_study/practice# cat < text01.txt > text02.txt
root@goorm:/workspace/Linux_study/practice# cat text01.txt
우우우
아아아
root@goorm:/workspace/Linux_study/practice# cat text02.txt
우우우
아아아
=> 변경된 내용
10. alias - 자주 사용하는 명령어들을 별명으로 정의하여 쉽게 사용할 수 있도록 설정
- 명령어 별명 지정 : alias 별명 = '명령어 정의'
- 명령어 별명 해제 : unalias 별명(해제할)