Fit-In 프로젝트 개발에서의 포인트를 짚고 정리하는 글
현재상황
-
Fit-In의 전체적인 컨셉과 주제,기획안은 완료 이를 바탕으로 UI/UX 구성 및 초안 작성 완료
-
서버 구현은 REST API 형식으로 구현, AWS로 배포하기 전 로컬 형태로 테스트 해보면서 진행, 한 번에 바로 하는것보다 공부와 직접 구현 및 커스텀의 포커스를 맞췄기 때문에 이에 맞춰서 천천히 진행할 예정
REST API가 궁금하다면 아래 링크 참조
REST API란?
- 로그인 및 회원가입 부분 먼저 시작하며 하나씩 구현할 예정이고, 해당 부분에 대한 기능 명세서 및 디자인은 완료
요구사항
-
Spring 서버에서 회원가입 & 로그인에 대한 Controller 완성, DTO 형태로 데이터를 넘겨주면 서버단에서 내부적으로 처리하여 DB에 입력한 정보를 바탕으로 회원가입 및 로그인 진행됨
-
아래의 Controller 기준으로 REST API 방식으로 설계가 됨
@PostMapping("/signup")
public ResponseEntity<AccountResponseDto> signup(@RequestBody AccountRequestDto accountRequestDto){
return ResponseEntity.ok(authService.signup(accountRequestDto));
}
@PostMapping("/login")
public ResponseEntity<TokenDto> login(@RequestBody AccountRequestDto accountRequestDto){
return ResponseEntity.ok(authService.login(accountRequestDto));
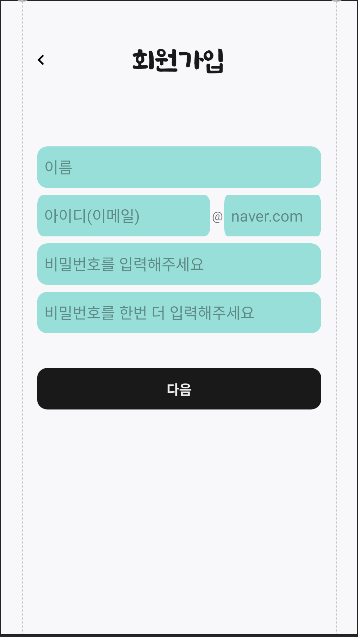
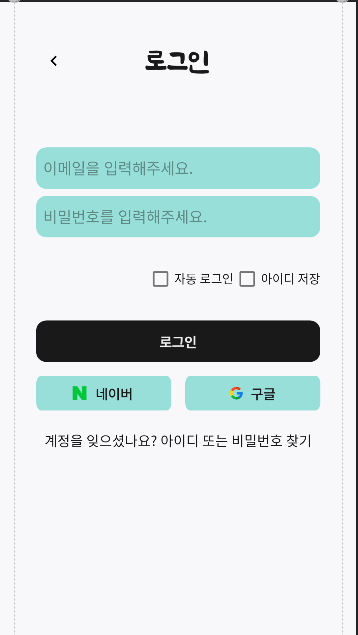
}- 이 부분에 대해서 안드로이드 단에서는 아래와 같이 회원가입 및 로그인을 위한 정보를 입력받게 화면을 구성함
회원가입
로그인
필요한 구현 사항
-
EditText를 통해 입력한 사항에 대해서 해당 데이터를 바탕으로 서버와 통신한 뒤, 유저를 저장하고 로그인 할 수 있어야함
-
위 기준으로
auth/signup,auth/loginAPI와 통신을 해야함 -
이를 위해 서버와 통신하는 방법 중 Retrofit을 활용하여 REST API 통신을 함
Retrofit이란?
REST API 통신을 위해서 사용하는 통신 라이브러리 중 하나
실제 통신을 위해서는 HttpUrlConnection, OkHttp 쿼리 스트링 동기 비동기 구현 등 필요 이상의 작업을 거쳐야 하지만 해당 라이브러리를 통해서 가독성 있게 빠르게 처리 가능함
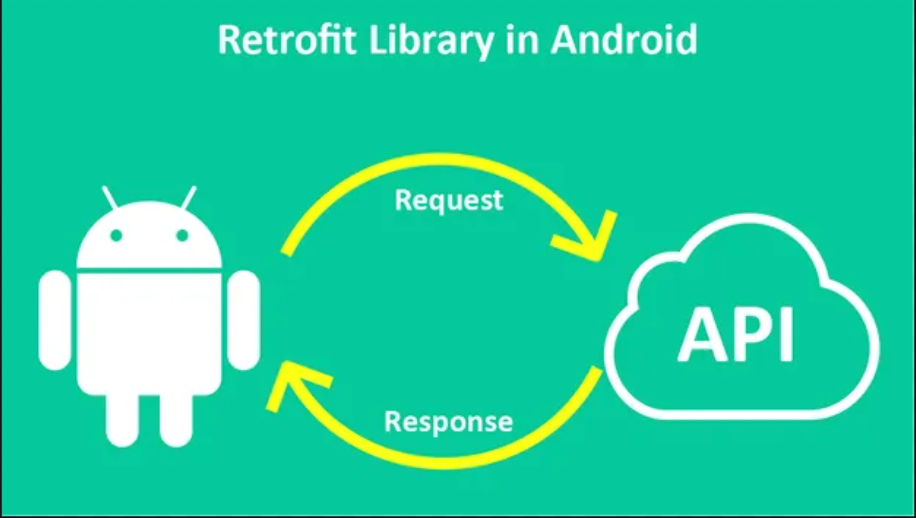
- 그래서 Retrofit을 사용하여 서버에서 만든 API를 통신을 할 것임
구현
-
먼저 Gradle의 Retrofit과 Converter에 대한 의존성 추가를 해주고 Manifest 상에서 인터넷 권한 설정을 추가해줘야함
-
그리고 크게 보면 3가지의 구성요소를 구성하여 처리할 수 있다고 볼 수 있는데 하나씩 알아보면
DTO
-
먼저 DTO(Data Transfer Object) 형태의 모델이 필요함 JSON 타입 변환에 사용되는데 REST API로 받아올 데이터나 보낼 데이터에 대해서 서버에서 보내준 스펙을 바탕으로 동일하게 구현함
-
확실한 구분을 위해서 아래와 같이 dto 패키지 안에 만듬
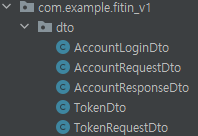
- DTO를 만들기 앞서 REST API로 어떤걸 보내고 받는지 다시 알아보면
	@PostMapping("/signup")
    public ResponseEntity<AccountResponseDto> signup(@RequestBody AccountRequestDto accountRequestDto){
        return ResponseEntity.ok(authService.signup(accountRequestDto));
    }

    @PostMapping("/login")
    public ResponseEntity<TokenDto> login(@RequestBody AccountRequestDto accountRequestDto){
        return ResponseEntity.ok(authService.login(accountRequestDto));
}- 각각 Request로 DTO를 보내는 것을 알 수 있는데 AccountRequestDto의 형태로 보낸다고 나옴
@Getter
@AllArgsConstructor
@NoArgsConstructor
public class AccountRequestDto {

    private String name;
    private String email;
    private String password;

    public Account toAccount(PasswordEncoder passwordEncoder){
        return Account.builder()
                .name(name)
                .email(email)
                .password(passwordEncoder.encode(password))
                .role(Role.ROLE_USER)
                .build();
    }


    public UsernamePasswordAuthenticationToken toAuthentication(){
        return new UsernamePasswordAuthenticationToken(email, password);
    }
}-
서버쪽에서는 name, email, password를 받아 DB에 넘기기전 암호화 처리등을 한 뒤 JPA를 이용해 DB에 저장하는 것을 알 수 있음
-
여기서 안드로이드단에서는 통신을 위해서 넘기기 위해 동일하게 DTO를 작성해서 보내줘야 하는데 아래와 같이 만들 수 있음
package com.example.fitin_v1.dto;

import com.google.gson.annotations.SerializedName;

public class AccountRequestDto {

    @SerializedName("email")
    private String email;

    @SerializedName("password")
    private String password;

    @SerializedName("name")
    private String name;

    public AccountRequestDto(String email, String password, String name) {
        this.email = email;
        this.password = password;
        this.name = name;
    }

}
@SerializedName의 경우 JSON과 객체를 직렬화 및 역직렬화를 위한 것인데 정의된 field에 맞게 쓰기 위해서 써줌 해당 어노테이션을 써주면
private String email이 아닌private String userEmail로 해도 email에 해당하는 value로 들어감
-
생성자를 만들어준 것은 해당 Activity에서 입력받은 내용을 객체에 담아서 보내줄 것이므로 만듬
-
이와 마찬가지로
AccountResponseDto,TokenDto등 응답값에 대한 DTO도 아래와 같이 만듬
package com.example.fitin_v1.dto;

import com.google.gson.annotations.SerializedName;

public class AccountResponseDto {

    @SerializedName("email")
    private String email;

    public String getEmail() {
        return email;
    }
}
package com.example.fitin_v1.dto;
public class TokenDto {
private String grantType;
private String accessToken;
private String refreshToken;
private Long accessTokenExpiresIn;
public String getAccessToken() {
return accessToken;
}
public String getRefreshToken() {
return refreshToken;
}
}- getter를 쓴 것은 서버에서 받아온 응답값을 안드로이드 단에서 필요한 곳에 쓸 수 있게 하기 위해 한 것임(Token 관련해서는 다음 글에서 상세하게 설명할 예정)
Interface 정의
-
DTO를 서버의 맞게 만들었으므로 이제 본격적으로 통신을 위한 준비가 필요함
-
Retrofit에서 Interface는 HTTP CRUD 동작(메소드)을 정의해놓은 인터페이스임 이말은 즉 CRUD(Create / Read / Update / Delete) -> HTTP Method(POST / GET / PUT / DELETE)로 API에 맞게 인터페이스를 구성하면 그에 맞춰서 서버와 정상적으로 통신을 함
-
앞서 서버에서 정의한 부분을 본다면
auth/signup의 경우@PostMapping을auth/login도 역시@PostMapping으로 설계됨, 이 API에 맞게 Retrofit 인터페이스도 역시 정의할 수 있음 -
이 부분도 패키지로 remote/api로 구분해서 별도로 정의함
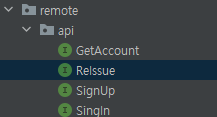
package com.example.fitin_v1.remote.api;

import com.example.fitin_v1.dto.AccountRequestDto;
import com.example.fitin_v1.dto.AccountResponseDto;

import retrofit2.Call;
import retrofit2.http.Body;
import retrofit2.http.POST;

public interface SignUp {
    // 해당 URL로 DTO로 넘김
    @POST("/auth/signup")
    Call<AccountResponseDto> getSignUp(@Body AccountRequestDto accountRequestDto);

}
package com.example.fitin_v1.remote.api;
import com.example.fitin_v1.dto.AccountLoginDto;
import com.example.fitin_v1.dto.TokenDto;
import retrofit2.Call;
import retrofit2.http.Body;
import retrofit2.http.POST;
public interface SignIn {
@POST("/auth/login")
Call<TokenDto> getSignIn(@Body AccountLoginDto accountLoginDto);
}- 이 부분은 어렵게 생각할 것 없이 서버의 Controller 부분과 비교해보면 동일하게 요청을 해서 보내면 됨을 알 수 있음
	@PostMapping("/signup")
    public ResponseEntity<AccountResponseDto> signup(@RequestBody AccountRequestDto accountRequestDto){
        return ResponseEntity.ok(authService.signup(accountRequestDto));
    }

    @PostMapping("/login")
    public ResponseEntity<TokenDto> login(@RequestBody AccountRequestDto accountRequestDto){
        return ResponseEntity.ok(authService.login(accountRequestDto));
    }
현재 진행 상황 localhost로 기반하기 때문에 서버 프로젝트도 같이 보는 중, 실제로는 배포된 서버와 REST API 명세서를 받아서 그에 맞게 설계하면 됨
-
그리고
@Body를 사용 앞서 만든 DTO 객체를 그대로 HTTP 통신으로 전달해서 보냄, 이렇게 하면 Convertor가 직렬화를 담당함(이 외에도@Field로 직접 키-값 방식으로 인자들을 넣어서 보낼 수 있고@FieldMap으로 사용도 가능함) -
현재는
@POST로 DTO를 보내서 전송함
Retrofit 인스턴스 생성
- baseUrl, Converter, Client를 설정해서 등록해서 만드는 부분, 이 부분은 싱글톤 패턴으로 만듬, 왜냐하면 통신 자체를 많이 활용할 것이므로 싱글톤 패턴으로 해당 부분을 구성함
public class RetrofitBuilder {

    // 기본 Retrofit 세팅 기준 URL을 가지고
    public static Retrofit getRetrofit() {
        HttpLoggingInterceptor interceptor = new HttpLoggingInterceptor();
        interceptor.setLevel(HttpLoggingInterceptor.Level.BODY);
        OkHttpClient client = new OkHttpClient.Builder()
                .addInterceptor(interceptor)
                .addInterceptor(new AuthInterceptor())
                .build();

        return new Retrofit.Builder()
                .baseUrl("http://xx.x.x.x:xxxx")
                .client(client)
                .addConverterFactory(GsonConverterFactory.create())
                .build();
    }

}
Interceptor 부분은 401 error를 위해서 처리한 부분 다음 글에서 토큰 방식 설명과 함께 볼 예정
baseUrl의 경우 localhost로 하기 때문에 직접 그 Url을 넣어서 처리함
-
Retrofit 인스턴스를 만들고 리턴하는 함수를 만듬, 이제 통신을 위해 인스턴스를 만들어서 써야 하는 부분에서 위의 함수를 그대로 가져오면 생성해서 쓸 수 있음
-
Retrofit 인스턴스를 생성했다면 생성한 것과 Interface 객체 구현을 하고 동기 / 비동기 통신작업을 실행하면 됨
Spring 서버와 통신
- 이제 REST API를 바탕으로 DTO, Interface와 Retrofit 인스턴스 생성하는 싱글톤을 만들었으므로 해당 Activity에서 데이터를 받아 진행할 수 있음
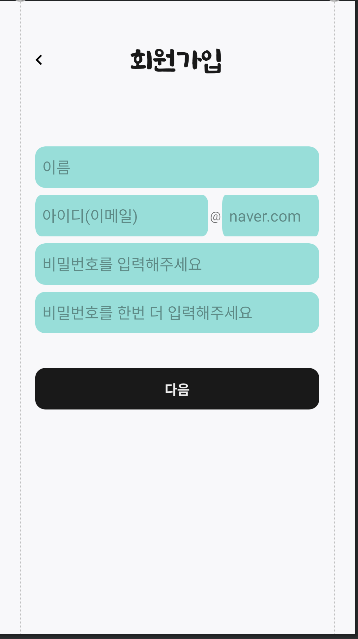
회원가입
-
이름, 아이디(이메일), 비밀번호를 안드로이드에서 입력받음, 그 값을 Retrofit을 통해 POST 요청을 하여 서버 DB에 저장을 할 것임
-
먼저 Retrofit 인스턴스로 인터페이스 객체를 구현함
SignUp signUp = RetrofitBuilder.getRetrofit().create(SignUp.class);-
위에서 정의한대로 싱글톤으로 구현했으므로
getRetrofit()함수를 호출해 인스턴스를 생성하고SignUp인터페이스를.create와 함께 구현을 함 -
그리고 다음 버튼을 누를시 안드로이드에서 입력한 데이터를 기준으로 Dto를 만들어
signUp호출시 불러서 넘김, 그 다음 이 Interface 객체 구현에 대해서 Call 객체에 추상 메소드 중 사용할 메소드를 등록함
public interface SignUp {
    // 해당 URL로 DTO로 넘김
    @POST("/auth/signup")
    Call<AccountResponseDto> getSignUp(@Body AccountRequestDto accountRequestDto);

}-
사용할 메소드는
getSignUp으로 REST API 명세를 보면 이름, 이메일, 비밀번호를 입력받고 Dto로 보내면 해당 값이 DB에 저장된 후 Response로 이메일을 주는 통신임 -
그리고 입력받은 값으로 Dto를 넘기기 위해서 이메일, 이름, 비밀번호를
EditText에서 받아온 뒤 String으로 앞서AccountRequestDto의 생성자를 만들었는데 생성자를 통해서 해당 객체를 만들어서 넘김 -
그리고 Call에
getSignUp을 등록함, 이 때account가@Body로 넘어감
binding.btnNext.setOnClickListener(new View.OnClickListener() {
            @Override
            public void onClick(View view) {

                et1 = binding.etEmailId.getText().toString();
                et2 = binding.etEmail.getText().toString();
                email = et1 + "@" + et2;
                name = binding.etName.getText().toString();
                password = binding.etPassword.getText().toString();
                AccountRequestDto account = new AccountRequestDto(email, password, name);

                Call<AccountResponseDto> call = signUp.getSignUp(account);
                // ....
            }
});- 그리고 Call 객체에 등록을 했으므로 이를 동기/비동기 통신작업을 실행함, 이땐 데이터를 처리하기 때문에 비동기 통신을 실행함
call.enqueue(new Callback<AccountResponseDto>() {

                    @Override
                    public void onResponse(Call<AccountResponseDto> call, Response<AccountResponseDto> response) {
                    // 실패시
                        if (!response.isSuccessful()) {
                            Log.e("연결이 비정상적 : ", "error code : " + response.code());
                            return;
                        } else {
                        // 성공시
                            Log.e("응답값 : ", response.body().getEmail());
                        }
                    }

                    @Override
                    public void onFailure(Call<AccountResponseDto> call, Throwable t) {

                    }
});-
비동기
enqueue작업으로 실행, 통신종료 후 이벤트 처리를 위해 Callback 리스너 등록 -
이때
onResponse성공,onFailure실패 구분하여 메인스레드에서 처리할 작업 등록함 -
근데 앞서
response를AccountResponseDto의 아래와 같은 형태로 받음
public class AccountResponseDto {

    @SerializedName("email")
    private String email;

    public String getEmail() {
        return email;
    }
}-
이 말은 응답값이
email이 넘어오고 이 값을 getter를 통해서 접근가능함 -
그래서
onResponse에서isSuccessful()을 통해 성공여부를 확인한 후 성공했다면response.body().getEmail()을 통해서 응답값 Dto에 있는 이메일을 로그로 찍은 것임 -
만약 실패했다면 실패응답 코드를 보여줌
-
이 과정을 거쳐서 확인 결과 아래와 같이 정상적으로 DB에 들어감을 알 수 있었음

- 로그인 역시 이와 같은 방식으로 진행이 됨 하지만 다음 글에서 JWT 토큰 방식과 이를 저장한 방식 재발급 이슈 등 함께 더 자세히 알아볼 예정
정리 & 아쉬운 점
-
위에서 설명한 흐름대로 Retrofit 통신이 이루어짐
-
설령 localhost가 아닌 배포된 서버여도 동일하게 작동하고 위에서 POST 위주의 설명이었지만 다른 요청 방식도 비슷하게 돌아감(세부적인 부분에서 수정이 필요한 것이고 전체 큰 흐름은 유사함)
-
개선의 여지가 보이는 몇 가지 사항이 보이긴 함, 아래 사항을 추후 업데이트 하여 같이 연재해볼 예정
1. API에 대한 Interface를 각각 만들었지만 하나의 Interface로 통합관리하는 것
2. Kotlin으로의 개선, 현재 Java로 사용하지만 Kotlin이 공식언어이기도 하면서 레퍼런스에서 Kotlin이 좀 더 많고 확실히 코드적인 부분에서도 Kotlin이 간결성을 좀 더 추구하다보니 현재 코드에서 난잡한 부분을 Kotlin으로 리팩토링 하는 것이 좋아보임
참고링크
Retrofit 추가적인 사항은 아래 링크 참고
https://jaejong.tistory.com/33
https://jaejong.tistory.com/38?category=873924
https://jaejong.tistory.com/34?category=873924
https://morm.tistory.com/296
https://bubblebubble.tistory.com/7
