Modal,Toast, 알림 등 화면 위에 띄워줘야할 상황이 있는데 이때 window를 하나 더 띄우고 메인 윈도우와는 다른 라이프 사이클을 가지도록 할 수 있다.
1. AppDelegate
우선 SwiftUI에 AppDelegate가 없기 때문에 만들어준다.
class AppDelegate: NSObject, UIApplicationDelegate {
    func applicationDidFinishLaunching(_ application: UIApplication) {
            return
    }

    func application(_ application: UIApplication, configurationForConnecting connectingSceneSession: UISceneSession, options: UIScene.ConnectionOptions) -> UISceneConfiguration {
        let sceneConfig: UISceneConfiguration = UISceneConfiguration(name: nil, sessionRole: connectingSceneSession.role)
        sceneConfig.delegateClass = SceneDelegate.self
        return sceneConfig
    }
}
그리고 Project App Class에서 선언해준다.
@UIApplicationDelegateAdaptor(AppDelegate.self) private var appDelegate
2. ScondView 만들기
예시로 토스트를 보여준다고 가정하고 SecondView를 만들어준다.
struct SecondWindowView: View {
    var body: some View {
        VStack {
            Spacer()

            Text("SecondView!!")
                .foregroundColor(.blue)
                .padding(12)
                .background(
                    RoundedRectangle(cornerRadius: 16)
                        .foregroundColor(.gray)
                )
        }
    }
}
3. ScenceDelegate 생성 및 Window들 등록
일반적으로는 UIWindow가 하나 존재하겠지만 여기서는 두개의 Window를 보여주는게 목적이므로 두개의 window를 만들어주지만 두 Window의 등록 방법이 다르다.
class SceneDelegate: UIResponder, UIWindowSceneDelegate {
    var mainWindow: UIWindow?
    var secondWindow: UIWindow?


    func scene(_ scene: UIScene, willConnectTo session: UISceneSession, options connectionOptions: UIScene.ConnectionOptions) {
        if let windowScene = scene as? UIWindowScene {
            self.setupMainWindow(in: windowScene)
            self.setupSecondWindow(in: windowScene)
        }
    }

    func setupMainWindow(in scence: UIWindowScene) {
        let window = UIWindow(windowScene: scence)
        window.rootViewController = UIHostingController(rootView: ContentView())
        self.mainWindow = window
        window.makeKeyAndVisible() // MARK: - 'makeKeyAndVisible' for visible window and receiving keyboard and other events first.
    }

    func setupSecondWindow(in scence: UIWindowScene) {
        let secondWindow = UIWindow(windowScene: scence)
        let secondViewController = UIHostingController(rootView: SecondWindowView())
        secondViewController.view.backgroundColor = .clear
        secondWindow.rootViewController = secondViewController
        secondWindow.isHidden = false
        self.secondWindow = secondWindow
    }
}
MainWindow는 makeKeyAndVisible function을 사용하여 Keyboard 및 다른 이벤트들을 다 받고 화면에 보이도록 해준다.
반면에, SecondWindow는 backgroundColor를 투명하게 해주고
isHidden이 true가 default 값이기 때문에 false를 할당해줌으로써 화면에 보이게 해줄 수 있다.
4. 결과
화면에 두개의 window가 존재하게 되었다.
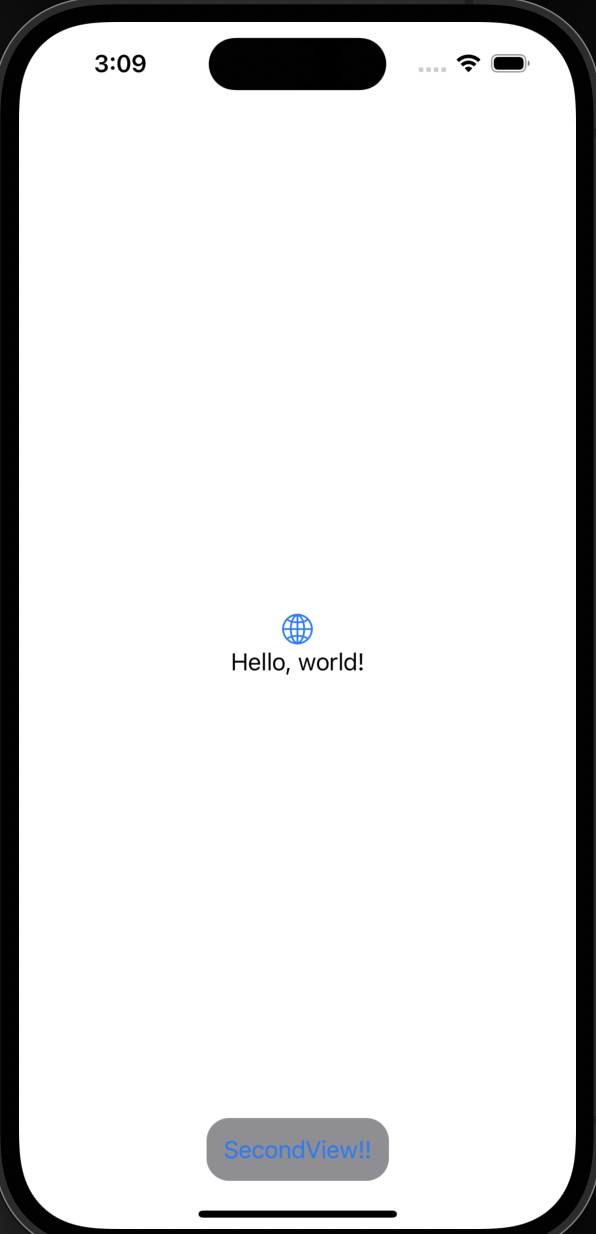
이 방법을 사용하여 토스트 등 여러가지 뷰를 window 단에서 컨트롤 할 수 있다. 데이터는 environmentObject나 singleton 객체를 사용하여 공유할 수 있다.
Reference: https://www.fivestars.blog/articles/swiftui-windows/

가고일(gagoil)의 개발일지