[NestJS] Authentication using Google OAuth (+ Session)
시작하기에 앞서
인증의 마지막? (마지막이 되지 않을 수도 있지만 형식상 이번 포스팅을 잠정 마지막으로 하려한다...) 포스팅에서 다룰 주제는 지난 포스팅의 OAuth2.0 개념에 이어서 실제 NestJS에서 구현해보는 OAuth2.0이다.
여러 소셜 로그인 제공 서비스가 많지만 가장 흔하게 접해볼 수 있는 "Google-OAuth-Login"을 다뤄보기로 하였다.
구글링을 통해 확인해볼 수 있는 여러 블로그 또는 자료에서 Google-Login 창을 띄워 로그인을 하는 것 까지에 대한 내용은 많았지만, 조금 더 세밀한 접근에 대해 알 수 없었다. 이번 포스팅에선 단순 로그인 구현을 넘어 실제 인증을 확인하는 것 까지 다뤄보고자 한다.
✔ 구현 과정
- Google Cloud에서 Client_ID 및 Secret 값 받기 (생략)
- PassportModule을 통해 로그인 전략 구축
- Session Serializer를 통한 유저 인증 상태 관리 (세션 사용)
- DB에 소셜 로그인 정보 저장 및 업데이트
💥 Google OAuth 인증 수행하기
"Google Cloud"로 부터 받아와야할 필수 값 (client_id, secret, scope)을 불러왔다고 가정하고 시작하겠다.
이번 "Google-OAuth Social Login"의 핵심은 여태까지 다루었던 다른 인증과는 다르게 "jwt"를 사용하지 않고, "session"을 사용하도록 하였다.
여태껏 계속해서 이놈의 "jwt"를 활용하여 로컬 로그인 시의 access_token, refresh_token에 사용하였고 더하여 2FA에서도 사용하였다. 하지만, 당연한 얘기겠지만 Google로부터 발급받은 인증 토큰은 "jwt"가 아니다.
즉, Google에서 제공받은 인증 토큰(그 중에서도 "access token")은 로그인 시 유저에 대한 id 정보를 담고 있는 토큰이 아니다. "access token"의 목적은 "Google API"에 승인 정보를 제공하기 위해 사용된다. (ID token 따로 존재)
물론, 자체적으로 서명한 "JWT"를 사용하는 방법또한 가능하다. 여태껏 그래왔던 것처럼 직접 JWT 토큰을 생성해서 유저를 인증하는 것이다. 사실 그렇게 수행해도 괜찮을 것 같다는 생각이지만, 너무 "JWT"에 의존하고 있다 느꼈고, 인증 상태에 대해 조금 더 유연하게 처리할 수 있지 않을까 생각해보았다.
> GoogleStrategy && Guard (using Passport)
(설치해야할 패키지에 대한 명령어는 생략)
먼저, google-passport를 통해 불러온 Strategy 클래스를 만든다. 해당 전략 클래스 내부에서 우린 Google-Authentication에 필요한 필수 환경 요소를 설정해준다. 해당 값들을 직접 작성하기 보단, .env와 같은 전역파일에 작성해주는 것이 좋을 것이다.
// .env

# Google-OAuth2.0
GOOGLE_CLIENT_ID=19288...vgdbff.apps.googleusercontent.com
GOOGLE_CLIENT_SECRET=GOCSPX-..._maJX
GOOGLE_CALLBACK_URL=http://localhost:4000/api/auth/google/redirect
GOOGLE_SCOPE_PROFILE=profile
GOOGLE_SCOPE_EMAIL=email
✔ GoogleStrategy
// google-strategy.ts

import { Injectable } from "@nestjs/common";
import { PassportStrategy } from "@nestjs/passport";
import { Profile, Strategy, VerifyCallback } from "passport-google-oauth20";
import { GoogleAuthenticationService } from "../google-auth.service";
import { SocialLoginInfoDto } from "../utils/socialLogin-info.dto";


@Injectable()
export class GoogleStrategy extends PassportStrategy(Strategy) {
  constructor(
    private readonly googleAuthService: GoogleAuthenticationService
  ) {
    super({
      clientID: process.env.GOOGLE_CLIENT_ID,
      clientSecret: process.env.GOOGLE_CLIENT_SECRET,
      callbackURL: process.env.GOOGLE_CALLBACK_URL,
      scope: [process.env.GOOGLE_SCOPE_PROFILE, process.env.GOOGLE_SCOPE_EMAIL],
    });
  }

  // refreshToken을 얻고 싶다면 해당 메서드 설정 필수
  authorizationParams(): {[key: string]: string; } {
    return ({
      access_type: 'offline',
      prompt: 'select_account',
    });
  }

  async validate(accessToken: string, refreshToken: string, profile: Profile, done: VerifyCallback): Promise<void> {
    const { name, emails, provider } = profile;
    const socialLoginUserInfo: SocialLoginInfoDto = {
      email: emails[0].value,
      firstName: name.givenName,
      lastName: name.familyName,
      socialProvider: provider,
      externalId: profile.id,
      accessToken,
      refreshToken,
    };
    try {
      const user = await this.googleAuthService.validateAndSaveUser(socialLoginUserInfo);
      console.log(user,"strategy");
      done(null, user, accessToken);
    } catch (err) {
      done(err, false);
    }
  }
}
코드에 대해 일일히 주저리주저리 설명하긴 너무 지루할 것이고, 중요한 부분을 짚고 넘어가자.
먼저 authorizationParams() 메서드 설정이다. 위 메서드 설정은 필수가 아니다. 하지만, 만약 "refresh token"을 얻고 싶다면 해당 메서드를 정의하고 내부에 access_type: 'offline'이란 값을 리턴해야할 것이다. 오프라인 액세스 타입을 지정함으로써 사용자는 액세스 토큰과 함께 리프레시 토큰도 발급받을 수 있다.
리프레시 토큰 발급이 필수는 아니지만, 만약 구글로부터 API 접근에 필요한 access token을 갱신할 수 있는 리플레시 토큰을 받고 싶다면 꼭 위의 코드가 필요하다. 생각보다 해당 설정에 대한 내용을 찾기가 매우 힘들었다. 그러므로 공유해본다.
이제, 핵심이 되는 validate() 함수이다. 우린 우리가 설정한 scope에 따라 구글을 통해 토큰 및 "profile" 정보를 불러올 수 있다. 콘솔을 통해 profile 객체를 출력해보면 아래와 같은 형태를 얻을 수 있을 것이다. 이 데이터를 통해 우린 추후 필요한 작업들을 수행할 수 있게 된다.
{
  id: '106********4944',
  displayName: '킥코',
  name: { familyName: '킥', givenName: '코' },
  emails: [ { value: 'a********@gmail.com', verified: true } ],
  photos: [
    {
      value: 'https://lh3.googleusercontent.com/a/AAcHTtcYFrnWmVzI4qayqhqWfmUEGt27y6QMqo8-_l4I4A=s96-c'
    }
  ],
  provider: 'google',
  _raw: '{\n' +
    '  "sub": "106********4944",\n' +
    '  "name": "킥코",\n' +
    '  "given_name": "코",\n' +
    '  "family_name": "킥",\n' +
    '  "picture": "https://lh3.googleusercontent.com/a/AAcHTtcYFrnWmVzI4qayqhqWfmUEGt27y6QMqo8-_l4I4A\\u003ds96-c",\n' +
    '  "email": "a********@gmail.com",\n' +
    '  "email_verified": true,\n' +
    '  "locale": "ko"\n' +
    '}',
  _json: {
    sub: '106********4944',
    name: '킥코',
    given_name: '코',
    family_name: '킥',
    picture: 'https://lh3.googleusercontent.com/a/AAcHTtcYFrnWmVzI4qayqhqWfmUEGt27y6QMqo8-_l4I4A=s96-c',
    email: 'a********@gmail.com',
    email_verified: true,
    locale: 'ko'
  }
}
위의 profile 데이터와 동시에 받게 되는 refreshToken 등을 활용해 user 객체를 리턴하기 전, 일련의 검증 및 추가작업을 수행하기 위해 서비스 로직에서 validateAndSaveUser() 메서드를 거치도록 하였다. 해당 메서드의 인자로써 구글 소셜 로그인을 통해 받게 된 정보의 객체를 받도록 한다.
async validate(accessToken: string, refreshToken: string, profile: Profile, done: VerifyCallback): Promise<void> {
    const { name, emails, provider } = profile;
    const socialLoginUserInfo: SocialLoginInfoDto = {
      email: emails[0].value,
      firstName: name.givenName,
      lastName: name.familyName,
      socialProvider: provider,
      externalId: profile.id,
      accessToken,
      refreshToken,
    };
    try {
      const user = await this.googleAuthService.validateAndSaveUser(socialLoginUserInfo);
      console.log(user,"strategy");
      // 3번째 인자로 accessToken을 담아줌으로써, login 요청마다 현재 로그인 상태에 대한 유효성을 검증 받도록 한다.
      done(null, user, accessToken);
    } catch (err) {
      done(err, false);
    }
  }
✔ GoogleAuthGuard
다음으로, 위에서 만들어준 전략(Strategy)을 사용할 "가드(Guard)"를 생성할 차례이다. 처음에 가드를 어떤 식으로 작성할 지 몰랐지만, "github issue"에서 특정인의 오피니언을 통해 해결할 수 있었다.
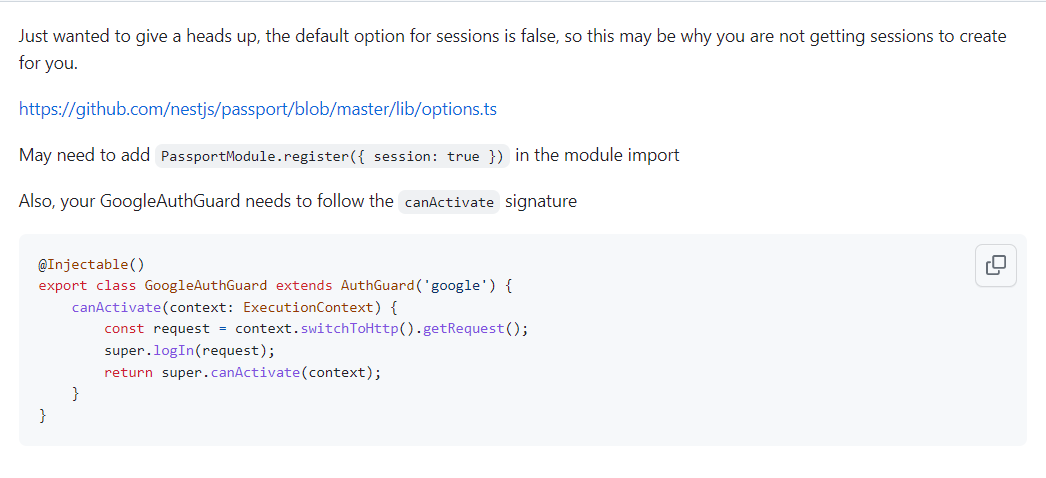
// google-auth.guard.ts

import { ExecutionContext, Injectable } from "@nestjs/common";
import { AuthGuard } from "@nestjs/passport";

@Injectable()
export class GoogleAuthGuard extends AuthGuard('google') {
  constructor() {
    super()
  }
  async canActivate(context: ExecutionContext) {
    const activate = await super.canActivate(context) as boolean;
    const request = context.switchToHttp().getRequest();
    await super.logIn(request);
    return activate;
  }
}
위의 logIn(request) 함수를 호출해줄 필요가 있다. 해당 logIn() 함수는 Passport와 함께 쓰이면서 Passport와 관련된 로그인 동작을 수행할 수 있다.
export declare type IAuthGuard = CanActivate & {
    logIn<TRequest extends {
        logIn: Function;
    } = any>(request: TRequest): Promise<void>;
    handleRequest<TUser = any>(err: any, user: any, info: any, context: ExecutionContext, status?: any): TUser;
    getAuthenticateOptions(context: ExecutionContext): IAuthModuleOptions | undefined;
};
만약, 세션 설정을 하였음에도 저장에 문제가 생긴다면 위의 가드 작성을 꼭 고려해볼 필요가 있을 것이다.
> Base Model (UserEntity && SocialProvider)
서비스 로직을 알아보기 전, 필요한 유저 객체 및 유틸 객체들을 미리 살펴보도록 하자.
✔ UserEntity
// user.entity.ts

import { Provider } from '../../auth/google-oauth2/utils/provider.enum';
import { Column, Entity, PrimaryGeneratedColumn } from 'typeorm';

@Entity({name:'users'})
export class User {
  @PrimaryGeneratedColumn()
  id: number;

  @Column({name:'firstname'})
  firstName: string;

  @Column({name:'lastname'})
  lastName: string;

  @Column({name:'email'})
  email: string;

  @Column({ nullable: true, default: null })
  password: string;

  @Column({ nullable: true })
  localRefreshToken: string;

  @Column({ type: 'datetime', nullable: true })
  localRefreshTokenExp: Date;

  @Column({ nullable: true })
  twoFactorAuthenticationSecret: string;

  @Column({ default: false })
  isTwoFactorAuthenticationEnabled: boolean;

  // 아래의 프로퍼티부터 소셜 로그인과 관련

  @Column({ default: false })
  isSocialAccountRegistered: boolean;

  @Column({ name: 'social_provider', default: Provider.LOCAL })
  socialProvider: string;

  @Column({ name: 'external_id', nullable: true, default: null })
  externalId: string;

  @Column({ name: 'social_refresh_token', nullable: true, default: null })
  socialProvidedRefreshToken: string;
}
처음엔 로컬 사용자와 각 소셜 서비스마다의 사용자의 테이블을 분리하는 구조를 계획했으나, 분리시킬 경우 일련의 처리를 수행할 시 불필요하게 테이블마다 접근을 해야하는 단점이 생길 것으로 판단하였다. 즉, 로컬과 소셜로그인을 통한 유저 테이블을 단일 테이블로 두기로 하였다.
✔ Provider
export enum Provider {
  LOCAL = 'local',
  GOOGLE = 'google',
  // 추후 다른 소셜 값들또한 작성하면 된다.
}
> GoogleAuthenticationService
서비스 로직에선 중복된 이메일로 가입된 계정이 존재하는지 판단하고, 만약 존재할 경우와 그렇지 않을 경우로 나누어 작업을 수행해주기로 하였다.
만약, 가입하려는 이메일이 이미 사용된 이메일일 경우 유저에게 "해당 이메일을 사용하는 계정이 이미 존재합니다" 라는 알림을 보냄과 동시에 다른 계정의 사용을 막을 수도 있을 것이다. 또한, 그와 반대로 동일한 이메일이여도 소셜 제공자가 다를 시 추가의 계정을 생성할 수 있게 할 수도 있을 것이다.
(클라이언트 측에서도 "localstorage"와 같은 저장소를 활용하여 해당 기기에 대한 최근 사용 계정들을 유저에게 표시할 수 있을 것이다)
이렇듯, "서비스의 방향성", "서비스의 계획안" 등에 따라 서로 다른 처리를 해줄 수 있을 것이고, 어떤 것이 옳고 그름에 대한 정답은 없다고 본다. 해당 문제에 대해선 아직 더 고민해 볼 필요가 많을 것 같고 (나아가서 계정 통합 등의 방법도 있을 것이다) 이번 포스팅에서 다루 긴 부족할 것 같다.
✔ GoogleAuthenticationService
// google-authentication.service.ts

import { Injectable } from "@nestjs/common";
import { SocialLoginInfoDto } from "./utils/socialLogin-info.dto";
import { UsersService } from "../../users/users.service";
import { Provider } from "./utils/provider.enum";
import { User } from "../../users/entities/users.entity";

@Injectable()
export class GoogleAuthenticationService {
  constructor(
    private readonly userService: UsersService,
  ) {}
  async validateAndSaveUser(socialLoginInfoDto: SocialLoginInfoDto): Promise<object | User> {
    const { email, refreshToken } = socialLoginInfoDto;

    const existingUser = await this.userService.findUserByEmail(email);

    if (existingUser) {
      if (existingUser.socialProvider !== Provider.GOOGLE) {
        return {
          existingUser: existingUser,
          msg: '해당 이메일을 사용중인 계정이 존재합니다.'
        }
      } else {
        const updateUserWithRefToken: User = await this.userService.updateSocialUserRefToken(existingUser.id, refreshToken);
        return updateUserWithRefToken;
      }
    }

    const newUser = await this.userService.createSocialUser(socialLoginInfoDto);
    const updateUser = await this.userService.updateSocialUserInfo(newUser.id);

    return updateUser;
  }
}
만약, existingUser가 존재한다면(true라면) 우린 특정 작업을 수행해야할 것이다.
여기서 주의할 점은 본인이 작성한 로직에 따라, validateAndSaveUser() 함수는 GoogleStrategy의 validate() 검증시에 실행되고 해당 검증은 "로그인 이후, redirect 이전"에 수행될 것이다. 즉, "로그인 시"에 수행된다는 것을 항상 염두해 두어야했다. (더 나은 로직이 분명 존재할 것이다. ㅠㅠ )
-
existingUser가 true임과 동시에 해당 유저의provider가GOOGLE이 아닌 경우
: 즉, 구글을 통한 소셜 가입 유저가 아닌 로컬 혹은 다른 소셜 서비스(kakao, ...) 가입 유저의 이메일 중복성을 체크하는 부분이다. -
provider가GOOGLE이 아닌 경우
: 해당 경우는 달리 말하면, 그냥 "로그인" 하였을 경우이다. 즉, 구글 로그인으로 생성된 유저가 구글 로그인을 수행하였을 때이다. (이것이 위에서 "로그인 시"를 강조한 이유이다...) 해당 경우에 그냥existingUser를 반환할 수 있지만, 우린 "refreshToken"을 구글로부터 발급받고 있으므로 로그인시마다 업데이트되어 제공되는 해당 토큰 값을 유저 테이블에서도 업데이트 시켜주어야할 것이다.
다음으로 if문을 벗어나, 로그인 시 사용된 이메일이 유저 테이블내에 존재하지 않는다면, 해당 계정을 생성하고 더하여 소셜 로그인을 사용하고 있는지에 대한 isSocialAccountRegistered 값을 true로 수정토록 한다.
✔ UserService
// user.service.ts

import { Injectable, } from '@nestjs/common';
import { UsersRepository } from './repositories/users.repository';
import { User } from './entities/users.entity';
import { ConfigService } from '@nestjs/config';
import { UpdateResult } from 'typeorm';
import { SocialLoginInfoDto } from '../auth/google-oauth2/utils/socialLogin-info.dto';

@Injectable()
export class UsersService {
  constructor(
    private readonly userRepository: UsersRepository,
    private readonly configService: ConfigService,
  ) {}

  async createSocialUser(socialLoginInfoDto: SocialLoginInfoDto): Promise<User> {
    const { email, firstName, lastName, socialProvider, externalId, refreshToken } = socialLoginInfoDto;

    const newUser: User = await this.userRepository.save({
      email: email,
      firstName: firstName,
      lastName: lastName,
      socialProvider: socialProvider,
      externalId: externalId,
      socialProvidedRefreshToken: refreshToken,
    });
    return await this.userRepository.save(newUser);
  }

  async findUserById(id: number): Promise<User> {
    return await this.userRepository.findOne({
      where: {
        id: id
      },
    })
  }

  async updateSocialUserInfo(id: number) {
    await this.userRepository.update(id, {
      isSocialAccountRegistered: true,
    })
    const updateUser = await this.userRepository.findOne({
      where: {
        id: id,
      },
    });
    return updateUser;
  }

  async updateSocialUserRefToken(id: number, refreshToken: string) {
    await this.userRepository.update(id, {
      socialProvidedRefreshToken: refreshToken,
    })
    const updateUser = await this.userRepository.findOne({
      where: {
        id: id,
      }
    });
    return updateUser;
  }

}
"Strategy" 에서 "GoogleAuthService" 로직을 호출하고, 동시에 "GoogleAuthService"에서 "UserService" 로직을 호출하는 구조이기 때문에 위와 같은 처리가 필요하였다.
Controller layer의 복잡성을 없애려고 위의 방법을 택했지만, 추후 더 고민해봐야할 부분이라 생각이 든다.
> SessionSerializer를 통한 세션 객체 사용
세션 사용 이유에 대한 설명은 위에 언급했으므로 생략하겠다.
세션 직렬화 및 역직렬화를 시작하기 전에 앱 단위 및 모듈 단위의 미들웨어 설정을 해주어야한다.
✔ main.ts
// main.ts

// `express-session` 미들웨어를 설치해 아래의 코드를 작성할 수 있다.
import * as session from 'express-session';
import * as passport from 'passport';

async function bootstrap() {
  const app = await NestFactory.create(AppModule);
  app.setGlobalPrefix("api");
  app.useGlobalPipes(new ValidationPipe({ transform: true }));
  app.use(
    session({
      secret: 'my-secret', // 세션을 암호화하기 위한 암호기 설정
      resave: false, // 모든 request마다 기존에 있던 session에 아무런 변경 사항이 없을 시에도 그 session을 다시 저장하는 옵션
	  // saveUnitialized: 초기화되지 않은 세션을 저장할지 여부를 나타낸다.
      saveUninitialized: false,
      // 세션 쿠키에 대한 설정을 나타낸다.
      cookie: {
        maxAge: 60000,  // 1 minute
        httpOnly: true,

      },
    })
  );
  // Passport를 초기화하는 미들웨어, 이를 통해 Passport의 인증/인가를 사용할 수 있다.
  app.use(passport.initialize());
  // Passport 세션을 사용하기 위한 미들웨어이다. 이를 통해 Passport는 세션을 기반으로 사용자의 인증 상태를 유지 관리 할 수 있다.
  app.use(passport.session());


bootstrap();
- why we set
resave == false?
: 변경 사항도 없는 세션이 매번 다시 저장되는 것은 비효율적이다. (일반 적으로 대부분의 상황에false이다. - why we set
saveUninitialized == false?
: 말그대로,uninitialized(초기화 되지 않은)상태의 세션도 저장할 것인가에 대한 옵션이다. 해당 옵션을true로 지정할 경우 세션 스토리지에 저장되는 세션의 수가 계속 증가할 것이고 결국 스토리지 사용량에 부하가 전달된다. 공식문서에선 로그인에 세션을 사용하는 경우, 해당 옵션을false로 할 것을 권장한다.
※ Info !
nestjs 공식문서에서 session에 대한 설명 중 다음과 같은 내용을 제시한다.

"기본적으로 제공되는 서버 측 세션 저장소는 의도적으로 프로덕션 환경에는 적합하지 않습니다. 대부분의 상황에서 메모리 누수가 발생하며, 단일 프로세스를 넘어서는 확장이 불가능하며, 주로 디버깅 및 개발 목적으로 사용됩니다. 자세한 내용은 공식 저장소에서 확인하세요."
공식문서에서 처음 제시하는 방법 및 현재 내가 수행하고 있는 세션 저장 방법은 기본적 제공되는 저장소를 이용한다. 이는, 프로덕션 환경에선 좋은 방법이 아니며, MysqlStore, RedisStore등 적절한 스토어를 설정하여 세션 객체를 저장하는 것이 좋을것이다.
동시에 "단일 프로세스"에 대해서 유효하고, 만약 "nginx" 등을 이용해 로드 밸런싱을 구현하여 다중 서버 환경("멀티 프로세스")을 사용한다면 세션을 기반으로 하는 데이터의 서버 간 "동기화" 문제가 발생할 수 있다.
위와 같은 내용에 대해 아직 공부해본적이 없기 때문에 깊이 다룰 순 없지만 이러한 상황에 대해서도 고려해볼 필요는 충분히 있을 것 같다. "세션" 자체가 이번 포스팅의 주제는 아니므로 이정도까지로 넘어가자.
✔ AuthModule (PassportModule session 추가 설정)
// auth.module.ts

@Module({
  imports: [

    // ...

    PassportModule.register({
      session: true,
    }),

	// ...

  ],
export class AuthModule {}
✔ SessionSerializer 💢중요!💢
우린 @nestjs/passport 에서 제공하는 PassportSerializer를 확장받아 "SessionSerializer" 클래스를 정의할 수 있다.
// serializer.ts

import { PassportSerializer } from "@nestjs/passport";
import { Injectable } from "@nestjs/common";
import { User } from "../../../users/entities/users.entity";
import { GoogleAuthenticationService } from "../google-auth.service";

@Injectable()
export class SessionSerializer extends PassportSerializer {
  constructor(
    private readonly googleAuthService: GoogleAuthenticationService,
  ) {
    super();
  }

  async serializeUser(user: User, done: (err: any, user?: any) => void): Promise<any> {
    console.log(user, "serializeUser"); // 테스트 시 확인
    done(null, user);
  }

  async deserializeUser(payload: any, done: (err: any, user?: any) => void): Promise<any> {
    const user = await this.googleAuthService.findUserById(payload.id);
    console.log(user, "deserializeUser"); // 테스트 시 확인
    return user ? done(null, user) : done(null, null);
  }
}
해당 SessionSerializer 클래스는 serializeUser와 deserilizeUser 메서드를 필수적으로 정의함으로써 사용할 수 있다.
이는 Passport의 직렬화(serilization)및 역직렬화(deserilization) 매커니즘을 구현하기 위해 사용되며, 세션 인증 기반에 필수적으로 사용된다.
serializeUser- 사용자 객체를 직렬화하여 세션에 저장한다. (직렬화 => 사용자의 상태를 세션에 캡슐화하는 과정)
- 세션은 일반적으로 서버(메모리, or DB)에 저장되고, 우리가 앞서 설정한 session 설정에 따라 식별자(Cookie)는 클라이언트로 전송된다.
serializeUser는 로그인 성공 후 호출되며, 사용자 식별자(일반적으로 ID 값)를 세션에 저장한다.
==> 하지만 우리의 경우엔user객체 자체를 식별자로 담아주었다.user.id를 식별자로 한 경우 제대로 된 요청 객체를 검증하지 못하였다.
-
deserializeUser-
세션에서 사용자 객체를 역직렬화하여 추출한다. (역직렬화 => 세션에 저장된 사용자 정보를 사용자 객체로 복원하는 과정)
-
(우리가 기존에 설정해 준 옵션에 따라서) 요청이 들어올 때마다 세션에서 사용자 정보를 검색하고, 해당 사용자에 대한 데이터베이스 조회 또는 기타 작업을 수행한다.
-
deserializeUser는 요청 핸들러에서req.user로 사용자에 대한 권한 부여 및 인가를 수행할 수 있게 해준다. ( 추후, 컨트롤러단에서 확인 ) -
이러한 역직렬화를 통해 인증된 사용자의 상태를 확인하고, 해당 사용자에 대한 권한 부여 및 인가를 수행할 수 있다.
// google-auth.service.ts

 async findUserById(id: number) {
   const user = await this.userService.findUserById(id);
   return user;
 }
-
> 요청 핸들러 (Controller) 및 테스트
이제 마지막으로 라우트 핸들러를 컨트롤러 단위에서 작성해보고, 우리가 생성한 전략, 가드, 서비스 로직을 테스트할 차례이다. Google-OAuth Login시에, 각 구현부들이 언제 개입하고 어떻게 적용되는지에 대해 확인해보자. (간단히 console.log()를 활용해 터미널에서 실행 과정및 순서를 알아볼 것이다)
✔ GoogleAuthenticationController
// google-auth.controller.ts

import { Controller, Get, Req, UseGuards } from "@nestjs/common";
import { GoogleAuthGuard } from "./guard/google-guard";

@Controller('auth/google')
export class GoogleAuthenticationController {
constructor() {}

  // login 라우트 핸들러
  @Get('/login')
  @UseGuards(GoogleAuthGuard)
  async handleLogin() {
    return {
      msg: 'Google Authentication',
    }
  }

  // login 성공 시, redirect를 수행할 라우트 핸들러
  @Get('/redirect')
  @UseGuards(GoogleAuthGuard)
  async handleRedirect(
    @Req() req: any,
  ) {
    return req.user;
  }

  // session 저장에 따른 유저 객체 인증/인가 테스트
  @Get('/status')
  async user(@Req() req: any) {
    if (req.user) {
    console.log(req.user, "Authenticated User");
      return {
        msg: "Authenticated",
      }
    } else {
    console.log(req.user, "User cannot found");
      return {
        msg: "Not Authenticated",
      }
    }
  }
}
✔ 로컬 환경에서 테스트해보기
-
http://localhost:4000/api/auth/google/login 으로 접속
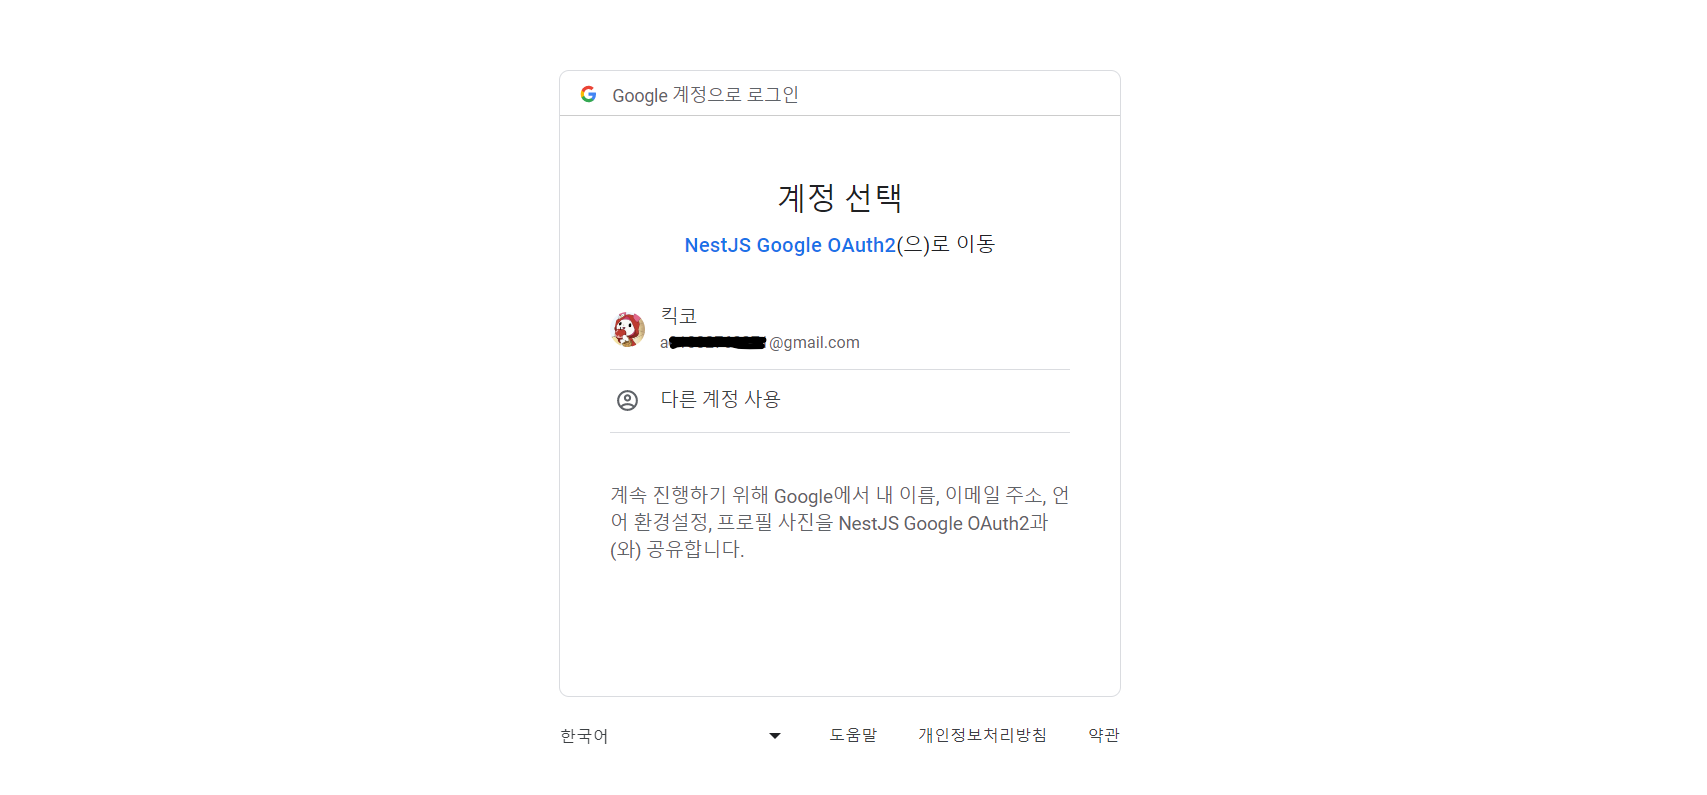
위 이미지의 구글 로그인 폼을 확인할 수 있을 것이다.
-
Redirect 주소로 이동 후, 로그인 성공
(리디렉트 주소로 이동할 경우, 위와 같은 주소를 확인할 수 있을 것이다.)
User {
  id: 3,
  firstName: '코',
  lastName: '킥',
  email: 'a****@gmail.com',
  password: null,
  localRefreshToken: null,
  localRefreshTokenExp: null,
  twoFactorAuthenticationSecret: null,
  isTwoFactorAuthenticationEnabled: false,
  isSocialAccountRegistered: true,
  socialProvider: 'google',
  externalId: '106********4944',
  socialProvidedRefreshToken: '1//0ed**************************7e1nXLfKlU0'
} strategy   // Strategy 먼저 수행
User {
  id: 3,
  firstName: '코',
  lastName: '킥',
  email: 'a****@gmail.com',
  password: null,
  localRefreshToken: null,
  localRefreshTokenExp: null,
  twoFactorAuthenticationSecret: null,
  isTwoFactorAuthenticationEnabled: false,
  isSocialAccountRegistered: true,
  socialProvider: 'google',
  externalId: '106********4944',
  socialProvidedRefreshToken: '1//0ed**************************7e1nXLfKlU0'
} serializeUser  // Strategy 수행 후 --> SessionSerializer 수행
간단히 터미널 창에서 각 로직을 수행시점을 확인해본 결과, 가드가 실행이되며 해당 전략 패턴이 수행되고 그 후, SessionSerializer 내부에서 정의한 직렬화 과정이 수행됨을 알 수 있다.
✔ User 테이블 확인
mysql> SELECT * FROM `auth-project`.users;
+----+-----------+----------+------------------------+--------------------------------------------------------------+---------------------+------------------------+-------------------------------+----------------------------------+---------------------------+-----------------+-----------------------+---------------------------------------------------------------------------------------------------------+
| id | firstname | lastname | email                  | password                                                     | localRefreshToken | localRefreshTokenExp | twoFactorAuthenticationSecret | isTwoFactorAuthenticationEnabled | isSocialAccountRegistered | social_provider | external_id           | social_refresh_token                                                                                    |
+----+-----------+----------+------------------------+--------------------------------------------------------------+---------------------+------------------------+-------------------------------+----------------------------------+---------------------------+-----------------+-----------------------+---------------------------------------------------------------------------------------------------------+
|  1 | 대규      | 남       | daegyu@gmail.com       | $2b$12$MH/6i6.3XtNc/tyJXMBpie14fBXSKaOAx6J9q0FzUE90B68PAfxuK | NULL                | NULL                   | NULL                          |                                0 |                         0 | local           | NULL                  | NULL                                                                                                    |
|  2 | 린이      | 코       | korin@gmail.com        | $2b$12$VH/usYi6JBSWt5E52zyp9uXVXZzVAA5jkXkAp.vW8XMuqXI2uwAdu | NULL                | NULL                   | NULL                          |                                0 |                         0 | local           | NULL                  | NULL                                                                                                    |
|  3 | 코        | 킥       | a******@gmail.com      | NULL                                                         | NULL                | NULL                   | NULL                          |                                0 |                         1 | google          | 1**********4944       | 1//0edRL**********************KlU0 |
+----+-----------+----------+------------------------+--------------------------------------------------------------+---------------------+------------------------+-------------------------------+----------------------------------+---------------------------+-----------------+-----------------------+---------------------------------------------------------------------------------------------------------+
(localRefreshToken, twoFactorAuthenticationSecret과 같은 local 유저의 인증과 관련된 컬럼들에 대한 내용은 이전 포스팅들을 참조 바랍니다. (Nestjs auth series => auth - advanced part ✔(click!))
Google Login을 통해 가입된 유저가 테이블에 잘 등록된 것을 확인할 수 있다. refresh-token과 같은 정보는 위에 보여지는 것 같이 raw 값 그대로 저장하는 것이 아닌, bcrypt와 같은 라이브러리를 사용해 해시 암호화를 거친 후 저장하는 것이 좋을 것이다.
✔ 유저 상태 인증 (through Session)
http://localhost:4000/api/auth/google/status 주소로 접속
-
세션-쿠키의 만료시간 "1분"이 지나지 않았을 경우 (쿠키 생성)
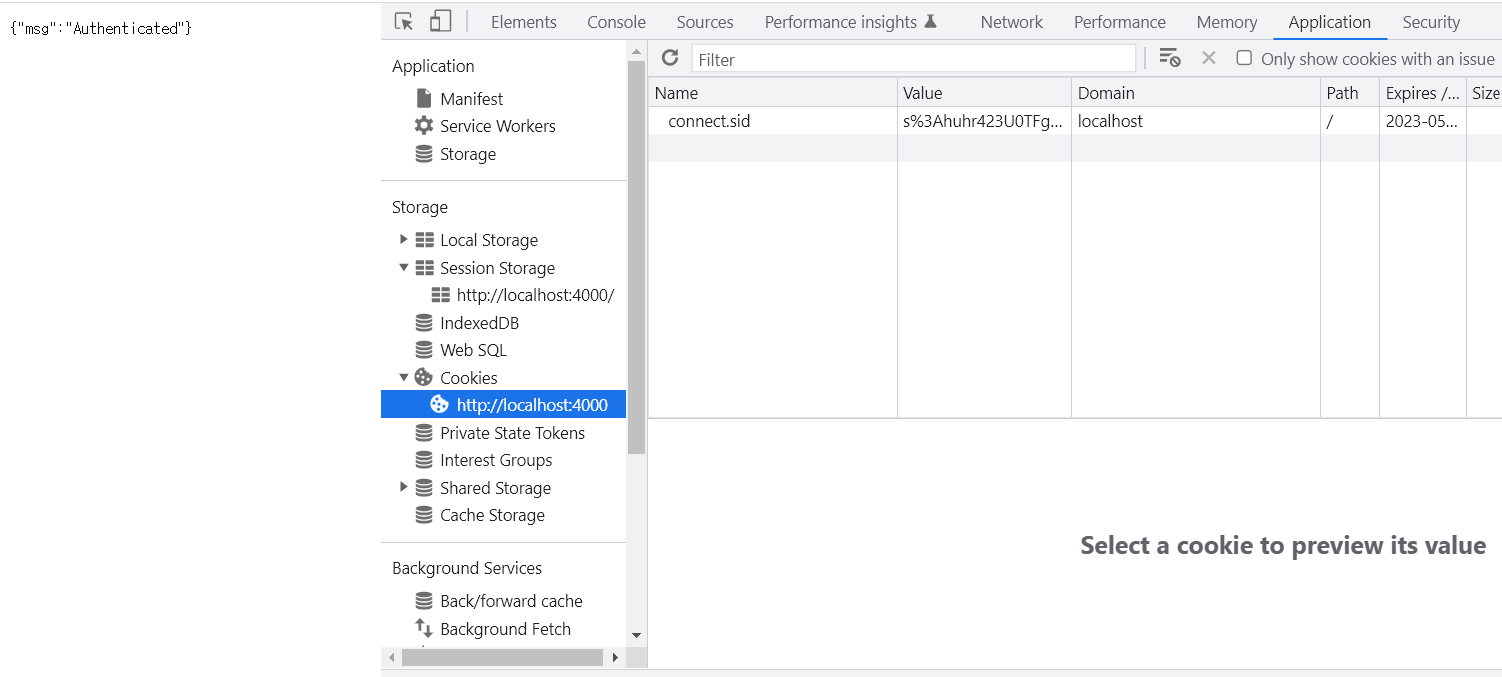
// SessionSerializer의 `deseriliazer` 함수 실행 User { id: 3, firstName: '코', lastName: '킥', email: 'a*******@gmail.com', password: null, localRefreshToken: null, localRefreshTokenExp: null, twoFactorAuthenticationSecret: null, isTwoFactorAuthenticationEnabled: false, isSocialAccountRegistered: true, socialProvider: 'google', externalId: '1********4944', socialProvidedRefreshToken: '1//0eeJIh3G*****************0n9L2nuPY' } deserializeUser // 컨트롤러의 http://localhost:4000/api/auth/google/status 내부 실행 User { id: 3, firstName: '코', lastName: '킥', email: 'a*******@gmail.com', password: null, localRefreshToken: null, localRefreshTokenExp: null, twoFactorAuthenticationSecret: null, isTwoFactorAuthenticationEnabled: false, isSocialAccountRegistered: true, socialProvider: 'google', externalId: '1********4944', socialProvidedRefreshToken: '1//0eeJIh3G*****************0n9L2nuPY' } Authenticated User // 인증된 유저 객체 반환됨 -
세션-쿠키의 만료시간 "1분"이 지났을 경우 (쿠키 사라짐)
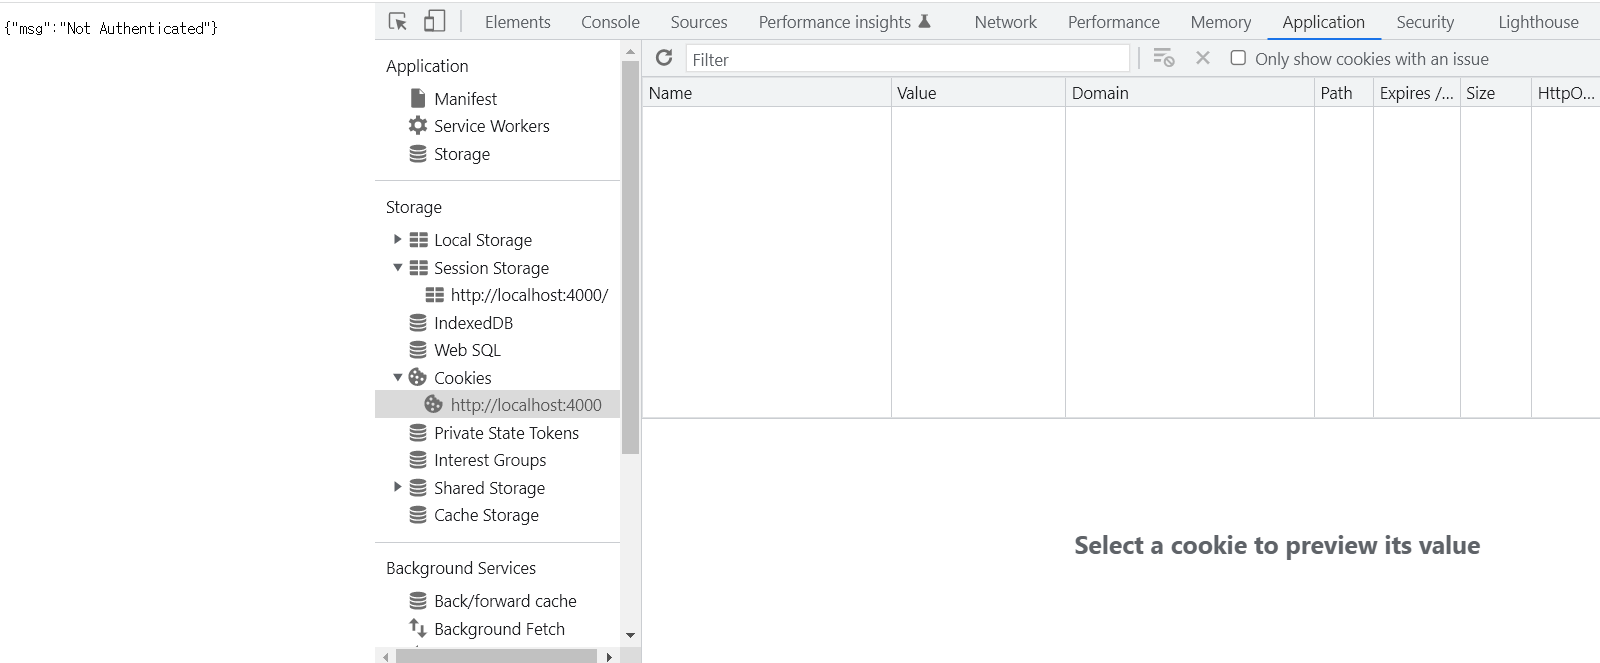
// SessionSerializer는 수행되지 않는다 (만료시간이 지났기 때문)
undefined User cannot found
==> 유저 인증에 실패생각정리
이번 포스팅은 지난 포스팅 "OAuth 2.0 개념 알아보기"에 이어서 Google OAuth와 nestjs를 활용하여 직접 소셜 로그인을 구현해보았다.
물론 위의 코드 내용들은 아직은 전체적 흐름을 간략히 잡는 수준 정도일 것이다. 실 서비스에서 소셜 로그인을 통한 유저관리를 하는 과정은 훨씬 복잡할 것이다. 앞서 서두에서도 언급했지만 기존 로컬 유저와 소셜 로그인을 통해 가입한 유저들을 어떻게 관리하느냐에 대한 문제는 계속해서 고민해볼 필요가 있을 것 같다.
또한, jwt가 아닌 "Session"을 통해 유저 인증을 처음 수행해보았고 세션을 통해 저장한 객체와 사용한 Passport 모듈을 어떻게 유연하게 동작하게끔 할 것인지에 대한 고민도 요구되었던 시간이었다.
그럼 이번 포스팅을 이렇게 마무리해보도록 하겠다.

안녀하세요 질문이 하나있습니다
클라이언트에서는 서버 api (http://localhost:4000/api/auth/google/login) 로 요청하면 될까요?
CORS 오류가 나서 어떻게 해결해야 되는건지 궁금합니다
nestjs 에는 이미 클라이언트 로컬주소가 enableCors 에 등록되어있는데 말이죠...