시작하기에 앞서
이전 포스팅에서 우린 권한 부여(인가 __Authorization)를 위한 RolesGuard를 직접 생성해 주었다. 해당 RolesGuard를 이번 시간엔 서비스와 컨트롤러에 적용해 보도록 하자.
적용해보기
AuthService 수정
기존 작성된 AuthService의 유저를 검증하는 validateUser() 내에서 생성한 payload객체에 authorities를 추가해 줄 필요가 있다.
// auth.service.ts

// ~~~ 생략

async validateUser(userDto: UserDto): Promise<{accessToken: string} | undefined> {
    let userFind: User = await this.userService.findByFields({
      where: { username: userDto.username}
    });
    const validatePassword = await bcrypt.compare(userDto.password, userFind.password);
    if(!userFind || !validatePassword) {
      throw new UnauthorizedException();
    }
    // don't give the password, it's not good way to authorize with JWT!
    const payload: Payload = {
        id: userFind.id,
        username: userFind.username,
        authorities: userFind.authorities,   //추가
    };
    return {
      accessToken: this.jwtService.sign(payload),
    }
  }
그냥 Payload에 authorites가 있으니 authorities를 추가해준다... 라고 생각해도 틀린것은 아니지만 그래도 정확히 짚고 넘어갈 필요가 있다.
우리는 인증된 유저를 통해 JWT 토큰을 불러올 때 아래와 같이
// auth.service.ts

async tokenValidateUser(payload: Payload): Promise<UserDto | undefined> {
    return await this.userService.findByFields({
      where: { id: payload.id }
    })
}Payload의 id를 통해 불러왔다. 즉 JwtStrategy내에서 tokenValidateUser()를 불러와 user객체를 던질 때
이렇게 하고 잠시 Postman으로 이동해 테스트 해보자.
Postman에서 권한체크 확인하기
- 토큰 얻기 (login을 통해)

우리가 앞서 controller에서 Post 방식으로 login시에 JWT 토큰을 리턴받게 하도록 설정하였으므로 위와 같이 Body에 회원가입된 유저 데이터를 실어보낸 후 토큰을 얻는다.
-
권한 체크하기 (authenticate를 통해)
 첫 번째 과정에서 얻은 JWT 토큰 값을 우리가 컨트롤러에서
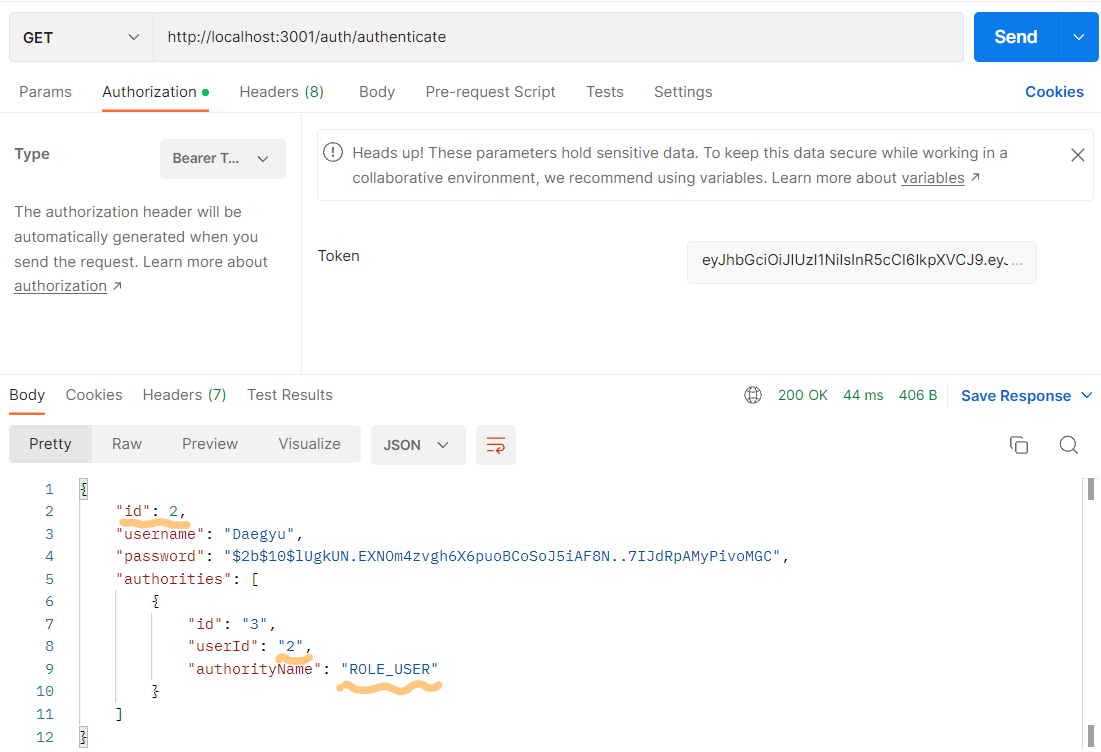
 GET방식으로 설정해 준authenticate경로로 들어가Authrotization을 누른 뒤Bearer Token타입으로 설정 후 (얻은 토큰 값을) 실어 보낸다.우린 위와 같은 과정을 통해 Body에서 해당 토큰 값을 지닌
user객체(데이터)를 얻을 수 있다.
1번 과정으로 잠깐 넘어가보면username이Daegyu인 것을 알 수 있고 이는 이번 포스팅에선 나오지 않지만 본인이 두 번째 아이디 값으로 회원등록한 데이터이다. 즉,id값이 2이다.
참고 사진 __MySQL user 테이블⬇⬇

우리가 앞전 포스팅에서 user_authority 테이블을 아래와 같이 설정하였고

위의 테이블을 보면 알 수 있듯이
user_id값이 1인 경우엔ROLE_USER와ROLE_ADMIN값을 모두 가질 수 있고,user_id값이 2인 경우엔ROLE_USER값만 가진다.이때
user_id값은 지난 번 포스팅에서 두 테이블(user,user_authority)의 두 columnid와user_id를 JOINT 시켜줌으로써user의id값과 매핑시킨 값이다.즉,
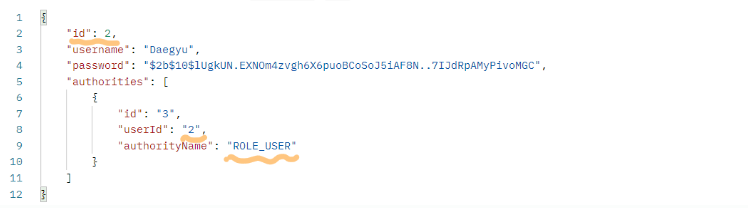
DaeGyu라는username을 가진 데이터를 입력했을 땐user의id가 2이므로user_authority의user_id또한 2로써 매핑된다.
위의 바디에 실린user데이터는 이러한 과정을 통해 얻게 된 값이다.여기서 한 가지 눈여겨 볼 특징이 하나 더 있다 !!
우리가 앞서 컨트롤러에서 아래와 같은 설정을 통해
@Get('/authenticate') @UseGuards(AuthGuard) isAuthenticated(@Req() req: Request): any { const user: any = req.user; return user; }user객체를 리턴하도록 하였는데 Postman을 통해서 불러온 결과user객체는 물론이고authorities내에 매핑된UserAuthority엔티티 (즉,user_authority테이블) 또한 함께 리턴되었다.이것 또한 위에 링크로 걸어둔 지난 포스팅에서 언급했었는데 우리가
User엔티티 내의authorities를 정의할 때@OneToMany(type => UserAuthority, userAuthority => userAuthority.user, {eager: true}) authorities?: any[];eager 속성을
true로 하였기 때문이다. 자세한건 포스팅을 참조 바 란다.
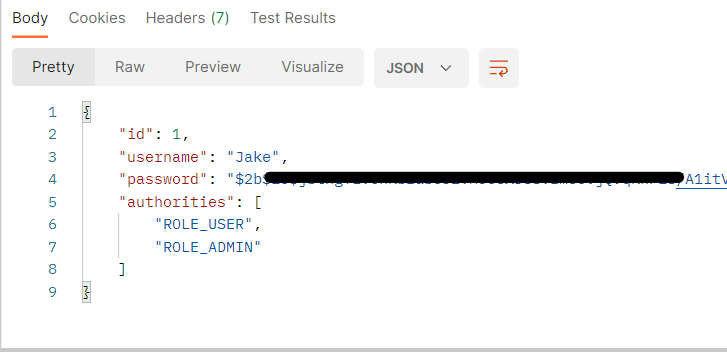
물론 user 테이블의 id값이 1에 해당하는 Jake라는
username을 가지는 데이터를 요청한다면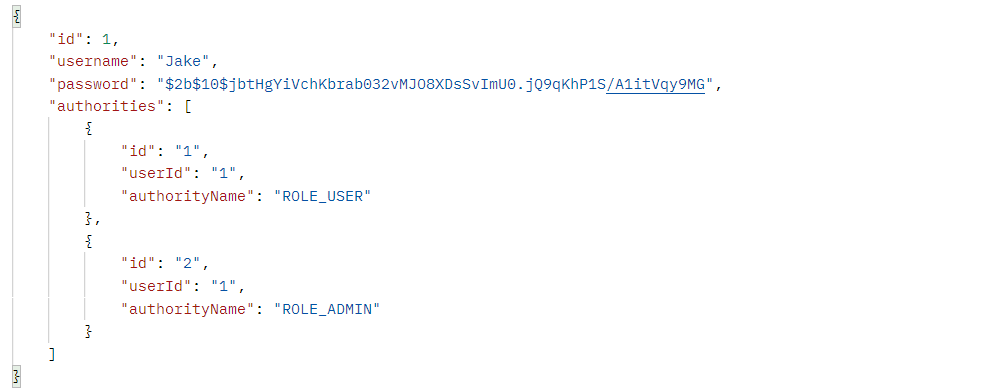 우리가 예상한대로
 ROLE_USER와ROLE_ADMIN권한을 모두 가진 객체가 리턴된다.
원하는 데이터만 불러오기
물론 위와 같이 authorites의 모든 값들 (즉, user_authority 테이블 내의 모든 컬럼들) 을 불러올 수도 있겠지만 우리는 권한(역할)에 해당하는 authorityName만 필요하다.
즉, 몇 가지 수정 작업을 통해 위를 구현해보도록 하자.
먼저 로그인 인증을 건드려야 할 것이다.
우린 로그인 인증을 하면서 db를 통해 조회(userFind())한 데이터를 payload에 담아 보낸 뒤 토큰을 얻게 된다.
그 과정을 우린 AuthService의 validateUser() 메서드 내에서 구현하였고 그 때 payload에 넘겨줄 user객체의 authorites의 값으로 authorityName만 실어서 보내주면 될 것이다.
코드를 통해 알아보면
// auth.service.ts

async validateUser(userDto: UserDto): Promise<{accessToken: string} | undefined> {
    let userFind: User = await this.userService.findByFields({
      where: { username: userDto.username}
    });
    const validatePassword = await bcrypt.compare(userDto.password, userFind.password);
    if(!userFind || !validatePassword) {
      throw new UnauthorizedException();
    }

    // 이곳에 어떠한 작업을 통해 userFind 객체 내의 authorityName을 수정해 payload
	//  로 넘겨줘야 할 것이다.

    const payload: Payload = {
        id: userFind.id,
        username: userFind.username,
        authorities: userFind.authorities,   //추가
    };
    return {
      accessToken: this.jwtService.sign(payload),
    }
  }
validateUser() 메서드 내의 payload 객체의 authorities가 기존의 user_authority 테이블 전체의 컬럼 값을 가지는 것이 아닌 authorityName값만 가지도록 실어보내는 일련의 작업을 수행해 주어야 할 것이다.
위의 작업을 converInAuthorites()라는 새로운 메서드를 생성해 구현해보자.
private convertInAuthorities(user: any): User {
  if(user && user.authorities) {
    const authorities: any[] = [];
    user.authorities.forEach(authority => {
      authorities.push({name: authority.authorityName});
    });
    user.authorities = authorities;
  }
  return user;
}
생성한 converInAuthorities()는 위에서도 언급하였듯이 validateUser() 내의 payload 생성 전에 아래와 같이 호출하여 줄 것이다.
this.convertInAuthorities(userFind);즉, validateUser() 내에서 정의한 db로 부터 조회한 userFind객체를 converInAuthorites(user: any)의 파라미터로 받는다. (user == userFind)
그럼, convertInAuthorities()를 해석해보자.
만약 db로부터 불러온 user와 user.authorities가 존재한다면 authorities라는 빈 배열을 생성한다. 해당 배열엔 push()를 이용해 user.authorities배열 내의 authorityName값을 object 형태로 넣어준다.
authorities 배열은 하나일 수도 있고 여러개일 수도 있다. 우리의 작업을 예시로 들자면 관리자와 사용자 둘 다의 권한이 있을 수도 있고, 사용자의 권한만 있을 수도 있는 것처럼 말이다. 그렇게 user의authorities를 돌면서 authorityName 값을
authorities.push({name: authority.authorityName});위와 같이 key: value의 object 형태로 빈 배열 authorities 안에 넣어준다. 그냥 authority.authorityName만이 아닌 key: value 형태로 받아줘야 우리가 컨트롤러에서 요청 시 "JSON" 객체로 리턴 받을 수 있다.
수정된 validateUser()
// auth.service.ts

async validateUser(userDto: UserDto): Promise<{accessToken: string} | undefined> {
    let userFind: User = await this.userService.findByFields({
      where: { username: userDto.username}
    });
    const validatePassword = await bcrypt.compare(userDto.password, userFind.password);
    if(!userFind || !validatePassword) {
      throw new UnauthorizedException();
    }
	/* 추가 !!  */
    this.convertInAuthorities(userFind);  // <---- 여기 !
    console.log(userFind)
    const payload: Payload = {
        id: userFind.id,
        username: userFind.username,
        authorities: userFind.authorities,
    };
    return {
      accessToken: this.jwtService.sign(payload),
    }
  }
이렇게 private한 메서드 convertInAutorities()를 호출하고 우리가 원하는 대로 userFind객체가 수정되었는지 console.log(userFind)를 통해 확인해보자.
User {
  id: 1,
  username: 'Jake',
  password: '$2b$10$jbtHgYiVchKbrab032vMJO8XDsSvImU0.jQ9qKhP1S/A1itVqy9MG',
  authorities: [ { name: 'ROLE_USER' }, { name: 'ROLE_ADMIN' } ]
}
다음과 같이 userFind한 User 객체가 우리가 원하는 값의 authorities값만 가지도록 수정이 된 것을 확인할 수 있었다.
기존에는 아래와 같았다.
User {
  id: 1,
  username: 'Jake',
  password: '$2b$10$jbtHgYiVchKbrab032vMJO8XDsSvImU0.jQ9qKhP1S/A1itVqy9MG',
  authorities: [
    UserAuthority { id: '1', userId: '1', authorityName: 'ROLE_USER' },
    UserAuthority { id: '2', userId: '1', authorityName: 'ROLE_ADMIN' }
  ]
}
두 번째로 토큰 인증(검증)하는 부분을 수정해준다.
위의 Postman을 통한 토큰 인증 요청 시 해당 user 객체는 아래와 같았다.
{
    "id": 1,
    "username": "Jake",
    "password": "$2b$10$jbtHgYiVchKbrab032vMJO8XDsSvImU0.jQ9qKhP1S/A1itVqy9MG",
    "authorities": [
        {
            "id": "1",
            "userId": "1",
            "authorityName": "ROLE_USER"
        },
        {
            "id": "2",
            "userId": "1",
            "authorityName": "ROLE_ADMIN"
        }
    ]
}
로그인 인증때와 마찬가지로 authorities에 실을 값은 Role을 담당하는 authorityName으로 충분하다. 수정해보자.
데이터를 플랫(flat)하게 보내준다는 뜻으로 flatAuthorities()라는 메서드를 생성해 작업해 줄 것이다.
과정은 앞 전 converInAuthorities() 생성과 동일하다.
private flatAuthorities(user: any): User {
  if(user && user.authorities) {
    const authorities: string[] = [];
    user.authorities.forEach(authority => {
      authorities.push(authority.authorityName)
    });
    user.authorities = authorities;
  }
  return user;
}
그 후 토큰을 인증하는 tokenValidateUser()에 넣어준다. 해당 메서드를 약간 수정해보자.
// 기존

async tokenValidateUser(payload: Payload): Promise<UserDto | undefined> {
   return await this.userService.findByFields({
     where: { id: payload.id }
   })
 }
// 수정
async tokenValidateUser(payload: Payload): Promise<UserDto | undefined> {
const userFind = await this.userService.findByFields({
where: { id: payload.id }
})
this.flatAuthorities(userFind); // <-- 여기
return userFind;
}생각정리 및 다음 포스팅 예고
이번 포스팅에선 postman을 활용하여 우리가 설정해 준 테이블과 JOIN에 따라 원하는 데이터가 어떠한 ROLE(권한)을 갖는지 확인해 보았고, 조금 더 플랫하게 데이터를 전달하도록 수정하는 작업도 해보았다.
다음 포스팅에선 컨트롤러를 통해 RolesGuard를 제대로 구현 및 적용해보도록 하자.