
시작하기에 앞서
지난 포스팅에서 우린 JWT 모듈을 통해 로그인 과정에서 인증을 통해 직접 토큰을 발급받아오는 과정을 수행해보았다.
이번 포스팅에선 "Passport" 라이브러리와 "Guard"를 이용해 받아온 토큰을 "검증(권한 인증)"하는 과정을 진행해보고자 한다. 우린 "Passport Strategy"와 "Guard"에 대해 알아보게 될 것인데 해당 구조들이 어떻게 토큰의 검증에 적용되는지를 중점으로 생각해보면 좋을 것 같다.
이전 포스팅과 마찬가지로 JWT를 통해 권한 인증및 인가로 이어지는 전체 구조적 과정을 위주로 설명하고자 한다. 즉, 각 키워드에 대한 상세한 설명은 꼭 개인적으로 찾아보면 좋을 것이다.
본격적 내용에 앞서 이번 포스팅에서 다룰 "흐름"을 먼저 언급하고자 한다. 사실 세세한 코드보다 이런 추상화 과정이 먼저 앞서야 한다고 생각한다.
-
이전 포스팅 -- 토큰이 발급되었다. (이전 포스팅 확인)
-
로그인(상태)이 필요한 API가 존재할 것이다.
-
해당 API에서 (서버에서) 어떻게 토큰을 검증하는지 살펴봐야 한다.
이러한 과정으로 진행해보고자 한다.
Passport Strategy
토큰에 대한 검증을 위한 Passport Strategy를 정의한다.
(참고로 Strategy는 Passport Middleware에서 사용하는 인증 전략이다.)
Passport 란?
Node.js에서 (Nest도 Node.js를 기반으로 만들어짐) Authenticate(인증)를 적용할 때에, 편하게 사용할 수 있는 미들웨어이다. 마치 출입국자의 출입국 심사 인증을 하는 "여권(passport)"의 역할과 같은데, 클라이언트가 서버에 권한을 요청을 할 자격이 있는지 인증(검증)할 때에 "passport" 미들웨어를 사용한다. Nest는 이러한 토큰 인증(검증)에 있어서 passport의 사용을 권장하고 있다.
Passport는 다음과 같은 단계를 시행하게 된다 :
-
Authenticate a user by verifying their "credentials" (such as username/password, JSON Web Token (JWT), or identity token from an Identity Provider)
: "자격 증명"(예: username, password, JWT or ID 제공자의 ID 토큰)을 확인하여 사용자를 인증한다. -
Attach information about the authenticated user to the Request object for further use in route handlers
: 인증된 사용자에 대한 정보를 라우트 핸들러에서 추가로 더 사용하기 위해 Request 객체에 첨부한다.
패키지 설치
For any Passport strategy you choose, you'll always need the @nestjs/passport and passport packages. Then, you'll need to install the strategy-specific package (e.g., passport-jwt or passport-local) that implements the particular authentication strategy you are building.
공식문서에 따르면 어떤 passport 전략을 사용하던 간에 항상 @nestjs/passport 패키지를 선수적으로 요한다고 말한다. 그 후, 특정 인증을 위해 우리가 필요로하는 특정 패키지를 설치하면 된다.
또한, 우리는 타입스크립트(Nest)로 코드를 작성하다보니 @types/passport를 불러와야 할 것이다.
패키지 설치 과정은 다음과 같다. 물론 묶어서 한 번에 설치해도 상관없다.
npm install --save @nestjs/passport

npm install --save passport-jwt

npm install --save @types/passport-jwt
각자의 로컬 환경은 서로 다르게 때문에 위의 과정대로 하는 것이 좋다.
Passport strategy 생성
이전 포스팅에서 "payload" 객체를 생성할 때 만들어 준 파일과 같은 폴더 내에서 진행하면 좋다.
// passport.jwt.strategy.ts

import { Injectable, UnauthorizedException } from "@nestjs/common";
import { PassportStrategy } from "@nestjs/passport";
import { ExtractJwt, Strategy, VerifiedCallback } from "passport-jwt";
import { AuthService } from "../auth.service";
import { Payload } from "./payload.interface";

@Injectable()
export class JwtStrategy extends PassportStrategy(Strategy){
  constructor(private authService: AuthService) {
    super({
      jwtFromRequest: ExtractJwt.fromAuthHeaderAsBearerToken(),
      ignoreExpiration: true,
      // secret key는 외부에 노출되면 안 되는 값이므로 환경변수나 config로 빼서 사용하는 것을 권장한다.
      secretOrKey: 'SECRET_KEY',
    })
  }

  async validate(payload: Payload, done: VerifiedCallback): Promise<any> {
    const user = await this.authService.tokenValidateUser(payload);
    console.log(user);
    if(!user) {
      return done(new UnauthorizedException({message: 'user does not exist'}), false)
    }
    return done(null, user);
  }
}
passport 또한 미들웨어의 구현이므로 @Injectable()을 데코레이터로 사용한다.생성한 JwtStrategy 클래스는 nest의 passport에서 제공하는 PassportStrategy를 따르도록 한다.
우린 토큰을 검증하는데 있어 AuthService를 사용할 것이므로 constructor에서 받아준다.
constructor 생성자 내에 super키워드를 주목해 볼 필요가 있다.
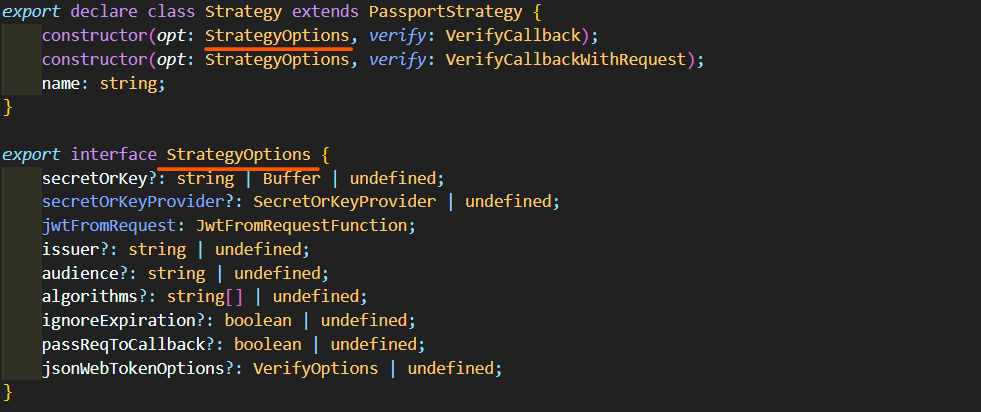
Vscode에선 확장자 모듈의 정의를 알아볼 수 있도록 기능을 제공한다. ctrl + 좌클릭 시 node_modules 내부에 제공되어 있는 해당 모듈의 객체를 알려준다.
이를 통해 우린 PassportStrategy의 생성자 파라미터로 StrategyOptions를 가진다는 것을 알 수 있고 즉, 우리가 생성한 JwtStrategy의 생성자 내부에서 super 키워드를 이용해서 부모 클래스 PassportStrategy의StrategyOptions를 불러 올 수 있게 된다.
constructor(private authService: AuthService) {
    super({
      jwtFromRequest: ExtractJwt.fromAuthHeaderAsBearerToken(),
      ignoreExpiration: true,
      // secret key는 외부에 노출되면 안 되는 값이므로 환경변수나 config로 빼서 사용하는 것을 권장한다.
      secretOrKey: 'SECRET_KEY',
    })
}-
jwtFromRequest: ExtractJwt.fromAuthHeaderAsBearerToken():
jwtFromRequest를 작성하는 방법 중 하나이다. jwt로 생성해서 클라이언트 측으로 보냈던 토큰 값을 Header에 Bearer Token 값으로 실어 보내야 (요청해야) 서버에서 해당 토큰을 받아 검사할 수 있다. -
ignoreExpiration: true: 토큰이 만료되었는지 검사를 하게 되는데 해당 속성을
ture로 설정하면 만료되더라도 바로 strategy에서 에러를 리턴하지 않도록 해준다. 만약false로 설정해주게 되면, 이는 JWT가 만료되지 않았음을 보증하는 책임을 Passport 모듈에 위임하게 된다. 즉, 만약 만료된 JWT를 받았을 경우, request는 거부되고401 Unauthorizedresponse를 보낼 것이다. -
secretOrKey: ~~: 토큰 발급에 쓰일 SECRET KEY를 의미한다. 이 키는 절대 외부에 노출되면 안 되는 만큼 위에 처럼 바로 명시하는 것 보단, 따로 환경변수나 config 모듈로 빼서 사용하는 것을 권장한다. 우리가 앞서 토큰을 생성할 때 명시하였던 SECRET KEY와 동일 값이어야 한다.
다음은 토큰이 유효한지 검증하는 validate() 메서드이다.
async validate(payload: Payload, done: VerifiedCallback): Promise<any> {
    const user = await this.authService.tokenValidateUser(payload);
    if(!user) {
      return done(new UnauthorizedException({message: 'user does not exist'}), false)
    }
    return done(null, user);
  }
꼭 그래야하는 건 아니지만 일반적으로 Passport Strategy엔 validate()메서드를 사용한다.
파라미터로는 Payload와 VerifiedCallback을 받도록 해주었다. 일단 이 설명은 조금 있다가 하도록 하고, 앞서 해줄 작업이 있다.
보다시피 우린 authService.tokenValidateUser()을 사용해서 유효한 토큰을 지닌 유저를 지정해줄 것인데, 아직 AuthService에서 해당 tokenValidateUser()라는 메서드를 설정해주지 않았다.
먼저 해당 메서드를 선언해주자.
// auth.service.ts

import { HttpException, HttpStatus, Injectable, UnauthorizedException } from '@nestjs/common';
import { UserDto } from './dto/user.dto';
import { UserService } from './user.service';
import * as bcrypt from 'bcrypt';
import { Payload } from './security/payload.interface';
import { User } from './entity/user.entity';
import { JwtService } from '@nestjs/jwt';


@Injectable()
export class AuthService {
 constructor(
   private userService: UserService,
   private jwtService: JwtService,
 ){}

 async registerUser(newUser: UserDto): Promise<UserDto> {
   let userFind: UserDto = await this.userService.findByFields({
     where: { username: newUser.username }
   })
   if(userFind) {
     throw new HttpException("Username already used!", HttpStatus.BAD_REQUEST);
   }
   return await this.userService.save(newUser);
 }

 async validateUser(userDto: UserDto): Promise<{accessToken: string} | undefined> {
   let userFind: User = await this.userService.findByFields({
     where: { username: userDto.username}
   });
   const validatePassword = await bcrypt.compare(userDto.password, userFind.password);
   if(!userFind || !validatePassword) {
     throw new UnauthorizedException();
   }
   // don't give the password, it's not good way to authorize with JWT!
   const payload: Payload = { id: userFind.id, username: userFind.username };
   return {
     accessToken: this.jwtService.sign(payload),
   }
 }

 async tokenValidateUser(payload: Payload): Promise<UserDto | undefined> {
   return await this.userService.findByFields({
     where: { id: payload.id }
   })
 }
}
다음과 같이 마지막에 tokenValidateUser()을 생성해준다. 매개변수로는 Payload 인터페이스를 받아올 것이고, 유효한 토큰을 가진 유저를 검증할때도 로그인 인증과 마찬가지로 UserService에서 정의한 findByFields()를 이용하여 유저의 객체를 생성한다. (Payload의 id값을 통해 찾아오도록 한다.)
다시 Passport Strategy로 돌아와 validate()구문을 살펴보자.
async validate(payload: Payload, done: VerifiedCallback): Promise<any> {
    const user = await this.authService.tokenValidateUser(payload);
    if(!user) {
      return done(new UnauthorizedException({message: 'user does not exist'}), false)
    }
    return done(null, user);
  }
앞서 생성한 AuthService의 tokenValidateUser(payload)를 통해 유효한 유저 객체를 받아오고, 해당 유저가 존재하지 않을 시 PassportStrategy에서 정의되어 있는 VerifiedCallback을 사용하여 에러반환과 false를 인자로 담아준다.
(인증된 유저 객체가 없으므로 user를 반환하는 두 번째 인자는 "false"로 지정)
그리고 만약 유저 객체가 (user) 있다면 마찬가지로 VerifiedCallback을 반환하는데 이땐 에러를 나타내는 첫 번째 인자엔 null을, 두 번째엔 user를 반환해 준다.
AuthModule에 등록
import { Module } from '@nestjs/common';
import { JwtModule } from '@nestjs/jwt';
import { PassportModule, PassportStrategy } from '@nestjs/passport';
import { TypeOrmModule } from '@nestjs/typeorm';
import { AuthController } from './auth.controller';
import { AuthService } from './auth.service';
import { User } from './entity/user.entity';
import { TypeOrmExModule } from './repository/typeorm-ex.module';
import { JwtStrategy } from './security/passport.jwt.strategy';
import { UserRepository } from './repository/user.repository';
import { UserService } from './user.service';

@Module({
  imports: [
    TypeOrmModule.forFeature([User]),
    TypeOrmExModule.forCustomRepository([UserRepository]),
    JwtModule.register({
      secret: 'SECRET_KEY',
      signOptions: {expiresIn: '300s'},
    }),
    // PassportModule 등록
    PassportModule,
  ],
  exports: [TypeOrmModule, TypeOrmExModule],
  controllers: [AuthController],
  // JwtStrategy를 provider로 등록
  providers: [AuthService, UserService, JwtStrategy],
})
export class AuthModule {}
AuthGuard 생성
가드 (Guard)
코드를 구현하기 전, 먼저 가드(Guard)에 대한 간단한 개념과 사용 이유에 대해 알고 넘어갈 필요가 있다.
일반적으로 node.js는 인증/인가의 작업에서 "미들웨어(MiddleWare)"를 활용한다.
하지만, Nest는 인가를 구현할 땐, "가드(Guard)"를 이용하도록 권장한다.
인증과 인가는 비슷하게 느낄 수도 있고, 실제로 연장선 상에 위치하지만 개별적으로 다른 의미를 지니고 있다.
인증과 같은 경우는 요청자가 자신이 누구인지 증명하는 과정이다. 우리가 여태껏 구현해왔던 것 처럼, 어떠한 요청마다 헤더에 JWT 토큰을 실어 보내고 이 토큰을 통해 요청자가 라우터에 접근 가능한 지 서버는 확인하게 된다. 이러한 검증 과정이 "인증(Authentication)"이라고 보면 된다.
반면에 "인가(Authorization)"는 인증을 통과한 유저가 (즉, 검증을 마친) 요청한 기능을 사용할 권한이 있는지를 판별하는 것을 말한다.
퍼미션, 롤, ACL 과 같은 개념을 사용하여 유저가 가지고 있는 속성으로 리소스(자원) 사용을 허용할 지 판별한다. 바로 이러한 인가과정을 "가드"를 통해 구현하는 것이 Nest의 방향성이다.
그런데 왜 "인가"는 "인증"처럼 "미들웨어(Middleware)"로 구현하지 않을까?
하지만 미들웨어는 실행 컨텍스트(ExecutionContext)에 접근하지 못한다. 단순히 자신의 일만 수행하고 next()를 호출한다. 즉, 다음에 어떤 핸들러가 실행될 지 알 수 없다. 이에 반해 가드는 실행 컨텍스트 인스턴스에 접근할 수 있어, 다음 실행될 작업을 정확히 알고 있다.
requset(요청)와 response(응답)의 정확한 지점에 이 가드를 삽입하여, 요청에 대한 거부, 혹은 승인을 할 수 있게 되는 것이다. 어쩌면 "가드" 또한 "미들웨어"의 역할과 한 부류라고 볼 수 있긴 하지만 특정 역할에 있어서는 조금 다르다고 볼 수 있다.
가드는 미들웨어 바로 이후에 실행되어 클라이언트의 요청을 넘겨받아 "2차 인증"을 한다고 봐도 무방하다.
AuthGuard 만들어주기
import { ExecutionContext, Injectable } from "@nestjs/common";
import { AuthGuard as NestAuthGuard } from "@nestjs/passport";
import { Observable } from "rxjs";

@Injectable()
export class AuthGuard extends NestAuthGuard('jwt') {
  canActivate(context: ExecutionContext): boolean | Promise<boolean> | Observable<boolean> {
      return super.canActivate(context);
  }
}
nestjs의 passport 모듈에서 제공하는 AuthGuard를 사용한다.
export declare const AuthGuard: (type?: string | string[]) => Type<IAuthGuard>;AuthGuard는 함수로 정의되어져 있고, 매개변수로 string 형태로 사용할 타입인 jwt를 받는다.
그리고 모든 가드는 "canActivate"함수를 구현해야 한다. canActivate는 요청 여부에 대한 값을 true, false로 반환해야 한다.
만약 true가 리턴된다면 우리는 해당 request를 통과시키고, 그렇지 않다면 통과시키지 않을 것이다.
컨트롤러에 적용
// auth.controller.ts

import { Body, Controller, Get, Post, Req, Res, UseGuards } from '@nestjs/common';
import { Request, Response } from 'express';
import { AuthService } from './auth.service';
import { UserDto } from './dto/user.dto';
import { AuthGuard } from './security/auth.guard';

@Controller('auth')
export class AuthController {
  constructor(private authService: AuthService){}

  @Post('/register')
  async registerAccount(@Req() req: Request, @Body() userDto: UserDto): Promise<any>{
    return await this.authService.registerUser(userDto);
  }

  @Post('/login')
  async login(@Body() userDto: UserDto, @Res() res: Response): Promise<any> {
    const jwt =  await this.authService.validateUser(userDto);
    res.setHeader('Authorization', 'Bearer '+ jwt.accessToken);
    return res.json(jwt);
  }


  // 가드(AuthGuard) 추가해주기
  @Get('/authenticate')
  @UseGuards(AuthGuard)
  isAuthenticated(@Req() req: Request): any {
    const user: any = req.user;
    return user;
  }
}
추가된 @Get방식의 라우터는 단순해보이지만 생각해봐야 할 것들이 많다.
먼저 isAuthenticated()는 JWT 토큰을 실어보낸 로그인 시, 인증을 확인하는 라우터이다.
isAuthenticated()메서드는 파라미터로 Request를 받고, 해당 Request의 user값을 리턴받는다. 해당 user의 값을 읽어오는데 있어서 일련의 절차가 수행되는데 알고 넘어갈 필요가 있다.
user은 데코레이터로 추가한 @UseGuards(AuthGuard)를 통해 불러와진다. 그럼 잠시 AuthGuard로 가보자.
// auth.guard.ts

import { ExecutionContext, Injectable } from "@nestjs/common";
import { AuthGuard as NestAuthGuard } from "@nestjs/passport";
import { Observable } from "rxjs";

@Injectable()
export class AuthGuard extends NestAuthGuard('jwt') {
  canActivate(context: ExecutionContext): boolean | Promise<boolean> | Observable<boolean> {
      return super.canActivate(context);
  }
}
컨트롤러의 추가한 라우터에서 적용한 @UseGuards(AuthGuard)는 조금 풀어서 작성해보자면 @UseGuards(AuthGuard('jwt'))와 동일하다. 즉, passport-jwt strategy를 채택하도록 하는 것이다. (canActivate한지 확인)
그 후 PassportStrategy를 상속받은 JwtStrategy가 클래스 내부에서 선언해 준 validate()메서드를 통해 (아래 코드 참조 ⬇⬇)
// passport.jtw.strategy.ts
// ~~~~

async validate(payload: Payload, done: VerifiedCallback): Promise<any> {
    const user = await this.authService.tokenValidateUser(payload);
    if(!user) {
      return done(new UnauthorizedException({message: 'user does not exist'}), false)
    }
    return done(null, user);
  }
자동으로 user객체를 생성해주고, 이 때 return done(null,user)를 수행하면서, 앞서 추가한 isAuthenticated()라우터의 매개변수로 받아준 Request에 할당해준다.
즉, 우린 이렇게 라우터에서 req.user를 리턴받을 수 있고, 그에 따라 토큰 인증을 확인할 수 있는 것이다.
⁕ 여기서 의문 ?
분명히 AuthGuard에는 JwtStrategy를 찾아낼 수 있는 어떠한 의존성 주입 구문도 없다. 그런데 어떻게 AuthGuard는 JwtStrategy를 찾고, 해당 Strategy를 적용하는 것일까?
: @UseGuard(AuthGuard)로 데코레이팅된 컨트롤러가 실행되면 AuthGuard는 자동으로 PassPortStrategy를 상속받은 JwtStrategy를 찾아서 로직을 수행한다.
여기서 AuthGuard가 JwtStrategy를 찾을 수 있는 이유는 JwtStrategy가 AuthModule의 provider로 등록 되어 있고, "@nestjs/passport"의 내부 로직에 의해 PassportStrategy를 상속받은 JwtStrategy를 찾아낸다.
다음 포스팅 예고 ...
이번 포스팅에선 "Passport"를 사용하여 토큰을 인증하고, "Guard"를 사용하여 해당 인증(Authentication)을 확인하는 작업까지 하였다. 이러한 "Guard"는 "인가(Authorization)"를 가능케 하는데, 다음 포스팅에선 유저의 역할(roles)에 따른 "인가",즉 권한 관리 및 부여를 알아보도록 하겠다.