포스팅을 시작하면서 ...
이번 포스팅은 "Javascript - 비동기 처리" 의 마지막 개념이자 "꽃"이라고 할 수 있는 "async & await"에 관한 내용이다.
callback , Promise를 거쳐 마지막 단계인 async-await으로 실제적으로 3가지 키워드가 어떻게 연결이 되는지에 대해 중점적으로 알아가고자 한다. 사실, callback 함수에서 Promise로 넘어가면서 이런생각이 들었었다.
"Promise의 then으로도 충분히 깔끔하고 편한 코드 같은데,,, 굳이 async-await을 또 배워서 더 편하게 쓰는게 의미가 있을까?"
아직 복잡한 코드를 작성해 본 적이 없고 async-await에 대해서 배워보지 않아서 그런 생각을 할 수 있지만 괜히 저런 생각을 해 보았다. 그래서 작성자 본인은 이번 시간을 통해 도대체 async-await이 Javascript-비동기처리에 있어서 왜 좋은가? 에 대해 알아보고자 한다.
async-await
- async await의 등장
: async-await 이란 키워드는 ECMAScript 2017이후부터 추가된 개념이다.
이 기능들은 기본적으로 비동기 코드를 쓰고 Promise를 더 읽기 더 쉽도록 만들어준다. 비동식 코드는 구식 동기코드를 읽기 쉽게 만들기 때문에 학습할 가치가 있다.
MDN - async&await 참조
async-await의 등장배경
async-await이란 키워드가 개발자들을 힘들게 하려고 그냥 나온 키워드는 아닐 것이다. 도대체 async-await은 왜 등장했고 어떤 매력으로 쓰이는 것일까?
간단한 코드를 통해 알아보자.
( 사전지식 : callback function, Promise & then )
여기 한 타이머가 있다. 이 타이머를 이용해 1초 뒤 작업을 수행하고 또 1초 뒤 작업을 수행해나가는 식의 타이머라고 하자. 저번 callback 함수 시간에 배웠듯이 어떠한 코드진행을 무조건적으로 "순차적"으로 하고 싶다면 우린 "callback function"을 이용한다고 하였다.
timer(1000, function () {
  console.log("작업");
  timer(1000, function () {
    console.log("작업");
    timer(1000, function () {
      console.log("작업");
    });
  });
});
전체적 코드 진행이 이런식으로 흘러 갈 것이다. 처음 "callback"포스팅에서도 언급했듯이 여기서 작업을 몇번만 더 수행하면 더욱 보기싫은 코드가 만들어질 것이다.
그렇다. "callback hell"이 되는 것이다.
이런 문제를 해결해나가기 위해 우린 "Promise"를 배웠고 만약 timer란 함수가 Promise를 return한다면 then이라는 method를 이용해서 비동기 처리를 하였다.
timer(1000)
  .then(() => {
    console.log("작업");
    return timer(1000);
  })
  .then(() => {
    console.log("작업");
    return timer(1000);
  })
  .then(() => {
    console.log("작업");
  });
처음 callback함수와 같은 기능을 하는 코드이지만 timer가 Promise를 return한다는 전재하에 then메서드를 이용해서 훨씬 깔끔하고 보기 좋은 코드를 작성할 수 있었다.
솔직히, 진짜 솔직한 생각으로는 아직 제대로 된 코드를 짜본 적이 없어서 그럴줄 모르지만 위 코드가 아직도 매우 깔끔하고 예뻐보인다. ( 죄송합니다. )
그렇지만, 프로그래머 형님들께선 then 메서드안에서 callback함수를 받고 값을 return하는 저런 형식의 구문조차 복잡하다 느끼기 시작했다. 흔히 일컫는 'then hell'에 빠진 것이다.
이러한 문제를 해결하고자, 즉 then과 그 안의 function, 그 안의 return 구문없이 조금 더 동기적코드처럼 보이게끔 코드를 짜고자 async-await이 등장하게 된다.
async-await 어떤 모습일까?
위 타이머 함수를 async-await구문으로 진행하여 보자.
그 전에, async-await을 사용함으로써 어떠한 코드 "모습"을 원하는지 한번 보자.
timer(1000)
console.log('작업')
timer(1000)
console.log('작업')
timer(1000)
console.log('작업')
이처럼 비동기코드도 "동기적" 으로 움직이길 원한다.
단계 1
그러기 위해선 실행할 함수앞에 "await"를 붙여준다.
await timer(1000)
  	console.log('작업')
await timer(1000)
  	console.log('작업')
await timer(1000)
  	console.log('작업')
단계 2
await을 붙여준다고 해서 비동기 처리가 되는 것이 아니다. 이 await란 키워드는 어떠한 "함수"안에서 실행되어야 하고 그 함수는 async로 시작되어야한다.
async function run(){
    await timer(1000)
    	console.log('작업')
    await timer(1000)
    	console.log('작업')
    await timer(1000)
    	console.log('작업')
}
run();
만약 function앞에 async가 없다면 "Error"가 실행된다. 항상 await는 async함수 안에서만 "유효" 하다는 것을 의미한다.
자, 이제 Promise.then을 이용한 코드와 완전히 똑같은 기능을 하는 또 하나의 코드가 완성이 되었다.
async-await 어떻게 작성할까?
Promise 함수를 통해 async-await으로 넘어가보도록 하자.
Promise
먼저 다음은 Promise를 활용한 타이머 수행 코드이다.
function timer(time) {
  return new Promise((resolve) => {
    setTimeout(() => {
      resolve(time);
    }, time);
  });
}
timer(1000).then(function (time) {
  console.log("time:" + time);
});
결과는 다음과 같다.

여기서 이 타이머에 1초를 더한 지연 시간을 갖고 싶다고 하면 어떻게 코드를 짜야할까?
function timer(time) {
  return new Promise((resolve) => {
    setTimeout(() => {
      resolve(time);
    }, time);
  });
}
timer(1000)
  .then(function (time) {
    console.log("time:" + time);
    return timer(time + 1000);
  })
  .then(function (time) {
    console.log("time:" + time);
    return timer(time + 1000);
  })
  .then(function (time) {
    console.log("time:" + time);
  });
결과를 확인해보면 (크기가 작아서 양해바랍니다.)
.gif)
다음과 같이 순차적으로 1초뒤, 2초뒤, 3초뒤 실행이된다.
이것은 뭐 다들 아시다시피 저번 포스팅에서 알아본 Promise.then( )코드이다.
여기서 코드의 시작과 끝을 알려주는 코드를 호출하고 싶다고 하자.
일반적인 생각으로는 다음과 같이 코드를 짤 것이다.
function timer(time) {
  return new Promise((resolve) => {
    setTimeout(() => {
      resolve(time);
    }, time);
  });
}
console.log("start");
timer(1000)
  .then(function (time) {
    console.log("time:" + time);
    return timer(time + 1000);
  })
  .then(function (time) {
    console.log("time:" + time);
    return timer(time + 1000);
  })
  .then(function (time) {
    console.log("time:" + time);
  });
console.log("end");
(GIF 파일로 업로드 못한 점 양해)
결과를 확인해보니 time출력전에 start와 end가 모두 출력된 것을 확인할 수 있다.
우리가 원하는 것은 start가 호출된 후 time값이 호출되고 그 후 마지막으로 end가 나오는 것이다.
하지만 Promise를 return하는 then메서드안의 구문들은 비동기 처리되므로 다른 구문들이 전부 호출된 후 마지막으로 호출하게 된다.
즉, 우리가 원하는 값을 얻고 싶으면
console.log("start");
timer(1000)
  .then(function (time) {
    console.log("time:" + time);
    return timer(time + 1000);
  })
  .then(function (time) {
    console.log("time:" + time);
    return timer(time + 1000);
  })
  .then(function (time) {
    console.log("time:" + time);
    console.log("end");     // 마지막 then안에 end를 호출한다.
  });
이런식으로 console.log("end")의 위치를 수정할 수 있다.

처음과 끝에 start ,end 가 잘 나오는 것을 확인하였다.
이것이 Promise를 쓰는 기본적인 방법이다.
그럼 끝난 것일까?
물론 위의 방법도 괜찮은 방법일 수도 있다. 하지만 얼핏 보기에도 console.log("end")의 위치도 뭔가 깔끔한 위치가 아닌거 같고 흔히 말하는 "then hell"이 계속해서 생기고 있으므로 지저분해 보인다.
async-await
async-await을 사용하여 위의 코드를 정리해보자.
function timer(time) {
  return new Promise((resolve) => {
    setTimeout(() => {
      resolve(time);
    }, time);
  });
}
// console.log("start");
// timer(1000)
//   .then(function (time) {
//     console.log("time:" + time);
//     return timer(time + 1000);
//   })
//   .then(function (time) {
//     console.log("time:" + time);
//     return timer(time + 1000);
//   })
//   .then(function (time) {
//     console.log("time:" + time);
//     console.log("end");
//   });
console.log("start");
let time = await timer(1000);
console.log("time:" + time);
time = await timer(time + 1000);
console.log("time:" + time);
time = await timer(time + 1000);
console.log("time:" + time);
console.log("end");
이런 식으로 진행하여 Promise.then( )과 Promise를 return하는 구문 없이도 "await"라는 키워드를 이용하여 Promise를 자동 return할 수 있게끔 만들 수 있다.
await란 키워드만 썼는데 자동으로 Promise 형태로 나온다니... 이래서 바로 async-await을 "syntatic sugar"라고 하는 이유이다.
근데 위 코드를 실행하면 값이 원하는 대로 호출이될까???

다음과 같이 " await is only valid in async functions "라는 문구와 함께 Error가 나왔다.
해석하자면 "await 키워드는 async함수 안에서만 유효하다"는 뜻이다.
즉, 우리에겐 await를 감쌀 수 있는 "함수(function)" 가 필요하고, 특히나 "async"가 붙은 함수가 필요하다는 것이다.
function timer(time) {
  return new Promise((resolve) => {
    setTimeout(() => {
      resolve(time);
    }, time);
  });
}
async function run() {      // async 함수로 감싸줌
  console.log("start");
  let time = await timer(1000);
  console.log("time:" + time);
  time = await timer(time + 1000);
  console.log("time:" + time);
  time = await timer(time + 1000);
  console.log("time:" + time);
  console.log("end");
}
run();
이렇게 await구문들을 async function안에 넣어줌으로써 Promise로 작성한 결과와 동일한 결과를 얻을 수 있게 된다.
.gif)
(!! 화질 흐린거 수정가능하신 분 부탁드릴게요 ㅠㅠ GIF 파일 크기 조절 시 화질 최적화하는 방법을 모르겠습니다....)
조금 더 복잡한 과정
여기서 끝마치지 말고 조금 더 작업을 추가해보자.
start와 end로 닫혀있는 작업을 감싸는 또다른 "parent start"와 "parent end"를 출력하는 코드를 작성해보자.
일반적인 생각으로는 (물론 작성자 본인의 생각일수도 있음)
async function run() {
  console.log("start");
  let time = await timer(1000);
  console.log("time:" + time);
  time = await timer(time + 1000);
  console.log("time:" + time);
  time = await timer(time + 1000);
  console.log("time:" + time);
  console.log("end");
}
console.log('parent start');
run();
console.log('parent end');
이렇게 async 함수 run을 호출하는 코드 run( )의 위, 아래로 parent start와 parent end를 작성하면 될 것처럼 보이지만 결과는 그렇지 않았다.

(에러구문은 무시 - code 에러가 아님)
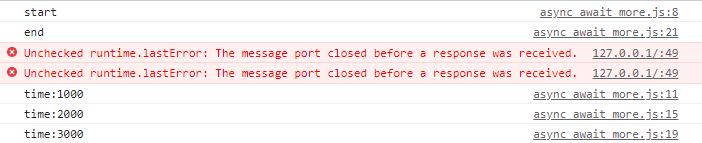
다음과 같이 parent start는 먼저 출력되었지만 parent end는 가장 마지막이 아닌 start뒤에 바로 출력된 것을 알 수 있다.
그 뜻은 parent end가 run( )함수안의 await를 기다리지 않고 바로 호출되었다는 것을 의미한다.
console.log("parent start");
//run();
console.log(run());   // 출력
console.log("parent end");
이유를 알아보기 위해 다음과 같이 async함수인 run( )을 직접 출력해보면

다음과 같이 Promise를 return한다는 것을 알 수 있고 즉, 비동기적으로 작동된다는 것이다.
그렇다면 "paraent end"를 가장 마지막에 출력시키려면 어떻게 해야하는 것일까?
우리는 위의 작업을 통해 async가 앞에 붙은 run 함수가 Promise를 return한다는 사실을 알았고 그것이 의미하는 점은 run( )앞에 또 await를 붙일 수 있다는 것을 시사한다.
console.log("parent start");
await run();            //await를 붙임
console.log("parent end");
결과를 확인해보면 제대로 작동할 것 같지만

아까전과 같이 await가 async구문안에서만 유효하다는 메시지와 함께 에러가 뜬다.
run 함수앞에 async 키워드를 추가해주었고 그에 따라서 await를 붙여 호출하므로 작동이 될 법도 한데 에러가 뜬 것이다.
그렇다. 아무리 run 함수가 async구문이긴 하여도 호출하는 과정에서 await run( );이 async로 감싸져 있는 것이 아니라면 에러가 뜨게 된다.
모든 await는 무조건적으로 async안에 감싸져 있어야한다.
async function run() {
  console.log("start");
  let time = await timer(1000);
  console.log("time:" + time);
  time = await timer(time + 1000);
  console.log("time:" + time);
  time = await timer(time + 1000);
  console.log("time:" + time);
  console.log("end");
}
async function run2() {         // run2함수 추가
  console.log("parent start");
  await run();
  console.log("parent end");
}
run2();
앞전에 언급했던 방법대로 await run( );을 감싸주는 또다른 함수( run2 )를 만들고 그 앞에 async를 붙여주어야 한다.
결과를 확인해보면
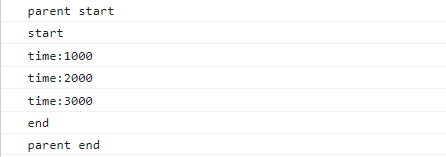
원하는 순서대로 잘 출력이 되었다.
여기서 그치지 말고 우린 궁금한 점이 생겨야 한다.
function timer(time) {
  return new Promise((resolve) => {
    setTimeout(() => {
      resolve(time);
    }, time);
  });
}
timer(1000)
  .then(function (time) {
    console.log("time:" + time);
    return timer(time + 1000);
  })
  .then(function (time) {
    console.log("time:" + time);
    return timer(time + 1000);
  })
  .then(function (time) {
    console.log("time:" + time);
  });
앞전의 코드로써 1초씩 시간지연이 증가하는 타이머를 오로지 Promise구문으로 작성한 코드이다.
Promise.then( )을 사용하였고 resolve안의 time을 then안에서 return해줌으로써 1초 늦은시간을 만들어주는 형식이였다.
즉, return을 사용해서 "Promise Chaining"을 이어나간 것이다.
그렇다면 async 함수또한 Promise를 return하니까 time자체를 return할 수도 있지않을까?
바로 코드를 작성해보면
function timer(time) {
  return new Promise((resolve) => {
    setTimeout(() => {
      resolve(time);
    }, time);
  });
}
async function run() {
  console.log("start");
  let time = await timer(1000);
  console.log("time:" + time);
  time = await timer(time + 1000);
  console.log("time:" + time);
  time = await timer(time + 1000);
  console.log("time:" + time);
  console.log("end");
  return time;               // time을 return
}
async function run2() {
  let 리턴값 = await run();             // 리턴값 받음
  console.log(리턴값 + " -> 리턴 값입니다.");
}
run2();
다음과 같이 run함수 안에서의 return값을 run2에서 받게 되고 , 결과를 확인해보면
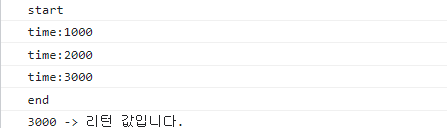
마지막 출력값과 같이 return된 time을 받을 수 있게 된다.
다음 포스팅에선 ...
이번 포스팅은 async-await이란 무엇이고 Promise와 어떻게 연관이 되어있고 또한 작성법은 어떻게 다른지에 대해 기초적인 부분을 알아보았다.
사실 여기서 마무리 짓지 않고 계속해서 포스팅을 작성해나가는 중 async-awiat의 예외처리 부분에 있어 다루고자 하는 내용이 상당히 많고 길어질 것으로 생각해 여기서 잠깐 자르고자 한다.
그럼 다음 포스팅에서 async-await의 예외처리 구문에 관하여 자세히 알아보도록 하겠다.