

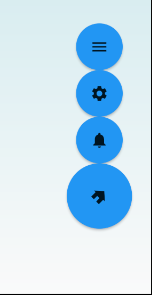
Flow위젯을 알아보고 프로젝트에 맞게 응용해 보았다.
Widget class
class _FloatingFlowButtonState extends State<FloatingFlowButton> with TickerProviderStateMixin{

  late AnimationController menuAnimation;
  //새로 추가
  late AnimationController buttonAnimation;

  @override
  void initState() {
    super.initState();

    menuAnimation = AnimationController(
      duration: const Duration(milliseconds: 500),
      vsync: this
    );

    buttonAnimation = AnimationController(
      duration: const Duration(milliseconds: 400),
      vsync: this
    );
  }
buttonAnimation 변수를 새로 만들고 initState에서 초기화 해준다. dispose안에서 변수 해제 잊지 말자.
@override
Widget build(BuildContext context) {

  return Flow(
    delegate: FloatingFlowButtonDelegate(menuAnimation: menuAnimation),
    //변경
    children: List.generate(menuItems.length, (index) => buildChild(menuItems[index], index)),
  );
}
children속성에 리스트의 인덱스가 필요하기 때문에 기존의 menuList.map대신 List.generate를 사용했다.
Widget buildChild(IconData icon, int index){

    return RawMaterialButton(
      fillColor: Colors.blue,
      shape: const CircleBorder(),
      constraints: BoxConstraints.tight(const Size(50, 50)),
      onPressed: () {
        index == 0
        ? pressParentButton()
        : pressChildButton(index);
      },
      child: index == 0
      ? AnimatedBuilder(
          animation: buttonAnimation,
          child: Icon(
            icon,
            size: 20,
          ),
          builder: (context, child){
            return Transform.rotate(
              angle: AppUtil.degToRad(45)*buttonAnimation.value,
              child: child,
            );
          }
        )
      : Icon(
          icon,
          size: 20,
        ),
    );
  }

  void pressParentButton(){
    print('pressMainButton');
    buttonAnimation.status == AnimationStatus.dismissed
      ? buttonAnimation.forward()
      : buttonAnimation.reverse();
    menuAnimation.status == AnimationStatus.dismissed
      ? menuAnimation.forward()
      : menuAnimation.reverse();
  }

  void pressChildButton(int index){
    print('index : $index');

  }
onPress와 child에서 index에 따라 분기하고 0이면 큰 버튼으로 처리한다.
pressParentButton에선 두 개의 컨트롤러를 동작 시켜 작은 버튼이 위로 올라가고 큰 버튼이 45도 기울게 한다.
pressChildButton에선 각각의 작은 버튼을 눌렀을 때 실행할 코드를 추가한다.
AppUtil.degToRad(45)*buttonAnimation.value은 degree값을 radian값을 변형 해주는 스태틱 메소드이다.
delegate class
달라진 점은 버튼의 크기와 위치이다. 기울어진 아이콘은 위에서 처리함
@override
BoxConstraints getConstraintsForChild(int i, BoxConstraints constraints) {
  return i == 0 ? BoxConstraints.tight(const Size(70,70)) : constraints;
}
getConstraintsForChild를 재정의 한다. 파라미터의 i가 Flow의 children이며 0은 가장 커야 하는 위젯으로 Size(70, 70)으로 바꾼 값을 리턴하도록 했다.
@override
void paintChildren(FlowPaintingContext context) {

  double x = context.size.width - context.getChildSize(0)!.width-20;
  double y = context.size.height - context.getChildSize(0)!.height-70;

  for(int i = context.childCount-1 ; i>=0; i--){
    Size? buttonSize = context.getChildSize(i);
    double dx = x;
    double dy = buttonSize!.height * i;

    i == 0
    ? context.paintChild(
      i,
      transform: Matrix4.translationValues(
        dx,
        y,
        0
      )
    )
    :context.paintChild(
      i,
      transform: Matrix4.translationValues(
        dx +10,
        y - dy*menuAnimation.value,
        0
      ),
    );
  }
}
x와 y값을 화면 오른쪽 아래 기준에서 (-20, -70) 이동했고
i값에 따라 context.paintChild를 분기한 후 작은 위젯의 dx값에 10을 더해 중앙에 오도록 했다.
45도 회전하는 효과를 delegate안에서 구현하지 못한 이유는
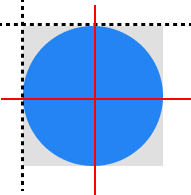
버튼의 회전 축이 빨간 선이 만나는 점이어야 하는데 실선이 만나는 점을 축으로 회전해서 원하는 모습이 나오지 않았다.
Transform.roatate의 origin값과 alignment를 바꿔도 축이 움직이지 않는데 이유를 모르겠다.
