
💡 Reanimated를 왜 사용하게 되었는가?
회사 업무 중 실제 구현이 필요했던 요구사항은 아래 네이버캘린더의 기능처럼 하단 View영역을 제스쳐로 드래그해 올려, 내용을 크게 볼 수 있는 Drawer View 형태 였다.
처음에는 간단한 라이브러리로 구현 할 수 있을꺼라고 쉽게 생각하여, 오픈 라이브러리를 사용해보았다.
아래는 사용해본 라이브러리 순서대로 느낀점을 적어보았다.
- react-native-draggable-drawer
좋았다. 원하는 UX를 구현 할 수 있었고, 사용방법도 쉬웠다.
하지만 마지막 업데이트와 배포일이 8년전인 것과 안드로이드에서의 화면때문에 조금 선택하기 망설여졌다. 👊
각종 Drawer 네이게이션 라이브러리들을 사용해보았다.
... 하지만 대부분 Drawer는 View가 보이지 않는 영역에 있다가 특정 버튼이나 제스쳐를 통해 보이는 기능만 지원을 했고, 우리 앱의 요구사항에는 맞지 않아 보였다.
💦 오픈 소스 라이브러리 10개 정도 모두 설치해서 프로토타입을 만들어 보았지만, 뭔가 3% 부족해 보였고 네이버 캘린더처럼 똑같이 만들고 싶다는 욕심도 있었기 때문에 선택이 그 3% 포기하고 라이브러리를 선택하는건 쉽지 않았다.
💡 많은 서칭을 하던중 모든 Drawer 라이브러리들이 아래와 같은 의존성 패키지를 설치해야지만 사용이 가능하다는 것을 알게 되었다!!
react-native-reanimated && react-native-gesture-handler
Reanimated란?
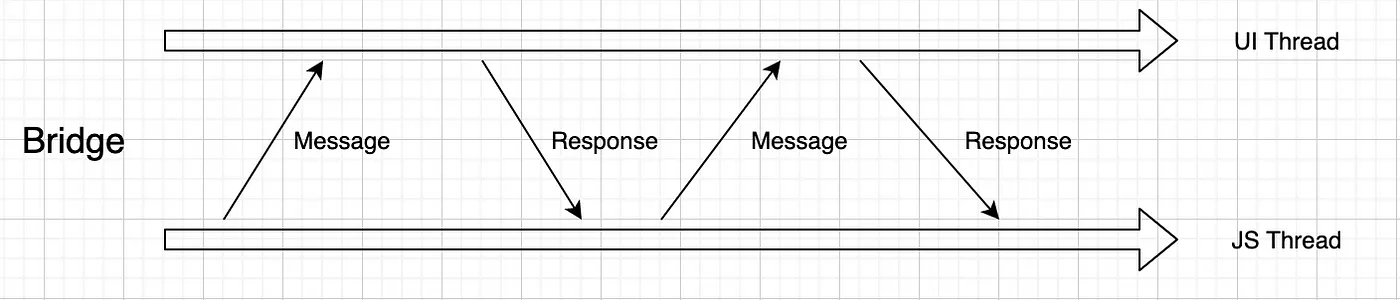
Reanimated는 부드러운 애니메이션을 구현하기 위해서는 초당 60프레임의 화면전환이 필요하다. 그리고 이를 위해서는 16밀리초 내에 프레임이 렌더링되어야 한다고 한다. 리액트 네이티브에서 기본적으로 제공되는 gesture와 Animated API를 사용하면 애니메이션의 계산을 UI Thread와 JS Thread의 커뮤니케이션에 의존해야 합니다. 그리고 두 쓰레드 간의 통신은 비동기로 이루어지기 때문에 Response가 16 밀리초 이내에 오는 것을 보장할 수 없다. 특히 모바일의 성능이 떨어지는 경우에는 시간이 더 지연될 수도 있다.
(아래 사진 참조) Thread 간의 통신은 Bridge를 통해 비동기적으로 메시지를 주고 받습니다
그렇게 직접 Reanimated를 사용해 만들어보기로 결정했다. 직접 만들면 유지보수나, 추후 확장성 측면에서도 유리 할 것이라고 생각했고, 분명 추가적인 고도화를 거치면서 추가적인 요구사항이 있을 것이라고 생각했다. (가보자고~)
1. 애니매이션 값 만들기
컴포넌트의 움직임은 translate 값에 의존하게 됩니다. useSharedValue 를 통해 선언해줍니다. 이 값은 이벤트 함수 내부에서 이벤트의 값에 따라 계속 업데이트 되며 style 값에 바인딩 되어 업데이트된 값이 실제 style props에 반영될 수 있도록 합니다.
const animation = useSharedValue(200); // Default height when closed2. 이벤트 함수 만들기
이벤트가 일어나면 수행될 이벤트 함수를 만들어줍니다. reanimated에서 import한useAnimatedGestureHandler 를 사용합니다. 제네릭으로 필요한 타입을 주입해줄 수 있습니다. onStart는 제스처가 시작될 때, onActive 는 제스처가 진행되는 동안, onEnd 는 제스처가 종료되었을 때 호출됩니다. 각 프로퍼티에 할당된 콜백은 모두 event 객체와 context 객체를 받아올 수 있습니다.
ps. 예민하게 반응해서 좌표 계산과 세팅하는데 어려움이 좀 있었습니다.
솔직히 아직 정확히 이해하고 사용한다고 보기는 힘든 상황인거 같음. 느낌정도만..
    const onGestureEvent = useAnimatedGestureHandler({
        onStart: (_, ctx) => {
            ctx.startHeight = animation.value;
        },
        onActive: (event, ctx) => {
            let newHeight = ctx.startHeight - event.translationY;
            if (newHeight > maxHeight) {
                newHeight = maxHeight;
            }
            if (newHeight < minHeight) {
                newHeight = minHeight;
            }
            animation.value = newHeight;
        },
        onEnd: (event) => {
            if (event.translationY < gestureHeight || animation.value > screenHeight - openGestureY) {
                animation.value = withTiming(maxHeight, { duration: 300 });
                runOnJS(setOpen)(true);
            } else {
                runOnJS(setOpen)(false);
                if (animation.value !== maxHeight && animation.value !== openGestureY) {
                    animation.value = withTiming(minHeight, { duration: 300 });
                }
            }
        },
    });
3. 애니메이션 스타일
reanimated 에서는 useAnimatedStyle 이라는 훅을 통해 애니메이션 스타일을 관리합니다. 이 훅을 통해 sharedValue 와 View properties 간의 관계가 만들어집니다. 훅을 통해 만들어진 animStyle 은 매번 sharedValue 값이 업데이트 될 때마다 업데이트됩니다. 만약 특정 조건에서 업데이트 되도록 하고 싶다면 useEffect 와 유사하게 두번째 인자로 [dependencies] 를 추가해줄 수도 있습니다. 이 훅을 통해 만들어진 값은 반드시 Reanimated 에서 import 한 Animated 컴포넌트의 style 프로퍼티에 할당해주어야 합니다.
   const boxStyle = useAnimatedStyle(() => {
        return {
            height: animation.value,
        };
    });
4. 애니메이션 값 할당
    return (
        <>
            <View style={{ flex: 1}}>
                <Calendar
                    onDayPress={day => {
                        setSelected(day.dateString);
                    }}
                    markedDates={{
                        [selected]: {selected: true, disableTouchEvent: true, selectedDotColor: 'orange'}
                    }}
                />
            </View>
            <View style={{ position: 'absolute', zIndex: 99, bottom: 0, backgroundColor: 'white' ,borderTopWidth:1,borderColor:'#C9C9C9'}}>
                <PanGestureHandler onGestureEvent={onGestureEvent}>
                    <Animated.View style={[boxStyle, styles.mySummaryModal, { width: screenWidth}]}>
                        <View style = {{padding:12,alignItems:'center'}}>
                            <View style = {{width:50,height:5,backgroundColor:'#C9C9C9',borderRadius:8}}>

                            </View>
                        </View>
                        <View style={{ padding: 20 }}>
                            <Text></Text>
                        </View>
                    </Animated.View>
                </PanGestureHandler>
            </View>
        </>
    );
};
👏 완성된 화면과 전체 소스코드!
아래는 완성된 코드 입니다.
일부 Gesture 좌표 같은 부분은 다듬을 필요가 있겠지만 요구사항대로 잘 만들어진거 같네요 🔥
const MyCalendar = () => {
    const [selected, setSelected] = useState('');

    const screenHeight = Dimensions.get('screen').height;
    const screenWidth = Dimensions.get('screen').width;
    const [open, setOpen] = useState(false);
    //플러스 버튼 클릭시 열리는 백그라운드 뷰
    const animation = useSharedValue(200); // Default height when closed
    const openGestureY = 200;
    const minHeight = 400; // Set the maximum height the view can expand to
    const maxHeight = 700; // Set the maximum height the view can expand to
    const gestureHeight = -100; //얼만큼 손을 올려야지 올라갈건지


    useEffect(() => {
        if (open) {
            animation.value = withSpring(maxHeight, { damping: 100 });
        } else {
            animation.value = withSpring(minHeight, { damping: 100});
        }
    }, [open]);

    const onGestureEvent = useAnimatedGestureHandler({
        onStart: (_, ctx) => {
            ctx.startHeight = animation.value;
        },
        onActive: (event, ctx) => {
            let newHeight = ctx.startHeight - event.translationY;
            if (newHeight > maxHeight) {
                newHeight = maxHeight;
            }
            if (newHeight < minHeight) {
                newHeight = minHeight;
            }
            animation.value = newHeight;
        },
        onEnd: (event) => {
            if (event.translationY < gestureHeight || animation.value > screenHeight - openGestureY) {
                animation.value = withTiming(maxHeight, { duration: 300 });
                runOnJS(setOpen)(true);
            } else {
                runOnJS(setOpen)(false);
                if (animation.value !== maxHeight && animation.value !== openGestureY) {
                    animation.value = withTiming(minHeight, { duration: 300 });
                }
            }
        },
    });

    const boxStyle = useAnimatedStyle(() => {
        return {
            height: animation.value,
        };
    });


    return (
        <>
            <View style={{ flex: 1}}>
                <Calendar
                    onDayPress={day => {
                        setSelected(day.dateString);
                    }}
                    markedDates={{
                        [selected]: {selected: true, disableTouchEvent: true, selectedDotColor: 'orange'}
                    }}
                />
            </View>
            <View style={{ position: 'absolute', zIndex: 99, bottom: 0, backgroundColor: 'white' ,borderTopWidth:1,borderColor:'#C9C9C9'}}>
                <PanGestureHandler onGestureEvent={onGestureEvent}>
                    <Animated.View style={[boxStyle, styles.mySummaryModal, { width: screenWidth}]}>
                        <View style = {{padding:12,alignItems:'center'}}>
                            <View style = {{width:50,height:5,backgroundColor:'#C9C9C9',borderRadius:8}}>

                            </View>
                        </View>
                        <View style={{ padding: 20 }}>
                            <Text></Text>
                        </View>
                    </Animated.View>
                </PanGestureHandler>
            </View>
        </>
    );
};
참고 사이트
https://github.com/software-mansion/react-native-reanimated
https://docs.swmansion.com/react-native-reanimated/
https://medium.com/crossplatformkorea/%EC%9B%90%EB%A6%AC%EC%99%80-%EC%98%88%EC%A0%9C%EB%A5%BC-%ED%86%B5%ED%95%B4-react-native-reanimated-v2-%EC%9E%85%EB%AC%B8%ED%95%98%EA%B8%B0-336e832f6ed6

좋은 글 감사합니다. 자주 올게요 :)