논문 정보
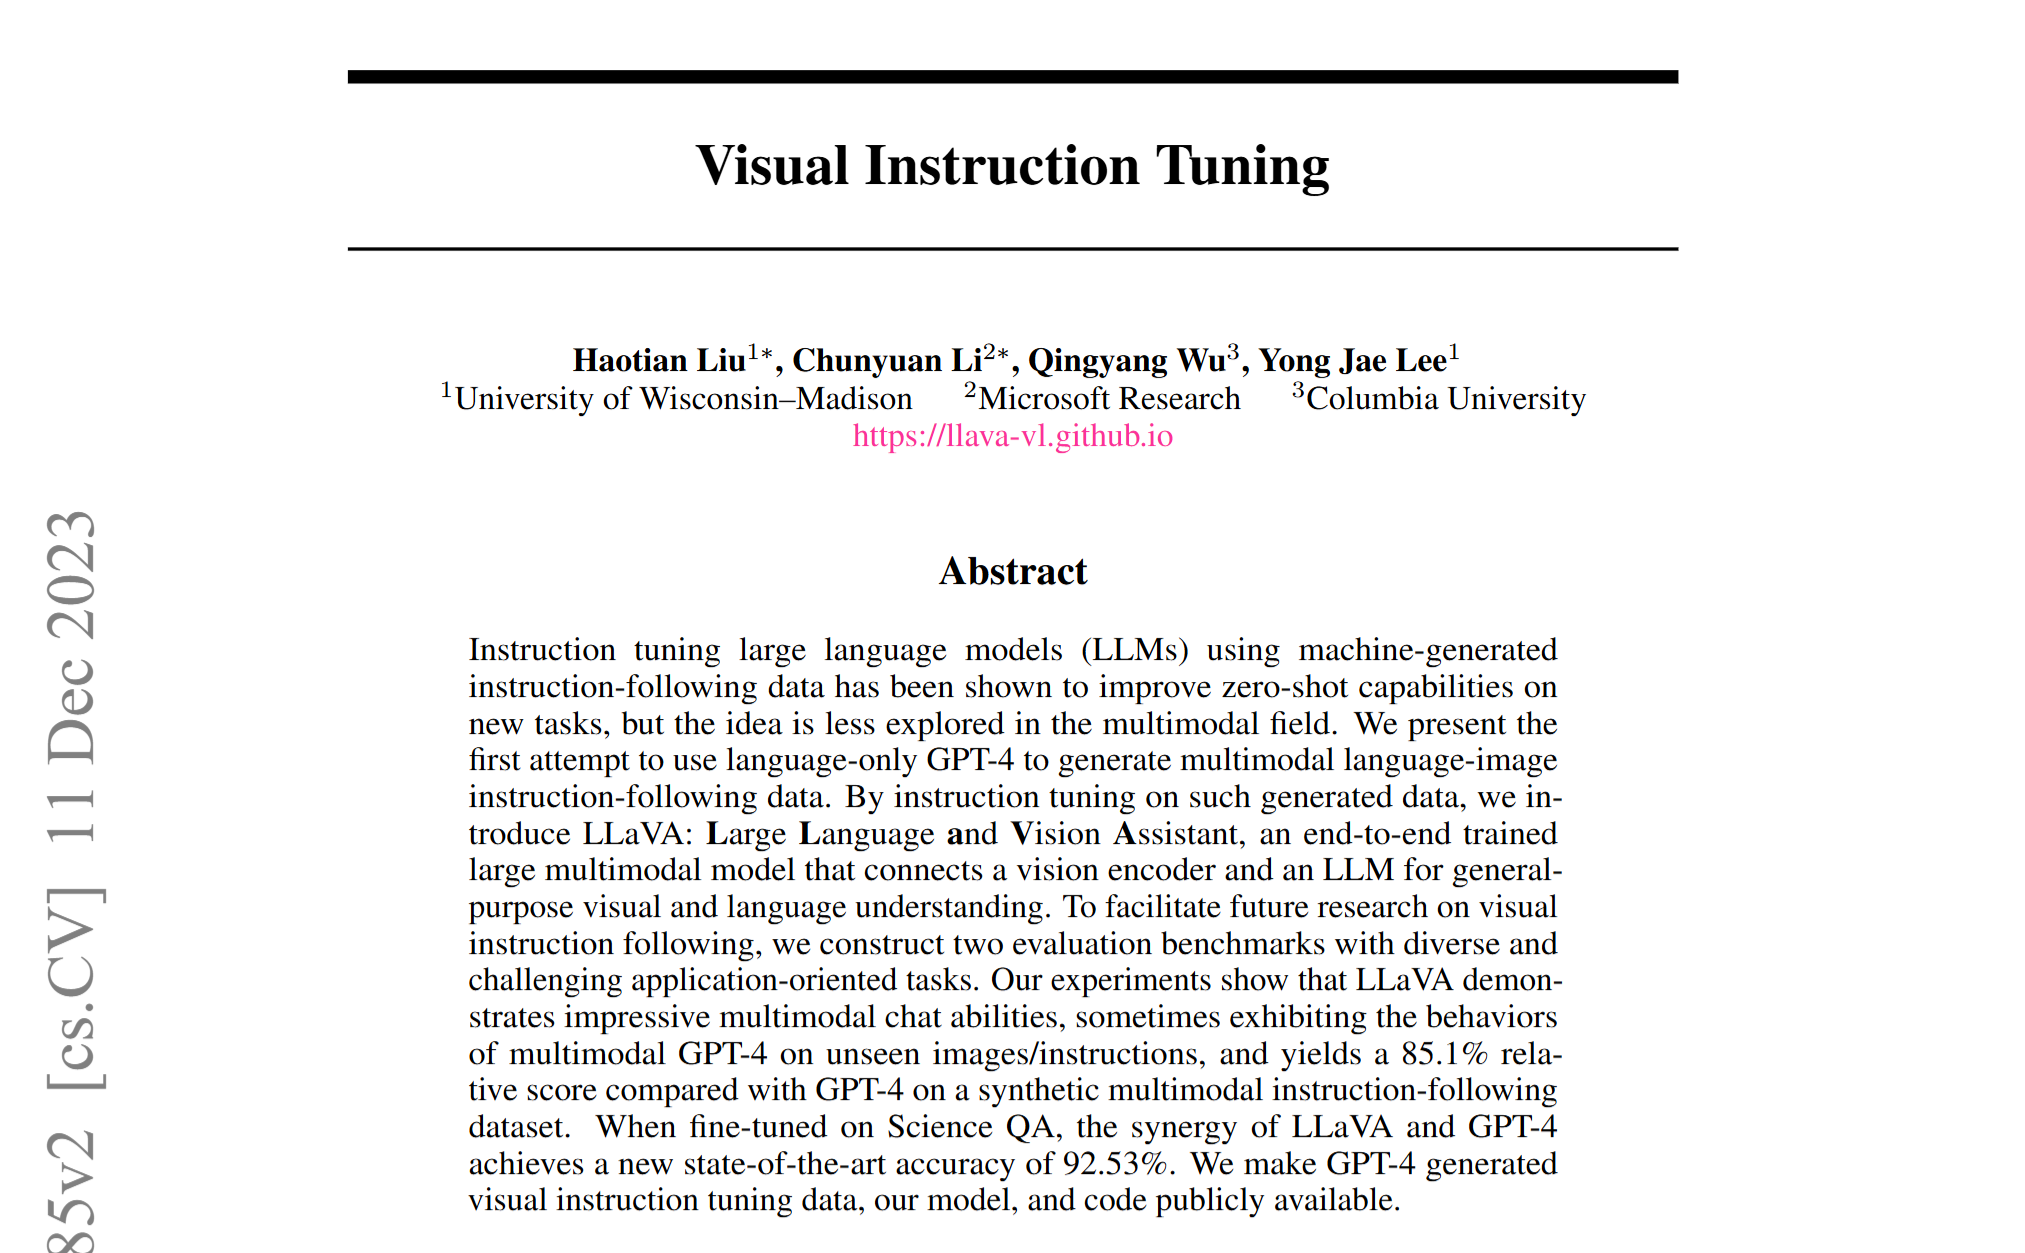
- 제목: Visual Instruction Tuning
- 저자: Haotian Liu, Chunyuan Li, Qingyang Wu, Yong Jae Lee
- 소속: University of Wisconsin–Madison, Microsoft Research, Columbia University
- 발표: NeurIPS 2023
- 논문 링크: https://arxiv.org/abs/2304.08485
- GitHub: https://github.com/haotian-liu/LLaVA
1. Introduction: Visual Instruction Tuning의 탄생
연구 배경
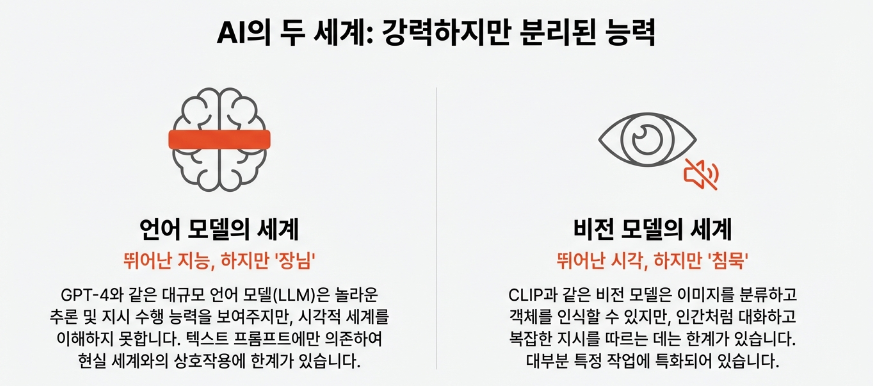
대형 언어 모델(LLM)은 instruction tuning을 통해 zero-shot 성능을 크게 향상시켰습니다. ChatGPT와 GPT-4의 성공은 언어 영역에서 instruction-following의 강력함을 입증했습니다. 하지만 멀티모달 영역에서의 instruction tuning은 거의 탐구되지 않았습니다.
기존 컴퓨터 비전 연구들은:
- 각 태스크를 독립적으로 해결 (classification, detection, segmentation 등)
- 고정된 인터페이스와 제한적인 상호작용성
- 언어를 이미지 설명에만 활용
LLaVA의 핵심 아이디어
LLaVA(Large Language and Vision Assistant)는 vision과 language를 통합한 end-to-end 학습 멀티모달 모델입니다.

주요 기여점:
-
Multimodal Instruction-Following Data
- 언어 전용 GPT-4를 활용하여 vision-language instruction 데이터 생성
- Image-text 쌍을 instruction-following 형식으로 변환
- 총 158K개의 고품질 데이터셋 구축
-
Large Multimodal Model (LMM)
- CLIP 비전 인코더와 Vicuna 언어 모델 연결
- End-to-end 학습으로 멀티모달 instruction-following 능력 획득
- GPT-4와의 앙상블로 Science QA에서 92.53% 정확도 달성 (새로운 SOTA)
-
평가 벤치마크
- LLaVA-Bench (COCO): 일관성 있는 평가
- LLaVA-Bench (In-the-Wild): 다양하고 도전적인 실세계 태스크
성과
- GPT-4 대비 85.1% 상대 점수 달성 (synthetic multimodal instruction-following 데이터셋)
- Unseen 이미지/명령에서 GPT-4와 유사한 멀티모달 행동 전시
- 모든 데이터, 코드, 모델을 오픈소스로 공개
2. Related Work: 기존 연구와의 차별점
Multimodal Instruction-Following Agents
사람에게 "이 사진에서 고양이를 찾아서 빨간색으로 칠해줘"라고 말하면 대부분 쉽게 해낼 수 있습니다. 하지만 AI에게는 이미지 이해, 자연어 해석, 행동 실행이라는 세 가지 능력이 동시에 필요한 어려운 문제입니다. 연구자들은 이 문제를 크게 두 방향으로 접근해왔습니다.
첫 번째는 End-to-End 학습 모델입니다.
입력부터 출력까지 하나의 신경망이 모든 것을 처리하는 방식으로, Vision-Language Navigation(VLN), Habitat 2.0, InstructPix2Pix 등이 대표적입니다.
- VLN은 "거실로 가서 빨간 소파 옆에 서"와 같은 지시를 받아 로봇이 실제로 이동하는 태스크를 다루고, InstructPix2Pix는 "이 사진을 흑백으로 바꿔줘" 같은 편집 지시를 받아 이미지를 직접 수정합니다.
- 이런 모델들은 추론 속도가 빠르고 학습된 태스크에서 높은 성능을 보이지만, 각 모델이 특정 태스크에만 특화되어 있다는 한계가 있습니다. 새로운 태스크가 필요하면 처음부터 별도의 모델을 학습시켜야 합니다.
두 번째는 시스템 기반 접근입니다.
LLM을 지휘자(Orchestrator)로 활용하여 여러 전문 모델을 순차적으로 호출하는 방식입니다. Visual ChatGPT, MM-REACT, VisProg, ViperGPT 등이 여기에 해당합니다.
- 예를 들어 Visual ChatGPT는 사용자가 "배경을 제거하고 유화 스타일로 바꿔줘"라고 요청하면, ChatGPT가 이 지시를 분석하여 Segment Anything으로 배경을 제거하고, Stable Diffusion으로 스타일을 변환하는 식으로 작동합니다. 다양한 태스크를 처리할 수 있다는 장점이 있지만, 여러 모델을 순차 호출하므로 속도가 느리고, 앞선 모델의 오류가 뒤따르는 모델로 전파되는 문제가 있습니다.
LLaVA는 이 두 접근법 사이에서 균형점을 찾습니다. End-to-End 모델의 효율성(단일 모델, 빠른 추론)을 유지하면서도, 시스템 기반 접근의 범용성(다양한 태스크 처리)을 갖추는 것이 목표입니다.
Instruction Tuning in NLP
Instruction Tuning은 사전학습된 LLM을 자연어 지시문 형태의 데이터로 추가 학습시켜, 다양한 태스크를 zero-shot으로 수행할 수 있게 만드는 기법입니다.
- GPT-3는 InstructGPT로, T5는 FLAN-T5로, PaLM은 FLAN-PaLM으로 발전했습니다. 기본 GPT-3에게 "Translate 'hello' to Korean"이라고 입력하면 문장을 그냥 이어서 생성하지만, InstructGPT는 지시를 이해하고 "안녕하세요"라고 정확히 응답합니다.
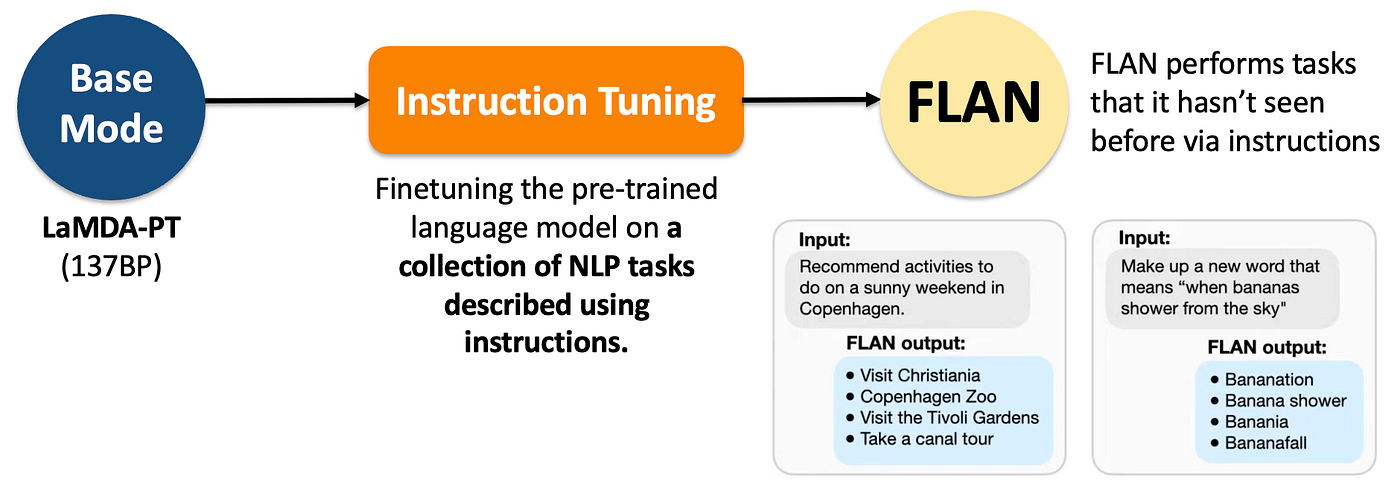
https://medium.com/@lmpo/an-overview-instruction-tuning-for-llms-440228e7edab
LLaVA는 이 Instruction Tuning 아이디어를 비전 분야에 적용합니다. 핵심은 학습 데이터를 어떻게 확보하느냐인데, LLaVA는 GPT-4를 데이터 생성기로 활용합니다. GPT-4는 이미지를 직접 볼 수 없지만, 이미지의 캡션이나 바운딩 박스 정보를 텍스트로 제공받으면 해당 이미지에 대한 고품질 Q&A 데이터를 생성할 수 있습니다. 이는 NLP에서 검증된 Self-Instruct 방식의 변형으로, LLaVA는 이렇게 생성된 visual instruction-following 데이터로 vision-language 모델을 튜닝합니다.
기존 Large Multimodal Models (LMMs)
LLaVA가 등장하기 전에도 이미지와 텍스트를 함께 처리하는 Large Multimodal Model들이 존재했습니다. 이 흐름의 시작점으로 많이 언급되는 것이 바로 Flamingo입니다.
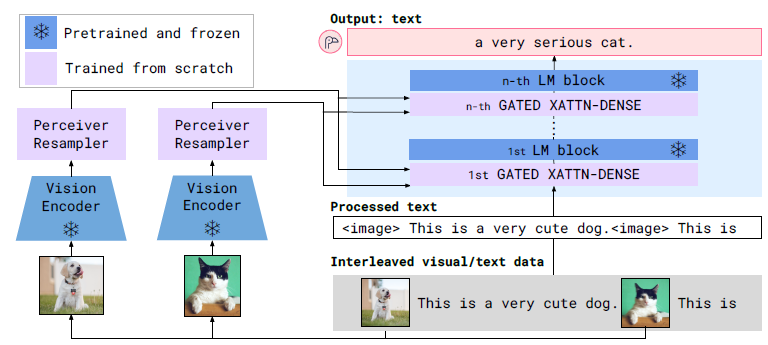
Flamingo는 "멀티모달 GPT-3 순간"이라 불릴 만큼 상징적인 모델로, 대규모 이미지-텍스트 데이터로 학습하여 zero-shot task transfer와 in-context learning 능력을 보여주었습니다.
(참고) GPT-3(2020) 이전의 NLP 모델들은 새로운 태스크를 수행하려면 해당 태스크에 맞는 데이터로 fine-tuning이 필수였습니다.
- 그런데 GPT-3는 별도 fine-tuning 없이 프롬프트에 몇 개의 예시만 보여주면(few-shot) 새로운 태스크를 수행할 수 있었습니다. 이게 바로 in-context learning이고, "scaling이 곧 능력이다"라는 패러다임을 열었죠.
마치 GPT-3가 NLP 분야에서 few-shot learning의 가능성을 열었듯이, Flamingo는 비전-언어 분야에서 비슷한 패러다임 전환을 이끌었습니다.
Flamingo는 GPT-3처럼 few-shot in-context learning을 멀티모달 영역에서 처음으로 가능하게 했습니다:
- 이미지-텍스트 예시 몇 개만 프롬프트에 넣어주면
- Fine-tuning 없이 VQA, 캡셔닝, 분류 등 다양한 태스크 수행
- 심지어 일부 벤치마크에서 fine-tuned 모델들을 능가
Flamingo 이후로 다양한 image-text 쌍 기반 학습 모델들이 등장했습니다. BLIP-2는 frozen image encoder와 LLM을 Q-Former라는 경량 모듈로 연결하여 효율적인 학습을 가능하게 했고, FROMAGe는 텍스트 생성과 이미지 검색(retrieval)을 모두 수행할 수 있는 능력을 갖추었습니다. KOSMOS-1은 마이크로소프트에서 발표한 모델로 다양한 멀티모달 태스크에서 강력한 성능을 보였으며, PaLM-E는 구글에서 로봇 제어와 같은 embodied AI 태스크를 위해 설계되었습니다. 오픈소스 진영에서도 OpenFlamingo와 LLaMA-Adapter 등이 공개되면서 연구 커뮤니티의 접근성이 높아졌습니다.
- BLIP-2, FROMAGe 등은 contrastive learning이나 captioning 같은 특정 태스크로 학습되어 그 범위 내에서만 동작했습니다. Flamingo는 few-shot in-context learning으로 더 유연했지만, 이것도 예시 패턴을 따라하는 방식이지 자연어 지시를 직접 이해하는 것은 아니었습니다. 즉, '이 이미지에서 사람들의 감정을 분석해줘' 같은 복잡한 instruction을 자연스럽게 따르도록 명시적으로 학습된 모델은 없었습니다.
NLP 분야에서 GPT-3가 InstructGPT로 발전하며 사용자 지시를 훨씬 잘 따르게 된 것처럼, 멀티모달 모델에도 이런 instruction tuning이 필요했지만 아직 체계적으로 연구되지 않은 상태였습니다.
- 그 결과, 이 모델들은 언어 전용 태스크에서는 준수한 성능을 보이면서도, 이미지에 대한 복잡한 질문에 답하거나 시각적 reasoning이 필요한 멀티모달 태스크에서는 상대적으로 낮은 성능을 보였습니다.
LLaVA는 바로 이 격차를 메우기 위해 등장했습니다. 기존 모델들이 놓치고 있던 visual instruction tuning을 체계적으로 연구하고, 이를 통해 멀티모달 태스크에서의 성능을 끌어올리는 것이 LLaVA의 핵심 목표입니다.
3. GPT-assisted Visual Instruction Data Generation
문제점: 멀티모달 Instruction 데이터 부족
- Image-text 쌍 (CC, LAION)은 풍부
- 하지만 multimodal instruction-following 데이터는 매우 제한적
- 이유: 수작업 수집이 시간 소모적이고 정의가 모호함
해결책: GPT-4 활용 데이터 생성
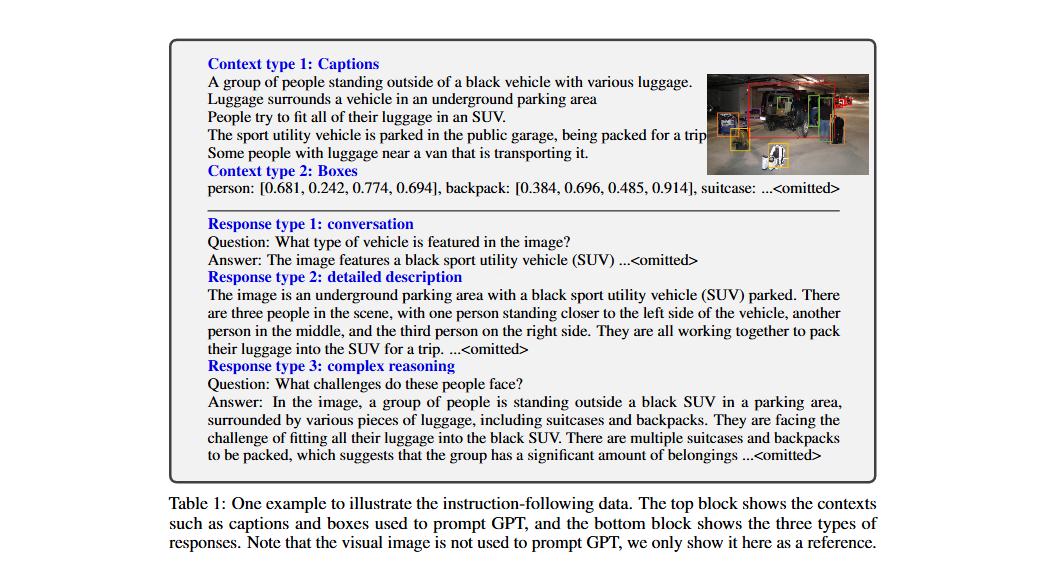
GPT-4는 이미지를 직접 볼 수 없으니까, 텍스트로 이미지 정보를 설명해줍니다. (이미지 상단: GPT-4에게 주는 입력 (Context))
Symbolic Representation
이미지를 언어 전용 GPT-4가 이해할 수 있는 형태로 인코딩:
1. Captions (이미지 설명)
- 다양한 관점에서 시각적 장면 묘사
- 예시:
A group of people standing outside of a black vehicle with various luggage.
Luggage surrounds a vehicle in an underground parking area.
People try to fit all of their luggage in an SUV.
2. Bounding Boxes (객체 위치)
- 객체 개념과 공간 정보 인코딩
- 예시:
person: [0.681, 0.242, 0.774, 0.694]
backpack: [0.384, 0.696, 0.485, 0.914]
suitcase: [0.758, 0.413, 0.845, 0.69]
이 context를 바탕으로 GPT-4가 3가지 유형의 Q&A 데이터를 생성합니다. (이미지 하단: GPT-4가 생성하는 출력 (Response))
세 가지 데이터 유형
Response type 1: Conversation (단순 대화)
- 사람과 어시스턴트 간의 대화
- 객체 유형, 개수, 행동, 위치, 상대적 위치 등에 대한 질문
- 명확한 답변이 있는 질문만 포함
Q: What type of vehicle is featured in the image?
A: The image features a black sport utility vehicle (SUV)...
Response type 2: Detailed Description (상세 설명)
- 이미지에 대한 풍부하고 포괄적인 설명
- GPT-4가 질문 목록 생성 후 선별
Q: (암묵적으로 "이미지를 설명해줘")
A: The image is an underground parking area with a black SUV parked.
   There are three people in the scene, with one person standing closer
   to the left side of the vehicle...
Response type 3: Complex Reasoning (복잡한 추론)
- 시각 콘텐츠 기반 심층 추론 질문
- 단계별 논리적 추론 과정 필요
Q: What challenges do these people face?
A: They are facing the challenge of fitting all their luggage into the
   black SUV. There are multiple suitcases and backpacks to be packed,
   which suggests that the group has a significant amount of belongings...
4. Visual Instruction Tuning
4.1 Architecture: 3-Component 설계
전체 구조
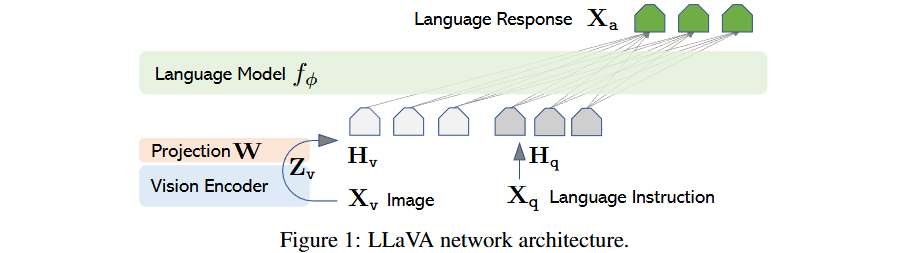
구성 요소
1. Vision Encoder: CLIP ViT-L/14
- Pre-trained, frozen 상태 유지
- 입력: 336×336px 이미지
- 출력: Grid features (Zv)
- 576 patch tokens (24×24 grid)
- 1 class token
- Dimension: 1024
2. Projection Layer
- Trainable projection matrix W
- 비전 features를 언어 embedding 공간으로 변환
- Lightweight 설계로 빠른 실험 반복 가능
3. Language Model: Vicuna
- 공개된 체크포인트 중 최고의 instruction-following 능력
- 파라미터 ϕ로 표현

설계 철학
- Simple but Effective:
- Linear projection 사용
- 더 정교한 방식도 가능:
- Flamingo의 gated cross-attention
- BLIP-2의 Q-former
- 향후 연구 과제로 남김
4.2 Training: 2-Stage Procedure
데이터 형식
각 이미지 에 대해 multi-turn conversation 데이터 를 생성합니다. 여기서 는 총 턴 수이고, 는 질문, 는 응답입니다.
번째 턴의 instruction 는 다음과 같이 구성됩니다:
- 첫 번째 턴 (t=1): 또는 중 랜덤 선택 (질문-이미지 순서를 섞어서 모델이 둘 다 익숙해지도록)
- 이후 턴 (t>1): 만 사용 (이미지는 이미 제공됨)

입력 시퀀스 형식
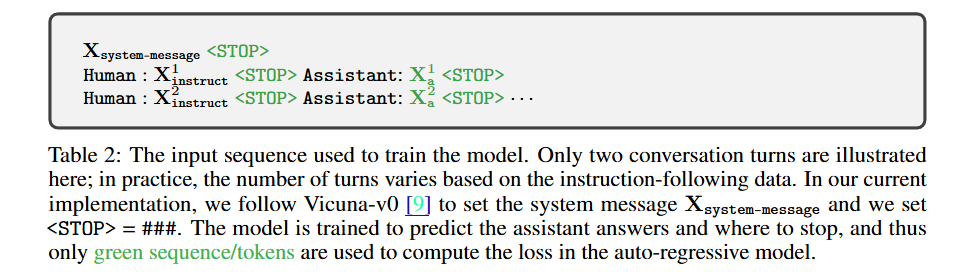
학습 목표
LLM의 기존 auto-regressive training objective를 사용합니다. 길이 인 시퀀스에서 target answer 의 확률을 최대화합니다:
중요한 점은 Assistant의 응답 토큰()만 loss 계산에 사용된다는 것입니다. Human의 질문이나 이미지 토큰에는 loss를 걸지 않습니다.
Stage 1: Pre-training for Feature Alignment
목적:
- Visual tokenizer 학습
(이미지 features를 LLM word embedding 공간에 정렬)
데이터:
- CC3M 필터링 → 595K image-text 쌍
- Concept coverage와 학습 효율성 균형
학습 설정:
X_system-message <STOP>
Human: X_instruct <STOP> Assistant: X_a <STOP>

- X_instruct = [X_q, X_v] 또는 [X_v, X_q] (랜덤 선택)
- X_q: 이미지 설명 요청 질문 (랜덤 샘플링)
- X_v: 이미지 features
- X_a: 원본 캡션 (ground-truth)파라미터:
- Frozen: Vision encoder, LLM
- Trainable: W (projection matrix)만
- 학습률: 2e-3
- Batch size: 128
- Epochs: 1
- 시간: 4시간 (8×A100)
결과: 이미지 features 가 LLM word embedding과 정렬됨
Stage 2: Fine-tuning End-to-End
목적:
- Instruction-following 능력 획득
파라미터:
- Frozen: Vision encoder
- Trainable: W + ϕ (projection + LLM)
Multi-turn Conversation 형식:
Xsystem-message <STOP>
Human: X¹_instruct <STOP> Assistant: X¹_a <STOP>
Human: X²_instruct <STOP> Assistant: X²_a <STOP>
...

- X_instruct = [X_q, X_v] 또는 [X_v, X_q] (랜덤 선택)
- X_q: 이미지 설명 요청 질문 (랜덤 샘플링)
- X_v: 이미지 features
- X_a: 원본 캡션 (ground-truth)구성:
- t=1 (첫 턴): [, ] 또는 [, ] (랜덤)
- t>1:
Loss Computation:
- 예측 토큰()만 loss 계산
- Auto-regressive training objective
결과: LLM이 visual context를 이해하면서 다양한 instruction을 따르는 Multimodal Chatbot 능력 획득
Use Case 1: Multimodal Chatbot
데이터: 158K language-image instruction-following samples
- Conversation (multi-turn)
- Detailed description (single-turn)
- Complex reasoning (single-turn)
- Uniform sampling during training
학습 설정:
- 학습률: 2e-5
- Batch size: 32
- Epochs: 3
- 시간: 10시간 (8×A100)
Use Case 2: Science QA
데이터셋: ScienceQA benchmark
- 21K multimodal multiple choice questions
- 3 subjects, 26 topics, 127 categories, 379 skills
- 자연어 설명과 이미지 컨텍스트 제공
형식: Single-turn conversation
- X_instruct: Question & context
- X_a: Reasoning process + answer
학습 설정:
- Visual features: Before last layer 사용
- 출력 순서: Reasons → Answer
- Epochs: 12
- 시간: 4시간 (8×A100)
5. Experiments: 성능 검증
5.1 Multimodal Chatbot 평가
Qualitative Analysis: GPT-4 예제 테스트
Example: Extreme Ironing
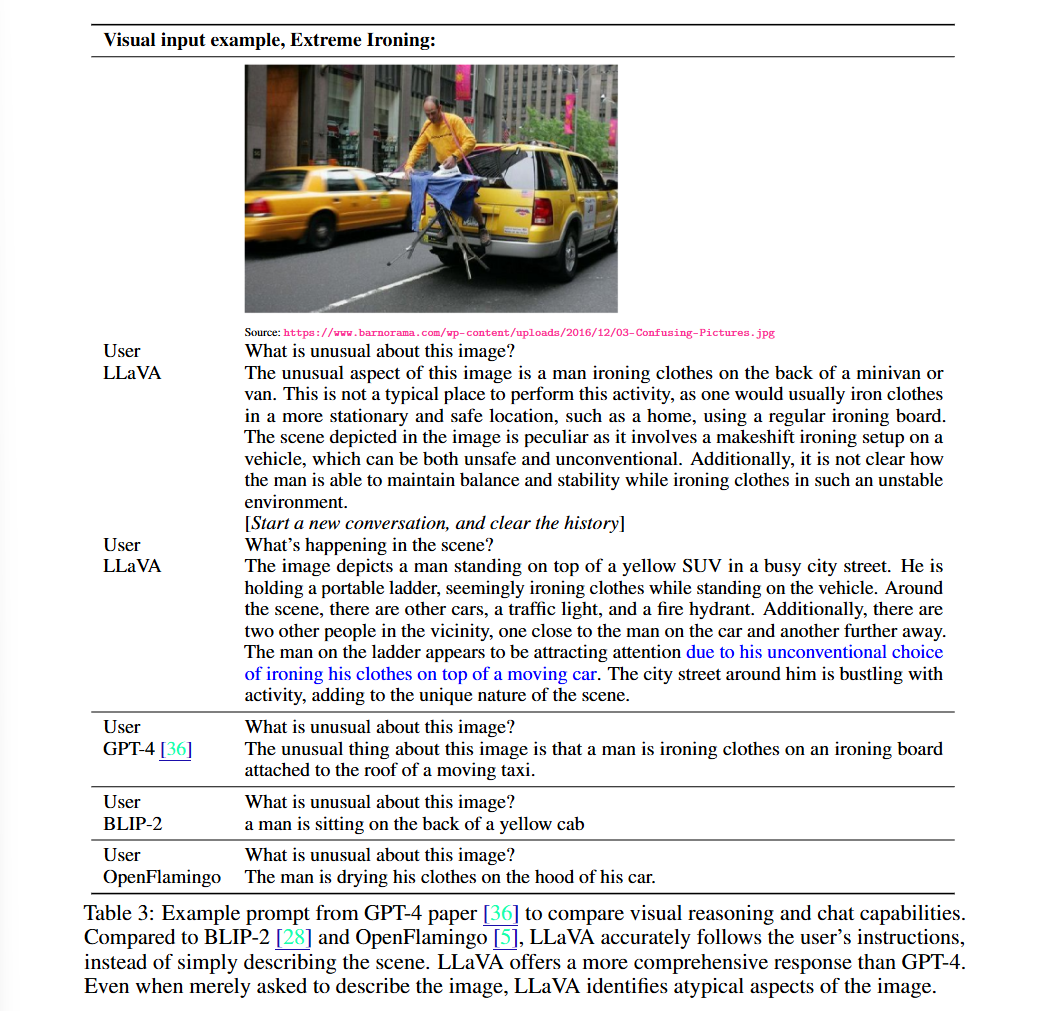
LLaVA 응답:
The unusual aspect of this image is a man ironing clothes on the back
of a minivan or van. This is not a typical place to perform this activity,
as one would usually iron clothes in a more stationary and safe location,
such as a home, using a regular ironing board. The scene depicted in the
image is peculiar as it involves a makeshift ironing setup on a vehicle,
which can be both unsafe and unconventional...
GPT-4 응답:
The unusual thing about this image is that a man is ironing clothes on
an ironing board attached to the roof of a moving taxi.
BLIP-2 응답:
a man is sitting on the back of a yellow cabOpenFlamingo 응답:
The man is drying his clothes on the hood of his car.분석:
- ✅ LLaVA: 지시사항을 정확히 따르고 상세한 설명 제공
- ✅ GPT-4: 간결하지만 정확
- ❌ BLIP-2, OpenFlamingo: 단순 이미지 설명, instruction 무시
Quantitative Evaluation: GPT-4 기반 평가
평가 방법:
1. Triplet 생성: (Image, Ground-truth description, Question)
2. 모델 응답 생성
3. Text-only GPT-4를 judge로 활용
- Ground-truth description 기반 참조 답변 생성
- 두 응답 비교 (helpfulness, relevance, accuracy, detail)
- 1-10점 척도 평가
LLaVA-Bench (COCO): 90 questions
| Training Data | Conversation | Detail | Complex | All |
|---|---|---|---|---|
| Full data | 83.1 | 75.3 | 96.5 | 85.1 |
| Detail + Complex | 81.5 (-1.6) | 73.3 (-2.0) | 90.8 (-5.7) | 81.9 (-3.2) |
| Conv + 5% Detail + 10% Complex | 81.0 (-2.1) | 68.4 (-7.1) | 91.5 (-5.0) | 80.5 (-4.4) |
| Conversation | 76.5 (-6.6) | 59.8 (-16.2) | 84.9 (-12.4) | 73.8 (-11.3) |
| No Instruction Tuning | 22.0 (-61.1) | 24.0 (-51.3) | 18.5 (-78.0) | 21.5 (-63.6) |
핵심 발견:
1. Instruction tuning으로 50점 이상 향상
2. Detailed description + complex reasoning 추가 시 7점 향상
3. Reasoning 능력이 conversation 능력도 보완
4. 세 가지 데이터 유형 모두 사용 시 최고 성능
LLaVA-Bench (In-the-Wild): 60 questions
| Model | Conversation | Detail | Complex | All |
|---|---|---|---|---|
| OpenFlamingo | 19.3 ± 0.5 | 19.0 ± 0.5 | 19.1 ± 0.7 | 19.1 ± 0.4 |
| BLIP-2 | 54.6 ± 1.4 | 29.1 ± 1.2 | 32.9 ± 0.7 | 38.1 ± 1.0 |
| LLaVA | 57.3 ± 1.9 | 52.5 ± 6.3 | 81.7 ± 1.8 | 67.3 ± 2.0 |
성과:
- BLIP-2 대비 +29% 향상
- OpenFlamingo 대비 +48% 향상
- Complex reasoning에서 text-only GPT-4 대비 81.7% 달성
Limitations 분석
도전적인 예제들:
1. Ramen 예제: 레스토랑 이름 인식
- 다국어 이해 및 광범위한 지식 필요
- 반찬 설명에는 멀티모달 정보 검색 필요
- Fridge 예제: 요거트 브랜드 인식
- 고해상도 이미지 처리 필요
- 광범위한 지식 coverage 요구
흥미로운 실패 사례:
- "딸기 맛 요거트가 있나요?" → "Yes"
- 실제로는 요거트와 딸기가 따로 존재
- LLaVA가 이미지를 "bag of patches"로 인식
- 복잡한 semantic 관계 파악 실패
5.2 ScienceQA 벤치마크
결과 (Test Set Accuracy %)
| Model | NAT | SOC | LAN | TXT | IMG | NO | G1-6 | G7-12 | Avg |
|---|---|---|---|---|---|---|---|---|---|
| Human | 90.23 | 84.97 | 87.48 | 89.60 | 87.50 | 88.10 | 91.59 | 82.42 | 88.40 |
| GPT-3.5 CoT | 75.44 | 70.87 | 78.09 | 74.68 | 67.43 | 79.93 | 78.23 | 69.68 | 75.17 |
| LLaMA-Adapter | 84.37 | 88.30 | 84.36 | 83.72 | 80.32 | 86.90 | 85.83 | 84.05 | 85.19 |
| MM-CoT_Large | 95.91 | 82.00 | 90.82 | 95.26 | 88.80 | 92.89 | 92.44 | 90.31 | 91.68 |
| LLaVA | 90.36 | 95.95 | 88.00 | 89.49 | 88.00 | 90.66 | 90.93 | 90.90 | 90.92 |
| LLaVA+GPT-4 (judge) | 91.56 | 96.74 | 91.09 | 90.62 | 88.99 | 93.52 | 92.73 | 92.16 | 92.53 |
핵심 성과:
1. LLaVA 단독으로 90.92% (SoTA MM-CoT_Large와 근접)
2. GPT-4 judge 앙상블로 92.53% (새로운 SOTA)
3. Text-only GPT-4(82.69%)가 multimodal 성능 향상에 기여
Design Ablations
| Variant | Before Last | Last |
|---|---|---|
| Best | 90.92 | 89.96 (-0.96) |
| Predict answer first | - | 89.77 (-1.15) |
| Train from scratch | 85.81 (-5.11) | - |
| 7B model | 89.84 (-1.08) | - |
발견:
1. Visual features: Before last layer가 0.96% 더 높음
- Last layer: 글로벌/추상 속성 집중
- Before last: 지역적 세부 정보 보존
-
Chain-of-Thought: Reasoning-first 전략
- 수렴 속도 향상 (6 epochs vs 12 epochs)
- 최종 성능에는 작은 영향
-
Pre-training: 5.11% 향상 기여
- Multimodal feature alignment
- Pre-trained knowledge 보존
-
Model size: 13B > 7B (1.08% 차이)
6. 코드 구현 분석
아래는 https://github.com/haotian-liu/LLaVA 코드를 분석 후 정리한 내용입니다.
6.1 리포지토리 구조
LLaVA/
├── llava/                    # 핵심 패키지
│   ├── model/                # 모델 아키텍처
│   │   ├── llava_arch.py     # 핵심 vision-language 모델
│   │   ├── builder.py        # 모델 로딩 및 인스턴스화
│   │   ├── multimodal_encoder/
│   │   │   └── clip_encoder.py   # CLIP 비전 인코더
│   │   └── multimodal_projector/
│   │       └── builder.py    # Vision-language bridge
│   ├── train/                # 학습 스크립트
│   │   ├── train.py          # 메인 학습 파이프라인
│   │   └── llava_trainer.py  # 커스텀 트레이너
│   ├── serve/                # 추론 서빙
│   │   ├── cli.py
│   │   ├── gradio_web_server.py  # Web UI
│   │   └── model_worker.py
│   ├── mm_utils.py           # 멀티모달 유틸리티
│   └── conversation.py       # 대화 관리
├── scripts/                  # 학습/평가 스크립트
│   ├── pretrain.sh
│   ├── finetune.sh
│   └── finetune_lora.sh
└── predict.py                # 추론 인터페이스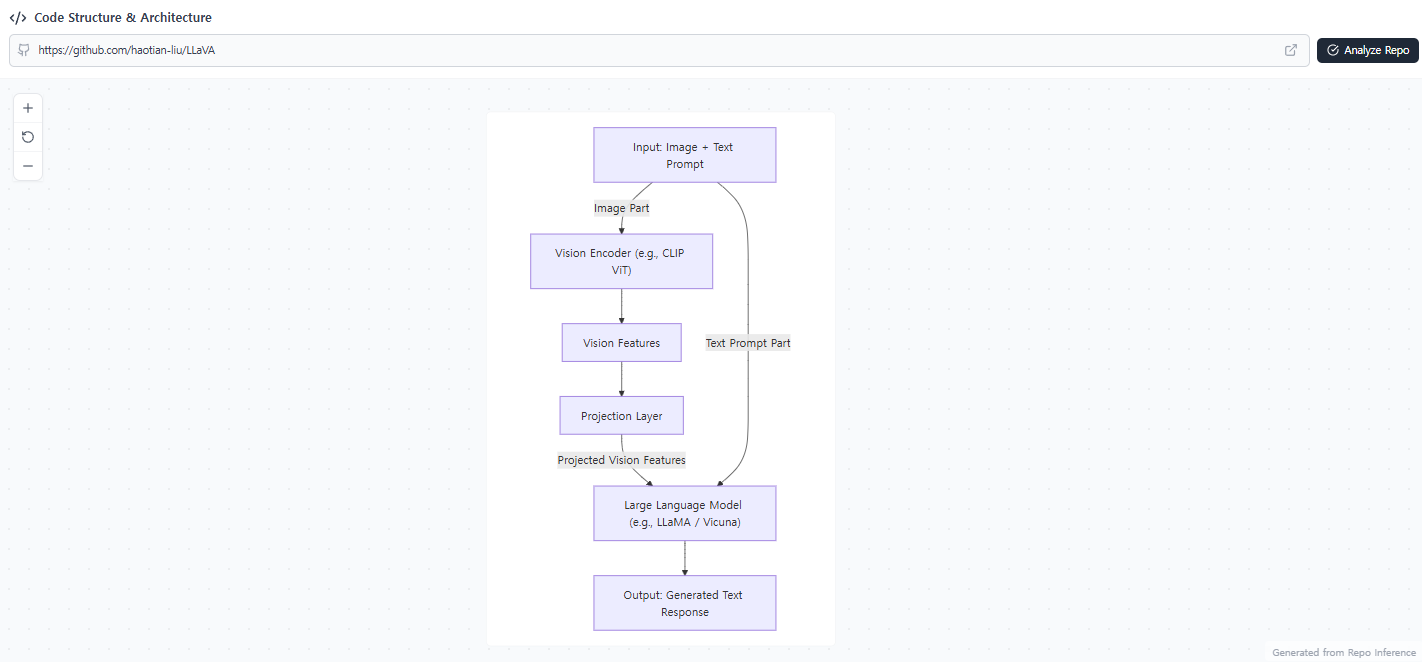
6.2 핵심 Architecture 구현
1. Vision Encoder (CLIP)
# CLIP Vision Model 로딩
self.vision_tower = CLIPVisionModel.from_pretrained(vision_tower_name)
self.vision_tower.requires_grad_(False)  # ⭐ 항상 Frozen

def forward(self, images):
    image_features = self.vision_tower(images, output_hidden_states=True)
    return image_features  # [batch, num_patches, 1024]
Vision Encoder는 CLIP ViT-L/14를 사용하며, Stage 1, 2 모두 frozen 상태로 유지됩니다.
2. Multimodal Projector
def build_vision_projector(config):
    projector_type = config.mm_projector_type

    if projector_type == 'linear':
        # 단순 선형 변환: 1024 → 4096
        return nn.Linear(config.mm_hidden_size, config.hidden_size)

    if projector_type == 'mlp2x_gelu':
        # 2-layer MLP: Linear → GELU → Linear
        return nn.Sequential(
            nn.Linear(config.mm_hidden_size, config.hidden_size),
            nn.GELU(),
            nn.Linear(config.hidden_size, config.hidden_size)
)Projector는 Vision Encoder 출력(1024차원)을 LLM embedding 공간(4096차원)으로 변환합니다.
3. 이미지-텍스트 결합 (핵심 로직)
def prepare_inputs_labels_for_multimodal(self, input_ids, images, labels, ...):
    # 1) 이미지 인코딩
    image_features = self.encode_images(images)  # [batch, 256, 4096]

    # 2) IMAGE_TOKEN_INDEX 위치 찾기
    image_token_indices = torch.where(input_ids == IMAGE_TOKEN_INDEX)[0]

    # 3) 텍스트 embedding과 이미지 features 결합
    for i, idx in enumerate(image_token_indices):
        # 이미지 토큰 이전 텍스트
        cur_new_input_embeds.append(embed_tokens(input_ids[:idx]))
        # 이미지 features 삽입
        cur_new_input_embeds.append(image_features[i])
        # 이미지 토큰 이후 텍스트
        cur_new_input_embeds.append(embed_tokens(input_ids[idx+1:]))

    # 4) 이미지 위치에는 IGNORE_INDEX로 loss 제외
    image_labels = torch.full((num_patches,), IGNORE_INDEX)

    return torch.cat(cur_new_input_embeds, dim=0)
핵심 흐름:
입력: "Human: <image> 이 사진을 설명해줘"
        ↓
1. <image> 토큰 위치 찾기
2. 해당 위치에 image_features (256개 토큰) 삽입
3. 이미지 토큰에는 loss 계산 제외 (IGNORE_INDEX)
        ↓
출력: [텍스트 임베딩] + [이미지 256토큰] + [텍스트 임베딩]
6.3 Training Pipeline
Stage 1 vs Stage 2 핵심 설정
# Stage 1: Projection만 학습
if model_args.tune_mm_mlp_adapter:
    model.requires_grad_(False)                      # 전체 frozen
    for p in model.get_model().mm_projector.parameters():
        p.requires_grad = True                       # projector만 trainable

# Stage 2: Projection + LLM 학습
if training_args.freeze_mm_mlp_adapter:
    for p in model.get_model().mm_projector.parameters():
        p.requires_grad = False                      # projector frozen (선택적)
학습 흐름 요약
def train():
    # 1) 모델 로딩
    model = LlavaLlamaForCausalLM.from_pretrained(model_name_or_path)

    # 2) Vision Tower 초기화 (CLIP)
    model.get_model().initialize_vision_modules(model_args)
    vision_tower = model.get_vision_tower()
    vision_tower.to(dtype=torch.bfloat16, device=device)

    # 3) 데이터셋 로딩
    data_module = make_supervised_data_module(tokenizer, data_args)

    # 4) 학습 실행
    trainer = LLaVATrainer(model=model, tokenizer=tokenizer, **data_module)
    trainer.train()

    # 5) 모델 저장
    trainer.save_state()
6.4 Data Processing
데이터 형식 (JSON)
{
  "image": "image_001.jpg",
  "conversations": [
    {"from": "human", "value": "<image>\n이 사진을 설명해줘"},
    {"from": "gpt", "value": "이 사진에는 고양이가 있습니다..."}
  ]
}
전처리 핵심 로직
class LazySupervisedDataset(Dataset):
    def __getitem__(self, i):
        # 1) 이미지 로딩 및 전처리
        image = Image.open(image_path).convert('RGB')
        image = processor.preprocess(image, return_tensors='pt')['pixel_values'][0]

        # 2) <image> 토큰 위치 정규화
        #    "이 사진 <image> 설명해줘" → "<image>\n이 사진 설명해줘"
        sentence['value'] = DEFAULT_IMAGE_TOKEN + '\n' + sentence['value']

        # 3) Conversation → input_ids, labels 변환
        data_dict = preprocess(sources, tokenizer, has_image=True)

        return {
            'input_ids': data_dict['input_ids'],
            'labels': data_dict['labels'],      # Assistant 응답만 loss 계산
            'image': image
        }
Labels 처리 (Loss 계산 대상)
입력:   [Human: <image> 설명해줘] [Assistant: 고양이입니다]
labels: [    IGNORE_INDEX       ] [    실제 토큰 ID        ]
                ↑                            ↑
        loss 계산 안 함              loss 계산 대상
6.5 Inference Pipeline
추론 흐름
class Predictor:
    def setup(self):
        # 모델 로딩
        self.tokenizer, self.model, self.image_processor, _ = load_pretrained_model(
            model_path="liuhaotian/llava-v1.5-13b"
        )

    def predict(self, image, prompt, temperature=0.2, max_tokens=1024):
        # 1) 이미지 전처리
        image_tensor = process_images([image], self.image_processor)
        image_tensor = image_tensor.to(self.model.device, dtype=torch.float16)

        # 2) Conversation 구성
        conv = conv_templates["vicuna_v1"].copy()
        inp = DEFAULT_IMAGE_TOKEN + "\n" + prompt   # "<image>\n사용자 질문"
        conv.append_message(conv.roles[0], inp)      # Human
        conv.append_message(conv.roles[1], None)     # Assistant (생성 대상)

        # 3) Tokenization
        input_ids = tokenizer_image_token(
            conv.get_prompt(),
            self.tokenizer,
            IMAGE_TOKEN_INDEX,
            return_tensors='pt'
        ).to(self.model.device)

        # 4) 생성
        with torch.inference_mode():
            output = self.model.generate(
                inputs=input_ids,
                images=image_tensor,
                temperature=temperature,
                max_new_tokens=max_tokens
            )

        return self.tokenizer.decode(output[0])
추론 시 입력 형태
[System Message] <STOP>
Human: <image>
이 사진을 설명해줘 <STOP>
Assistant:
    ↓
[시스템 토큰들] + [이미지 256토큰] + [질문 토큰들]
    ↓
LLM이 다음 토큰 생성 시작
7. 주요 특징 및 혁신
7.1 Data-Centric Approach
- GPT-4 활용: Language-only 모델로 vision-language 데이터 생성
- Symbolic Representation: Captions + Bounding boxes
- 다양성 확보: Conversation, Detailed description, Complex reasoning
- 확장 가능성: 더 많은 image-text 쌍에 적용 가능
7.2 Simple yet Effective Architecture
- Frozen Components: Vision encoder, LLM 고정
- Lightweight Connector: Linear projection (2-layer MLP)
- 빠른 학습: 4~10시간 (8×A100)
- 효율성: Pre-training 단계에서 alignment 달성
7.3 Two-Stage Training Strategy
Stage 1 (Feature Alignment):
- 595K caption pairs
- Projection matrix만 학습
- Visual tokenizer 역할
Stage 2 (Instruction Tuning):
- 158K instruction data
- LLM + projection 학습
- Vision encoder frozen
7.4 Emergent Capabilities
Out-of-distribution Generalization:
- Elon Musk 인식 (학습 데이터에 없었음)
- Meme 이해
- OCR 능력 (학습 데이터에 거의 없었음)
Multi-turn Conversation:
- Context 유지
- Follow-up 질문 처리
- Detailed explanations
8. Limitations 및 향후 방향
현재 한계
- Hallucination: 사실과 다른 출력 생성
- 고해상도 이미지: 세밀한 텍스트/브랜드 인식 어려움
- Complex Semantics: "Bag of patches" 문제
- 예: 딸기 + 요거트 → 딸기 맛 요거트 (X)
- Multilingual: 다국어 지원 제한적
향후 연구 방향
-
더 정교한 Connector:
- Gated cross-attention
- Q-former
- Multi-scale features
-
고해상도 처리:
- Patch-based processing
- Adaptive resolution
-
더 큰 데이터셋:
- Diverse domains
- More languages
- Complex reasoning
-
Model Scaling:
- 65B+ LLM variants
- Larger vision encoders
9. 사회적 영향 (Broader Impact)
Risks
Malicious Input:
- OpenAI Filter API로 유해 텍스트 차단
- NSFW Filter로 부적절한 이미지 차단
Hallucination:
- 의료 등 critical application에서 주의 필요
Biases:
- CLIP, LLaMA/Vicuna로부터 편향 전이 가능
Energy Consumption:
- 현재는 작은 데이터셋으로 학습 (595K)
- Scaling 시 에너지 소비 고려 필요
Benefits
Research Community:
- 모든 자산 오픈소스로 공개
- Reproducibility 확보
- Community 기여 가능
Accessibility:
- 다양한 vision-language 태스크 통합
- User-friendly interface
10. Conclusion
LLaVA는 visual instruction tuning이라는 새로운 패러다임을 제시했습니다:
핵심 기여:
1. GPT-4 기반 158K multimodal instruction data 생성
2. Simple yet effective 3-component architecture
3. ScienceQA에서 92.53% 달성 (SOTA)
4. LLaVA-Bench: 최초의 multimodal instruction-following 벤치마크
의의:
- Language-only LLM → Multimodal LMM 확장 경로 제시
- Data-centric approach의 효과 입증
- End-to-end 학습의 가능성 증명
오픈소스:
- 데이터, 코드, 모델 모두 공개
- Community-driven improvement 가능
LLaVA는 멀티모달 AI의 democratization을 위한 중요한 방향성을 제시한 중요한 논문입니다.
읽어주셔서 감사합니다 :)