1. Service Mesh 개념 정리
1-1. Service Mesh 란
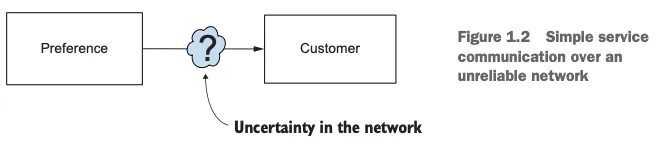
서비스 메시는 애플리케이션을 대신해 프로세스 외부에서 투명하게 네트워크 트래픽을 처리하는 분산형 애플리케이션 인프라입니다.
데이터 플레인과 컨트롤 플레인으로 구성되며, 특정 프로그래밍 언어나 프레임워크에 의존하지 않고 중요한 애플리케이션 네트워킹 기능을 구현합니다.
1-2. 등장 배경
클라우드 환경의 도전 과제
- 신뢰할 수 없는 인프라: 클라우드에서는 인프라가 일시적이거나 간혹 사용 불가능하다는 가정 하에 앱을 구축해야 함
- 복잡한 서비스 관계: 서비스 간 상호작용이 증가함에 따라 장애 전파 위험이 커짐
- 관찰 가능성 부족: 분산 시스템에서 무슨 일이 일어나고 있는지 파악하기 어려움
- 일관된 보안 정책 부재: 다양한 팀이 서로 다른 보안 접근 방식 사용
기존 해결책의 한계
[라이브러리 접근 방식의 문제점]
- 특정 언어/프레임워크에 종속됨
- 여러 언어 사용 시 일관성 유지 어려움
- 라이브러리 유지보수 및 업데이트 부담
[중앙화된 인프라(ESB, API 게이트웨이)의 한계]
- 중앙 병목 현상 발생
- 단일 장애 지점 생성
- 다중 홉(hop) 문제로 지연시간 증가
1-3. Service Mesh 의 구성 요소
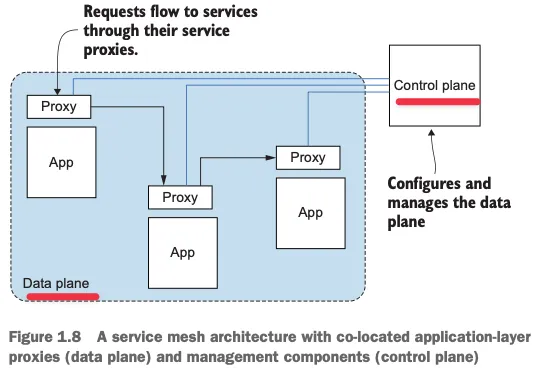
데이터 플레인
- 애플리케이션 옆에 배치된 서비스 프록시(사이드카)의 집합
- 엔보이 프록시(Envoy) 기반 (C++로 작성된 고성능 7계층 프록시)
- 트래픽을 처리하고 라우팅하며 메트릭을 수집
컨트롤 플레인
- 프록시를 관리하고 설정하는 중앙 컴포넌트
- 이스티오(Istio) 의 경우 istiod가 이 역할 담당
- API를 통해 네트워크 동작을 제어할 수 있게 함
1-4. Istio 서비스 메시
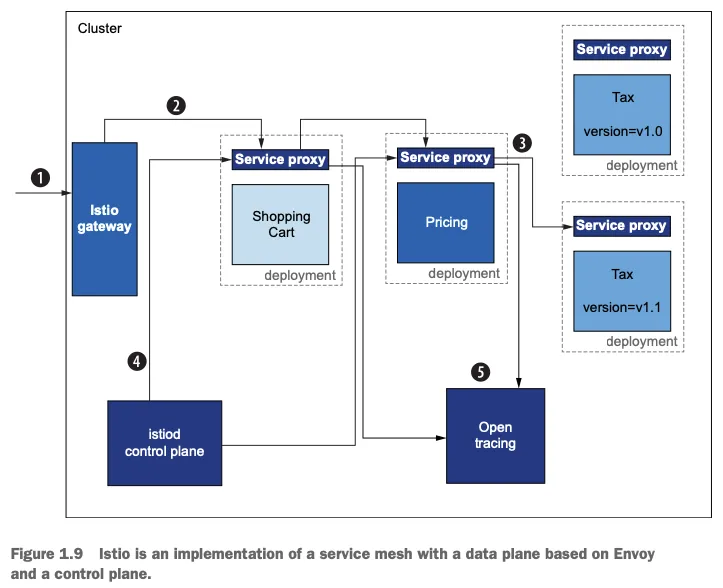
이스티오는 구글, IBM, 리프트가 개발한 오픈소스 서비스 메시 구현체로, 다음과 같은 구성요소를 가집니다.
- istiod: 컨트롤 플레인으로 다음 기능 통합합니다.
- 파일럿(Pilot): 프록시 라우팅 규칙 관리
- 갤리(Galley): 설정 데이터 검증 및 변환
- 시타델(Citadel): 인증서 관리 및 보안 기능
1-5. 서비스 메시의 주요 기능
서비스 복원력 패턴 구현
- 클라이언트 측 로드 밸런싱: 엔드포인트 목록을 제공하고 클라이언트가 결정
- 서비스 디스커버리: 정상 엔드포인트 목록을 찾는 메커니즘
- 서킷 브레이킹: 오동작하는 서비스에 부하 차단
- 격벽(Bulkheading): 리소스 사용량 제한
- 타임아웃 및 재시도: 실패한 요청 처리 전략
트래픽 제어
- 트래픽 시프팅: 특정 비율로 트래픽을 새 버전으로 전환 (카나리 배포)
- 폴트 인젝션: 의도적으로 요청 지연 또는 실패 구현
- 속도 제한: 요청 개수 제한
관찰 가능성
- 메트릭 수집: 요청 처리량, 에러율, 지연시간 등 측정
- 분산 트레이싱: 요청 흐름 전체를 추적
보안
- mTLS(상호 TLS): 서비스 간 암호화된 통신
- 접근 제어 정책: 어떤 서비스가 어떤 서비스와 통신할 수 있는지 제어
1-6. 엔보이 프록시의 핵심 개념
- 리스너(Listener): 트래픽을 수신하고 처리하는 방법 정의
- 라우트(Route): 들어온 요청을 어디로 보낼지 결정
- 클러스터(Cluster): 트래픽을 전달할 논리적 서비스 그룹
- 엔드포인트(Endpoint): 실제 접근 가능한 IP/서비스
- 필터(Filter): 요청 처리 파이프라인
- xDS API: 동적 구성을 위한 API (LDS, RDS, CDS, EDS)
1-7. 서비스 메시의 장단점
장점
- 언어/프레임워크에 구애받지 않는 일관된, 정확한 기능 구현
- 애플리케이션 코드 변경 없이 네트워킹 기능 구현
- 강력한 보안, 관찰성, 트래픽 제어 제공
단점
- 요청 경로에 프록시 추가로 복잡성 증가
- 잘못된 메시 구성 시 여러 서비스에 영향 줄 수 있음
- 운영 관점의 복잡성과 학습 곡선 존재
1-8. 서비스 메시와 다른 패턴 비교
ESB(Enterprise Service Bus)와 차이점
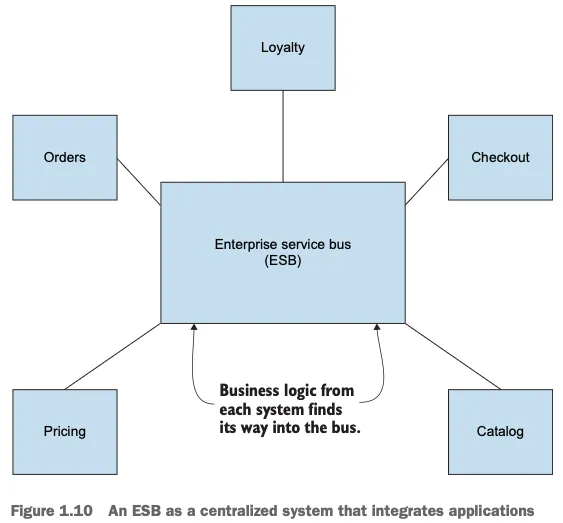
- ESB는 중앙화된 배포 모델, 서비스 메시는 분산 모델
- ESB는 비즈니스 로직과 네트워킹 관심사 혼합, 서비스 메시는 네트워킹에만 집중
- ESB는 종종 독점 솔루션, 서비스 메시는 오픈소스
API 게이트웨이와 차이점
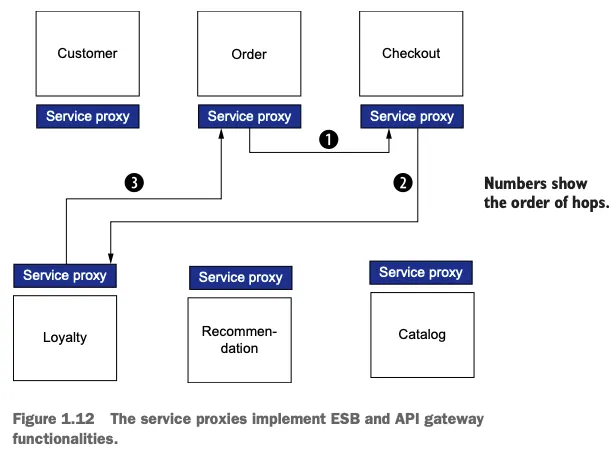
- API 게이트웨이는 경계에서 외부 클라이언트와 내부 서비스 연결
- 서비스 메시는 내부 서비스 간 통신에 집중
- API 게이트웨이는 다중 홉 문제 발생, 서비스 메시는 사이드카 패턴으로 해결
서비스 메시는 클라우드 환경에서 마이크로서비스 간 통신 문제를 해결하기 위한 강력한 패턴이며 애플리케이션 코드를 변경하지 않고도 복원력, 관찰 가능성, 보안, 트래픽 제어를 구현할 수 있어 개발자가 비즈니스 로직에 집중할 수 있게 해줍니다.
그러나 가장 중요한 점은 추가적인 복잡성을 도입하므로 도입 시 신중한 계획과 평가가 필요합니다.
2. Istio 첫걸음
실습을 위해 먼저 선행되어야 할 점은 Local PC 에 Docker Engine 이 설치되어 있어야합니다. Docker Desktop 대신 OrbStack 을 사용하였습니다.
또한, Minikube 대신 Kind : Docker-in-Docker 를 사용하여 k8s 클러스터를 프로비저닝 하는 환경으로 진행하겠습니다.
2-1. Kind Install
- 필수 설치
# Install Kind
brew install kind
kind --version

# Install kubectl
brew install kubernetes-cli
kubectl version --client=true

## kubectl -> k 단축키 설정
echo "alias =kubecolor" >> ~/.zshrc

# Install Helm
brew install helm
helm version- 유용한 툴 설치
# 툴 설치
brew install krew
brew install kube-ps1
brew install kubectx

# kubectl 출력 시 하이라이트 처리
brew install kubecolor
echo "alias kubectl=kubecolor" >> ~/.zshrc
echo "compdef kubecolor=kubectl" >> ~/.zshrc

# krew 플러그인 설치
kubectl krew install neat stern
2-2. k8s (1.23.17) 배포
git clone https://github.com/AcornPublishing/istio-in-action
cd istio-in-action/book-source-code-master
pwd # 각자 자신의 pwd 경로
code .
kind create cluster --name myk8s --image kindest/node:v1.23.17 --config - <<EOF
kind: Cluster
apiVersion: kind.x-k8s.io/v1alpha4
nodes:
- role: control-plane
  extraPortMappings:
  - containerPort: 30000 # Sample Application (istio-ingrssgateway)
    hostPort: 30000
  - containerPort: 30001 # Prometheus
    hostPort: 30001
  - containerPort: 30002 # Grafana
    hostPort: 30002
  - containerPort: 30003 # Kiali
    hostPort: 30003
  - containerPort: 30004 # Tracing
    hostPort: 30004
  - containerPort: 30005 # kube-ops-view
    hostPort: 30005
  extraMounts:
  - hostPath: /Users/leeeuijoo/Downloads/playground/istio/istio-in-action/book-source-code-master # 각자 자신의 pwd 경로로 설정
    containerPath: /istiobook
networking:
  podSubnet: 10.10.0.0/16
  serviceSubnet: 10.200.1.0/24
EOF
# 설치 확인
docker ps
# 노드에 기본 툴 설치
docker exec -it myk8s-control-plane sh -c 'apt update && apt install tree psmisc lsof wget bridge-utils net-tools dnsutils tcpdump ngrep iputils-ping git vim -y'- 편의성 툴 설치
# (옵션) kube-ops-view
helm repo add geek-cookbook https://geek-cookbook.github.io/charts/
helm install kube-ops-view geek-cookbook/kube-ops-view --version 1.2.2 --set service.main.type=NodePort,service.main.ports.http.nodePort=30005 --set env.TZ="Asia/Seoul" --namespace kube-system
kubectl get deploy,pod,svc,ep -n kube-system -l app.kubernetes.io/instance=kube-ops-view
kubectl get pods -n kube-system
NAME READY STATUS RESTARTS AGE
coredns-bd6b6df9f-mrtvh 1/1 Running 0 3m54s
coredns-bd6b6df9f-sp6x6 1/1 Running 0 3m54s
etcd-myk8s-control-plane 1/1 Running 0 4m7s
kindnet-zzmv6 1/1 Running 0 3m54s
kube-apiserver-myk8s-control-plane 1/1 Running 0 4m7s
kube-controller-manager-myk8s-control-plane 1/1 Running 0 4m7s
kube-ops-view-79df45849b-nmpfj 1/1 Running 0 20s
kube-proxy-wnrhv 1/1 Running 0 3m54s
kube-scheduler-myk8s-control-plane 1/1 Running 0 4m7s## kube-ops-view 접속 URL 확인
open "http://localhost:30005/#scale=1.5"
open "http://localhost:30005/#scale=1.3"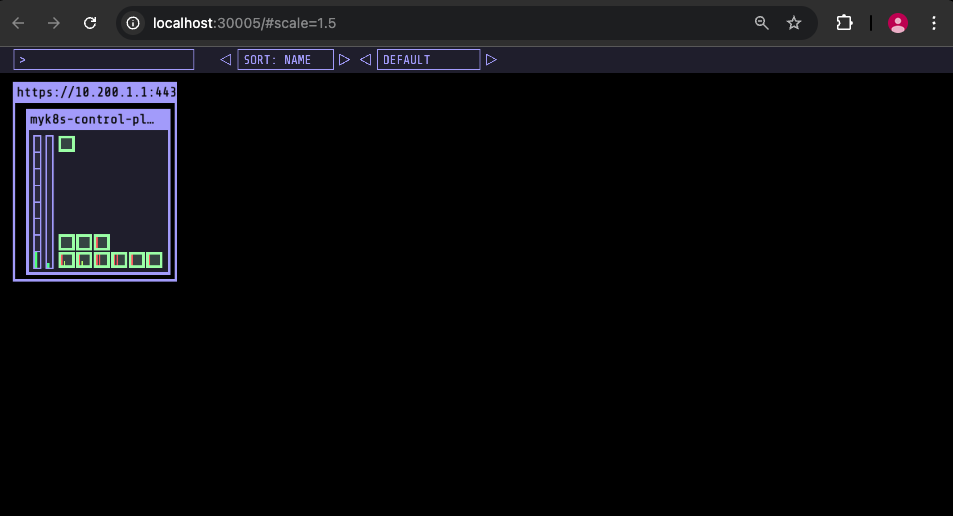
# (옵션) metrics-server
helm repo add metrics-server https://kubernetes-sigs.github.io/metrics-server/
helm install metrics-server metrics-server/metrics-server --set 'args[0]=--kubelet-insecure-tls' -n kube-system
kubectl get all -n kube-system -l app.kubernetes.io/instance=metrics-serverkubectl get pods -n kube-system
NAME READY STATUS RESTARTS AGE
coredns-bd6b6df9f-mrtvh 1/1 Running 0 6m56s
coredns-bd6b6df9f-sp6x6 1/1 Running 0 6m56s
etcd-myk8s-control-plane 1/1 Running 0 7m9s
kindnet-zzmv6 1/1 Running 0 6m56s
kube-apiserver-myk8s-control-plane 1/1 Running 0 7m9s
kube-controller-manager-myk8s-control-plane 1/1 Running 0 7m9s
kube-ops-view-79df45849b-nmpfj 1/1 Running 0 3m22s
kube-proxy-wnrhv 1/1 Running 0 6m56s
kube-scheduler-myk8s-control-plane 1/1 Running 0 7m9s
metrics-server-65bb6f47b6-2xl5v 1/1 Running 0 68s2-3. istio 1.17.8 설치
# myk8s-control-plane 진입 후 설치 진행
docker exec -it myk8s-control-plane bash
-----------------------------------
# 코드 파일들 마운트 확인
tree /istiobook/ -L 1하기 이미지를 보시면 이전에 host mount path 를 컨테이너(Control Plane 서버) 디렉토리를 공유하고 있는 것을 보실 수 있습니다.
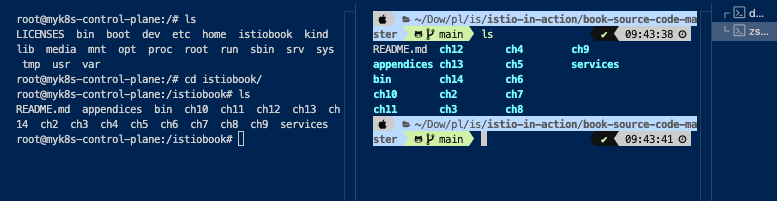
root@myk8s-control-plane:/istiobook# tree /istiobook/ -L 1
/istiobook/
|-- README.md
|-- appendices
|-- bin
|-- ch10
|-- ch11
|-- ch12
|-- ch13
|-- ch14
|-- ch2
|-- ch3
|-- ch4
|-- ch5
|-- ch6
|-- ch7
|-- ch8
|-- ch9
`-- services
17 directories, 1 file[istio Install]
curl -s -L https://istio.io/downloadIstio | ISTIO_VERSION=$ISTIOV sh -
tree istio-$ISTIOV -L 2 # sample yaml 포함root@myk8s-control-plane:/istiobook# tree istio-$ISTIOV -L 2
istio-1.17.8
|-- LICENSE
|-- README.md
|-- bin
| `-- istioctl
|-- manifest.yaml
|-- manifests
| |-- charts
| |-- examples
| `-- profiles
|-- samples
| |-- README.md
| |-- addons
| |-- bookinfo
| |-- certs
| |-- cicd
| |-- custom-bootstrap
| |-- extauthz
| |-- external
| |-- grpc-echo
| |-- health-check
| |-- helloworld
| |-- httpbin
| |-- jwt-server
| |-- kind-lb
| |-- multicluster
| |-- open-telemetry
| |-- operator
| |-- ratelimit
| |-- security
| |-- sleep
| |-- tcp-echo
| |-- wasm_modules
| `-- websockets
`-- tools
|-- _istioctl
|-- certs
`-- istioctl.bash
31 directories, 7 filescp istio-$ISTIOV/bin/istioctl /usr/local/bin/istioctl
istioctl version --remote=falseroot@myk8s-control-plane:/istiobook# cp istio-$ISTIOV/bin/istioctl /usr/local/bin/istioctl
root@myk8s-control-plane:/istiobook# istioctl version --remote=false
1.17.8- default 프로파일 컨트롤 플레인 배포
istioctl x precheck # 설치 전 k8s 조건 충족 검사
istioctl profile list
istioctl install --set profile=default -yroot@myk8s-control-plane:/istiobook# istioctl x precheck
✔ No issues found when checking the cluster. Istio is safe to install or upgrade!
To get started, check out https://istio.io/latest/docs/setup/getting-started/
root@myk8s-control-plane:/istiobook# istioctl profile list
Istio configuration profiles:
ambient
default
demo
empty
external
minimal
openshift
preview
remote
root@myk8s-control-plane:/istiobook# istioctl install --set profile=default -y
✔ Istio core installed
✔ Istiod installed
✔ Ingress gateways installed
✔ Installation complete Making this installation the default for injection and validation.
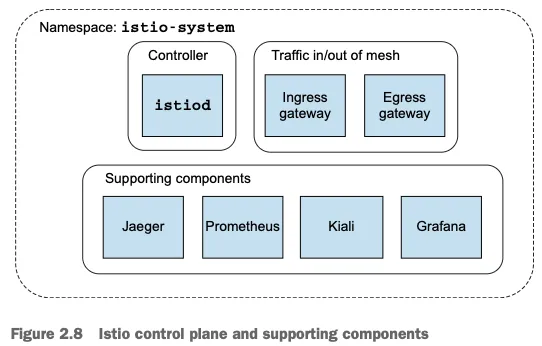
Thank you for installing Istio 1.17. Please take a few minutes to tell us about your install/upgrade experience! https://forms.gle/hMHGiwZHPU7UQRWe9- 설치 확인 : istiod, istio-ingressgateway, crd 등
kubectl get all,svc,ep,sa,cm,secret,pdb -n istio-system
kubectl get crd | grep istio.io | sort
istioctl verify-install # 설치 확인kubectl get all,svc,ep,sa,cm,secret,pdb -n istio-system
NAME READY STATUS RESTARTS AGE
pod/istio-ingressgateway-996bc6bb6-dbkqg 1/1 Running 0 54s
pod/istiod-7df6ffc78d-nlvdc 1/1 Running 0 66s
NAME TYPE CLUSTER-IP EXTERNAL-IP PORT(S) AGE
service/istio-ingressgateway LoadBalancer 10.200.1.50 <pending> 15021:30191/TCP,80:30932/TCP,443:31839/TCP 54s
service/istiod ClusterIP 10.200.1.109 <none> 15010/TCP,15012/TCP,443/TCP,15014/TCP 66s
NAME READY UP-TO-DATE AVAILABLE AGE
deployment.apps/istio-ingressgateway 1/1 1 1 54s
deployment.apps/istiod 1/1 1 1 66s
NAME DESIRED CURRENT READY AGE
replicaset.apps/istio-ingressgateway-996bc6bb6 1 1 1 54s
replicaset.apps/istiod-7df6ffc78d 1 1 1 66s
NAME REFERENCE TARGETS MINPODS MAXPODS REPLICAS AGE
horizontalpodautoscaler.autoscaling/istio-ingressgateway Deployment/istio-ingressgateway 9%/80% 1 5 1 54s
horizontalpodautoscaler.autoscaling/istiod Deployment/istiod 0%/80% 1 5 1 66s
NAME ENDPOINTS AGE
endpoints/istio-ingressgateway 10.10.0.8:15021,10.10.0.8:8080,10.10.0.8:8443 54s
endpoints/istiod 10.10.0.7:15012,10.10.0.7:15010,10.10.0.7:15017 + 1 more... 66s
NAME SECRETS AGE
serviceaccount/default 1 67s
serviceaccount/istio-ingressgateway-service-account 1 54s
serviceaccount/istio-reader-service-account 1 67s
serviceaccount/istiod 1 66s
serviceaccount/istiod-service-account 1 67s
NAME DATA AGE
configmap/istio 2 66s
configmap/istio-ca-root-cert 1 56s
configmap/istio-gateway-deployment-leader 0 57s
configmap/istio-gateway-status-leader 0 57s
configmap/istio-leader 0 57s
configmap/istio-namespace-controller-election 0 56s
configmap/istio-sidecar-injector 2 66s
configmap/kube-root-ca.crt 1 67s
NAME TYPE DATA AGE
secret/default-token-wxbjg kubernetes.io/service-account-token 3 67s
secret/istio-ca-secret istio.io/ca-root 5 57s
secret/istio-ingressgateway-service-account-token-6wmpb kubernetes.io/service-account-token 3 54s
secret/istio-reader-service-account-token-bkz4q kubernetes.io/service-account-token 3 67s
secret/istiod-service-account-token-5xjpd kubernetes.io/service-account-token 3 67s
secret/istiod-token-mcrhw kubernetes.io/service-account-token 3 66s
NAME MIN AVAILABLE MAX UNAVAILABLE ALLOWED DISRUPTIONS AGE
poddisruptionbudget.policy/istio-ingressgateway 1 N/A 0 54s
poddisruptionbudget.policy/istiod 1 N/A 0 66s
- 보조 도구 설치 - APM 도구 설치
kubectl apply -f istio-$ISTIOV/samples/addons
kubectl get pod -n istio-system
NAME READY STATUS RESTARTS AGE
grafana-67f5ccd9d7-cgkn4 1/1 Running 0 86s
istio-ingressgateway-58888b4f9b-7t5zj 1/1 Running 0 116s
istiod-78c465d86b-pvqv6 1/1 Running 0 2m14s
jaeger-78cb4f7d4b-d8b88 1/1 Running 0 86s
kiali-c946fb5bc-4njln 1/1 Running 0 86s
prometheus-7cc96d969f-6ft4s 2/2 Running 0 86s
# 빠져나오기
exit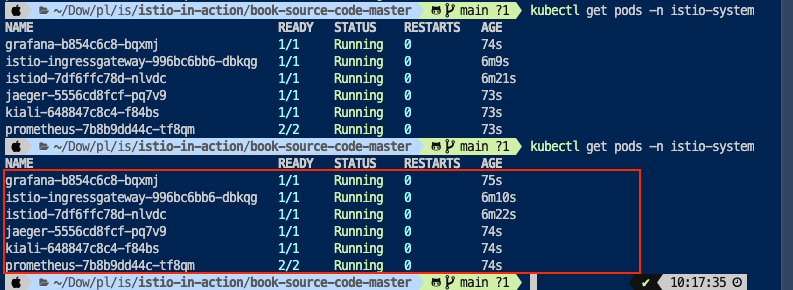
현재는 Ingress Gateway 만 배포되어 있는 상태
아직 Egress GW 는 배포하지 않았습니다.
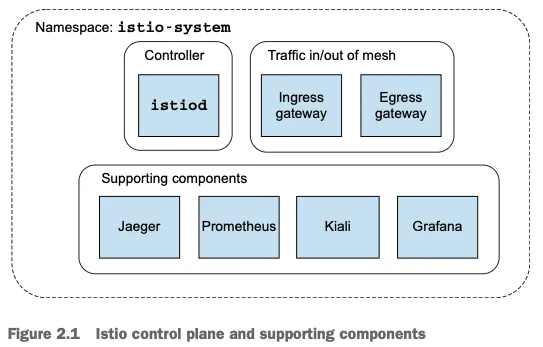
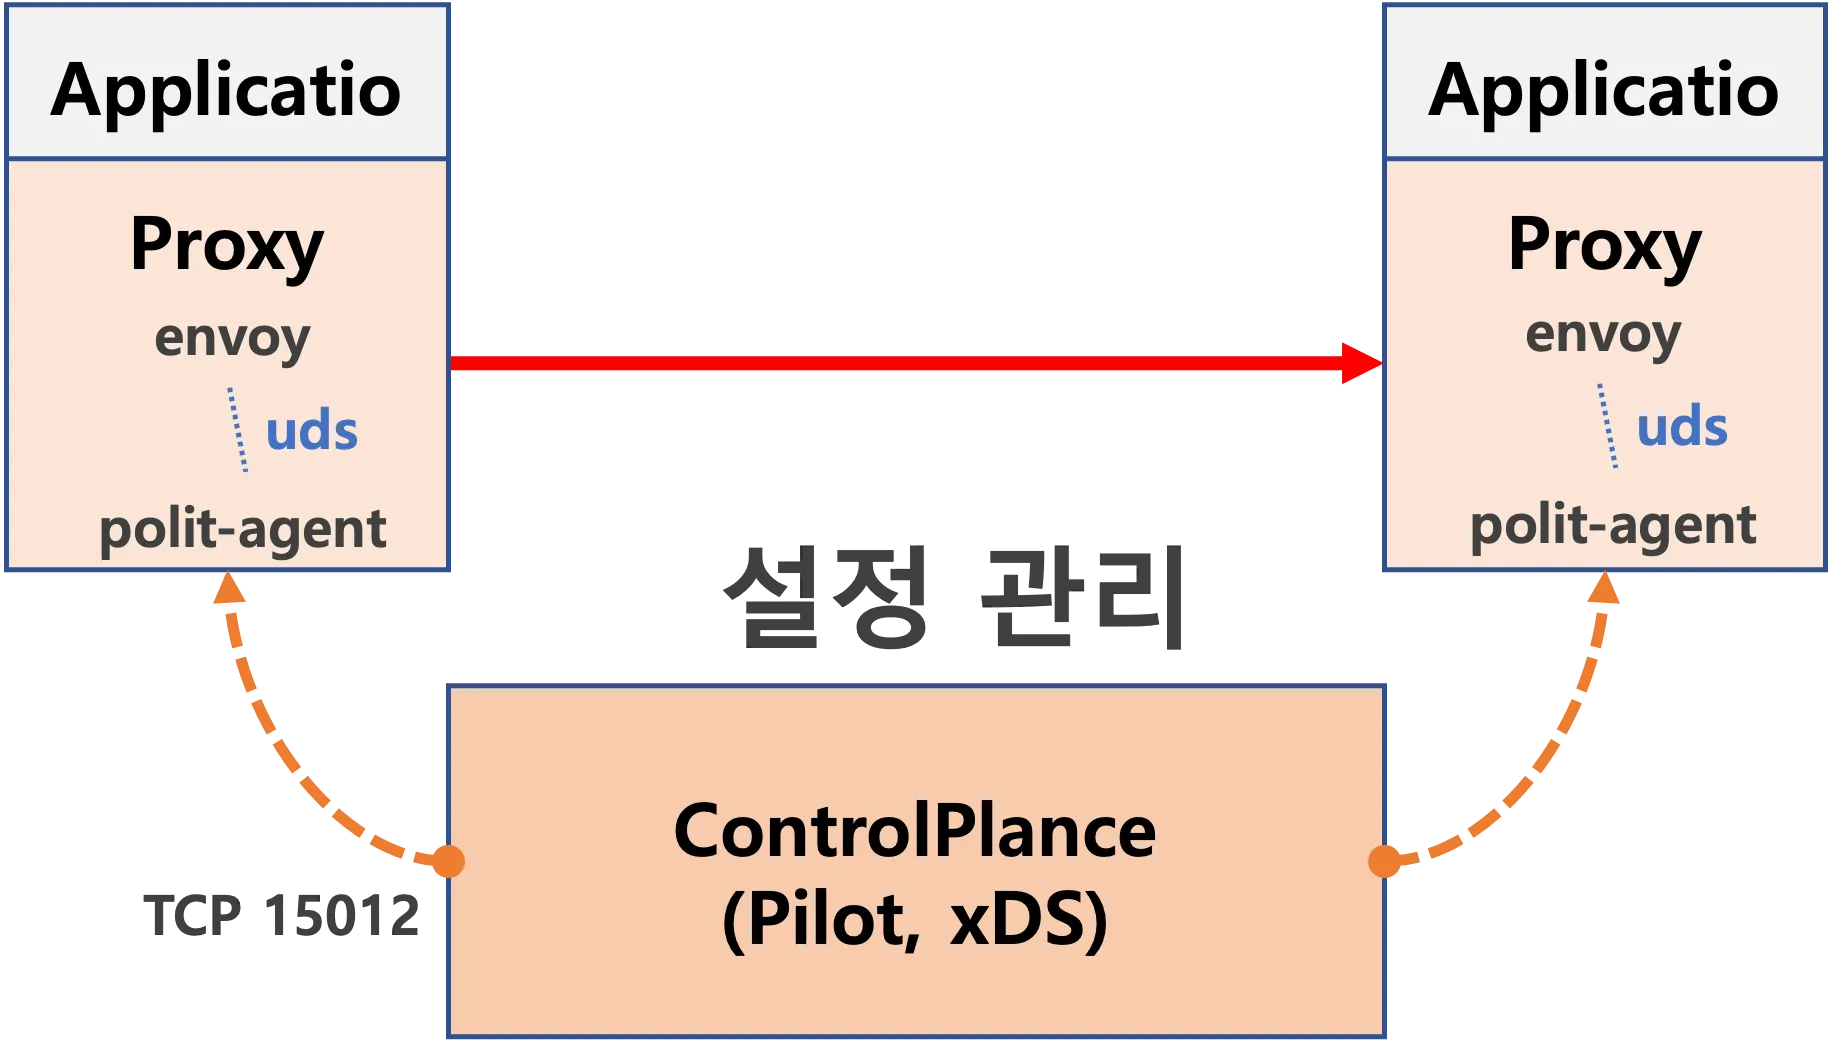
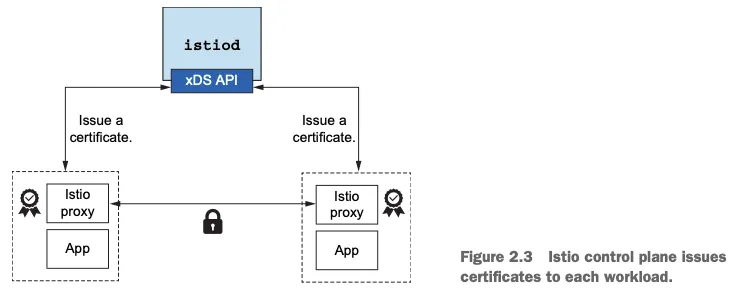
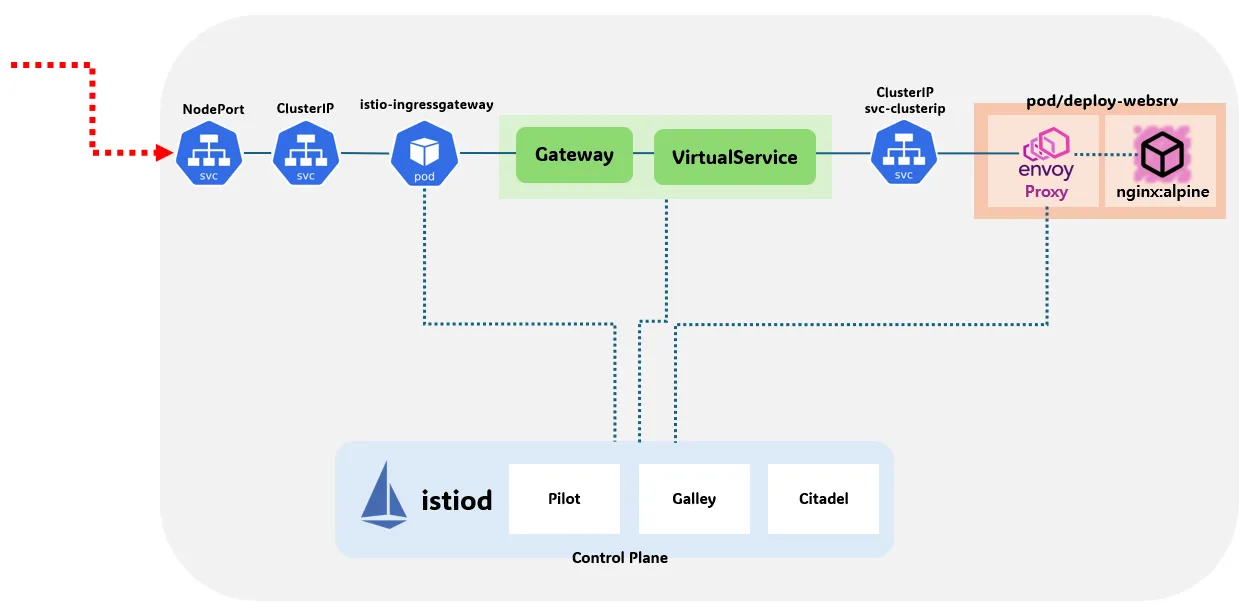
구성요소를 보게 되면 isiod 는 istio proxy 를 관리하고 있으며 xds API (Discovery API) 를 통해 proxy 안에 있는 Envoy 의 동적인 설정들을 주입시킵니다.

istiod 가 mtls 를 위한 인증서를 내려주는 로직입니다.
2-4. Service Mesh 에 첫 애플리케이션 배포

애플리케이션은 간단합니다.웹엡이라는 서비스는 카탈로그에 등록되어 있는 목록 정보들을 읽어나가는 애플리케이션 입니다.
서비스 매쉬를 주입하는 방법은 두가지 가 있는데 후자를 선택하여 진행합니다.
- 직접 Sidecar 패턴으로 주입하는 방법
- 자동으로 네임스페이의 pod spec 에 자동으로 주입
#
kubectl create ns istioinaction
# 방법1 : yaml에 sidecar 설정을 추가
cat services/catalog/kubernetes/catalog.yaml
docker exec -it myk8s-control-plane istioctl kube-inject -f /istiobook/services/catalog/kubernetes/catalog.yaml
...
- args:
- proxy
- sidecar
- --domain
- $(POD_NAMESPACE).svc.cluster.local
- --proxyLogLevel=warning
- --proxyComponentLogLevel=misc:error
- --log_output_level=default:info
- --concurrency
- "2"
env:
- name: JWT_POLICY
value: third-party-jwt
- name: PILOT_CERT_PROVIDER
value: istiod
- name: CA_ADDR
value: istiod.istio-system.svc:15012
- name: POD_NAME
valueFrom:
fieldRef:
fieldPath: metadata.name
...
image: docker.io/istio/proxyv2:1.13.0
name: istio-proxy
# 방법2 : namespace에 레이블을 추가하면 istiod (오퍼레이터)가 해당 namepsace의 pod spec에 자동으로 sidecar 설정을 주입
kubectl label namespace istioinaction istio-injection=enabled
kubectl get ns --show-labels
#
kubectl get mutatingwebhookconfiguration
NAME WEBHOOKS AGE
istio-revision-tag-default 4 9m24s # 특정 revision의 사이드카 주입 설정 관리
istio-sidecar-injector 4 9m45s # Istio는 각 애플리케이션 Pod에 Envoy 사이드카 프록시를 자동으로 주입
## 네임스페이스나 Pod에 istio-injection=enabled 라벨이 있어야 작동
kubectl get mutatingwebhookconfiguration istio-sidecar-injector -o yaml
#
kubectl get cm -n istio-system istio-sidecar-injector -o yaml | kubectl neat
현재는 catalog service yaml 파일을 보게 되면 istio 관련 세팅이 없는 것을 볼 수 있습니다.
apiVersion: v1
kind: ServiceAccount
metadata:
name: catalog
---
apiVersion: v1
kind: Service
metadata:
labels:
app: catalog
name: catalog
spec:
ports:
- name: http
port: 80
protocol: TCP
targetPort: 3000
selector:
app: catalog
---
apiVersion: apps/v1
kind: Deployment
metadata:
labels:
app: catalog
version: v1
name: catalog
spec:
replicas: 1
selector:
matchLabels:
app: catalog
version: v1
template:
metadata:
labels:
app: catalog
version: v1
spec:
serviceAccountName: catalog
containers:
- env:
- name: KUBERNETES_NAMESPACE
valueFrom:
fieldRef:
fieldPath: metadata.namespace
image: istioinaction/catalog:latest
imagePullPolicy: IfNotPresent
name: catalog
ports:
- containerPort: 3000
name: http
protocol: TCP
securityContext:
privileged: false하지만, istio 인젝션을 추가 하게 되면 아래와 같습니다. 추가로 yaml 파일도 출력됩니다.
네트워크를 꺾기 위해 iptable 을 조작하는 것을 보실 수 있으며 또한, sidecar 컨테이너도 생성 되는 것을 보실 수 있습니다.
spec:
containers:
- env:
- name: KUBERNETES_NAMESPACE
valueFrom:
fieldRef:
fieldPath: metadata.namespace
image: istioinaction/catalog:latest
imagePullPolicy: IfNotPresent
name: catalog
ports:
- containerPort: 3000
name: http
protocol: TCP
resources: {}
securityContext:
privileged: false
- args:
- proxy
- sidecar
- --domain
- $(POD_NAMESPACE).svc.cluster.local
- --proxyLogLevel=warning
- --proxyComponentLogLevel=misc:error
- --log_output_level=default:info
- --concurrency
- "2"
env:
- name: JWT_POLICY
value: third-party-jwt
- name: PILOT_CERT_PROVIDER
value: istiod
- name: CA_ADDR
value: istiod.istio-system.svc:15012
- name: POD_NAME
valueFrom:
fieldRef:
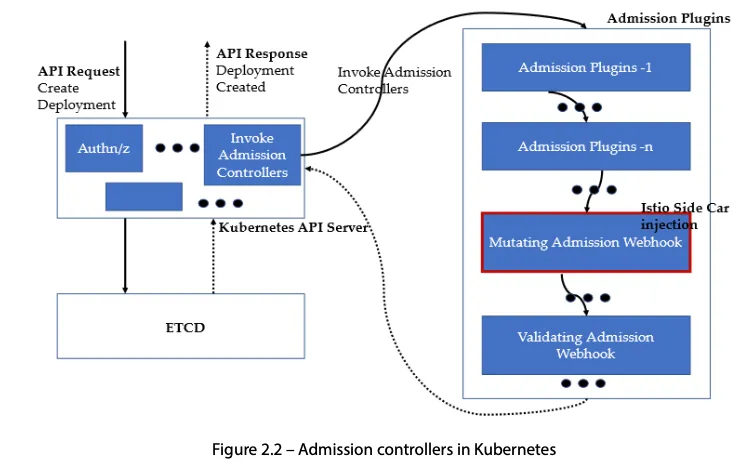
fieldPath: metadata.name하지만 매번 이렇게 yaml 파일을 넣을 순 없으니 mutation Webhook(kube API 가 인증 인가 이후에 admission 컨트롤 단계를 진행할 때) 을 사용합니다. 이것이 바로 인젝션 자동 주입 입니다.
#
kubectl create ns istioinaction
# 방법1 : yaml에 sidecar 설정을 추가
cat services/catalog/kubernetes/catalog.yaml
docker exec -it myk8s-control-plane istioctl kube-inject -f /istiobook/services/catalog/kubernetes/catalog.yaml
...
- args:
- proxy
- sidecar
- --domain
- $(POD_NAMESPACE).svc.cluster.local
- --proxyLogLevel=warning
- --proxyComponentLogLevel=misc:error
- --log_output_level=default:info
- --concurrency
- "2"
env:
- name: JWT_POLICY
value: third-party-jwt
- name: PILOT_CERT_PROVIDER
value: istiod
- name: CA_ADDR
value: istiod.istio-system.svc:15012
- name: POD_NAME
valueFrom:
fieldRef:
fieldPath: metadata.name
...
image: docker.io/istio/proxyv2:1.13.0
name: istio-proxy
# 방법2 : namespace에 레이블을 추가하면 istiod (오퍼레이터)가 해당 namepsace의 pod spec에 자동으로 sidecar 설정을 주입
kubectl label namespace istioinaction istio-injection=enabled
kubectl get ns --show-labels
#
kubectl get mutatingwebhookconfiguration
NAME WEBHOOKS AGE
istio-revision-tag-default 4 9m24s # 특정 revision의 사이드카 주입 설정 관리
istio-sidecar-injector 4 9m45s # Istio는 각 애플리케이션 Pod에 Envoy 사이드카 프록시를 자동으로 주입
## 네임스페이스나 Pod에 istio-injection=enabled 라벨이 있어야 작동
kubectl get mutatingwebhookconfiguration istio-sidecar-injector -o yaml
#
kubectl get cm -n istio-system istio-sidecar-injector -o yaml | kubectl neat
istioincation 네임스페이스에 라벨일 달린 것을 보실 수 있습니다.

이제, 실제 애플리케이션을 배포해보겠습니다.
cat services/catalog/kubernetes/catalog.yaml
kubectl apply -f services/catalog/kubernetes/catalog.yaml -n istioinaction
cat services/webapp/kubernetes/webapp.yaml
kubectl apply -f services/webapp/kubernetes/webapp.yaml -n istioinactionNAME READY STATUS RESTARTS AGE
catalog-6cf4b97d-k6kw8 2/2 Running 0 4m59s
webapp-7685bcb84-gzwl6 2/2 Running 0 4m54s
배포된 것을 보실 수 있으며, 첫번째로 확인해 볼 내용은 Pod 에 컨테이너가 하나인데 2/2 를 확인할 수 있습니다.
하여, kubectl describe 로 해당 Pod 를 살펴봅니다.
Containers:
catalog:
Container ID: containerd://3ec216599ed739bd63dc43e502ba980cda670d791e8e2c412e74d9150ce5536f
Image: istioinaction/catalog:latest
Image ID: docker.io/istioinaction/catalog@sha256:304226b8b076ec363f72c0cd13d60ae1a913680a9f2e61e33254d1de5b34f8fb
Port: 3000/TCP
Host Port: 0/TCP
State: Running
Started: Thu, 10 Apr 2025 10:41:45 +0900
Ready: True
Restart Count: 0
Environment:
KUBERNETES_NAMESPACE: istioinaction (v1:metadata.namespace)
Mounts:
/var/run/secrets/kubernetes.io/serviceaccount from kube-api-access-wzjxs (ro)
istio-proxy:
Container ID: containerd://a711e7bb1777eda8d7553345ef1602078cc170344a9015f9331bdfa02536824e
Image: docker.io/istio/proxyv2:1.17.8
Image ID: docker.io/istio/proxyv2@sha256:d33fd90e25c59f4f7378d1b9dd0eebbb756e03520ab09cf303a43b51b5cb01b8
Port: 15090/TCP
Host Port: 0/TCP
Args:
proxy
sidecar
--domain
$(POD_NAMESPACE).svc.cluster.local
--proxyLogLevel=warning
--proxyComponentLogLevel=misc:error
--log_output_level=default:info
--concurrency
2
State: Running
Started: Thu, 10 Apr 2025 10:41:45 +0900
Ready: True
Restart Count: 0
Limits:
cpu: 2
memory: 1Gi
Requests:
cpu: 100m
memory: 128Mi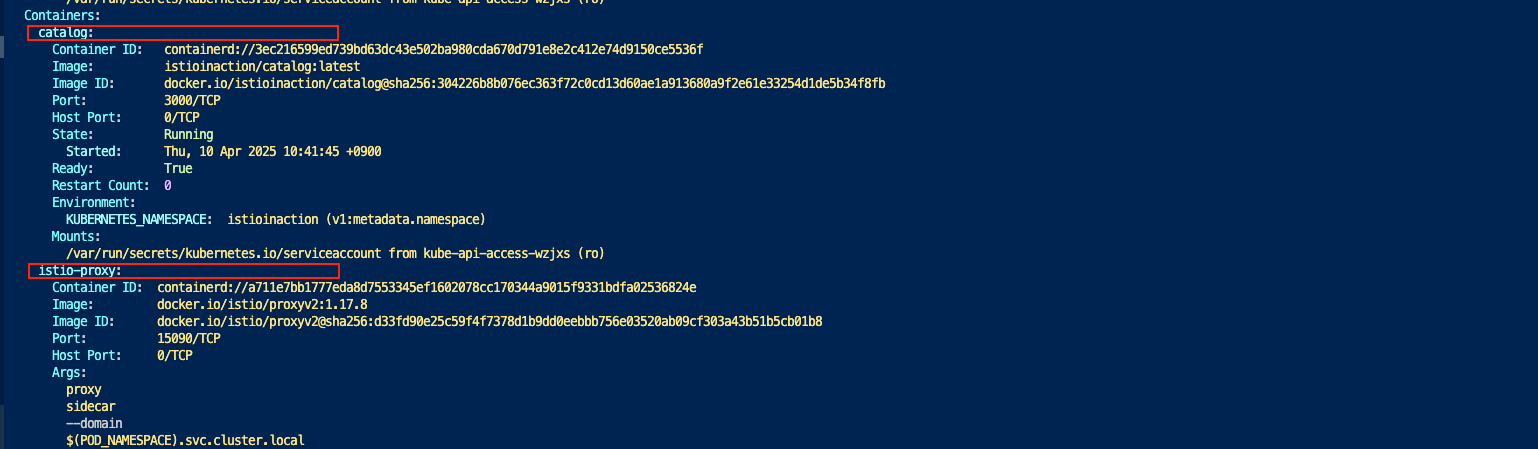
즉, Admission Webhook 이 istio-proxy 를 자동으로 주입한 것입니다.
네트워크 트러블 슈팅 도구를 배포 - netshoot
cat <<EOF | kubectl apply -f -
apiVersion: v1
kind: Pod
metadata:
name: netshoot
spec:
containers:
- name: netshoot
image: nicolaka/netshoot
command: ["tail"]
args: ["-f", "/dev/null"]
terminationGracePeriodSeconds: 0
EOFkubectl get svc,ep -n istioinaction
NAME TYPE CLUSTER-IP EXTERNAL-IP PORT(S) AGE
service/catalog ClusterIP 10.200.1.112 <none> 80/TCP 9m48s
service/webapp ClusterIP 10.200.1.9 <none> 80/TCP 9m43s
NAME ENDPOINTS AGE
endpoints/catalog 10.10.0.13:3000 9m48s
endpoints/webapp 10.10.0.14:8080 9m43scatalog 라는 서비스에 Cluster IP 에 매핑되는 도메인 주소로 접근하기 위해 netshoot Pod 에 접속하여 테스트
# catalog 접속 확인
kubectl exec -it netshoot -- curl -s http://catalog.istioinaction/items/1 | jq
# webapp 접속 확인
kubectl exec -it netshoot -- curl -s http://webapp.istioinaction/api/catalog/items/1 | jq
# 아래 방법 대신 임시 사용
kubectl port-forward -n istioinaction deploy/webapp 8080:8080
확인 후 CTRL+C 로 종료
#
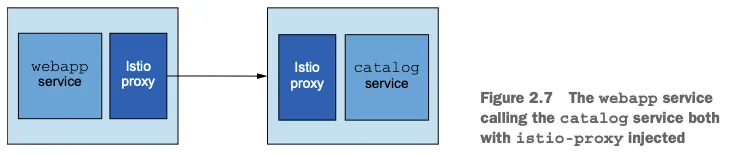
open http://localhost:8080두번째 명령어는 webapp 을 경유해서 catalog 서비스내 목록을 리턴 받는 명령어입니다.

현재 istioctl 명령어는 host 내에 설치가 되어 있지 않기 때문에 컨테이너 내에서 명령을 실행하는 점 참고를 부탁드립니다.
2-5. 복원력, 관찰가능성, 트래픽 제어
Istio 로 상태 정보 확인
# istioctl proxy-status : 단축어 ps
docker exec -it myk8s-control-plane istioctl proxy-status
docker exec -it myk8s-control-plane istioctl psdocker exec -it myk8s-control-plane istioctl proxy-status ✔ 12:55:56
NAME CLUSTER CDS LDS EDS RDS ECDS ISTIOD VERSION
catalog-6cf4b97d-k6kw8.istioinaction Kubernetes SYNCED SYNCED SYNCED SYNCED NOT SENT istiod-7df6ffc78d-nlvdc 1.17.8
istio-ingressgateway-996bc6bb6-dbkqg.istio-system Kubernetes SYNCED SYNCED SYNCED NOT SENT NOT SENT istiod-7df6ffc78d-nlvdc 1.17.8
webapp-7685bcb84-gzwl6.istioinaction Kubernetes SYNCED SYNCED SYNCED SYNCED NOT SENT istiod-7df6ffc78d-nlvdc 1.17.8
docker exec -it myk8s-control-plane istioctl ps ✔ 13:06:17
NAME CLUSTER CDS LDS EDS RDS ECDS ISTIOD VERSION
catalog-6cf4b97d-k6kw8.istioinaction Kubernetes SYNCED SYNCED SYNCED SYNCED NOT SENT istiod-7df6ffc78d-nlvdc 1.17.8
istio-ingressgateway-996bc6bb6-dbkqg.istio-system Kubernetes SYNCED SYNCED SYNCED NOT SENT NOT SENT istiod-7df6ffc78d-nlvdc 1.17.8
webapp-7685bcb84-gzwl6.istioinaction Kubernetes SYNCED SYNCED SYNCED SYNCED NOT SENT istiod-7df6ffc78d-nlvdc 1.17.8이제 istio Ingress GW 를 사용하여 webapp 을 Istio 망으로 외부에서 접근하는 내용을 다뤄보겠습니다.
- 이전에 dev Profile 을 사용하여 배포가 됐었음

cat ch2/ingress-gateway.yaml
cat <<EOF | kubectl -n istioinaction apply -f -
apiVersion: networking.istio.io/v1alpha3
kind: Gateway
metadata:
name: outfitters-gateway
namespace: istioinaction
spec:
selector:
istio: ingressgateway # use istio default controller
servers:
- port:
number: 80
name: http
protocol: HTTP
hosts:
- "*"
---
apiVersion: networking.istio.io/v1alpha3
kind: VirtualService
metadata:
name: webapp-virtualservice
namespace: istioinaction
spec:
hosts:
- "*"
gateways:
- outfitters-gateway
http:
- route:
- destination:
host: webapp
port:
number: 80
EOF여기서 중요한 점은 spec.selector, VirtualService 부분입니다.
- 현재 어떤 gateway 를 쓸 것 인가 (이미 라벨값이 설정 되어 있음)
- Virtual Service 를 통해 본격적으로 트래픽경로를 설정하게 됩니다.
[확인]
- 두가지
kubectl get gw,vs -n istioinaction ✔ kind-myk8s ⎈ 15:12:18
NAME AGE
gateway.networking.istio.io/outfitters-gateway 35s
NAME GATEWAYS HOSTS AGE
virtualservice.networking.istio.io/webapp-virtualservice ["outfitters-gateway"] ["*"] 35s추가적으로 아래는 evoy 로 동기화 되는 내용인데, envoy 에 대한 정보를 상세하게 보려면 아래의 명령어를 사용하시면 됩니다.

ISTIOIGW=istio-ingressgateway-996bc6bb6-dbkqg.istio-system
WEBAPP=webapp-7685bcb84-gzwl6.istioinaction# istioctl proxy-status : 단축어 ps
docker exec -it myk8s-control-plane istioctl proxy-status
NAME CLUSTER CDS LDS EDS RDS ECDS ISTIOD VERSION
catalog-6cf4b97d-nccfj.istioinaction Kubernetes SYNCED SYNCED SYNCED SYNCED NOT SENT istiod-7df6ffc78d-bj7h7 1.17.8
istio-ingressgateway-996bc6bb6-mz544.istio-system Kubernetes SYNCED SYNCED SYNCED SYNCED NOT SENT istiod-7df6ffc78d-bj7h7 1.17.8
webapp-7685bcb84-c55ck.istioinaction Kubernetes SYNCED SYNCED SYNCED SYNCED NOT SENT istiod-7df6ffc78d-bj7h7 1.17.8
ISTIOIGW=istio-ingressgateway-996bc6bb6-647tx.istio-system
WEBAPP=webapp-7685bcb84-nfntj.istioinaction
# istioctl proxy-config : 단축어 pc
docker exec -it myk8s-control-plane istioctl proxy-config all $ISTIOIGW
docker exec -it myk8s-control-plane istioctl proxy-config all $WEBAPP
docker exec -it myk8s-control-plane istioctl proxy-config listener $ISTIOIGW
docker exec -it myk8s-control-plane istioctl proxy-config route $ISTIOIGW
docker exec -it myk8s-control-plane istioctl proxy-config cluster $ISTIOIGW
docker exec -it myk8s-control-plane istioctl proxy-config endpoint $ISTIOIGW
docker exec -it myk8s-control-plane istioctl proxy-config log $ISTIOIGW
docker exec -it myk8s-control-plane istioctl proxy-config listener $WEBAPP
docker exec -it myk8s-control-plane istioctl proxy-config route $WEBAPP
docker exec -it myk8s-control-plane istioctl proxy-config cluster $WEBAPP
docker exec -it myk8s-control-plane istioctl proxy-config endpoint $WEBAPP
docker exec -it myk8s-control-plane istioctl proxy-config log $WEBAPP
# envoy 가 사용하고 있는 인증서 정보 확인
docker exec -it myk8s-control-plane istioctl proxy-config secret $ISTIOIGW
docker exec -it myk8s-control-plane istioctl proxy-config secret $WEBAPP
[route 확인]
- istio Ingress GW 에 설정되어 있는 Route 정보이며, 정리하자면 tcp 8080 으로 들어오고 Match 되는 트래픽은 webapp-virtualservice 으로 보낸다라는 내용을 의미합니다.
docker exec -it myk8s-control-plane istioctl proxy-config route $ISTIOIGW ✔ 15:18:15
NAME DOMAINS MATCH VIRTUAL SERVICE
http.8080 * /* webapp-virtualservice.istioinaction
* /stats/prometheus*
* /healthz/ready* [리스너 확인]
docker exec -it myk8s-control-plane istioctl proxy-config listener $ISTIOIGW ✔ 15:18:31
ADDRESS PORT MATCH DESTINATION
0.0.0.0 8080 ALL Route: http.8080
0.0.0.0 15021 ALL Inline Route: /healthz/ready*
0.0.0.0 15090 ALL Inline Route: /stats/prometheus*[클러스터 확인]
docker exec -it myk8s-control-plane istioctl proxy-config cluster $ISTIOIGW ✔ 15:21:03
SERVICE FQDN PORT SUBSET DIRECTION TYPE DESTINATION RULE
BlackHoleCluster - - - STATIC
agent - - - STATIC
catalog.istioinaction.svc.cluster.local 80 - outbound EDS
grafana.istio-system.svc.cluster.local 3000 - outbound EDS
istio-ingressgateway.istio-system.svc.cluster.local 80 - outbound EDS
istio-ingressgateway.istio-system.svc.cluster.local 443 - outbound EDS
istio-ingressgateway.istio-system.svc.cluster.local 15021 - outbound EDS
istiod.istio-system.svc.cluster.local 443 - outbound EDS
istiod.istio-system.svc.cluster.local 15010 - outbound EDS
istiod.istio-system.svc.cluster.local 15012 - outbound EDS
istiod.istio-system.svc.cluster.local 15014 - outbound EDS
jaeger-collector.istio-system.svc.cluster.local 9411 - outbound EDS
jaeger-collector.istio-system.svc.cluster.local 14250 - outbound EDS
jaeger-collector.istio-system.svc.cluster.local 14268 - outbound EDS
kiali.istio-system.svc.cluster.local 9090 - outbound EDS
kiali.istio-system.svc.cluster.local 20001 - outbound EDS
kube-dns.kube-system.svc.cluster.local 53 - outbound EDS
kube-dns.kube-system.svc.cluster.local 9153 - outbound EDS
kube-ops-view.kube-system.svc.cluster.local 8080 - outbound EDS
kubernetes.default.svc.cluster.local 443 - outbound EDS
metrics-server.kube-system.svc.cluster.local 443 - outbound EDS
prometheus.istio-system.svc.cluster.local 9090 - outbound EDS
prometheus_stats - - - STATIC
sds-grpc - - - STATIC
tracing.istio-system.svc.cluster.local 80 - outbound EDS
tracing.istio-system.svc.cluster.local 16685 - outbound EDS
webapp.istioinaction.svc.cluster.local 80 - outbound EDS
xds-grpc - - - STATIC
zipkin - - - STRICT_DNS
zipkin.istio-system.svc.cluster.local 9411 - outbound EDS [엔드포인트 확인]
docker exec -it myk8s-control-plane istioctl proxy-config endpoint $ISTIOIGW ✔ 15:21:56
ENDPOINT STATUS OUTLIER CHECK CLUSTER
10.10.0.10:9090 HEALTHY OK outbound|9090||prometheus.istio-system.svc.cluster.local
10.10.0.11:3000 HEALTHY OK outbound|3000||grafana.istio-system.svc.cluster.local
10.10.0.12:9090 HEALTHY OK outbound|9090||kiali.istio-system.svc.cluster.local
10.10.0.12:20001 HEALTHY OK outbound|20001||kiali.istio-system.svc.cluster.local
10.10.0.13:3000 HEALTHY OK outbound|80||catalog.istioinaction.svc.cluster.local
10.10.0.14:8080 HEALTHY OK outbound|80||webapp.istioinaction.svc.cluster.local
10.10.0.3:53 HEALTHY OK outbound|53||kube-dns.kube-system.svc.cluster.local
10.10.0.3:9153 HEALTHY OK outbound|9153||kube-dns.kube-system.svc.cluster.local
10.10.0.4:53 HEALTHY OK outbound|53||kube-dns.kube-system.svc.cluster.local
10.10.0.4:9153 HEALTHY OK outbound|9153||kube-dns.kube-system.svc.cluster.local
10.10.0.5:8080 HEALTHY OK outbound|8080||kube-ops-view.kube-system.svc.cluster.local
10.10.0.6:10250 HEALTHY OK outbound|443||metrics-server.kube-system.svc.cluster.local
10.10.0.7:15010 HEALTHY OK outbound|15010||istiod.istio-system.svc.cluster.local
10.10.0.7:15012 HEALTHY OK outbound|15012||istiod.istio-system.svc.cluster.local
10.10.0.7:15014 HEALTHY OK outbound|15014||istiod.istio-system.svc.cluster.local
10.10.0.7:15017 HEALTHY OK outbound|443||istiod.istio-system.svc.cluster.local
10.10.0.8:8080 HEALTHY OK outbound|80||istio-ingressgateway.istio-system.svc.cluster.local
10.10.0.8:8443 HEALTHY OK outbound|443||istio-ingressgateway.istio-system.svc.cluster.local
10.10.0.8:15021 HEALTHY OK outbound|15021||istio-ingressgateway.istio-system.svc.cluster.local
10.10.0.9:9411 HEALTHY OK outbound|9411||jaeger-collector.istio-system.svc.cluster.local
10.10.0.9:9411 HEALTHY OK outbound|9411||zipkin.istio-system.svc.cluster.local
10.10.0.9:14250 HEALTHY OK outbound|14250||jaeger-collector.istio-system.svc.cluster.local
10.10.0.9:14268 HEALTHY OK outbound|14268||jaeger-collector.istio-system.svc.cluster.local
10.10.0.9:16685 HEALTHY OK outbound|16685||tracing.istio-system.svc.cluster.local
10.10.0.9:16686 HEALTHY OK outbound|80||tracing.istio-system.svc.cluster.local
10.200.1.191:9411 HEALTHY OK zipkin
127.0.0.1:15000 HEALTHY OK prometheus_stats
127.0.0.1:15020 HEALTHY OK agent
192.168.97.2:6443 HEALTHY OK outbound|443||kubernetes.default.svc.cluster.local
unix://./etc/istio/proxy/XDS HEALTHY OK xds-grpc
unix://./var/run/secrets/workload-spiffe-uds/socket HEALTHY OK sds-grpc[envoy가 사용하는 인증서 확인]
docker exec -it myk8s-control-plane istioctl proxy-config secret $ISTIOIGW ✔ 15:23:30
RESOURCE NAME TYPE STATUS VALID CERT SERIAL NUMBER NOT AFTER NOT BEFORE
default Cert Chain ACTIVE true 302875308037867659574676603792259781271 2025-04-11T01:11:33Z 2025-04-10T01:09:33Z
ROOTCA CA ACTIVE true 115355687722131461630430825423341905706 2035-04-08T01:11:22Z 2025-04-10T01:11:22Z
docker exec -it myk8s-control-plane istioctl proxy-config secret $WEBAPP ✔ 15:23:34
RESOURCE NAME TYPE STATUS VALID CERT SERIAL NUMBER NOT AFTER NOT BEFORE
default Cert Chain ACTIVE true 225597692875984161266694924911353550614 2025-04-11T01:41:53Z 2025-04-10T01:39:53Z
ROOTCA CA ACTIVE true 115355687722131461630430825423341905706 2035-04-08T01:11:22Z 2025-04-10T01:11:22Zistio-ingressgateway 서비스 NodePort 변경 및 nodeport 30000로 지정 변경

kubectl get svc,ep -n istio-system istio-ingressgateway
kubectl patch svc -n istio-system istio-ingressgateway -p '{"spec": {"type": "NodePort", "ports": [{"port": 80, "targetPort": 8080, "nodePort": 30000}]}}'
kubectl get svc -n istio-system istio-ingressgatewayistio-ingressgateway 서비스 externalTrafficPolicy 설정 : ClientIP 를 확인 하기 위함
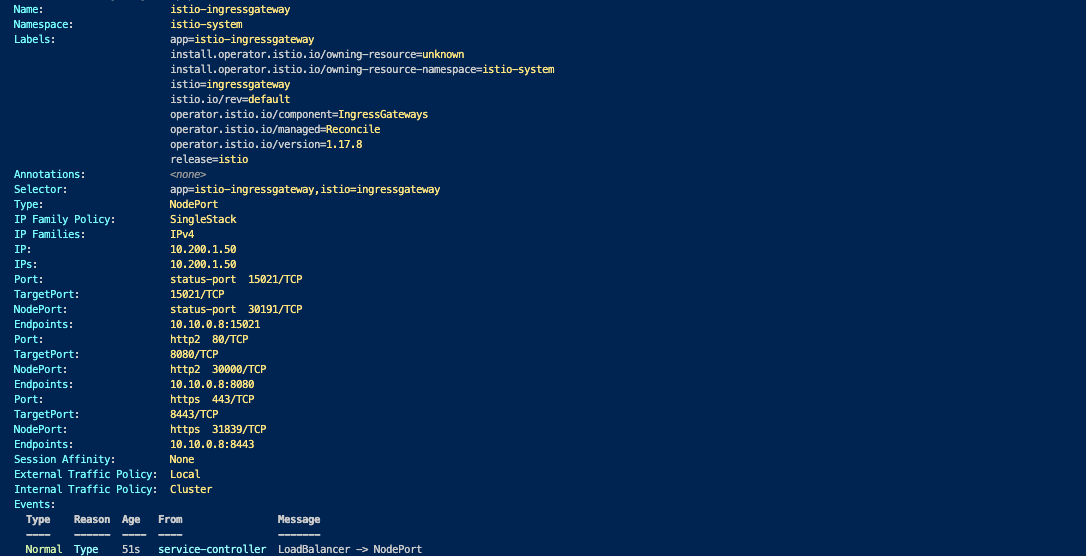
kubectl patch svc -n istio-system istio-ingressgateway -p '{"spec":{"externalTrafficPolicy": "Local"}}'
kubectl describe svc -n istio-system istio-ingressgateway[애플리케이션 내 로그를 보고 싶다면?]
kubectl stern -l app=webapp -n istioinaction
kubectl stern -l app=catalog -n istioinaction실제 애플리케이션에 접속
마스터 Node 의 30000 번 Port 로 접근 > istio ingressGW 가 수신 > GW + VirtualSerice 의 논리 세팅에 의해 > istio Service Mesh 내 web app 으로 라우팅이 진행됨
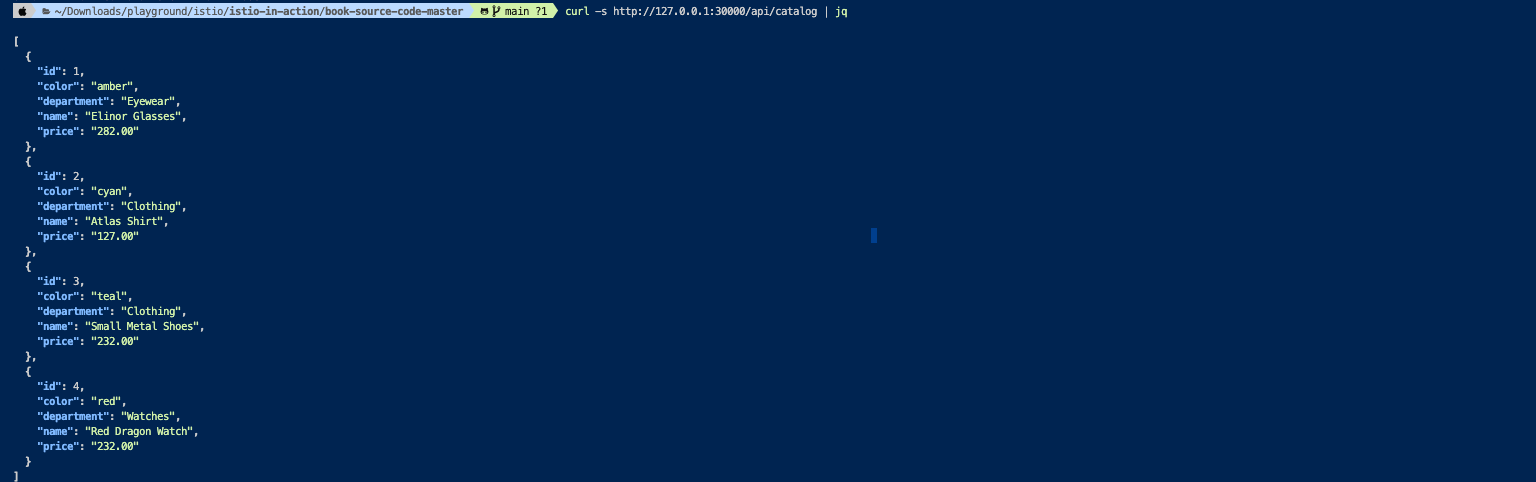
curl -s http://127.0.0.1:30000/api/catalog | jq
curl -s http://127.0.0.1:30000/api/catalog/items/1 | jq
curl -s http://127.0.0.1:30000/api/catalog -I | head -n 1- 반복 접근 설정 (로그 생성을 위함과 더불어 APM 도구로 확인 하기 위함)
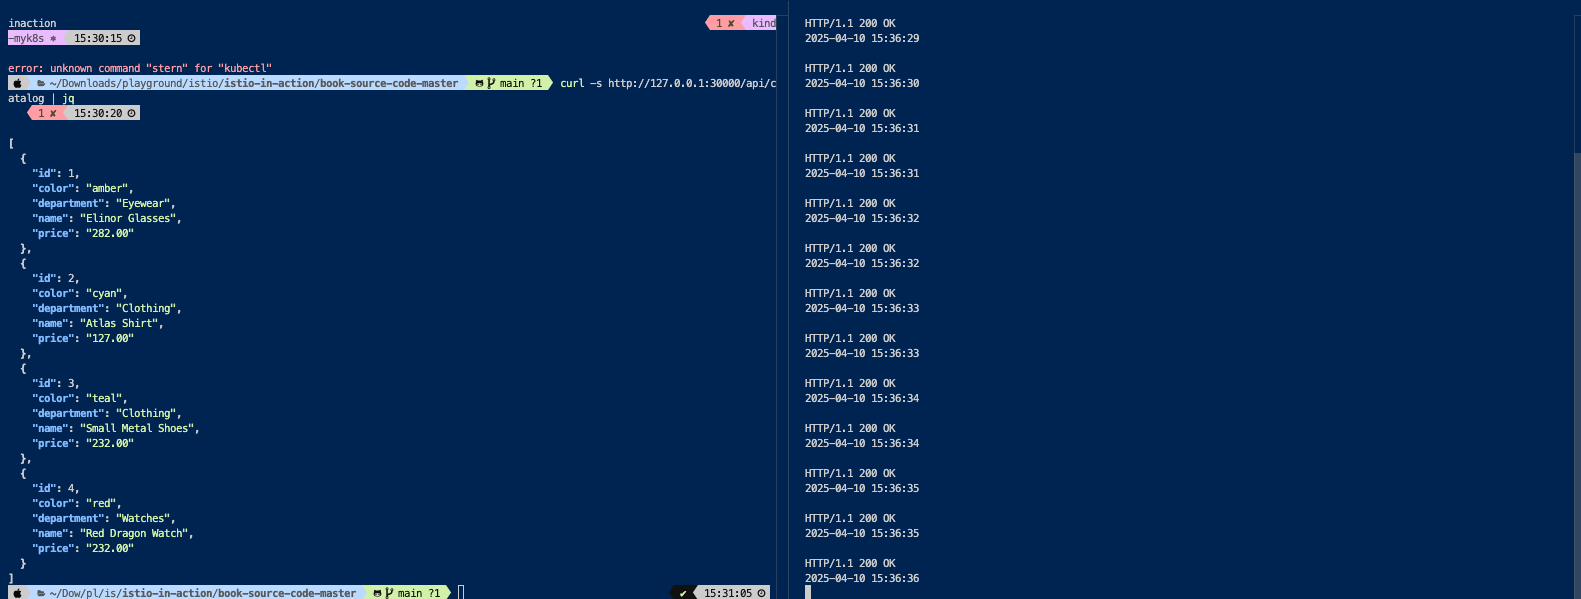
# webapp 반복 호출
while true; do curl -s http://127.0.0.1:30000/api/catalog/items/1 ; sleep 1; echo; done
while true; do curl -s http://127.0.0.1:30000/api/catalog -I | head -n 1 ; date "+%Y-%m-%d %H:%M:%S" ; sleep 1; echo; done
while true; do curl -s http://127.0.0.1:30000/api/catalog -I | head -n 1 ; date "+%Y-%m-%d %H:%M:%S" ; sleep 0.5; echo; done
Obervability 세팅
- 관찰 도구들은 Node Port 로 전환
# NodePort 변경 및 nodeport 30001~30003으로 변경 : prometheus(30001), grafana(30002), kiali(30003), tracing(30004)
kubectl patch svc -n istio-system prometheus -p '{"spec": {"type": "NodePort", "ports": [{"port": 9090, "targetPort": 9090, "nodePort": 30001}]}}'
kubectl patch svc -n istio-system grafana -p '{"spec": {"type": "NodePort", "ports": [{"port": 3000, "targetPort": 3000, "nodePort": 30002}]}}'
kubectl patch svc -n istio-system kiali -p '{"spec": {"type": "NodePort", "ports": [{"port": 20001, "targetPort": 20001, "nodePort": 30003}]}}'
kubectl patch svc -n istio-system tracing -p '{"spec": {"type": "NodePort", "ports": [{"port": 80, "targetPort": 16686, "nodePort": 30004}]}}'- APM 도구 접속
Prometheus
따로 애플리케이션 내 telemetry 를 구성할 필요가 없습니다.
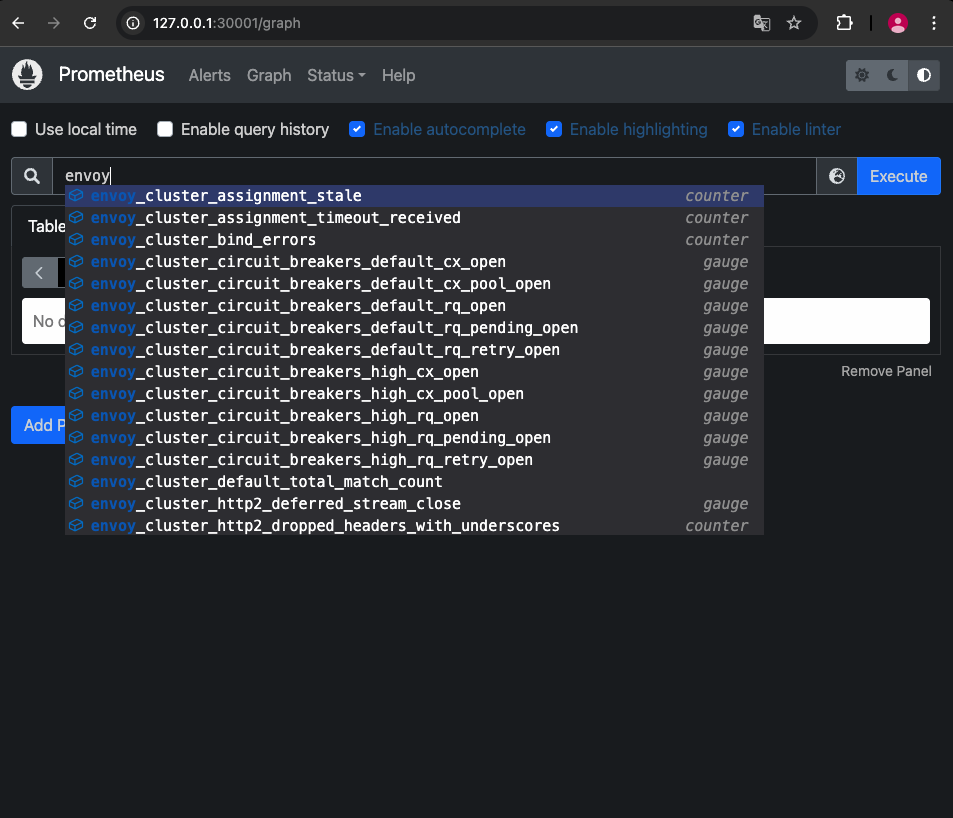
# Prometheus 접속 : envoy, istio 메트릭 확인
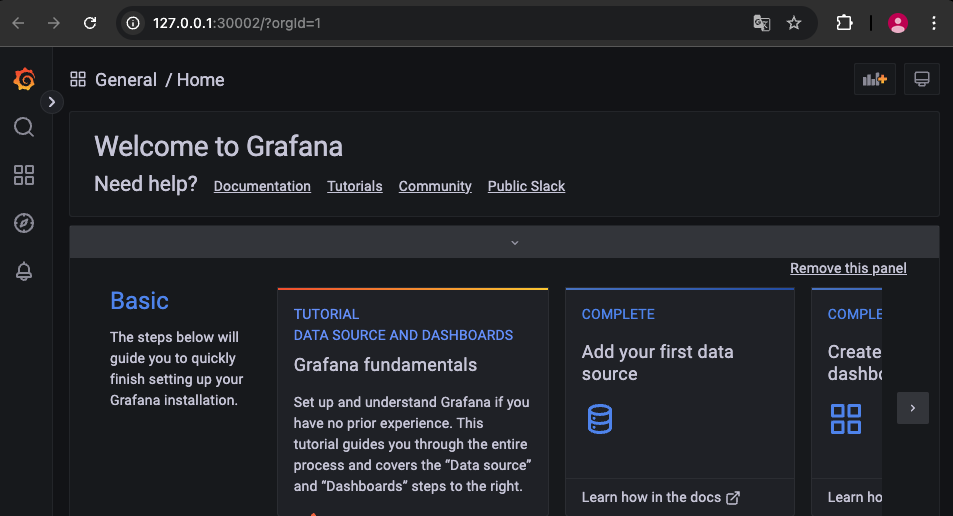
open http://127.0.0.1:30001Grafana
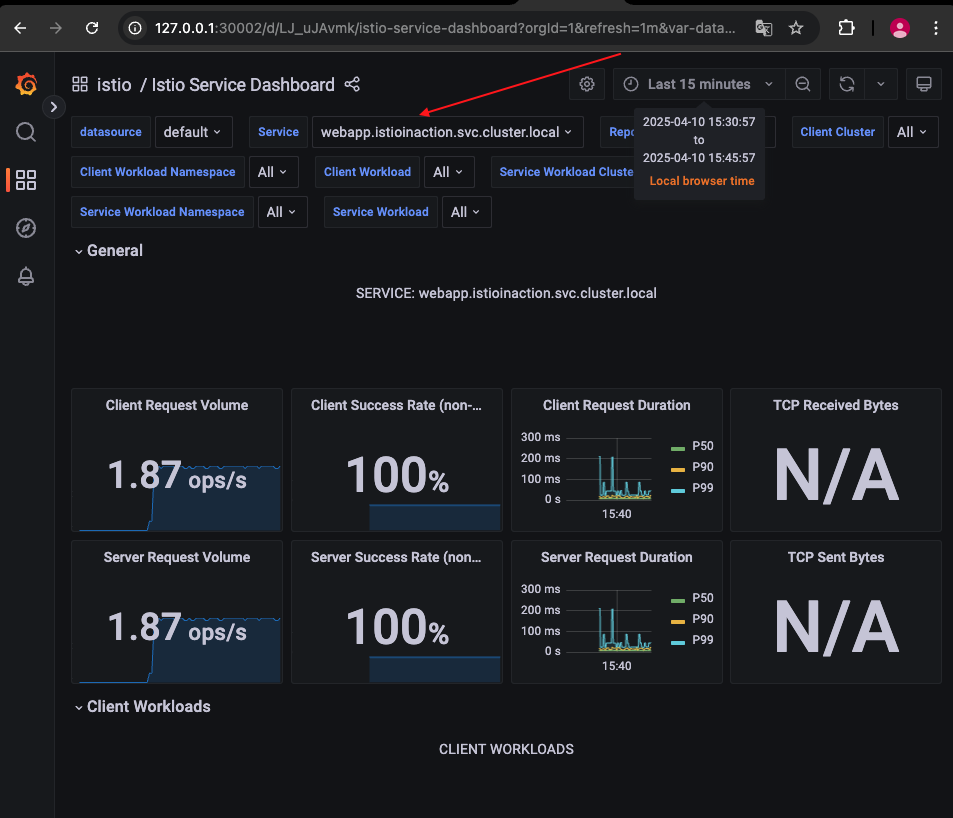
- 대시보드 - Istio Service Dashboard ⇒ 상단 Service (webapp.. 선택) ← 트래픽 반복 접속 해둔 상태
# Grafana 접속
open http://127.0.0.1:30002여러 대쉬보드가 존재
Kiali
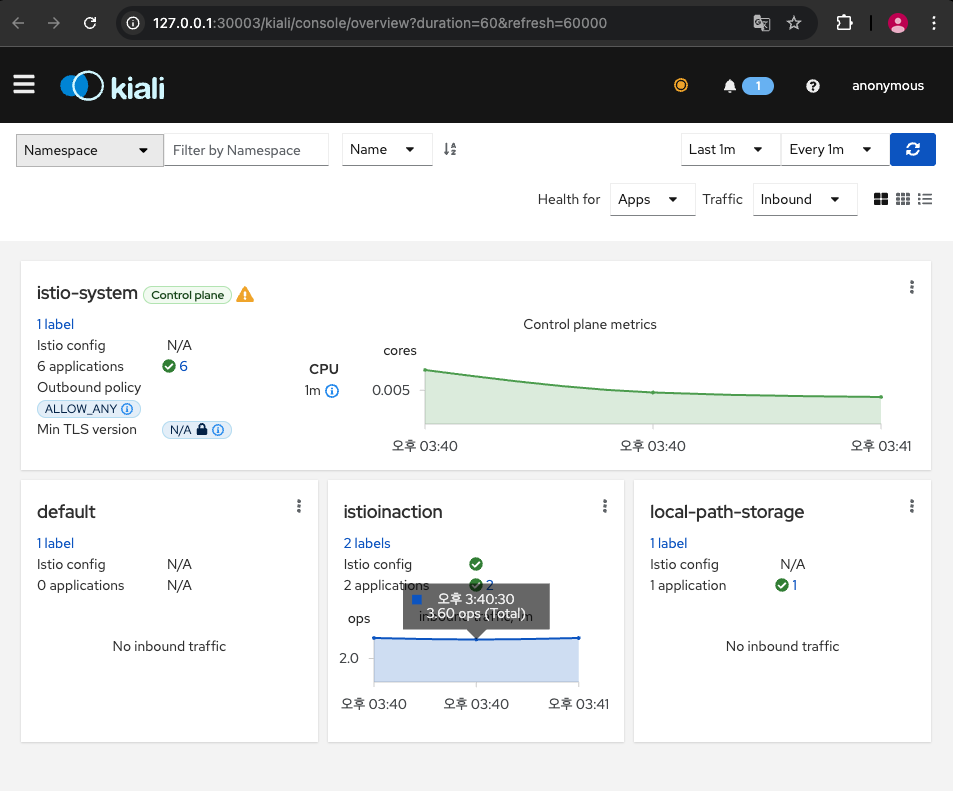
# Kiali 접속 1 : NodePort
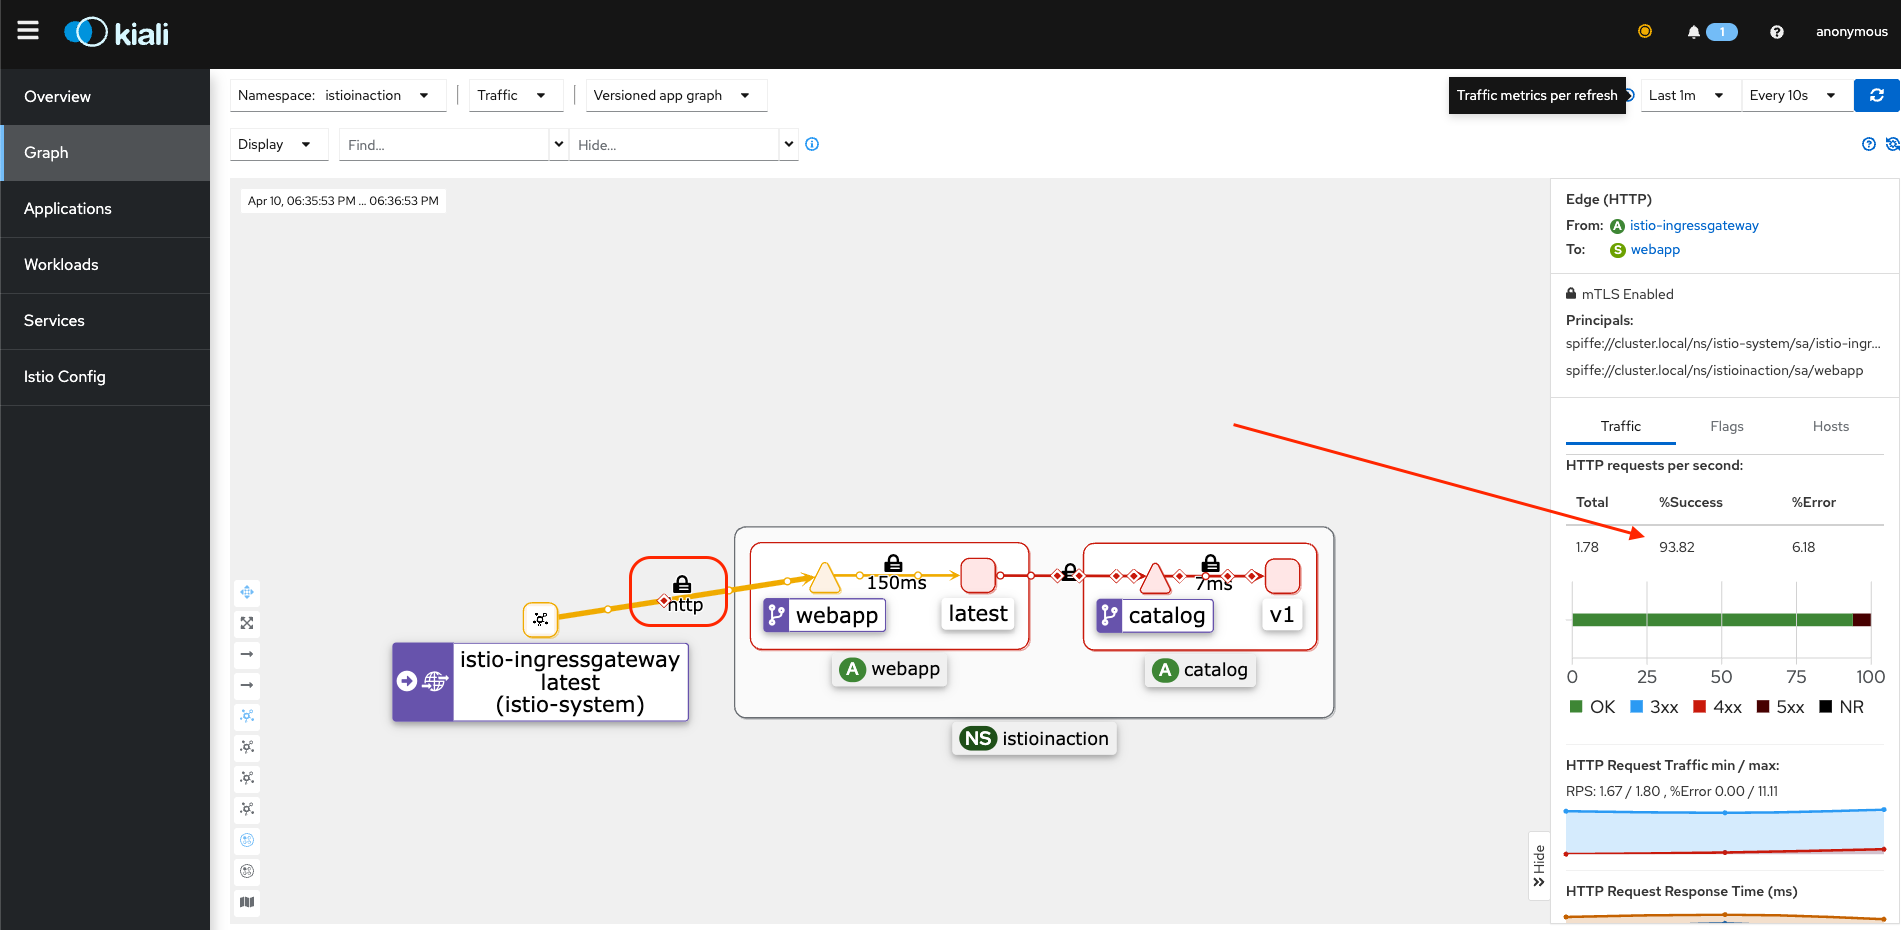
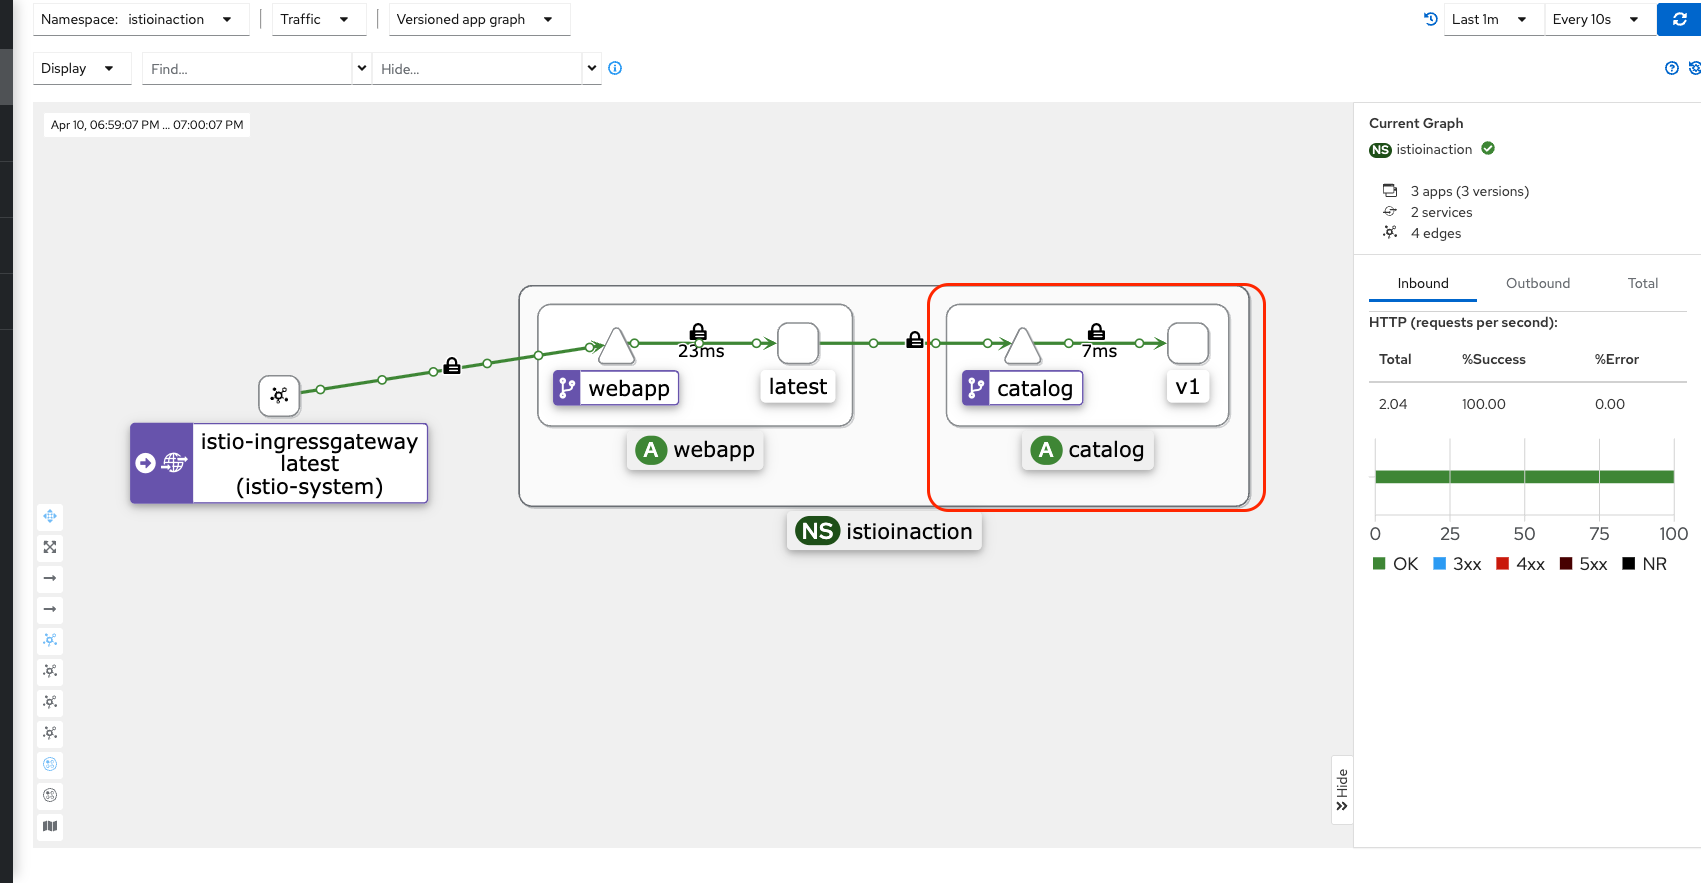
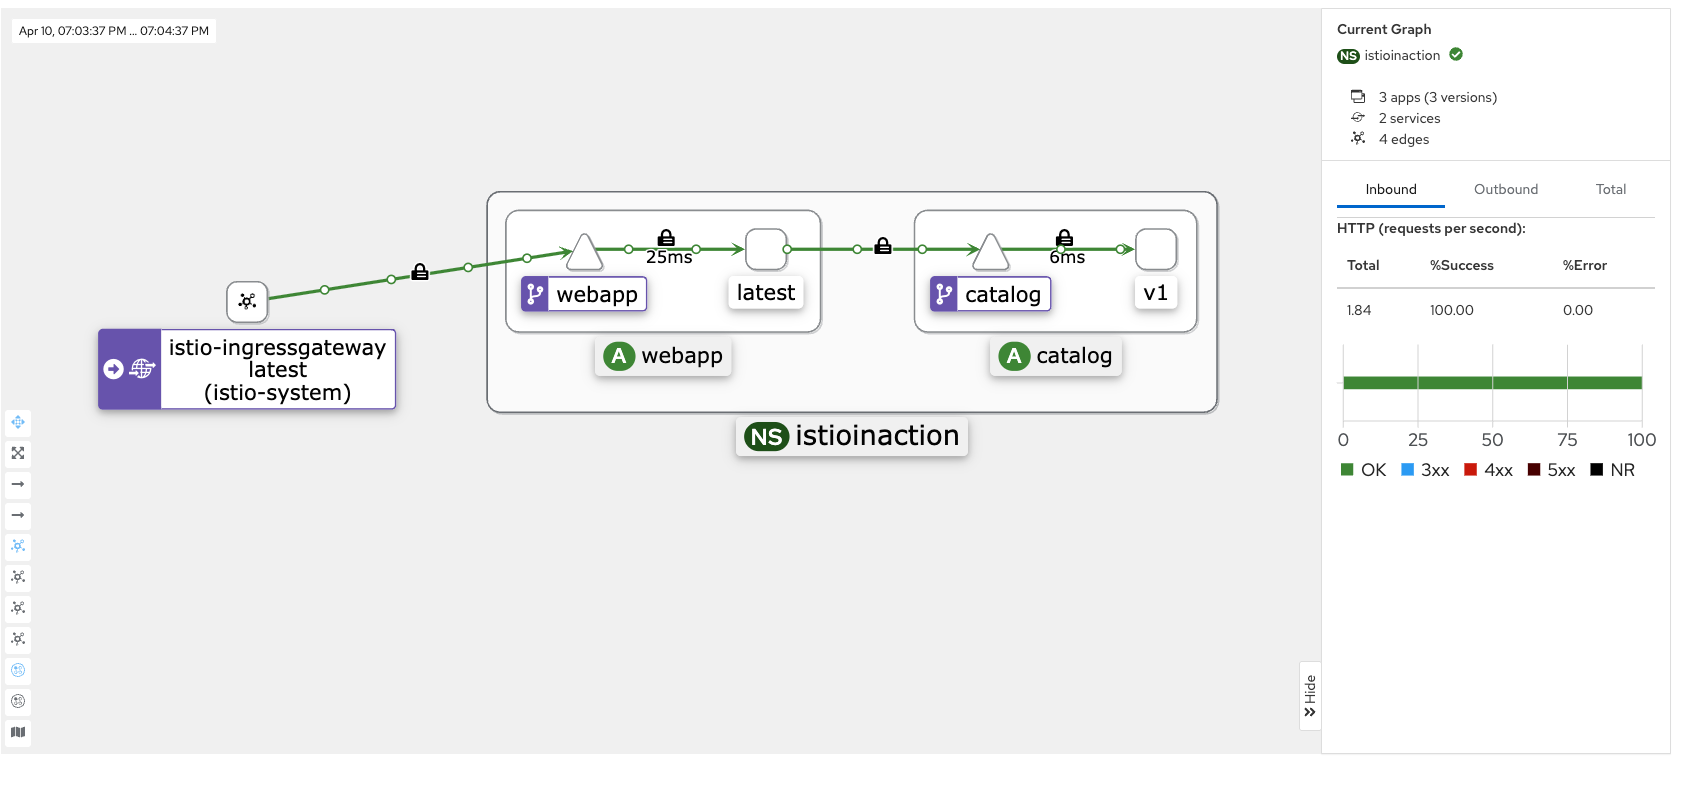
open http://127.0.0.1:30003Kiali UI > Graph > NameSpace : istioinaction 으로 설정 이후 하기 이미지와 같이 설정합니다.
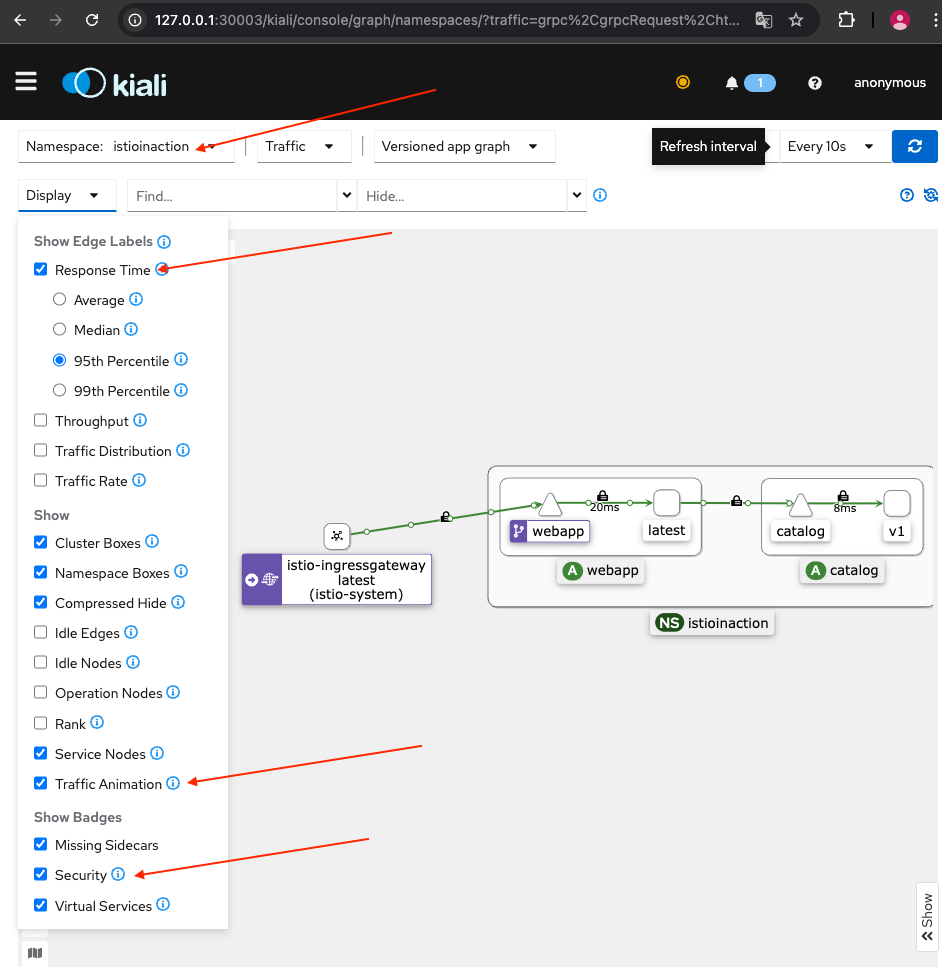
- 현재 실시간 반영이며, 빠르게 요청하면 트래픽 흐름이 빨라 지는 것을 보실 수 있습니다. (이전에 반복 요청 설정해둠)
- 자물쇠 모양은 쌍방향간 Mtls 통신을 하고 있다는 뜻입니다.
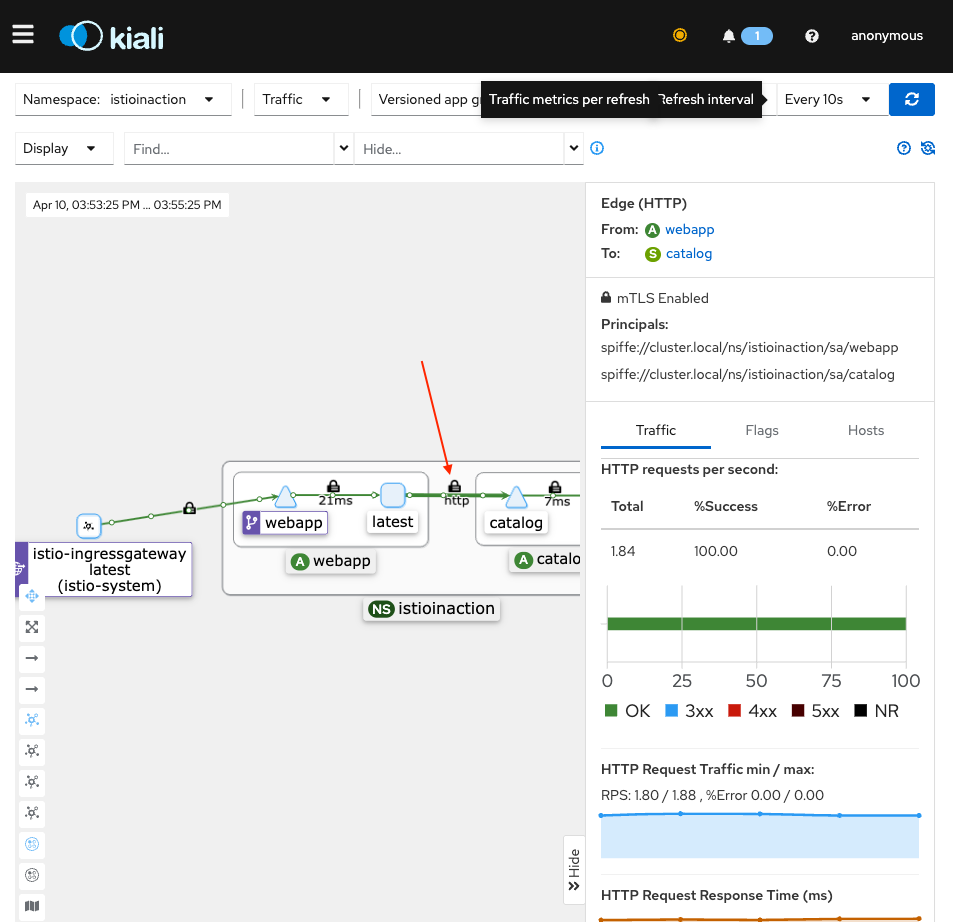
[워크로드 탭 > webapp]
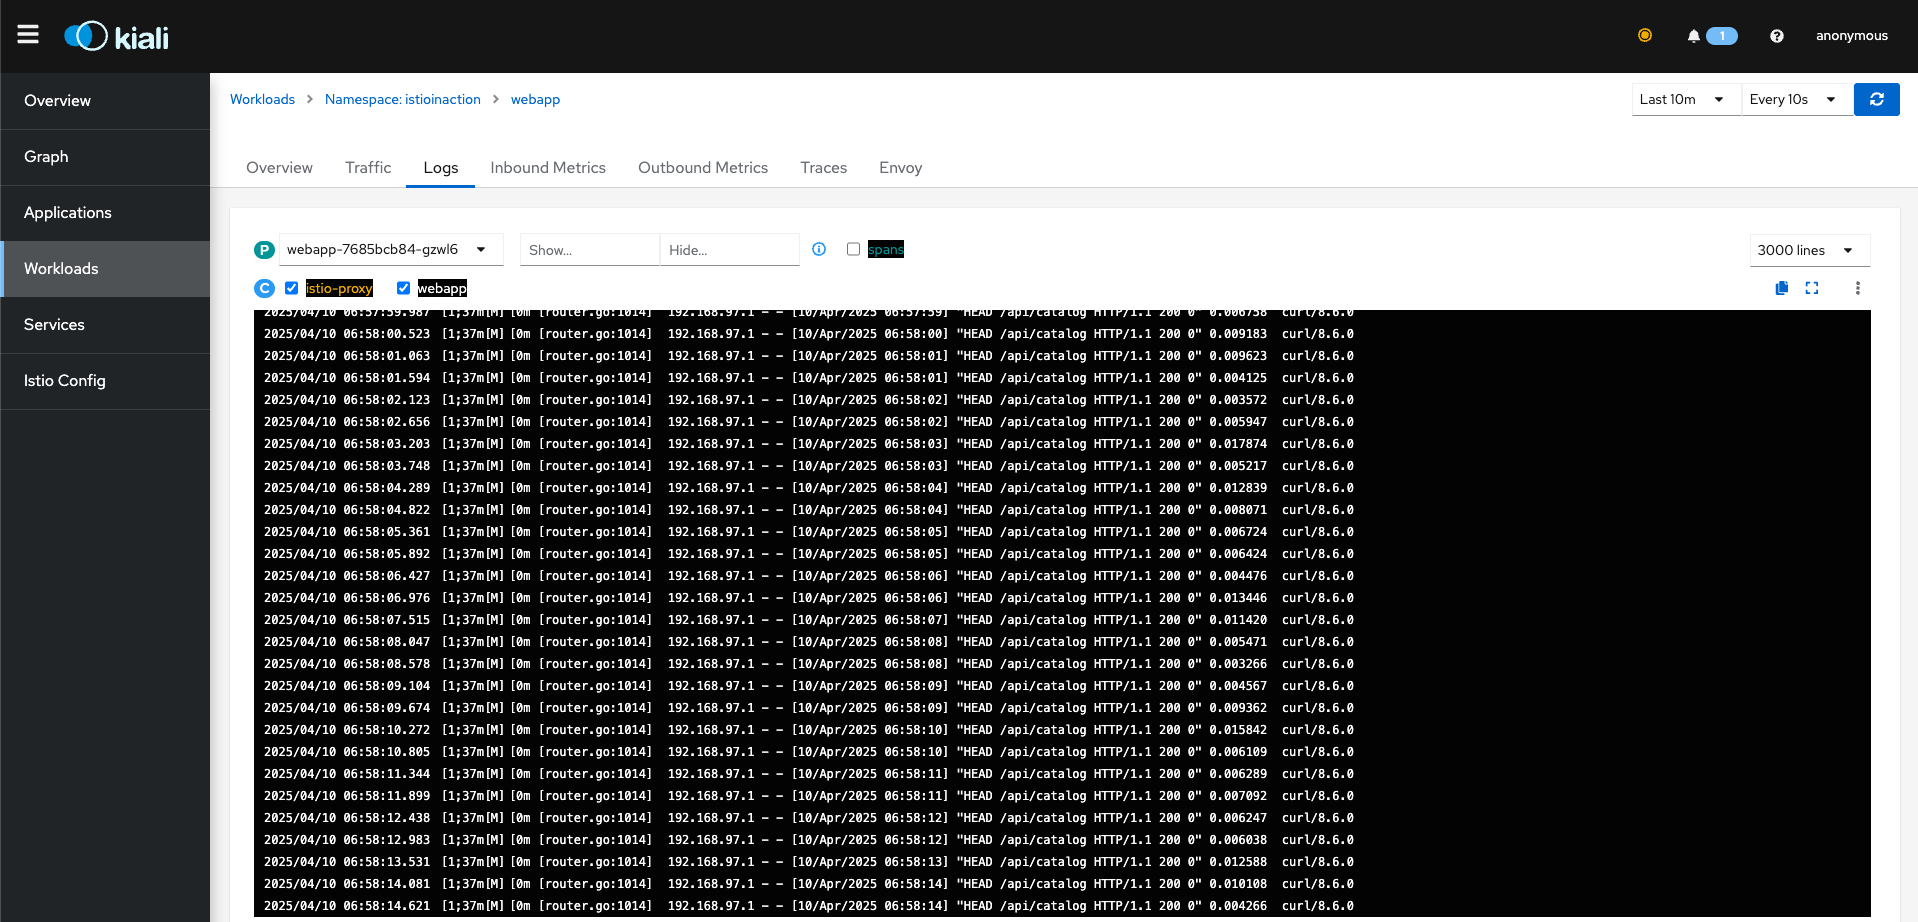
또한, Log 도 찾아보실 수 있습니다.
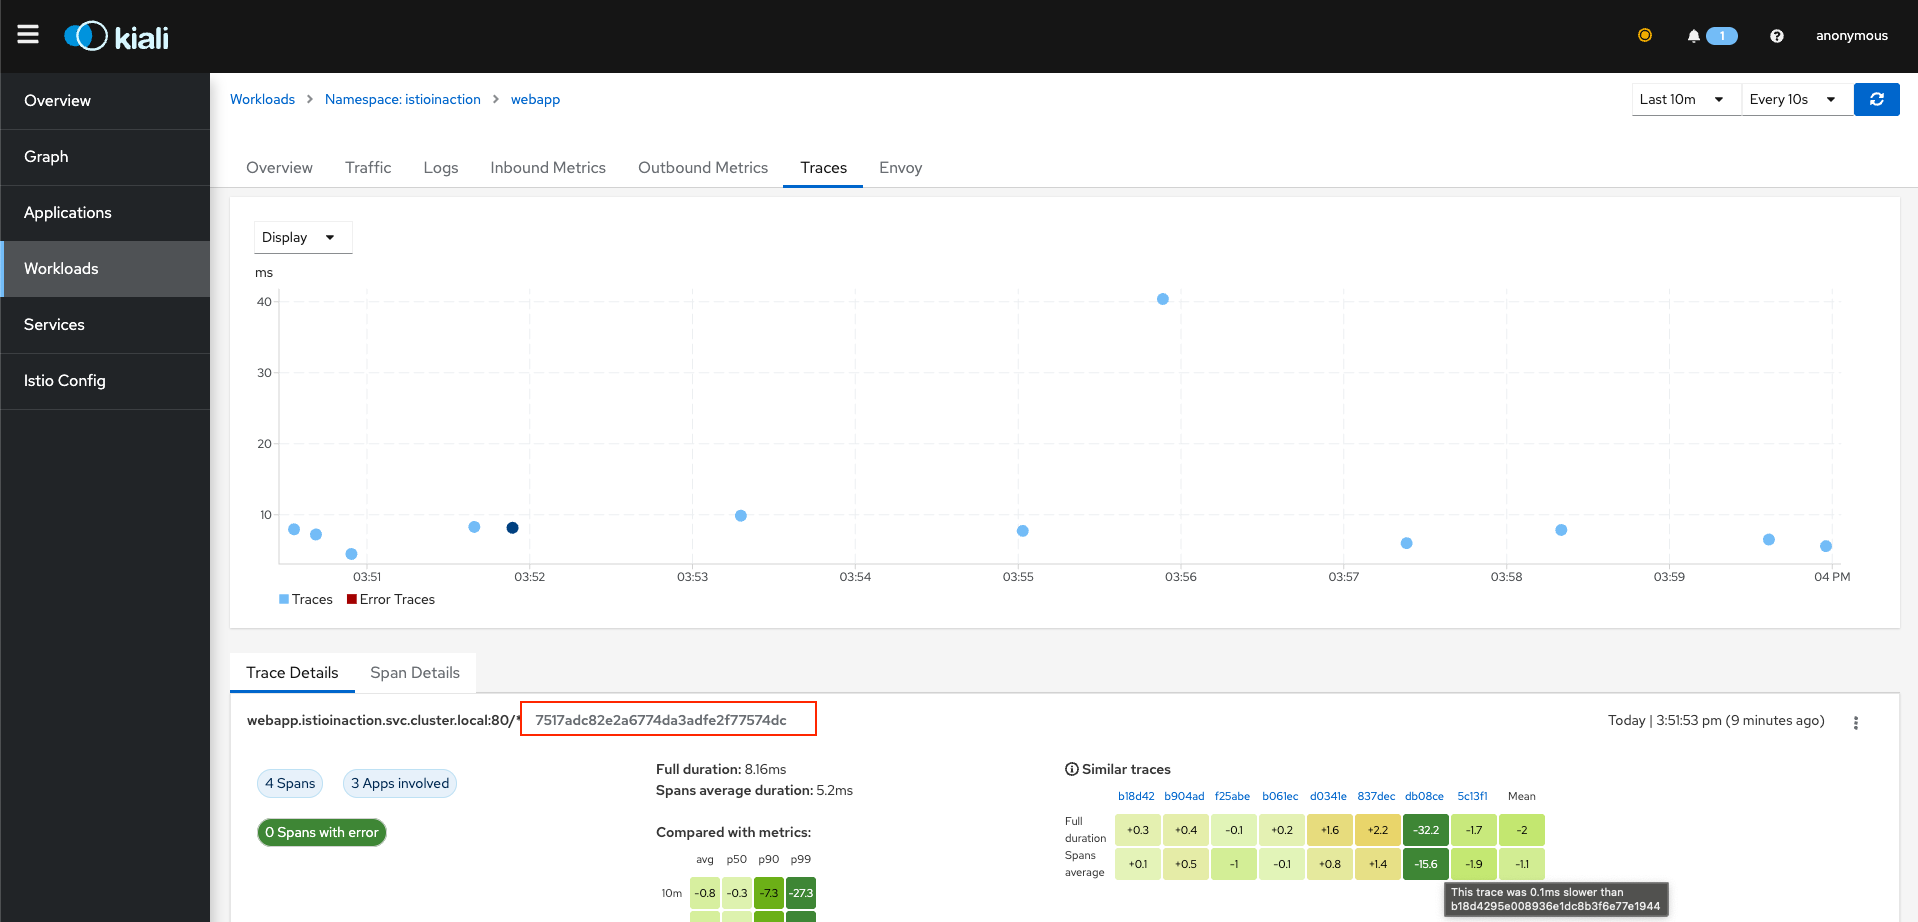
추가로 Traces 를 지원하며 해당 Trace 를 찍고, 해당 Trace Number 를 사용하여 Jaeger 도구를 사용해 분석하실 수 있습니다.
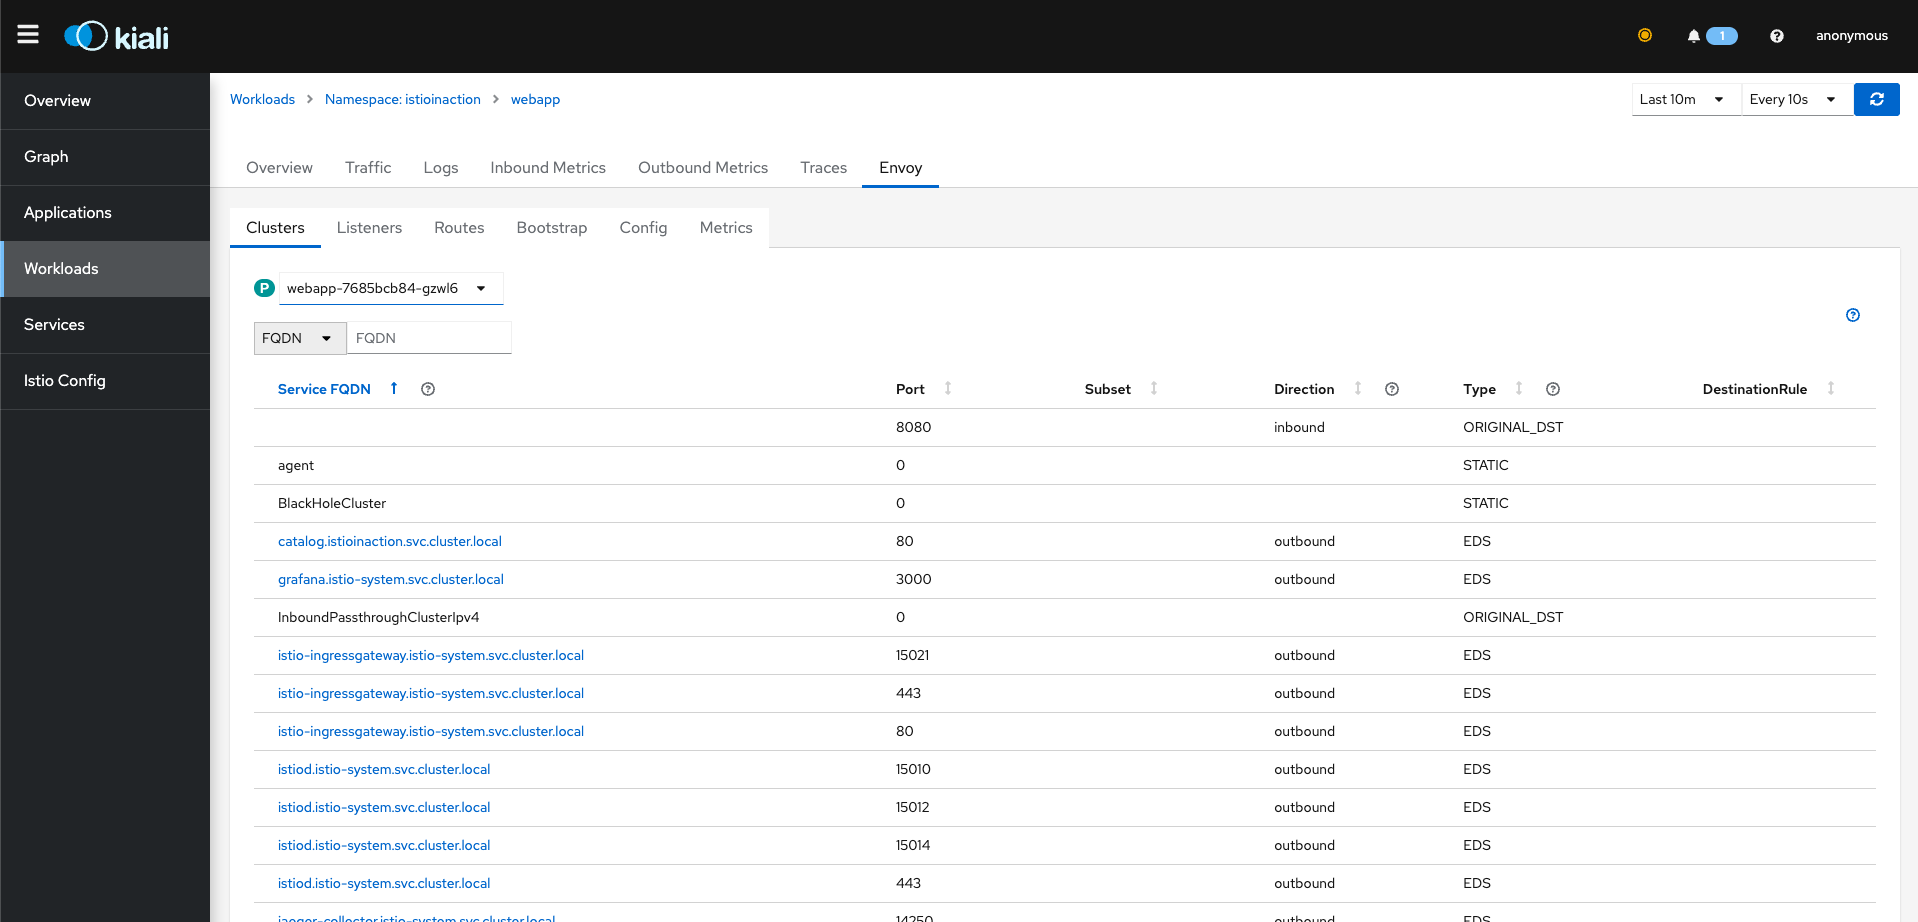
가장 중요한 점은 Envoy 설정을 Kiali 내에서 보실 수 있다는 점도 포인트 입니다.
envoy config 를 보시게 되면 '왜 Trouble Shooting' 이 어려운가' 를 아실 수 있습니다...ㅎ
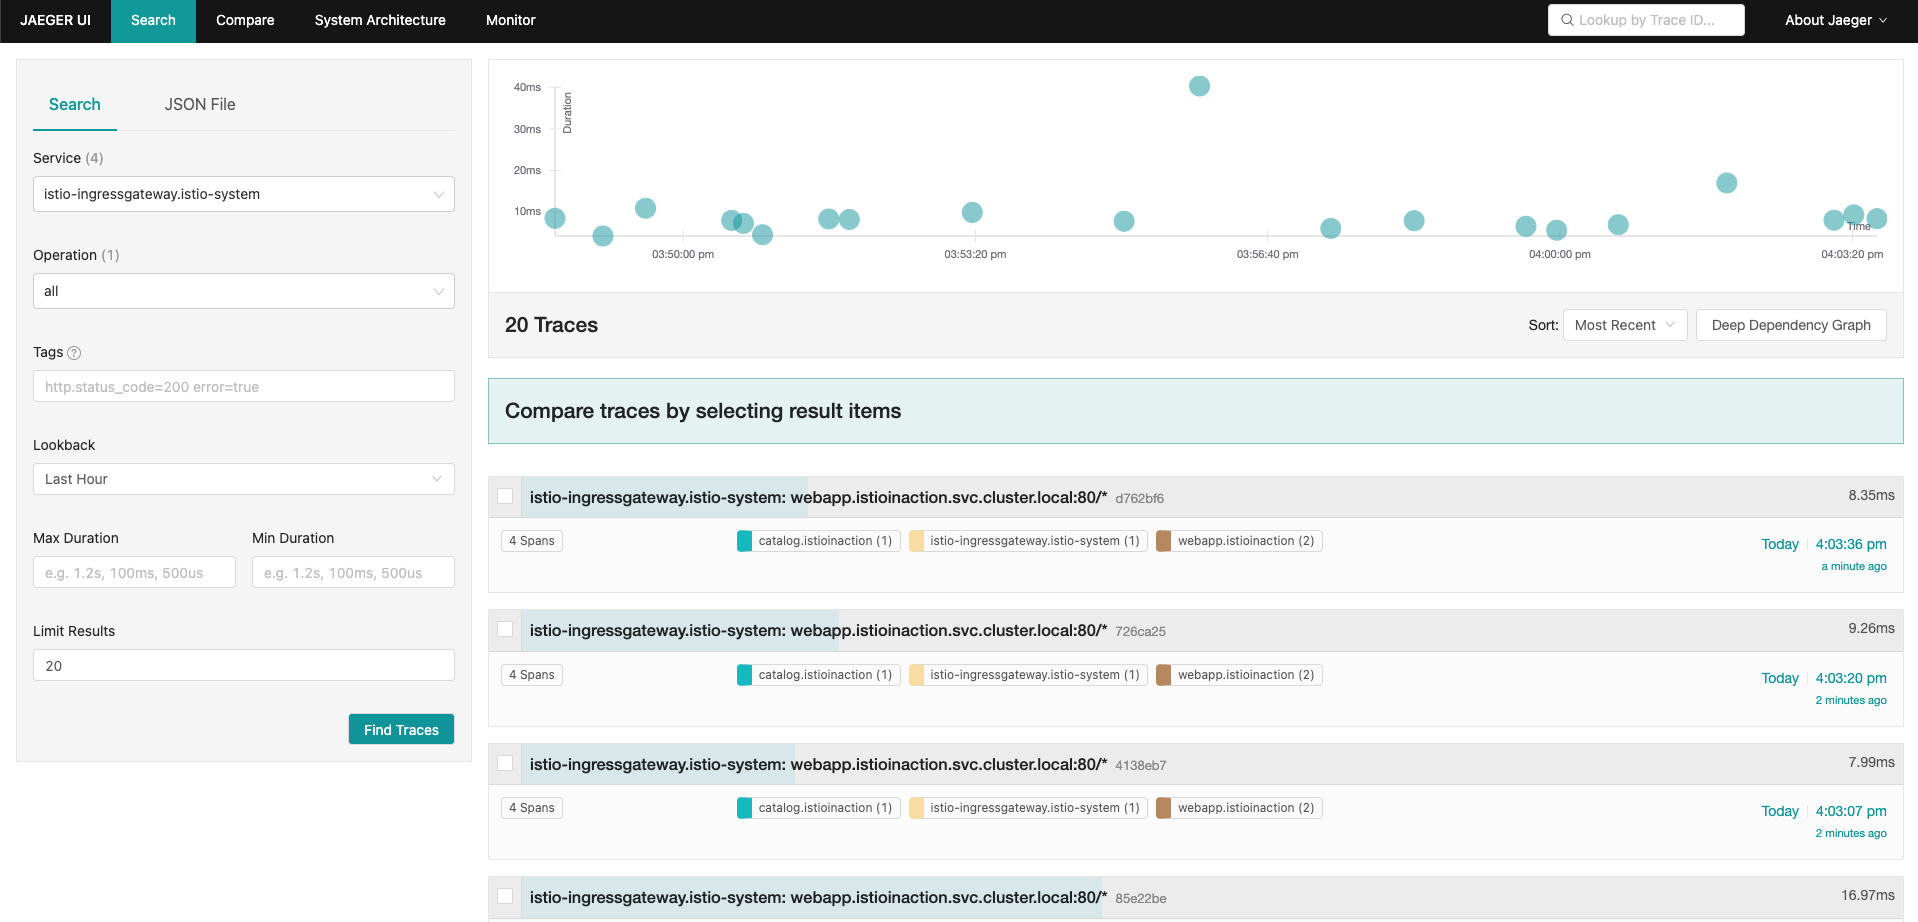
Jaeger
# tracing 접속 : 예거 트레이싱 대시보드
open http://127.0.0.1:30004istio ingree gateway 를 Tracing 해보겠습니다.
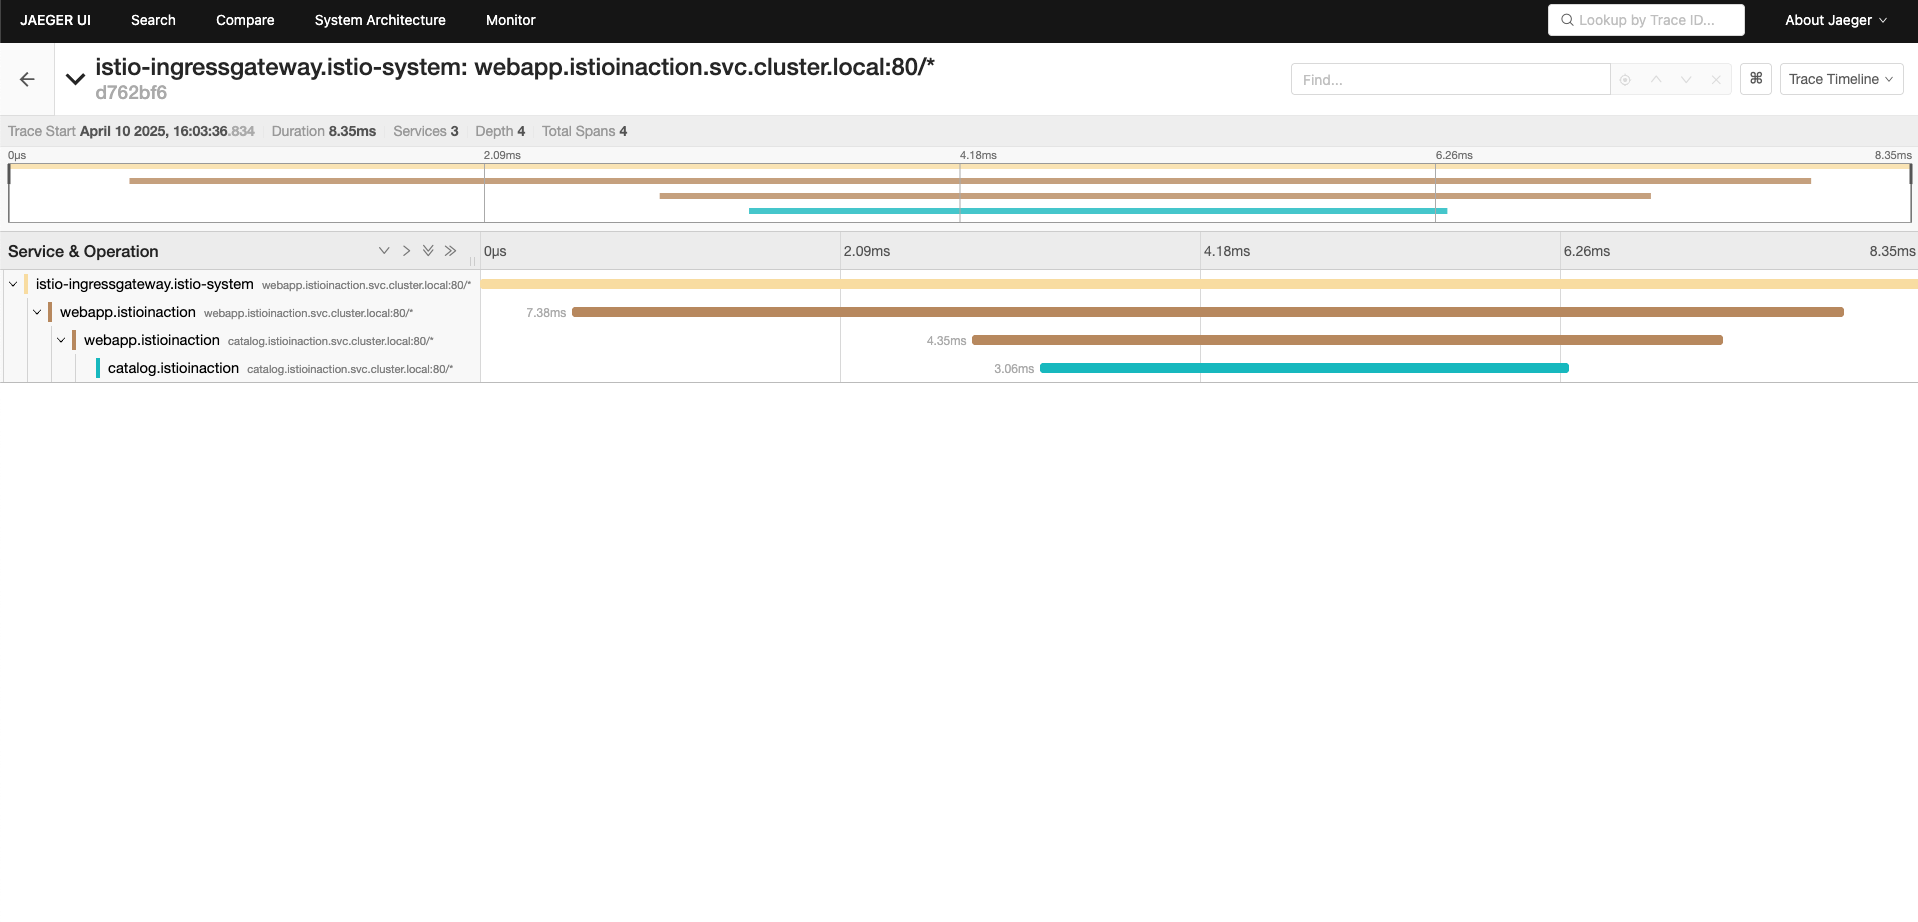
한개의 요청(개별 Trace ID)에 대해서 Span 을 살펴보게 되면, 아래와 같습니다.
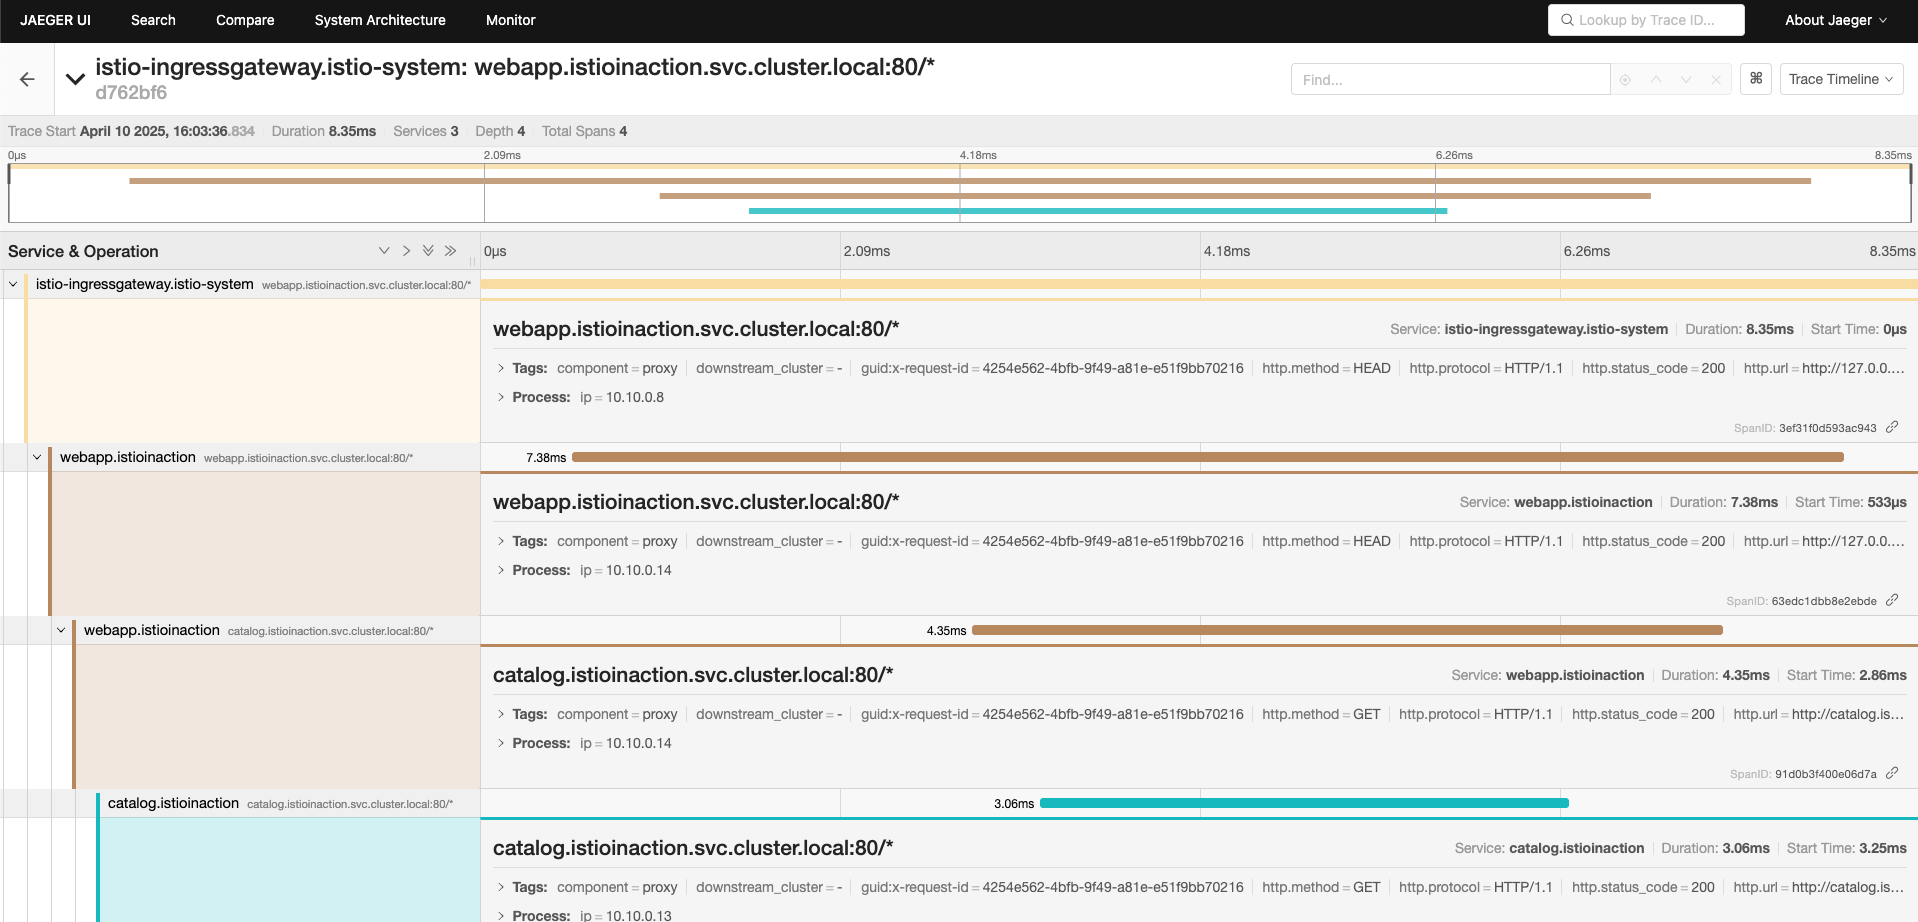
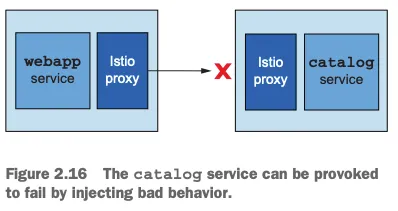
catalog에 의도적으로 500에러를 재현하고 retry로 복원력 높이기
만약 ‘간헐적/일시적 네트워크 오류’가 발생하여 webapp 은 catalog 요청 실패이 실패하는 경우가 발생 시, 애플리케이션 코드 수정 없이 복원력을 높여보겠습니다.
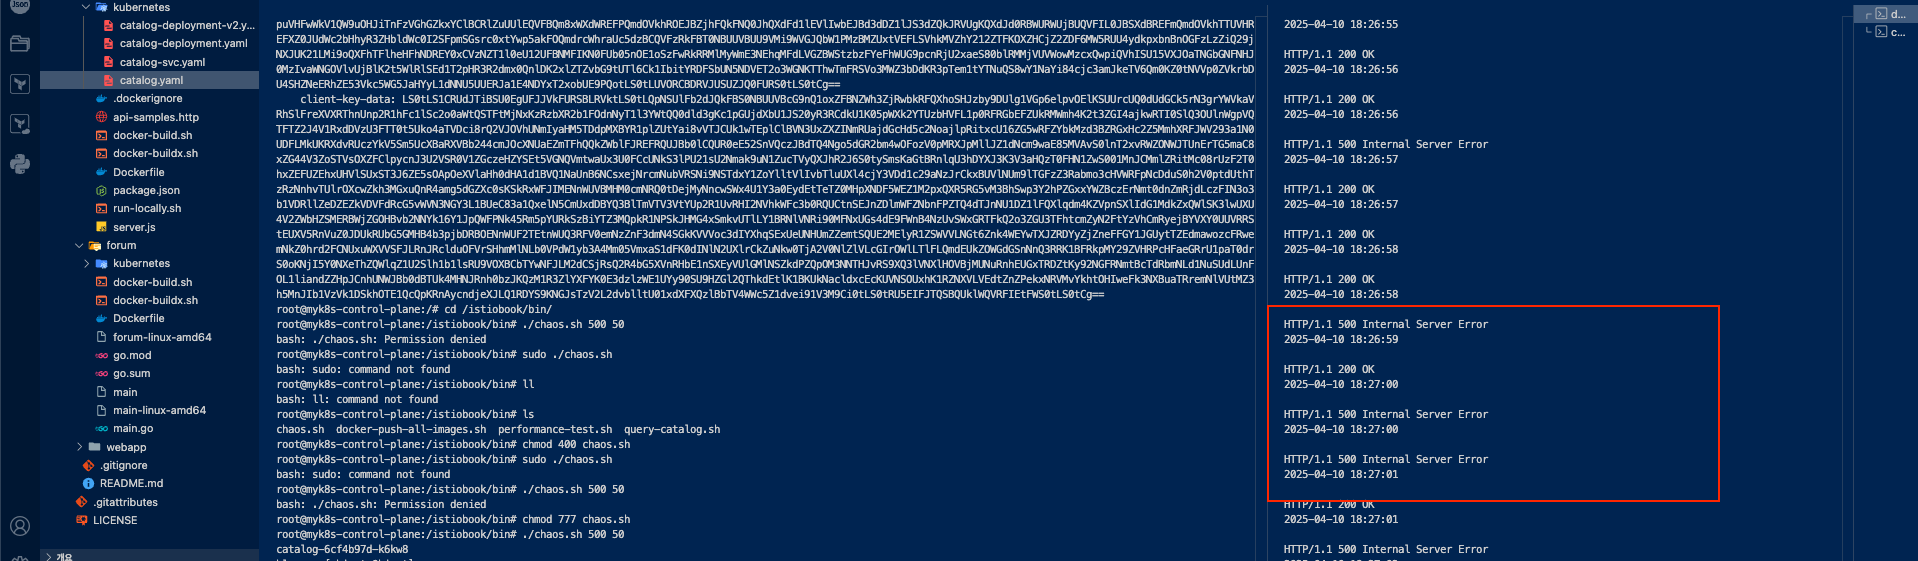
- bin/chaos.sh {에러코드} {빈도} - chaos.sh 500 50 (500에러를 50% 빈도로 재현)
docker exec -it myk8s-control-plane bash
----------------------------------------
# istioinaction 로 네임스페이스 변경
cat /etc/kubernetes/admin.conf
kubectl config set-context $(kubectl config current-context) --namespace=istioinaction
cat /etc/kubernetes/admin.conf
cd /istiobook/bin/
./chaos.sh 500 100 # 모니터링 : kiali, grafana, tracing
./chaos.sh 500 50 # 모니터링 : kiali, grafana, tracing- 500 Error 주입 화면
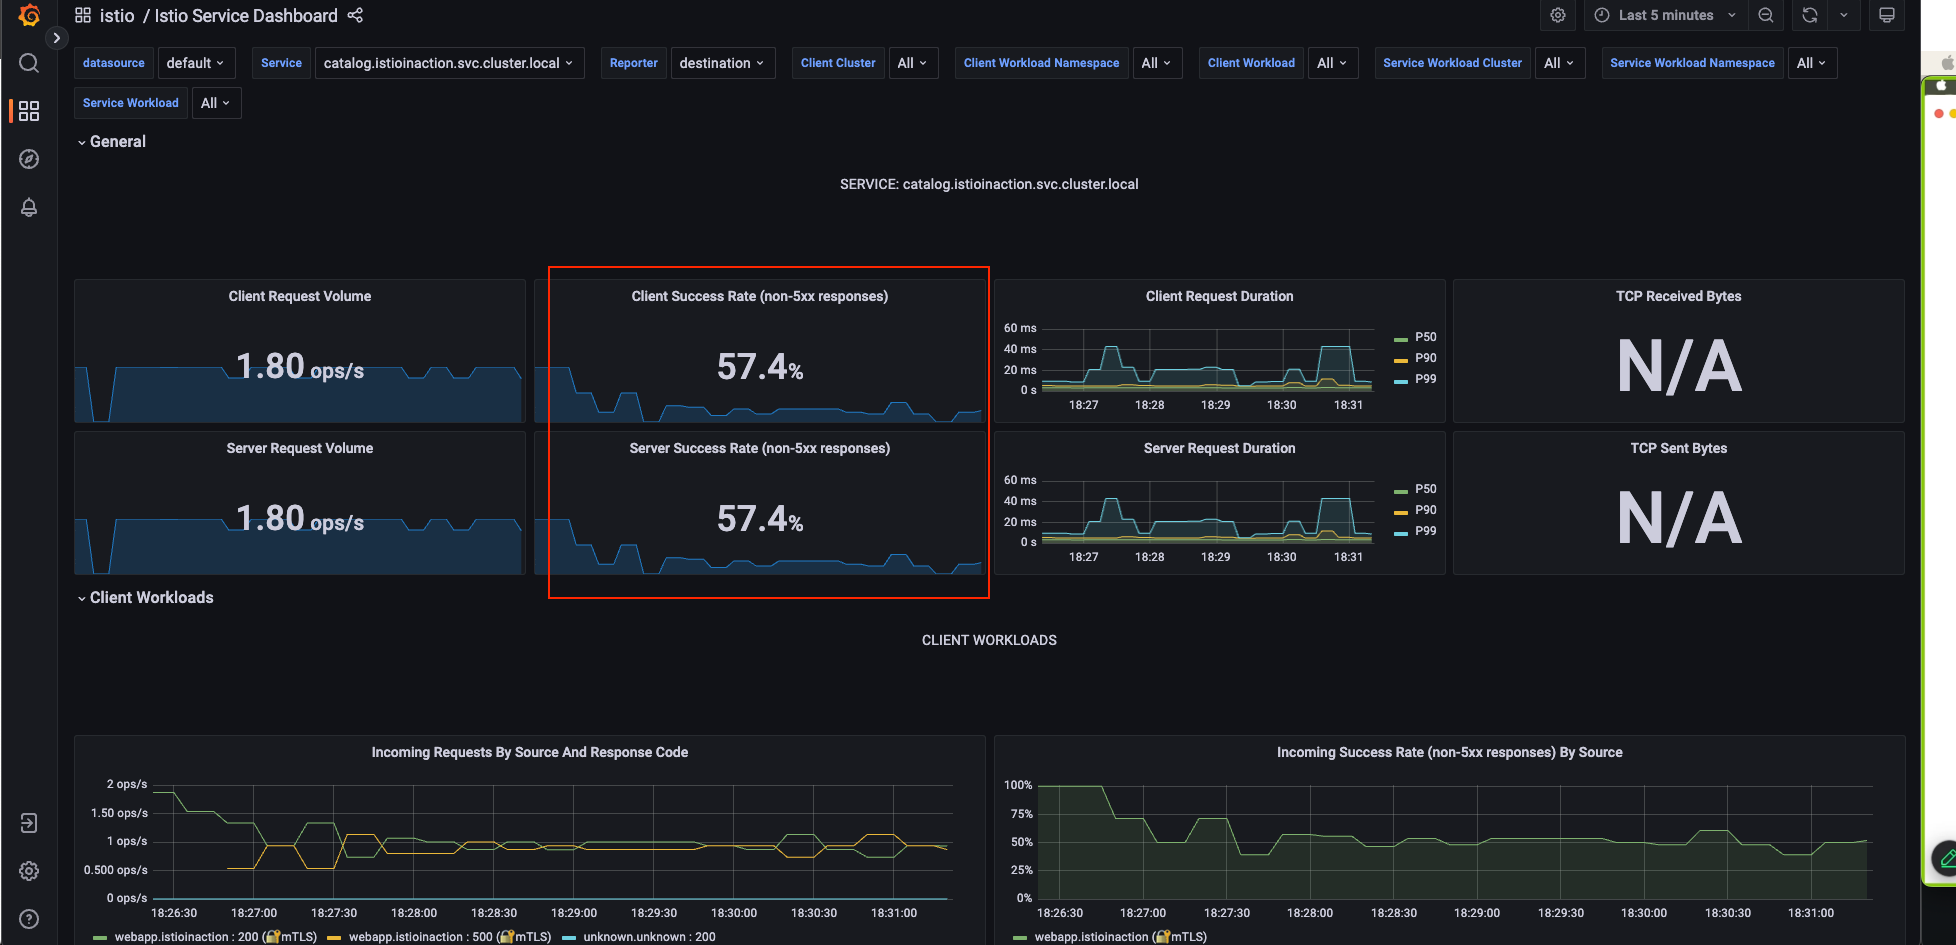
Kiali Dashboard 확인

Grafana Dashboard 확인
jaeger Dashboard 확인

코드 수정 없이 에러 발생 시 reslience 하게 retry 하도록 애플리케이션 설정
- Resiliency 하기 위해 proxy(envoy) endpoint(catalog) 5xx 에러 시 retry 적용합니다.
# catalog 3번까지 요청 재시도 할 수 있고, 각 시도에는 2초의 제한 시간이 있음.
cat <<EOF | kubectl -n istioinaction apply -f -
apiVersion: networking.istio.io/v1alpha3
kind: VirtualService
metadata:
name: catalog
spec:
hosts:
- catalog
http:
- route:
- destination:
host: catalog
retries:
attempts: 3
retryOn: 5xx
perTryTimeout: 2s
EOF
kubectl get vs -n istioinaction
NAME GATEWAYS HOSTS AGE
catalog ["catalog"] 12s
webapp-virtualservice ["outfitters-gateway"] ["*"] 3h38m
root@myk8s-control-plane:/istiobook/bin# kubectl get vs -n istioinaction
NAME GATEWAYS HOSTS AGE
catalog ["catalog"] 34s
webapp-virtualservice ["outfitters-gateway"] ["*"] 3h22mKiali Dashboard 확인
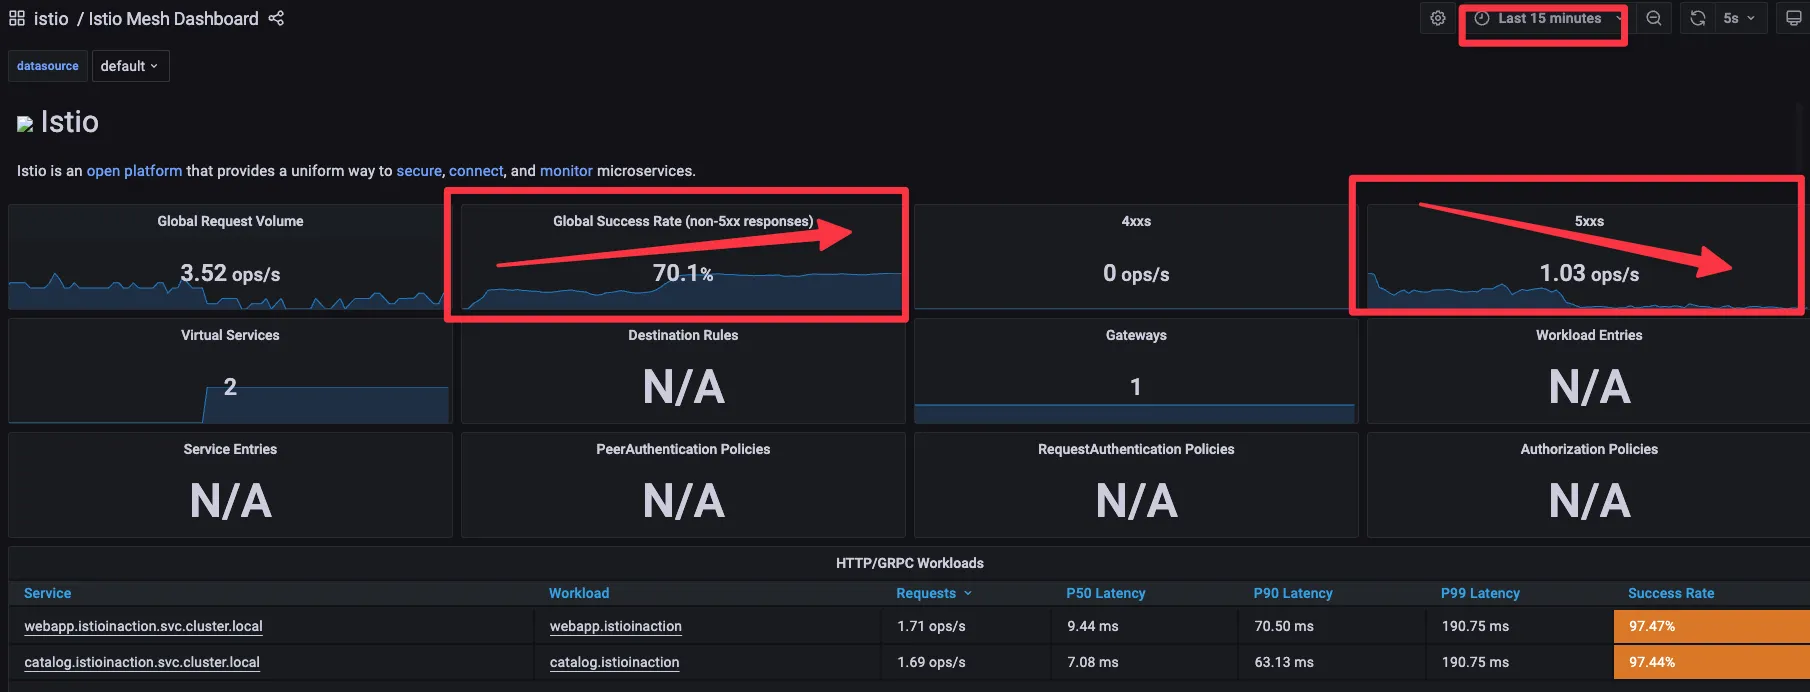
- Success Rate 가 상승하는 것을 보실 수 있습니다.
Grafana DashBoard 확인
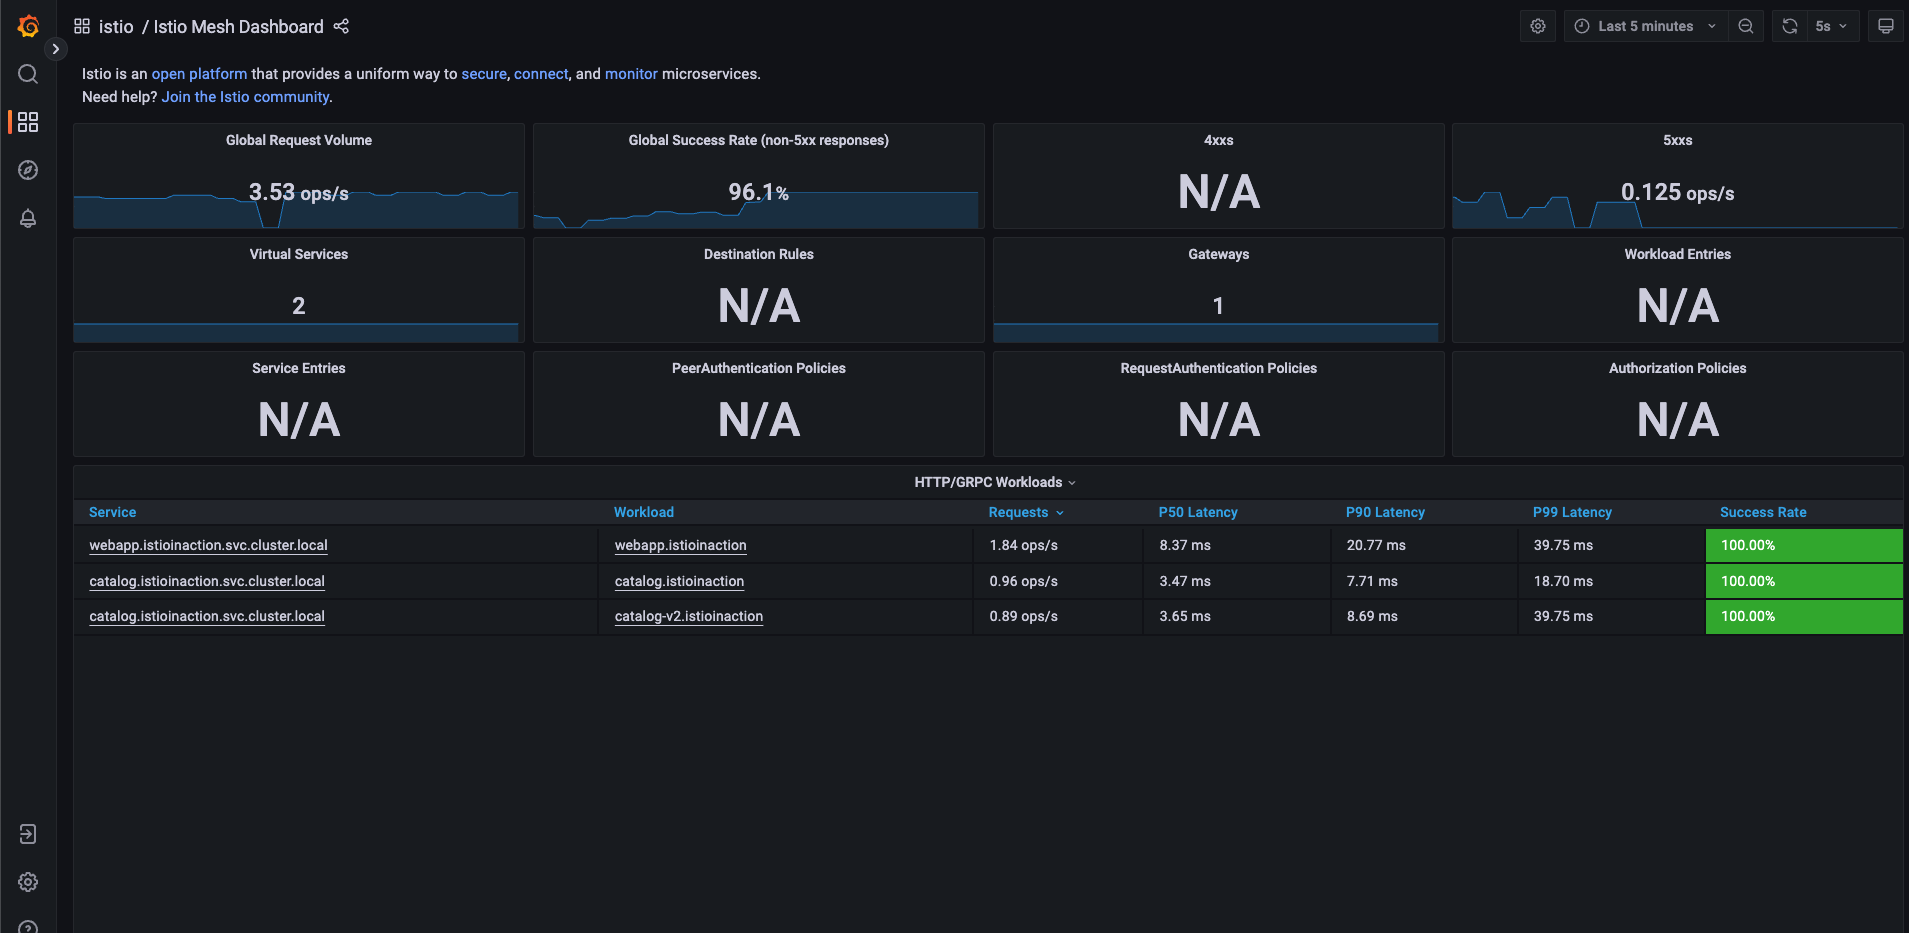
- 그라파나 (Istio Mesh Dashboard) : retry 적용 후 Success Rate은 증가하고 5xx 에러는 감소하는 것을 확인할 수 있습니다
새 기능 추가 시나리오 대응
배포를 다양하게 진행하는데 굉장히 복잡한 배포를 진행할때 굉장히 유연하게 중앙에서 통제가 가능합니다.
-
개발자가 신규 버전의 catalog V2 를 개발을 하였으며 검증 절차를 거치기 위해 QA 팀이 검증을 진행한다고 가정 - 검증이 완료 되어 이상이 없다고 판단 되면 트래픽을 V2 로 보내는 시나리오 입니다.
-
특정 사용자 집단만 새 배포로 라우팅하도록, 릴리즈에 단계적 접근 : catalog v2 에 imageUrl 새 속성 추가
# catalog v2 배포
cat <<EOF | kubectl -n istioinaction apply -f -
apiVersion: apps/v1
kind: Deployment
metadata:
labels:
app: catalog
version: v2
name: catalog-v2
spec:
replicas: 1
selector:
matchLabels:
app: catalog
version: v2
template:
metadata:
labels:
app: catalog
version: v2
spec:
containers:
- env:
- name: KUBERNETES_NAMESPACE
valueFrom:
fieldRef:
fieldPath: metadata.namespace
- name: SHOW_IMAGE
value: "true"
image: istioinaction/catalog:latest
imagePullPolicy: IfNotPresent
name: catalog
ports:
- containerPort: 3000
name: http
protocol: TCP
securityContext:
privileged: false
EOF
# (옵션) 500 에러 발생 꺼두기
docker exec -it myk8s-control-plane bash
----------------------------------------
cd /istiobook/bin/
./chaos.sh 500 delete
exit
----------------------------------------
#
kubectl get deploy,pod,svc,ep -n istioinaction
kubectl get gw,vs -n istioinaction
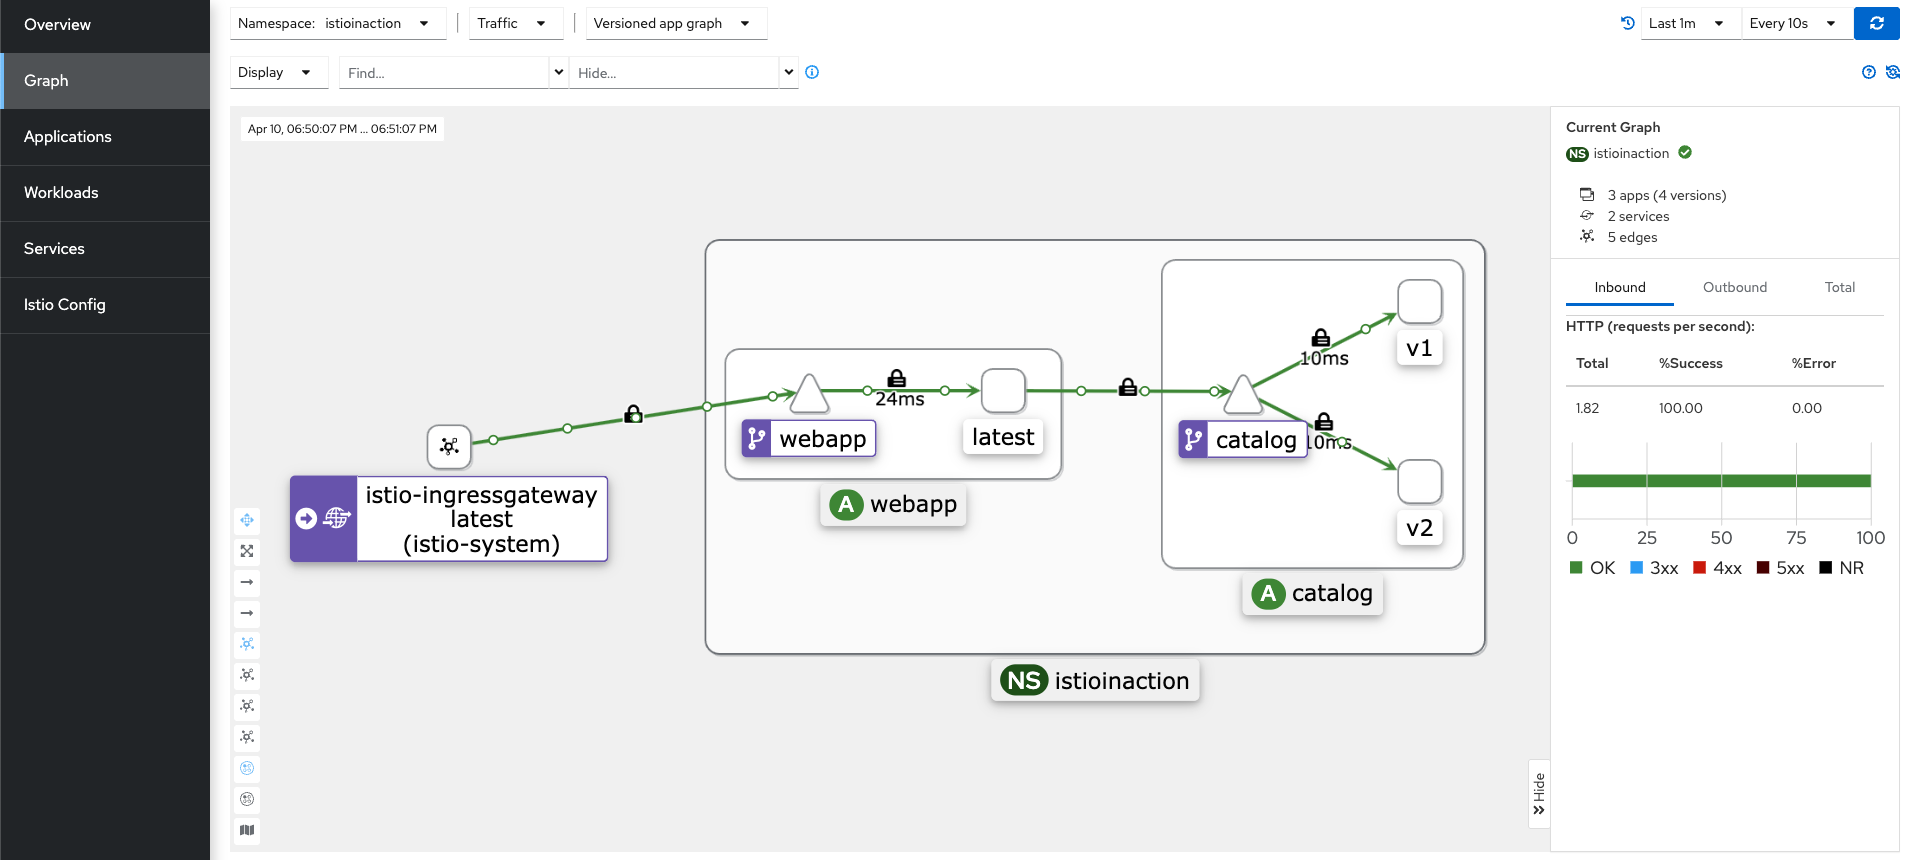
- name: SHOW_IMAGE value: "true"카탈로그의 새로운 이미지가 아니라 초기 이미지를 빌드할 때 환경 변수가 true 로 변경 되면 V2 로 배포가 되게끔 되어 있습니다.
배포 진행 후에 500Error 발생 스크립트를 중지시켜 놓고 Kiali 를 모니터링 해봅니다.
- Success Rate 100% 를 보실 수 있습니다.
- Grafana istio Mesh Dashboard 확인
이제 트래픽을 전환 해보겠습니다.
v1만 접속 설정 (꺾기)
- Rule 생성
#
cat <<EOF | kubectl -n istioinaction apply -f -
apiVersion: networking.istio.io/v1alpha3
kind: DestinationRule
metadata:
name: catalog
spec:
host: catalog
subsets:
- name: version-v1
labels:
version: v1
- name: version-v2
labels:
version: v2
EOFkubectl get dr -n istioinaction
# 반복 접속 : v1,v2 분산 접속 확인
while true; do curl -s http://127.0.0.1:30000/api/catalog | jq; date "+%Y-%m-%d %H:%M:%S" ; sleep 1; echo; done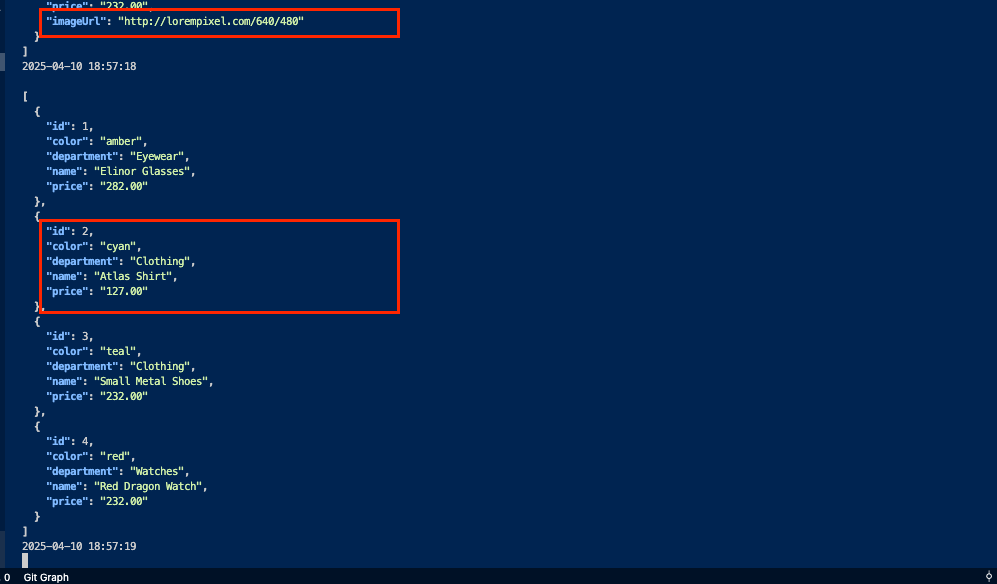
# v1 라우팅 VS 수정(업데이트)
cat <<EOF | kubectl -n istioinaction apply -f -
apiVersion: networking.istio.io/v1alpha3
kind: VirtualService
metadata:
name: catalog
spec:
hosts:
- catalog
http:
- route:
- destination:
host: catalog
subset: version-v1
EOF
# 반복 접속 : v1 접속 확인
while true; do curl -s http://127.0.0.1:30000/api/catalog | jq; date "+%Y-%m-%d %H:%M:%S" ; sleep 1; echo; done
- ImageURL 이 없는 반환값 만 반환 되며 V1 으로만 트래픽이 이동하는 것을 볼 수 있습니다.
- Kiali 내에서도 v1 서비스 만이 보이게 됩니다.
추가 시나리오 : x-dark-launch 헤더를 달고 오는 요청은 v2 로 라우팅 하는 시나리오
# 라우팅 VS 수정(업데이트)
cat <<EOF | kubectl -n istioinaction apply -f -
apiVersion: networking.istio.io/v1alpha3
kind: VirtualService
metadata:
name: catalog
spec:
hosts:
- catalog
http:
- match:
- headers:
x-dark-launch:
exact: "v2"
route:
- destination:
host: catalog
subset: version-v2
- route:
- destination:
host: catalog
subset: version-v1
EOF
#
kubectl get gw,vs,dr -n istioinaction
# 반복 접속 : v1 접속 확인
while true; do curl -s http://127.0.0.1:30000/api/catalog | jq; date "+%Y-%m-%d %H:%M:%S" ; sleep 1; echo; done
# 반복 접속 : v2 접속 확인
while true; do curl -s http://127.0.0.1:30000/api/catalog -H "x-dark-launch: v2" | jq; date "+%Y-%m-%d %H:%M:%S" ; sleep 1; echo; done

실습 완료 후 자원 삭제 방법
kubectl delete deploy,svc,gw,vs,dr --all -n istioinaction && kind delete cluster --name myk8s 3. 최신 버전 실습
실습 환경 : docker (kind - k8s 1.32.2) , istio 1.25.1
3-1. kind : k8s(1.23.17) 배포
#
kind create cluster --name myk8s --image kindest/node:v1.32.2 --config - <<EOF
kind: Cluster
apiVersion: kind.x-k8s.io/v1alpha4
nodes:
- role: control-plane
extraPortMappings:
- containerPort: 30000 # Sample Application
hostPort: 30000
- containerPort: 30001 # Prometheus
hostPort: 30001
- containerPort: 30002 # Grafana
hostPort: 30002
- containerPort: 30003 # Kiali
hostPort: 30003
- containerPort: 30004 # Tracing
hostPort: 30004
- containerPort: 30005 # kube-ops-view
hostPort: 30005
networking:
podSubnet: 10.10.0.0/16
serviceSubnet: 10.200.1.0/24
EOF
# 설치 확인
docker ps
# 노드에 기본 툴 설치
docker exec -it myk8s-control-plane sh -c 'apt update && apt install tree psmisc lsof wget bridge-utils net-tools dnsutils tcpdump ngrep iputils-ping git vim -y'
- 편의성 Tool 설치
# (옵션) kube-ops-view
helm repo add geek-cookbook https://geek-cookbook.github.io/charts/
helm install kube-ops-view geek-cookbook/kube-ops-view --version 1.2.2 --set service.main.type=NodePort,service.main.ports.http.nodePort=30005 --set env.TZ="Asia/Seoul" --namespace kube-system
kubectl get deploy,pod,svc,ep -n kube-system -l app.kubernetes.io/instance=kube-ops-view
## kube-ops-view 접속 URL 확인
open "http://localhost:30005/#scale=1.5"
open "http://localhost:30005/#scale=1.3"
# (옵션) metrics-server
helm repo add metrics-server https://kubernetes-sigs.github.io/metrics-server/
helm install metrics-server metrics-server/metrics-server --set 'args[0]=--kubelet-insecure-tls' -n kube-system
kubectl get all -n kube-system -l app.kubernetes.io/instance=metrics-server3-2. istio 1.25.1 설치 For Mac OS
brew install istioctl
istioctl version --remote=false

#
export ISTIOV=1.25.1
curl -s -L https://istio.io/downloadIstio | ISTIO_VERSION=$ISTIOV sh -

# 샘플 코드 확인
cd istio-$ISTIOV
tree
code .

# default 프로파일 배포
cat <<EOF | istioctl install -y -f -
apiVersion: install.istio.io/v1alpha1
kind: IstioOperator
spec:
  profile: demo
  components:
    ingressGateways:
    - name: istio-ingressgateway
      enabled: true
    egressGateways:
    - name: istio-egressgateway
      enabled: false
EOF
3-3. Bookinfo sample application 배포

kubectl apply -f samples/bookinfo/platform/kube/bookinfo.yaml

# 확인 : 서비스 어카운트(sa)는 spiffe 에 svid 에 사용됨
kubectl get all,sa

# product 웹 접속 확인
kubectl exec "$(kubectl get pod -l app=ratings -o jsonpath='{.items[0].metadata.name}')" -c ratings -- curl -sS productpage:9080/productpage | grep -o "<title>.*</title>"

# productpage 파드 로그
kubectl logs -l app=productpage -c istio-proxy --tail=-1
kubectl logs -l app=productpage -c productpage -f
[애플리케이션 노출]
# Istio Gateway/VirtualService 설정
cat samples/bookinfo/networking/bookinfo-gateway.yaml
apiVersion: networking.istio.io/v1
kind: Gateway
metadata:
name: bookinfo-gateway
spec:
# The selector matches the ingress gateway pod labels.
# If you installed Istio using Helm following the standard documentation, this would be "istio=ingress"
selector:
istio: ingressgateway # use istio default controller
servers:
- port:
number: 8080
name: http
protocol: HTTP
hosts:
- "*"
---
apiVersion: networking.istio.io/v1
kind: VirtualService
metadata:
name: bookinfo
spec:
hosts:
- "*"
gateways:
- bookinfo-gateway
http:
- match:
- uri:
exact: /productpage
- uri:
prefix: /static
- uri:
exact: /login
- uri:
exact: /logout
- uri:
prefix: /api/v1/products
route:
- destination:
host: productpage
port:
number: 9080
kubectl apply -f samples/bookinfo/networking/bookinfo-gateway.yaml
# Istio Gateway/VirtualService 설정 확인
kubectl get gw,vs
istioctl proxy-status
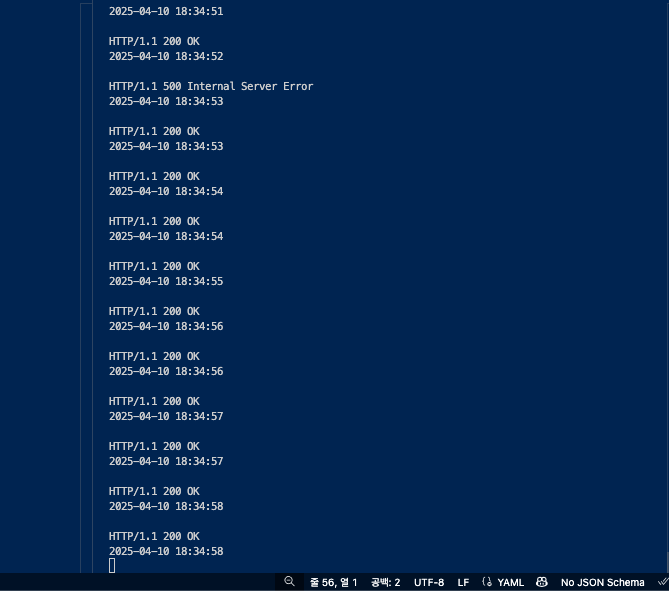
# productpage 파드의 istio-proxy 로그 확인 Access log 가 출력 - Default access log format : 링크
kubectl logs -l app=productpage -c istio-proxy -f
kubectl stern -l app=productpage
# productpage 웹 접속 : 새로고침
open http://127.0.0.1:30000/productpage
curl -v -s http://127.0.0.1:30000/productpage | grep -o "<title>.*</title>"
# 반복 접속
for i in {1..10}; do curl -s http://127.0.0.1:30000/productpage | grep -o "<title>.*</title>" ; done
for i in {1..100}; do curl -s http://127.0.0.1:30000/productpage | grep -o "<title>.*</title>" ; done
while true; do curl -s http://127.0.0.1:30000/productpage | grep -o "<title>.*</title>" ; echo "--------------" ; sleep 1; done
while true; do curl -s http://127.0.0.1:30000/productpage | grep -o "<title>.*</title>" ; echo "--------------" ; sleep 0.5; done
while true; do curl -s http://127.0.0.1:30000/productpage | grep -o "<title>.*</title>" ; echo "--------------" ; sleep 0.1; done
- istio-ingressgateway 에 istio-proxy 에도 로깅 Level 변경
kubectl exec -it deploy/istio-ingressgateway -n istio-system -- curl -X POST http://localhost:15000/logging
kubectl exec -it deploy/istio-ingressgateway -n istio-system -- curl -X POST http://localhost:15000/logging?http=debug
kubectl exec -it deploy/istio-ingressgateway -n istio-system -- curl -X POST http://localhost:15000/logging?http=info- istio-proxy 파드에 envoy 컨테이너 admin 페이지 접속
# istio-proxy 파드에 envoy 컨테이너 admin 접속 포트 포워딩 설정
kubectl port-forward deployment/deploy-websrv 15000:15000 &

# envoy 컨테이너 admin 페이지 접속
open http://localhost:15000- 실습 완료 후 삭제
kind delete cluster --name myk8s