출처 : 유튜브 GIS DEVELOPER https://youtu.be/F4aTwdpFkfw
Texture mapping
geometry에 UV좌표 개념으로 맵핑된다.
UV좌표는 three.js에서 제공하는 geometry에 기본적으로 지정되어있다.
const textureLoader = new THREE.TextureLoader();
const map = textureLoader.load("/images/texture.jpg", (texture) => {
// 이미지 반복 맵핑
texture.repeat.x = 2;
texture.repeat.y = 2;
texture.wrapS = THREE.RepeatWrapping;
texture.wrapT = THREE.RepeatWrapping;
// RepeatWrapping: 이미지를 반복해서 맵핑
// ClampToEdgeWrapping: 처음에만 이미지가 한 번 맵핑되고, 이후 반복부터는 이미지의 끝단 픽셀로 나머지 영역을 채움
// MirroredRepeatWrapping: 이미지를 x와 y 방향으로 반복하되, 짝수번째 반복에서는 이미지가 거울에 반사되어 뒤집힌 모양으로 맵핑됨
texture.offset.x = 0; // UV 좌표의 시작 위치 조정
texture.offset.y = 0;
texture.rotation = THREE.MathUtils.degToRad(45); // 이미지를 회전해서 맵핑
texture.center.x = 0.5; // 회전 기준 좌표
texture.center.y = 0.5;
texture.magFilter = THREE.LinearFilter; // 이미지의 원래 크기보다 화면에 더 크게 확대되어 랜더링
texture.minFilter = THREE.NearestMipMapLinearFilter; // 이미지의 원래 크기보다 화면에 더 작게 확대되어 랜더링
});
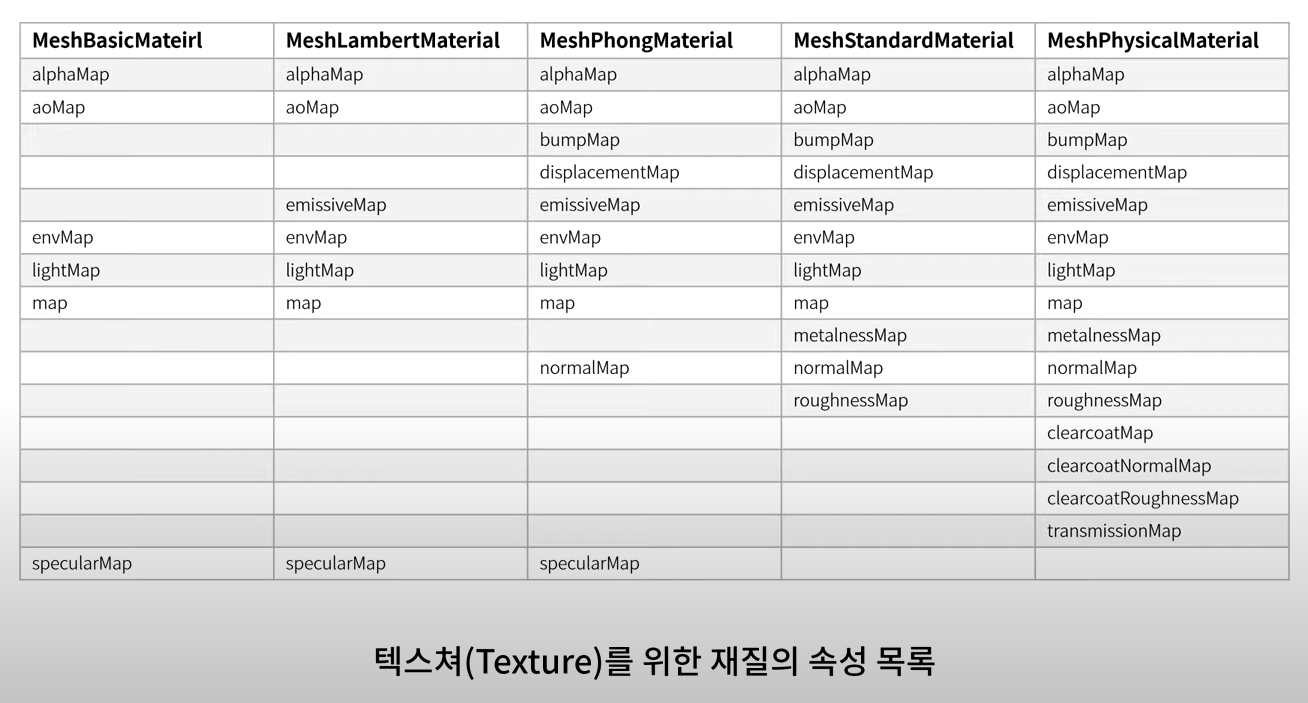
const material = new THREE.MeshStandardMaterial({
map: map,
});
출처 : 유튜브 GIS DEVELOPER https://youtu.be/F4aTwdpFkfw
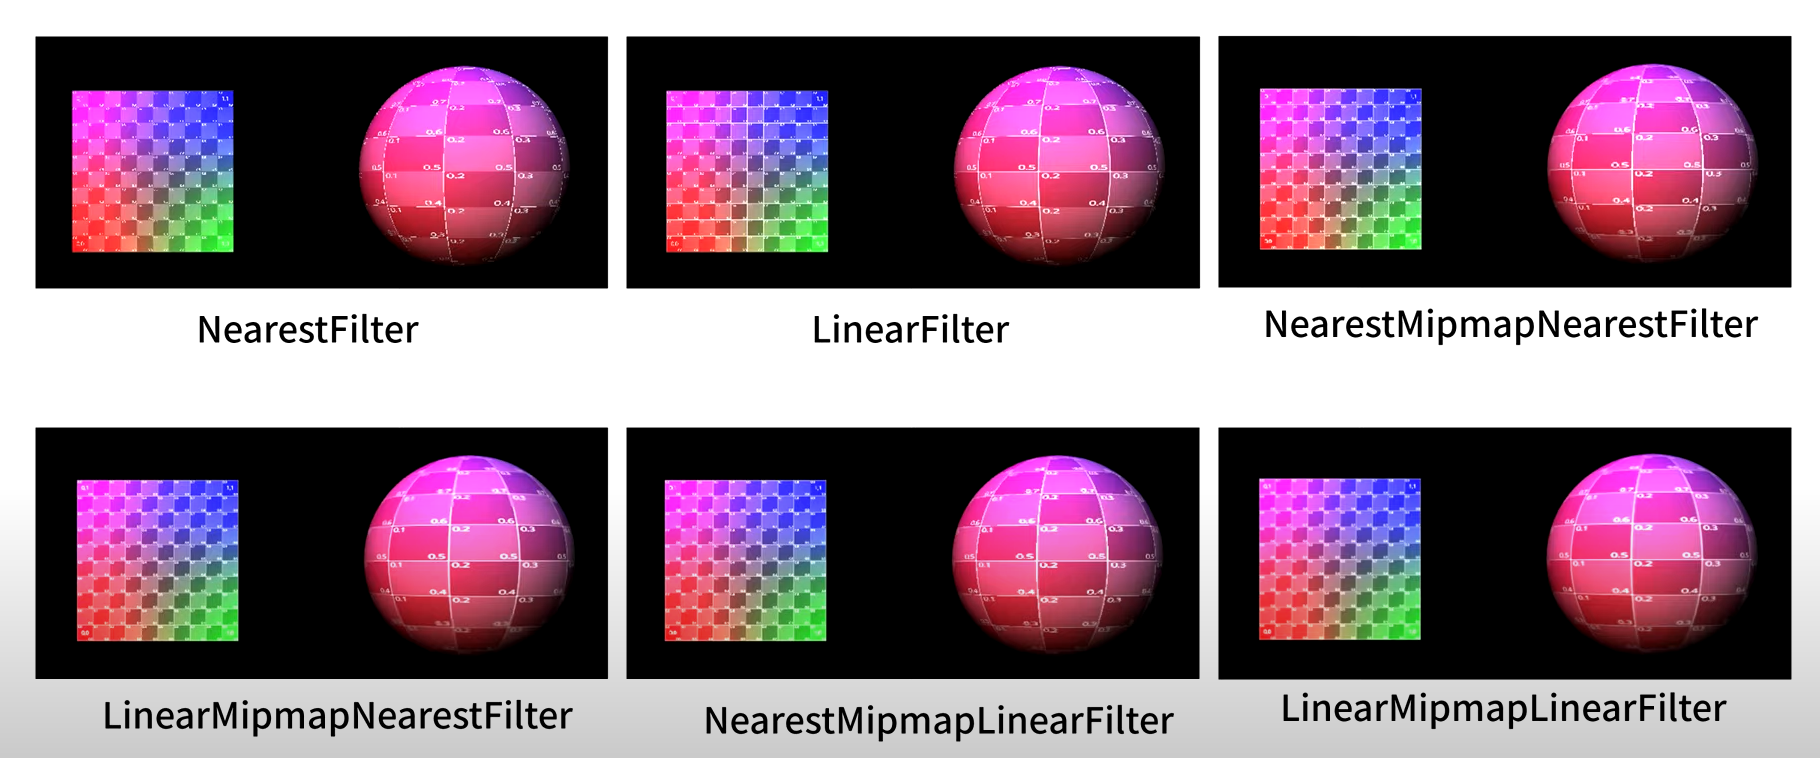
texture.minFilter 옵션
- mipMap: 원래의 이미지 크기를 절반으로 줄여서 미리 만들어놓은 이미지셋
- NearestFilter: mipMap을 사용하지 않고 단순히 가장 가까운 픽셀 하나를 가져와 사용
- LinearFilter: mipMap을 사용하지 않고 원래 텍스쳐로부터 4개의 가장 가까운 픽셀을 얻어와, 선형 보간한 값을 사용
- NearestMipMapNearestFilter: 랜더링할 맵핑 크기와 가장 가까운 mipMap 이미지를 1개 선택하고 가장 가까운 1개의 픽셀값을 가져와 사용
- LinearMipMapNearestFilter: 랜더링할 맵핑 크기와 가장 가까운 mipMap 이미지 1개를 선택하고 가장 가까운 4개의 픽셀을 가져와, 선형 보간하여 사용
- LinearMipMapLinearFilter: 랜더링할 맵핑 크기와 가장 크기가 가까운 mipMap 이미지 2개를 선택하고, 각각의 mipMap 이미지에 대해 가장 가까운 픽셀 4개를 얻은 뒤에 선형보간하게 되면 2개의 색상값이 얻어지는데, 이를 다시 가중치 평균한 색상값을 사용
-> mipMap을 사용한 경우가 랜더링 품질이 좋다.
하지만 항상 mipMap을 사용하는 것은 아님. mipMap 생성을 위한 메모리 사용량이 상당하고, 랜더링 시 하나의 픽셀값을 지정하기위한 계산에 필요한 연산량이 각 속성에 따라 모두 다르므로, 사용하는 텍스쳐 맵핑의 크기 등에 따라서 적절한 minFilter의 속성값을 지정해서 사용해야한다.
-> 대부분의 경우 기본값을 사용해도 무리가 없다.
mesh에 대한 법선 벡터 시각화
VertexNormalsHelper 클래스 사용
지정되지 않은 특정 지점에 대한 노말 벡터는 이 박스의 구성 좌표의 노말 벡터들을 이용해 보간되어 계산된다.
normalMap
normalMap을 사용하면 박스 표면의 노말 벡터를 normalMap 이미지의 RGB값을 이용해 계산한다.
이렇게 되면 인위적으로 mesh 표면의 각 픽셀에 대해 법선 벡터를 지정할 수 있게 되고 각 픽셀 단위로 광원 효과가 달라져 입체감을 표현할 수 있게 된다.
mesh의 geometry 형상이 바뀌는 것이 아니기 때문에 입체감은 착시현상이지만, 매우 적은 geometry의 좌표 구성만으로도 입체감을 매우 효과적으로 표현할 수 있는 방법이다.
import { VertexNormalsHelper } from "three/examples/jsm/helpers/VertexNormalsHelper";

const textureLoader = new THREE.TextureLoader();
const map = textureLoader.load(
  "/images/glass/Glass_Window_002_basecolor.jpg"
);
const mapNormal = textureLoader.load(
  "/images/glass/Glass_Window_002_normal.jpg"
);

const material = new THREE.MeshStandardMaterial({
  map: map,
  normalMap: mapNormal,
});

const box = new THREE.Mesh(new THREE.BoxGeometry(1, 1, 1), material);
box.position.set(-1, 0, 0);
this._scene.add(box);

const boxHelper = new VertexNormalsHelper(box, 0.1, 0xffff00);
this._scene.add(boxHelper);
displacementMap
실제로 mesh의 geometry의 좌표를 변형시켜 입체감을 표현한다.
맵 이미지의 픽셀값이 밝을 수록 좌표의 변위가 커지게 된다.
- displacementScale: 변위효과. default: 1(100%)
- displacementBias: 메쉬 정점에서 변위 맵 값의 오프셋. default: 0
박스의 경우, displacementMap이 실제 geometry의 구성 좌표를 변경시키기 때문에 이 박스의 표면에 대한 구성 좌표가 제공되어야 한다.
-> segment(분할 수)를 나눠준다.
displacementMap 효과를 위해 좌표를 더 많이 추가하는 것은 랜더링 속도면에서 비효율적이다.
-> 적절한 normalMap과 함께 displacementMap 효과를 위한 적절한 면 분할이 필요하다.
const textureLoader = new THREE.TextureLoader();
const mapHeight = textureLoader.load(
  "/images/glass/Glass_Window_002_height.png"
);
const mapNormal = textureLoader.load(
  "/images/glass/Glass_Window_002_normal.jpg"
);

const material = new THREE.MeshStandardMaterial({
  normalMap: mapNormal,
  displacementMap: mapHeight,
  displacementScale: 0.2,
  displacementBias: -0.15,
});
const box = new THREE.Mesh(
  new THREE.BoxGeometry(1, 1, 1, 256, 256, 256),
  material
);
box.position.set(-1, 0, 0);
this._scene.add(box);

const sphere = new THREE.Mesh(
  new THREE.SphereGeometry(0.7, 512, 512),
  material
);
sphere.position.set(1, 0, 0);
this._scene.add(sphere);
aoMap
텍스쳐 이미지에 미리 음영 효과를 그려 넣은 것
미리 만들어진 세밀한 그림자와 같은 느낌의 효과를 줄 수 있다.
aoMap이 적용되기 위한 필요 요소
- ambient light: 모든 mesh의 전체 면에 대해서 균일하게 광원을 비춘다.
- geometry 속성에 uv2를 지정해줘야 한다.
const material = new THREE.MeshStandardMaterial({
  aoMap: mapAO,
  aoMapIntensity: 2, // aoMap의 강도 지정. default: 1
});
const box = new THREE.Mesh(
  new THREE.BoxGeometry(1, 1, 1, 256, 256, 256),
  material
);
box.position.set(-1, 0, 0);
box.geometry.attributes.uv2 = box.geometry.attributes.uv;
this._scene.add(box);

const sphere = new THREE.Mesh(
  new THREE.SphereGeometry(0.7, 512, 512),
  material
);
sphere.position.set(1, 0, 0);
sphere.geometry.attributes.uv2 = sphere.geometry.attributes.uv;
this._scene.add(sphere);
roughnessMap
이 속성에 대한 맵 이미지의 픽셀값이 밝을수록 거칠기가 강해진다.
- roughness: roughnessMap에 대한 강도 조절. default: 1
const material = new THREE.MeshStandardMaterial({
  roughnessMap: mapRoughness,
  roughness: 0.5,
});
metalnessMap
금속 재질에 대한 느낌을 부여한다.
- metalness: metalnessMap에 대한 강도 조절. default: 0
const material = new THREE.MeshStandardMaterial({
  metalnessMap: mapMetalic,
  metalness: 0.5,
});
alphaMap
투명도. 이 속성에 대한 이미지의 픽셀값이 밝을수록 불투명해진다.
픽셀값이 완전한 검정색일 때 완전히 투명해진다.
- transparent: true - 투명도 활성화 필요
const material = new THREE.MeshStandardMaterial({
  alphaMap: mapAlpha,
  transparent: true,
  side: THREE.DoubleSide, // 물체의 뒷면이 보이도록 양면 랜더링
});
lightMap
지정된 이미지의 색상으로 발광하는 느낌을 표현.
- lightMapIntensity: lightMap에 대한 강도. default: 1
- geometry 속성에 uv2를 지정해줘야 한다.
const material = new THREE.MeshStandardMaterial({
  lightMap: mapLight,
  lightMapIntensity: 0.5
});
box.geometry.attributes.uv2 = box.geometry.attributes.uv;