-
stripe.com 대쉬보드 관리 및 App을 연결할 수 있는 Scret / Publishable Token 필요
Nest.Js - backend -
React-native(expo) - Frontend - -
stripe는 웹사이트에서 설정따라하면 됨.
-
Nest.Js 에서 yarn run stripe (최신버전 사용해돋 됨)
-
React-native(Expo)는 yarn 을 사용하면 버전이 맞지 않음.
(중요, 이거 안되서 시간 많이 소비함.)
npx expo install @stripe/stripe-react-native맞는 버전을 인스톨함. 2023년 3월 현재 맞는 버전은
"@stripe/stripe-react-native": "0.13.1",
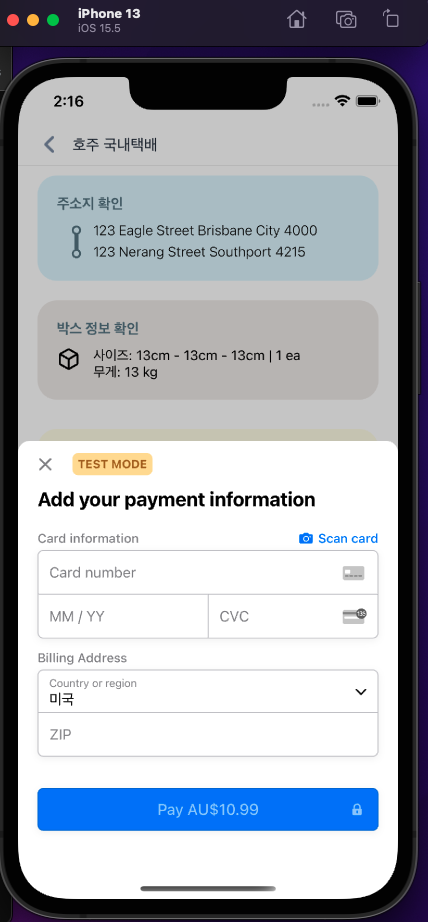
백엔드 부터(아직 완성아 아니지만 위 사진처럼 작동 확인함, 많은 삽질 정리)
import {  Injectable } from "@nestjs/common";
import { PaymentSheetInput, PaymentSheetOutput } from "./dtos/paymentSheet.dto";
const Stripe = require('stripe')


@Injectable()
export class StripeService {
    constructor(){}

    async paymentSheet(paymentSheetInput:PaymentSheetInput):Promise<PaymentSheetOutput>{
        try{

            const stripe = new Stripe(process.env.STRIPE_SECRET_KEY, {
                apiVersion: "2022-11-15",
                typescript: true
            })
            console.log('stripe', stripe)

            const customers = await stripe.customers.list()
            const customer = customers.data[0]
            if(!customer){
                return {
                    ok: false,
                    error: "현재 고객 정보가 없습니다. "
                }
            }

            const ephemeralKey = await stripe.ephemeralKeys.create(
                {customer: customer.id},
                {apiVersion: '2020-08-27'}
              );
            console.log('ephemeralKey', ephemeralKey)

            const paymentIntent = await stripe.paymentIntents.create({
                amount: 1099,
                currency: 'aud',
                customer: customer.id,
                automatic_payment_methods: {
                  enabled: true,
                },
              });

            console.log('paymentIntent', paymentIntent)

            return{
                ok: true,
                paymentIntent: paymentIntent.client_secret,
                ephemeralKey: ephemeralKey.secret,
                customer: customer.id,
                publishableKey: process.env.STRIPE_PUBLISHABLE_KEY
            }
        }catch(error){
            return { ok: false, error }}
    }

}
cargo4u로 모듈을 만들었으니 앞으로 위부분만 카피해서 쓰면 됨.
삽질 케이스는 거의 없이 공식문서대로 가능함.
expo 프론트에서 공식문서 외적으로 많이 들어갔음.
- app.json
{
  "expo": {

    "scheme": "Cargo4U",
위 Scheme을 포함시켜줘야 production에서 에러가 나지 않음.
- app.jsx
import { StripeProvider } from '@stripe/stripe-react-native';
import { PublishableKey } from '../constants/constants';

  <StripeProvider
            publishableKey={PublishableKey}
          >
            <Menu />
            </StripeProvider>
메인 앱을 StripeProvider 로 감싸줘야 하며
publishableKey를 입력해줘야함. 보안상으로 백엔드에서 주면 좋은데 지금은 constants로 import해서 그냥 사용하였음.
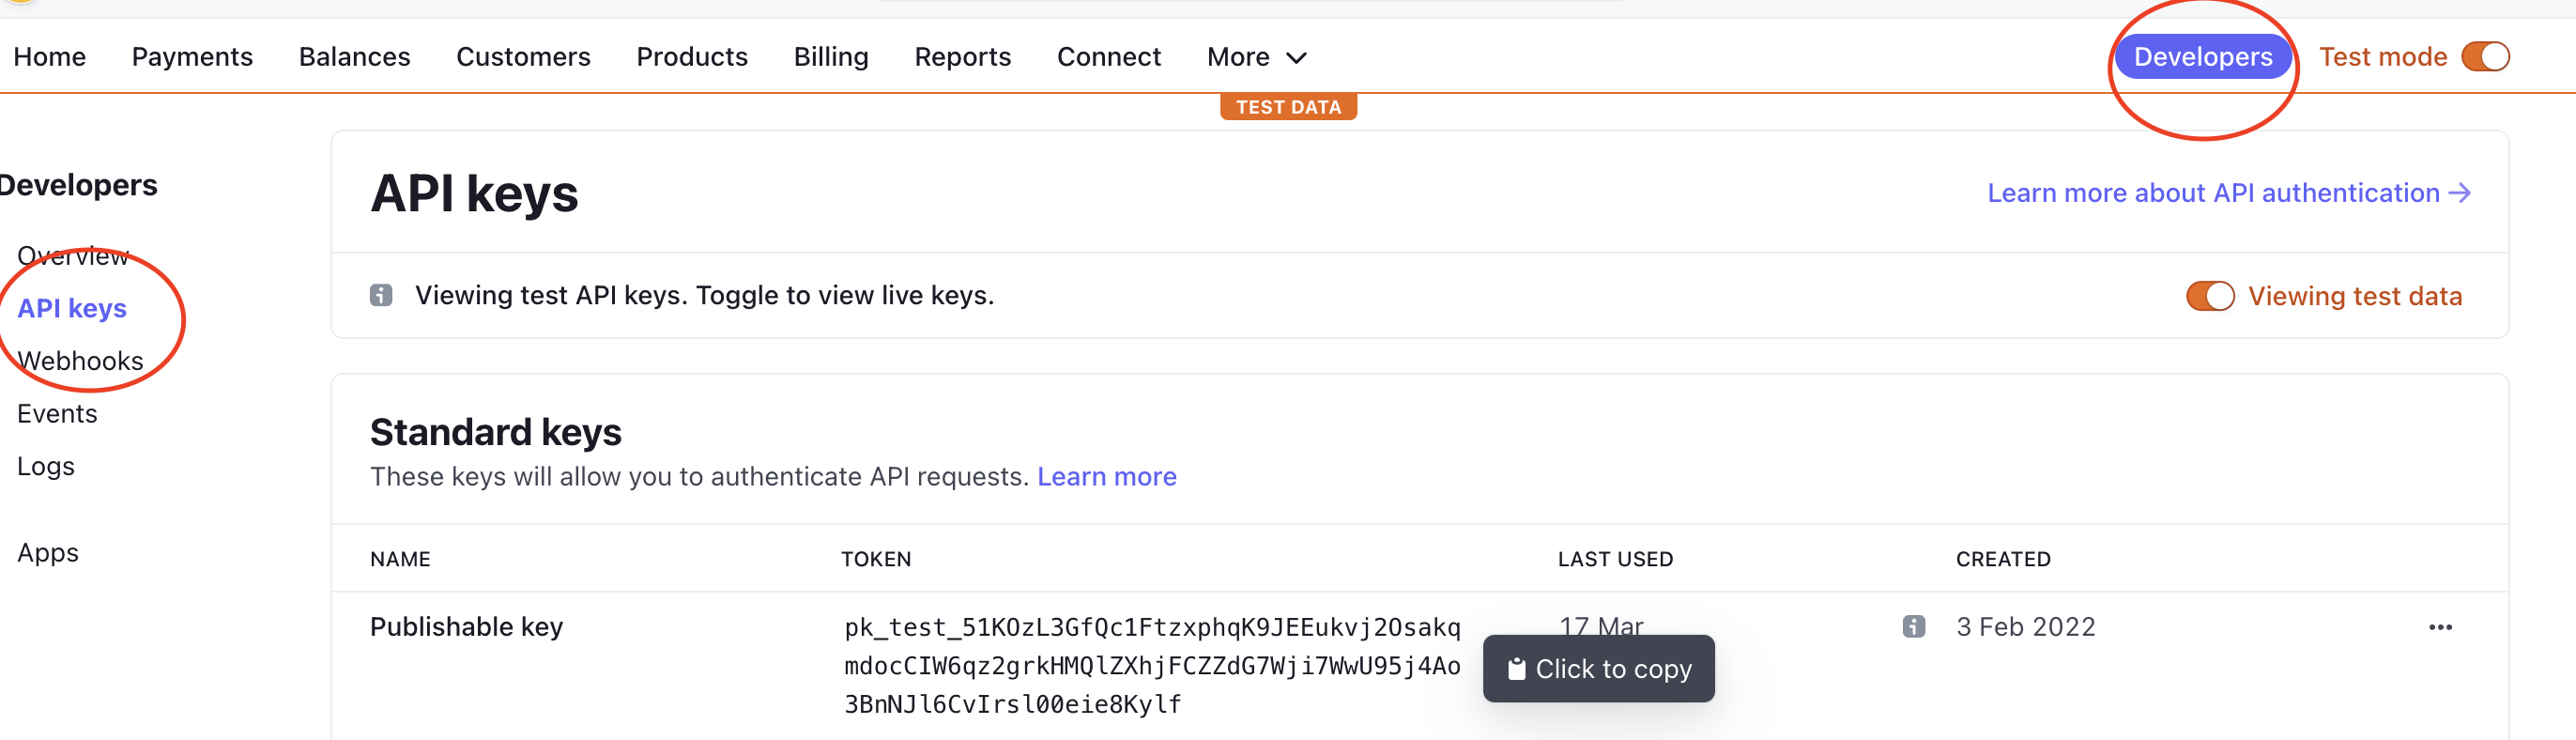
PublishableKey는 stripe.com 에 들어가서 계정을 만들면 아래 사진처럼 developerMode -> API 로 들어가면 나옴.
- DomesticCheckout.jsx
여기서도 공식문서와는 다르게 해야 진행이 되었음.
먼저 graphql로 아까 백엔드에서 만들었던 paymentSheet을 request해서 4가지 아이템을 가져옴.
const STRIPE = gql`
  mutation PAYMENT_SHEET($input: PaymentSheetInput!){
    paymentSheet(input: $input){
      ok, paymentIntent, ephemeralKey, customer, publishableKey
    }
  }
`

  const [ paymentSheetMutation, {data:response, error} ] = useMutation(STRIPE, {onCompleted
    ,variables: {
      input: {}
    }
  })

  useState(()=>{
    paymentSheetMutation()
  }, [])
paymentIntent, ephemeralKey, customer, publishableKey 4가지를 문제 없이 가져와서 response로 나옴.
가져오는 것이 성공하면 onCompleted하여 initializePaymentSheet의 함수를 실행을 시켜 Stripe의 초기화를 시켜준다.
 const onCompleted = () => {
    initializePaymentSheet()
  }

  const initializePaymentSheet = async() => {
    const { error } = await initPaymentSheet({
      merchantDisplayName: "Cargo4U Domestic",
      customerId: response?.paymentSheet?.ephemeralKey.customer,
      customerEphemeralKeySecret: response?.paymentSheet?.ephemeralKey,
      paymentIntentClientSecret: response?.paymentSheet?.paymentIntent,
      // Set `allowsDelayedPaymentMethods` to true if your business can handle payment
      //methods that complete payment after a delay, like SEPA Debit and Sofort.
      allowsDelayedPaymentMethods: true,
      returnURL: getUrl("/"),
      defaultBillingDetails: {
        name: 'Cargo4U',
      }
    });
    if (error) {
      alert(error.message)
    }else{
      setReady(true)
    }
  }
위의 내용중 returnURL에서 삽질이 필요한 건데 Stackoverflow에서 해결책을 받은 것은 아래이다.
  function getUrl(path = '') {
    if (path === '') {
      return Constants.appOwnership === 'expo'
      ? Linking.createURL('/--/' + path)
      : Linking.createURL(path);
    }
    return  Linking.createURL(path);
  }
그러면 DomestickCheckout.jsx 로 오게 되면 아무것도 하지 않아도
Stripe와 모든 것이 연결되어졌다.
버튼을 누르면 Stripe 가 만들어 놓은 Modal 창을 띄워야 하니까 버튼 함수를 만든다.
 const onBuy = async() => {
    // console.log('presetnPaymentSheet', presentPaymentSheet())
    const {error,} = await presentPaymentSheet()
    if(error){
      alert(error.message)

    }else{
      alert('감사합니다. 정상적으로 결제가 완료되었습니다.')
      setReady(false)
    }
  }
presentPaymentSheet() 에서 앱에 깨지는 현상이 많이 났었는데 원인은 expo Version이 Stripe 와 맞지 않아서였다. 위에서도 언급했듯이
npx expo install 로 진행을 해야지 yarn add 로 진행을 하면 버전이 최신버전으로 되면서 앱에 꺠지게 된다.
그리고 buy버튼을 누르면 정상작동이 위 사진처럼 문제 없이 되었다.
추후 좀더 User Experience가 좋도록 내부적으로 더 수정해야할 필요가 있긴하다.