API Gateway가 왜 필요한가?
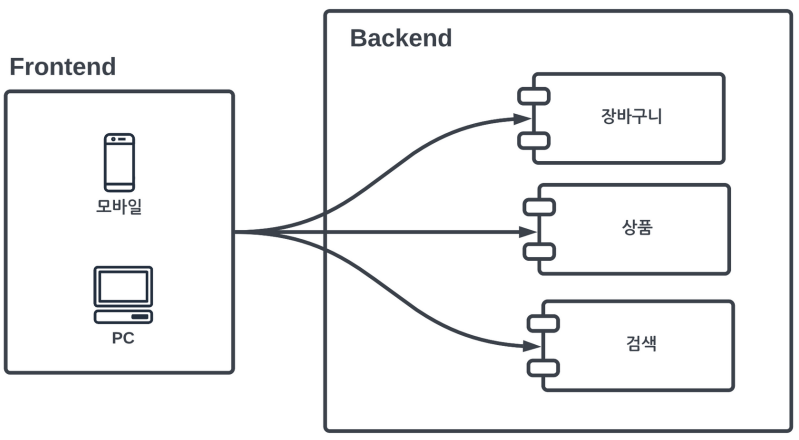
큰 서비스는 분산된 많은 마이크로 서비스가 존재합니다.
고객은 마이크로 서비스에 대해 너무 많은 통신이 필요하고 클라이언트와 서비스 간의 결합도가 매우 높아집니다.
또한 권한 처리와 같은 보안 이슈를 비롯하여 장애 처리, 로깅, 모니터링, 캐싱 처리가 비효율적일 수 밖에 없습니다.
API Gateway란?
API Gateway를 사용하면 위 구조를 아래와 같이 만들 수 있습니다.
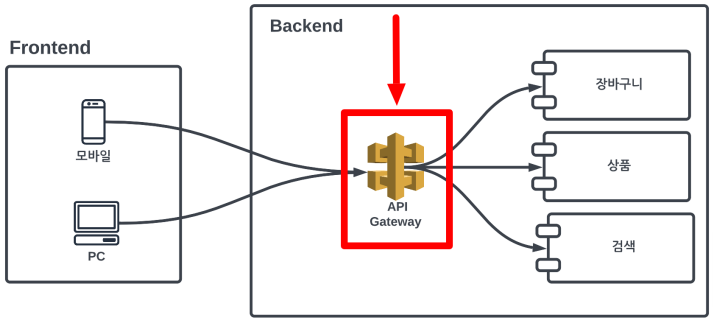
API Gateway의 특징은 크게 2개인데
단일접점: 마이크로 서비스를 모아서 단일 접점을 제공해줍니다.
캡슐화: 내부 마이크로 서비스를 캡슐화해줍니다.
API Gateway 장점
API Gateway는 마이크로 서비스를 묶어 단일 진입점을 제공합니다.
때문에 보안과 권한 제어과 같은 공통 로직 처리를 처리하기 좋습니다.
API에 대한 로깅 처리와 모니터링을 제어하기 수월합니다.
라우팅 기능을 제공하며 부하를 분산해주는 역할을 합니다.
API Gateway 단점
단일 장애 포인트가 될 수 있습니다.
만약 API Gateway에 장애가 생길 경우 서비스 전체가 다운되는 현상이 벌어집니다.
또한 추가 네트워크 호출이 늘어나기 때문에 응답 속도가 상대적으로 저하됩니다.
단점 극복
- API Gateway를 단일 장애 포인트(SPoF)로 만들지 않아야합니다.
- API Gateway에 장애가 생길 경우를 대비하여 고가용성을 확보해야합니다.
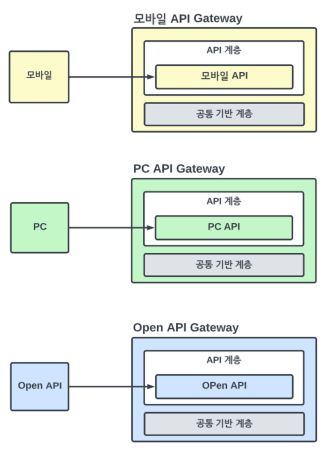
- Backend For Frontend 패턴
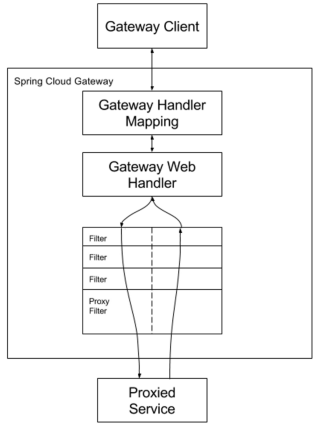
Spring Cloud Gateway
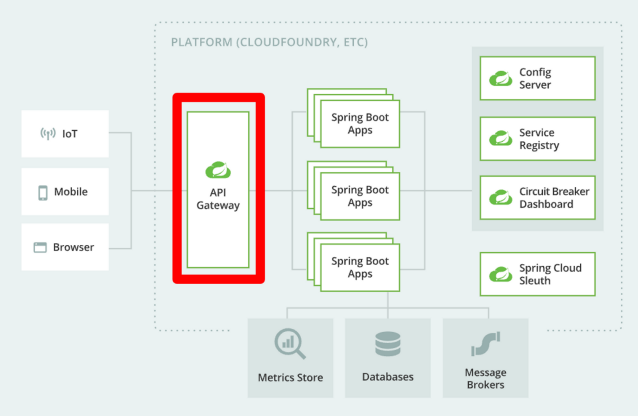
Spring Cloud Gateway 주요 기능
- Gateway Handler : 요청과 경로에 대한 매칭 처리
- Gateway Web Handler
- Before 필터
- After 필터
- Route
- 고유한 ID, 목적지 URI, Predicate, Filter로 구성되는 요소
- 조건에 만족하면 설정된 경로로 라우팅
- Predicate : 요청이 조건에 충족하는지 테스트
- Filter : 하위 마이크로 서비스로 요청과 응답을 보낼 때 변경하는 기능
Spring Cloud Gateway 동작 방식
정의
라우팅하는 방식은 Java Config 설정과 Yml 파일 설정을 가장 많이 사용하며 형식은 아래와 같습니다.
Java DSL
@Configuration
public class RouteConfiguration {
    public static final String MICROSERVICE_HOST_8080 = "http://localhost:8080";
    @Bean
    public RouteLocator helloRouteLocator(RouteLocatorBuilder builder) {
        return builder.routes()
                .route("path_simple_hello",
                        r -> r.path("/hello")
                                .uri(MICROSERVICE_HOST_8080)
                )
                .build();
    }
}
Yml
spring:
  cloud:
    gateway:
      routes:
        - id: path_simple_hello
          uri: http://localhost:8080
          predicates:
            - Path=/hello
경로 수정
Java DSL
@Configuration
public class RouteConfiguration {
    public static final String MICROSERVICE_HOST_8080 = "http://localhost:8080";
    @Bean
    public RouteLocator helloRouteLocator(RouteLocatorBuilder builder) {
        return builder.routes()
                .route("path_route_hello", r -> r.path("/gateway-hello")
                    .filters(f -> f.rewritePath("/gateway-hello", "/microservice-hello"))
           			.uri(MICROSERVICE_HOST_8080)).build();
    	}
}
Header에 값을 추가
@Bean
public RouteLocator helloRouteLocator(RouteLocatorBuilder builder) {
    return builder.routes()
            .route("add-header-route", r -> r.path("/get")
                    .filters(f -> f.addRequestHeader("role", "hello-api"))
                    .uri(ECHO_HTTP_BIN)
            ).build();
}
Yml
spring:
  cloud:
    gateway:
      routes:
        - id: path_route_hello
          uri: http://localhost:8080
          predicates:
            - Path=/gateway-hello
          filters:
            - RewritePath=/gateway-hello, /microservice-hello
TimeOut 설정
spring:
  cloud:
    gateway:
      httpclient:
        connect-timeout: 1000
        response-timeout: 5s
응용
@Component
class OrderApiRouteLocator {

    @Value("${route.order-api.v1.base-url}")
    String orderBaseUrl;

    private final String gatewayPath = "/providers/order-api/v1/";

    @Bean
    public RouteLocator customOrderApiRouteLocator(RouteLocatorBuilder routeLocatorBuilder) {
        return routeLocatorBuilder.routes()
            .route("order-api",
                r -> r.path(gatewayPath + "**")
                    .filters(f ->
                        f.rewritePath(gatewayPath + "(?<servicePath>.*)", "/${servicePath}")
                            ).uri(orderBaseUrl)).build();
    }
}
위 코드는 /providers/order-api/v1/가 포함되는 EndPoint로 요청이 왔을 때 라우팅을 해줍니다.
예를 들어 /providers/order-api/v1/orders/id 라는 응답이 오면 /providers/order-api/v1/ 뒤에 존재하는 /orders/id 경로로 라우팅을 해줍니다.
ex) routing 서버 = localhost:9090
주문 서버 = localhost:7070
결제 서버 = localhost:6060
orderBaseUrl = http://localhost:7070/
- client에서 localhost:9090/providers/order-api/v1/orders/${id}를 호출
- localhost:7070/orders/${id}로 라우팅
출처 : FastCampus
Git 주소