React에서는 카멜케이스를 사용한다.
<button onclick="handleEvent()">Event</button>js에서 이런 느낌이었다면, react에서는
<button onClick={handleEvent}>Event</button>JSX로 표현해준다.
내가 react를 배우면서 헷갈리는 점은, props와 useState의 상관관계였는데,
우선 나름대로의 useState의 정의를 내려보면,
const [tweets,setTweets] = useState()이런 구문이 있을때, setTweets는 tweets을 업데이트 해주는 함수.
그리고 tweets는 새로운 데이터를 받을때마다 자동으로 리렌더링된다.
js에서는 자동적으로 리렌더링 되지 않아서 render 함수를 직접 붙여주고는 했는데,
react에서는 그렇지 않는다는 점이 큰 장점이다.
import "./styles.css";
import React, { useState } from "react";

function NameForm() {
  const [name, setName] = useState("");

  const handleChange = (e) => {
    setName(e.target.value);
  };

  const handleClick = () => {
    alert(name);
  };
  return (
    <div className="App">
      <h1>Event handler practice</h1>
      <input type="text" value={name} onChange={handleChange}></input>
      <button onClick={handleClick}>Button</button>
      {/* <button onClick={() => alert(name)}>Button</button> */}
      <h3>{name}</h3>
    </div>
  );
}
export default NameForm;
예제 중에 하나인데, 위에서 알 수 있는 점은 alert를 handleClick의 return 값에 바로 설정해주는것이 아닌, 함수를 통해서 받는것을 알 수 있다. 왜 이런일이 일어날까? 이벤트에 함수를 바로 호출하게 되면
ex) onClick={alert(name)}
함수 자체가 호출되는 것이 아닌, 함수의 결과가 onClick에 적용되기 때문이다.
그래서 return문 안에서 함수를 정의하거나 리턴문 외부에서 함수를 정의 후 이벤트에 함수를 전달하면 된다.
import React, { useState } from "react";
import "./styles.css";

function SelectExample() {
  const [choice, setChoice] = useState("apple");

  const fruits = ["apple", "orange", "pineapple", "strawberry", "grape"];
  const options = fruits.map((fruit) => {
    return <option value={fruit}>{fruit}</option>;
  });
  console.log(choice);
  const handleFruit = (event) => {
    setChoice(event.target.value)
  };

  return (
    <div className="App">
      <select onChange={handleFruit}>{options}</select>
      <h3>You choose "{choice}"</h3>
    </div>
  );
}

export default SelectExample;
위의 예제는 options를 고른대로 return값에 choice를 나타내주고 있다.
여기서 choice는 state로 option에 따라 값이 유동적으로 변하기때문에 state로 나타낸다.
내가 여기서 배운점은 options를 fruits.map으로 보여준 후 selec에 {option}으로 넣어준것이다. select의 값을 바꾼만큼 h3의 부분 내용도 바뀐다.

밑으로는 처음 구현해봐서 생소했던 popup 예제다.
import React, { useState } from "react";
import "./styles.css";

function App() {
  const [showPopup, setShowPopup] = useState(false);

  const togglePopup = (event) => {
    // Pop up 의 open/close 상태에 따라
    // 현재 state 가 업데이트 되도록 함수를 완성하세요.
    setShowPopup(event.target.value);
  };

  return (
    <div className="App">
      <h1>Fix me to open Pop Up</h1>
      {/* 버튼을 클릭했을 때 Pop up 의 open/close 가 작동하도록
          button tag를 완성하세요. */}
      <button className="open" onClick={togglePopup} value="true">
        Open me
      </button>
      {showPopup ? (
        <div className="popup">
          <div className="popup_inner">
            <h2>Success!</h2>
            <button className="close" onClick={togglePopup}>
              Close me
            </button>
          </div>
        </div>
      ) : null}
    </div>
  );
}

export default App;
위의 방법 말고도 const togglePopup 부분을
const togglePopup =() => {
if(showPopup===false){
setShowPopup(true)}
else{setShowPopup(false)
}
}
이렇게 바꾸거나,
const togglePopup = () => {
    setShowPopup(!showPopup)
  };
이렇게도 가능하다.
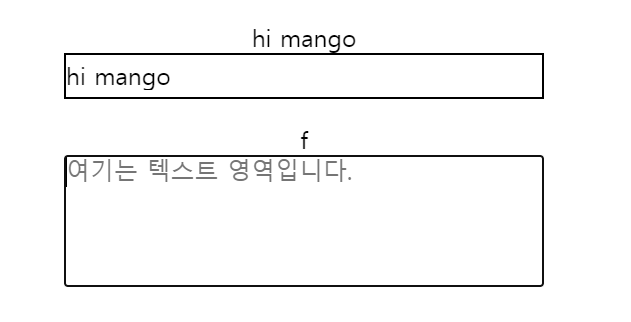
그리고 내가 하나 헷갈렸던 부분! input과 textarea에서 value는 정확히 무슨 일을 하는가...
였는데, 예제를 풀어보니 이해가 갔다. + 1/28일 추가 : value는 해당 엘리먼트의 초깃값을 설정하기 위해 필요하다.
ex) input의 value = {mango}로 설정해주고 setSomthingState="" 하면 비어있는 폼을 받을 수 있다.
import "./styles.css";
import React, { useState } from "react";
export default function App() {
const [username, setUsername] = useState("");
const [msg, setMsg] = useState("");
return (
<div className="App">
<div>{username}</div>
<input
type="text"
value={username}
onChange={(event) => setUsername(event.target.value)}
placeholder="여기는 인풋입니다."
className="tweetForm__input--username"
></input>
<div>{msg}</div>
<textarea
placeholder="여기는 텍스트 영역입니다."
className="tweetForm__input--message"
onChange={(event) => setMsg(event.target.value)}
value={msg}
></textarea>
</div>
);
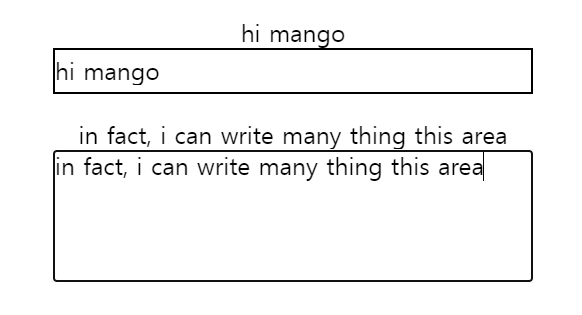
}밑부분 textarea value값에 value={""}을 넣고 문자를 아무리 넣어도! value안에 값이
저장되지 않아서 값이 하나밖에 나오지 않는다.
하지만 value에 두번째 useState의 첫 번째 인자인 mag를 넣어주게되면,
msg의 리렌더링되는 정보가 계속해서 들어오게 된다.