10. Partial Prerendering (Optional)
Partial Prerendering은 Next.js 14에 도입된 실험적 기능이다.
이 내용은 기능의 안정화가 진행되면서 업데이트 될 수 있다.
실험적 기능을 사용하고 싶지 않다면 이 장을 건너뛰어도 된다.
튜토리얼을 완료하는데 문제되지 않는다.
In this chapter...
- Partial Prerendering이 뭔지
- Partial Prerendering이 어떻게 동작하는지
Combining Static and Dynamic Content
현재, dynamic function(예: noStore(), cookies(), 등)을 route에서 호출한다면 전체 route가 danamic이 된다.
이것이 오늘날 대부분의 웹 앱이 빌드되는 방식이다.
전체 어플리케이션 또는 특정 route에 대해 정적 렌더링과 동적 렌더링 중 하나를 선택할 수 있다.
그러나 대부분의 route는 완전히 정적이거나 동적이지 않다.
정적 컨텐츠와 동적 컨텐츠가 모두 포함된 route가 있을 수 있다.
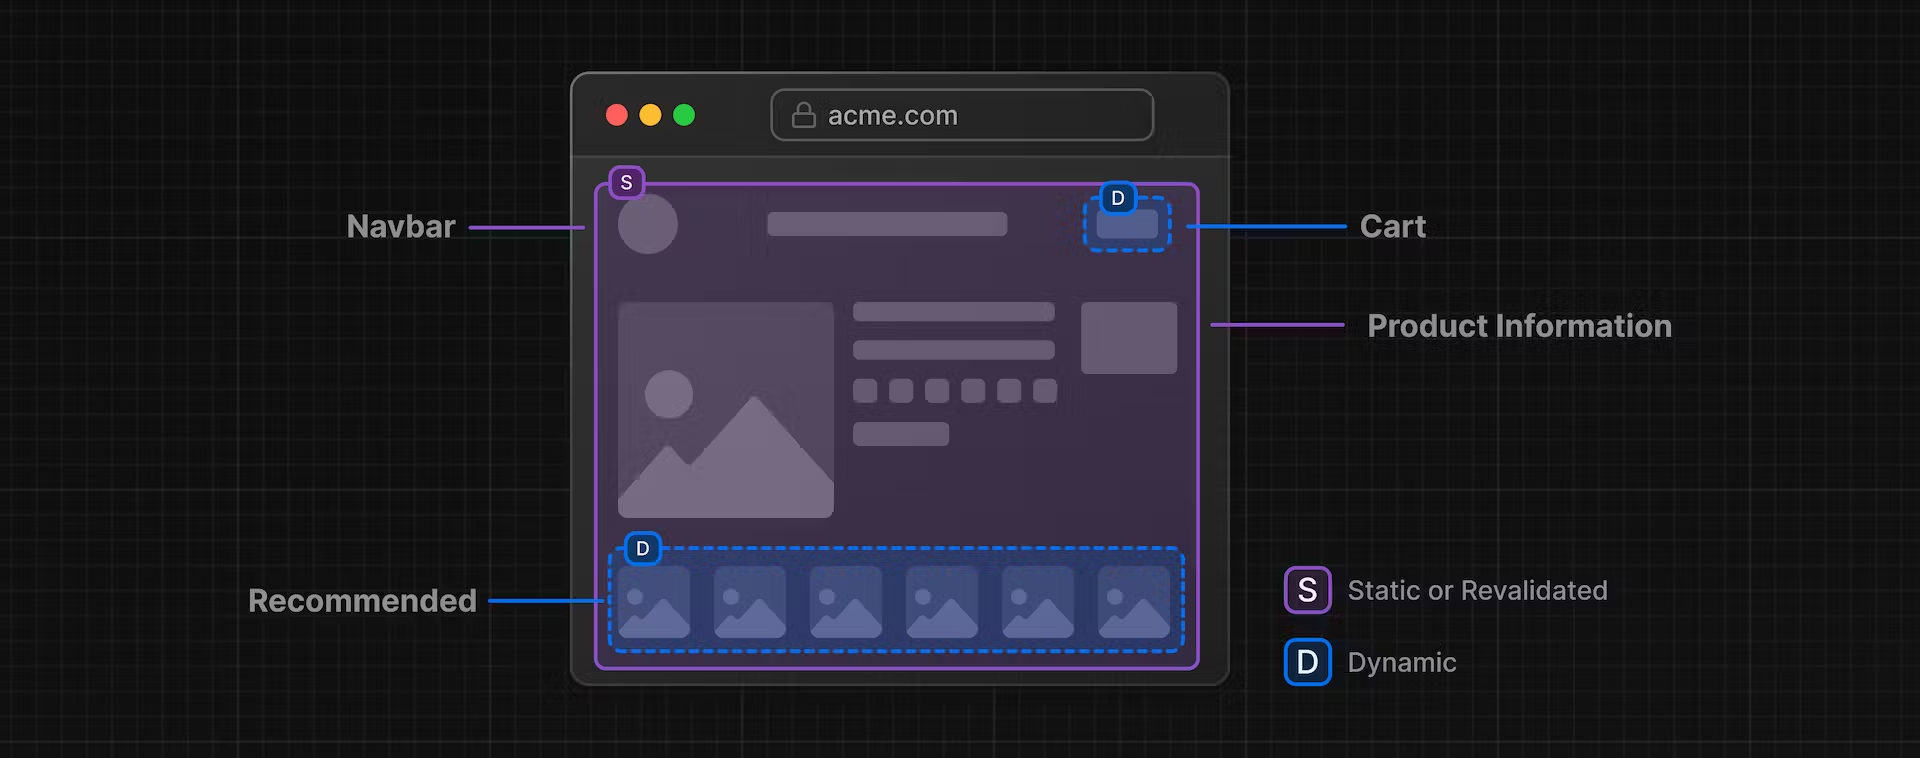
예를 들어 전자상거래 사이트를 생각해보자.
대부분의 제품 페이지를 미리 렌더링할 수 있지만 사용자의 장바구니와 추천 제품은 필요에 따라 동적으로 가져오고 싶을 수 있다.
대시보드 페이지로 돌아가서, 어떤 구성 요소를 정적 콘텐츠와 동적 콘텐츠로 고려할까?
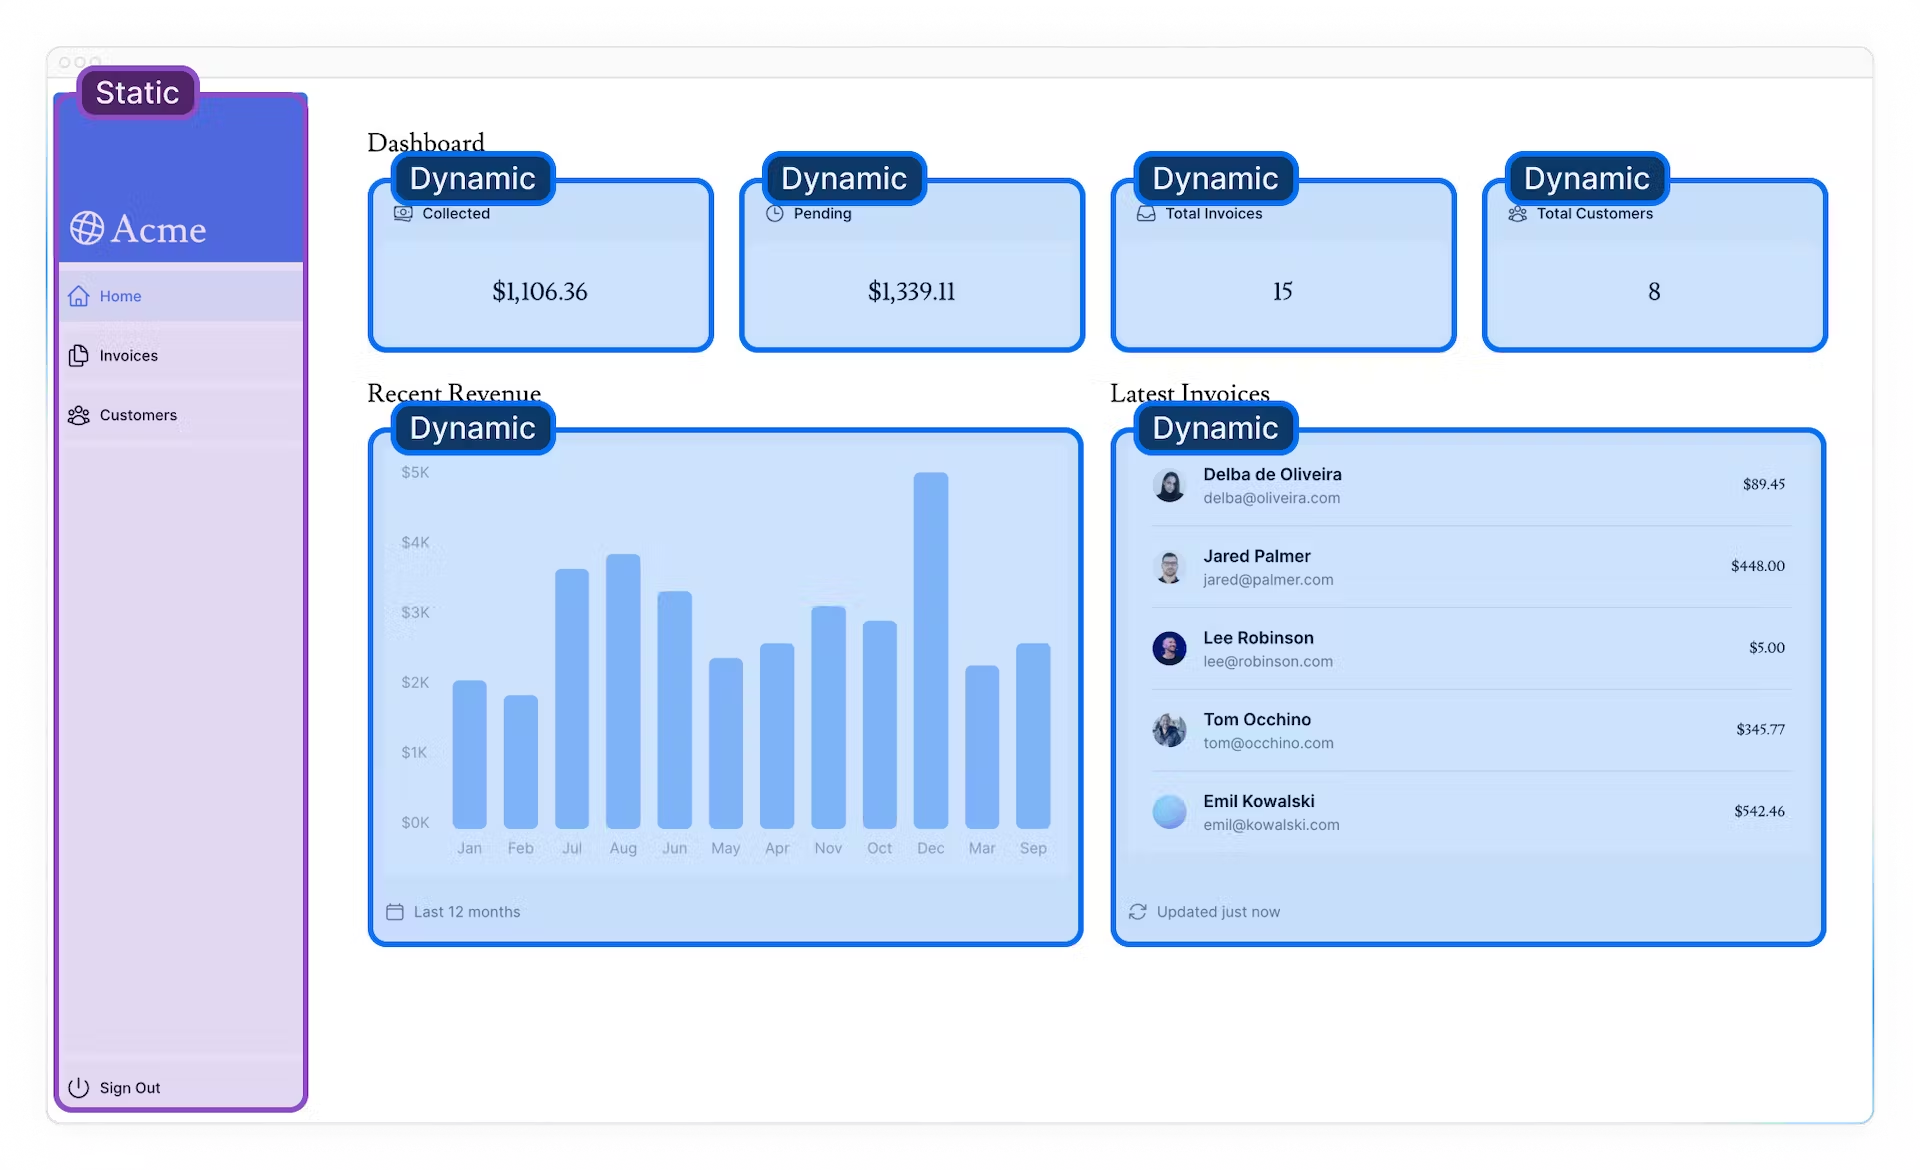
<SideNav />컴포넌트는 데이터에 의존하지 않고 사용자에게 맞춤화되지 않으므로 정적일 수 있다.<Page />의 구성요소는 자주 변경되는 데이터에 의존하고 사용자에게 맞춤화되므로 동적일 수 있다.
What is Partial Prerendering?
Next.js 14에는 Partial Prerendering의 preview가 포함되어 있다.
이는 실험적인 기능으로, 일부를 동적으로 유지하면서 static loading shell로 route를 렌더링할 수 있는 것을 뜻한다.
즉, route의 동적인 부분을 분리할 수 있다.
예를 들어
사용자가 route를 방문하는 경우:
- Static route shell이 제공되어 빠른 초기 로딩을 보장한다.
- Shell은 비동기적으로 로드될 동적 컨텐츠가 위치할 공간을 남긴다.
- 동적 컨텐츠가 위치할 공간은 병렬로 스트리밍되므로 페이지의 전체 로드 시간이 단축된다.
이는 전체 경로가 완전히 정적이거나 동적인 오늘날 애플리케이션의 작동 방식과는 다르다.
Partial Prerendering은 초고속 정적 엣지 전송과 완전한 동적 기능을 결합한 것으로, 정적 사이트 생성과 동적 전송의 장점을 결합하여 웹 애플리케이션의 기본 렌더링 모델이 될 수 있는 잠재력이 있다고 생각한다.
How does Partial Prerendering work?
Partial Prerendering은 리액트의 Concurrent API를 활용하고 Suspense를 사용하여 특정 조건이 충족될 때가지 (예: 데이터가 로드될 때까지) 애플리케이션의 일부 렌더링을 연기한다.
Fallback은 다른 정적 컨텐츠와 함께 초기 정적 파일에 임베드 된다.
빌드 시(또는 revalidation 도중에) route의 정적 부분이 미리 렌더링 되고 나머지는 사용자가 경로를 요청할때까지 연기된다.
컴포넌트를 Suspense로 래핑한다고 해서 컴포넌트 자체가 동적이 되는 것이 아니라(이 동작을 구현하기 위해 unstable_noStore을 사용했음을 기억하자) Suspense가 route의 정적 부분과 동적 부분 사이의 경계로 사용된다는 점에 주목할 필요가 있다.
Partial Prerendering의 가장 큰 장점은 이를 사용하기 위해 코드를 변경할 필요가 없다는 점이다.
Suspense를 사용하여 경로의 동적 부분을 래핑하기만 하면 Next.js는 경로의 어느 부분이 정적이고 어느 부분이 동적인지 알 수 있다.
Partial Prerendering을 구성하는 방법에 대해 자세히 알아보려면 공식문서를 참조하자.
다만, 공식문서에서도 이 기능을 프로덕션 배포에 사용하지 말라고 권장하고 있음
Summary
우리는 data fetching을 최적화하기 위한 몇 가지 작업을 했다.
- 서버와 DB사이의 지연시간을 줄이기 위해 애플리케이션 코드와 동일한 지역에 DB를 생성했다.
- Server Component를 사용하여 서버에서 데이터를 불러왔다. 이렇게 하면 값 비싼 data fetching 및 logic을 서버에서 진행하고 클라이언트에서 실행될 javascript 번들을 줄이며 DB가 클라이언트에 노출되는 것을 방지할 수 있다.
- SQL을 사용하여 필요한 데이터만 가져와서 각 요청에 대해 전송되는 데이터의 양과 데이터를 인메모리로 변환하는 데 필요한 javascript의 양을 줄인다.
- Javascript로 data fetching을 병렬처리 한다. (그게 합당한 경우만)
- 느린 data fetching으로 인해 전체 페이지가 blocking되는 것을 방지하고 사용자가 모든 항목이 로드될 때까지 기다리지 않고 UI와 상호 작용을 할 수 있도록 스트리밍을 구현했다.
- Data fetching이 필요한 컴포넌트로 내부로 이동하여 Partial Prerendering을 위해 route의 어느 부분이 동적이어야 하는지 분리해놓을 수 있다.
11. Adding Search and Pagination
In this chapter...
- Next.js의 APIs인
searchParams,usePathname,useRouter를 사용하는 방법 - 검색과 pagination을 URL search params로 구현
Starting code
/dashboard/invoices/page.tsx 파일 내부에 다음의 코드를 복붙하자.
/app/dashboard/invoices/page.tsx
import Pagination from '@/app/ui/invoices/pagination';
import Search from '@/app/ui/search';
import Table from '@/app/ui/invoices/table';
import { CreateInvoice } from '@/app/ui/invoices/buttons';
import { lusitana } from '@/app/ui/fonts';
import { InvoicesTableSkeleton } from '@/app/ui/skeletons';
import { Suspense } from 'react';

export default async function Page() {
  return (
    <div className="w-full">
      <div className="flex w-full items-center justify-between">
        <h1 className={`${lusitana.className} text-2xl`}>Invoices</h1>
      </div>
      <div className="mt-4 flex items-center justify-between gap-2 md:mt-8">
        <Search placeholder="Search invoices..." />
        <CreateInvoice />
      </div>
      {/*  <Suspense key={query + currentPage} fallback={<InvoicesTableSkeleton />}>
        <Table query={query} currentPage={currentPage} />
      </Suspense> */}
      <div className="mt-5 flex w-full justify-center">
        {/* <Pagination totalPages={totalPages} /> */}
      </div>
    </div>
  );
}
<Search />에서는 특정 incoives를 검색할 수 있다.<Pagination />는 invoices의 페이지 사이를 이동할 수 있다.<Table />은 invoices를 표시한다.
검색 기능은 클라이언트와 서버에 걸쳐 있다.
사용자가 클라이언트에서 invoices를 검색하면 URL 매개변수가 업데이트 되고 서버에서 데잍를 가져온 다음 새 데이터가 포함된 테이블이 서버에서 다시 렌더링 된다.
Why use URL search params?
위에서 언급했듯이 URL search params를 사용하여 검색 상태를 관리한다.
client side state를 사용하는 데 익숙하다면 이 패턴이 다소 생소할 수 있다.
URL search params로 검색을 구현하면 몇 가지 이점이 있다.
- Bookmarkable and Shareable URLs : search params가 URL에 있으므로 사용자는 검색 쿼리 및 필터를 포함한 애플리케이션의 현재 상태를 북마크에 추가하여 나중에 참조하거나 공유할 수 있다.
- Server-Side Rendering and Initial Load : URL 매개변수를 서버에서 직접 사용하여 초기 상태를 랜더링할 수 있으므로 서버 랜더링을 더 쉽게 처리할 수 있다.
- Analytics and Tracking : URL에 검색 쿼리와 필터를 직접 넣으면 추가적인 클라이언트 측 로직 없이도 사용자 행동을 쉽게 추적할 수 있다.
Adding the search functionality
다음은 검색 기능을 구현하는데 사용할 Next.js 의 클라이언트 hooks입니다.
useSearchParams: 현재 URL의 parameters에 액세스할 수 있다. 예를 들어 현재 URL이/dashboard/invoices?page=1&query=pending이라면{page:'1', query:'pending'}을 받아온다.usePathname: 현재 URL의 pathname을 읽을 수 있다. 예를 들어 현재 URL이/dashboard/invoices라면/dashboard/invoices를 받아온다.useRouter: 클라이언트 컴포넌트 내에서 프로그래밍 방식으로 route를 navigation할 수 있다.
다음은 구현 단계에 대한 간략한 개요이다.
- 사용자의 입력을 캡쳐한다.
- 사용자의 입력을 검색 매개변수로 변환하여 URL을 업데이트한다.
- URL을 사용자 입력 요소와 동기화 상태로 유지한다.
- 검색 쿼리를 반영하도록 테이블을 업데이트 한다.
1. Capture the user's input
<Search /> 컴포넌트(/app/ui/search.tsx)로 이동하면 다음을 확인할 수 있다.
use client: 이는 클라이언트 컴포넌트로, 이벤트 리스너와 훅을 사용함을 의미한다.<input />: 검색 입력 element이다.
새로운 handleSearch 함수를 만들고 onChange 리스너의 콜백함수로 등록한다.
그 후 <input /> element에 onChange를 등록한다.
입력 값이 변경될 때마다 onChange 가 handleSearch 함수를 호출한다.
/app/ui/search.tsx
'use client';

import { MagnifyingGlassIcon } from '@heroicons/react/24/outline';

export default function Search({ placeholder }: { placeholder: string }) {
  function handleSearch(term: string) {
    console.log(term);
  }

  return (
    <div className="relative flex flex-1 flex-shrink-0">
      <label htmlFor="search" className="sr-only">
        Search
      </label>
      <input
        className="peer block w-full rounded-md border border-gray-200 py-[9px] pl-10 text-sm outline-2 placeholder:text-gray-500"
        placeholder={placeholder}
        onChange={(e) => {
          handleSearch(e.target.value);
        }}
      />
      <MagnifyingGlassIcon className="absolute left-3 top-1/2 h-[18px] w-[18px] -translate-y-1/2 text-gray-500 peer-focus:text-gray-900" />
    </div>
  );
}
개발자 도구에서 콘솔을 열어 제대로 찍히는지 테스트해본다.
이제 검색어로 URL을 업데이트 해야 한다.
2. Update the URL with the search params
useSearchParams hook을 'next/navigation 모듈로부터 import한다.
그 후, 변수에 할당한다.
/app/ui/search.tsx
'use client';

import { MagnifyingGlassIcon } from '@heroicons/react/24/outline';
import { useSearchParams } from 'next/navigation';

export default function Search() {
  const searchParams = useSearchParams();

  function handleSearch(term: string) {
    console.log(term);
  }
  // ...
}
handleSearh 내에서 searchParams 를 사용해 URLSearchParams 인스턴스를 생성한다.
/app/ui/search.tsx
'use client';

import { MagnifyingGlassIcon } from '@heroicons/react/24/outline';
import { useSearchParams } from 'next/navigation';

export default function Search() {
  const searchParams = useSearchParams();

  function handleSearch(term: string) {
    const params = new URLSearchParams(searchParams);
  }
  // ...
}
URLSearchParams 는 URL query parameters를 조작하기 위한 유틸리티 메서드를 제공하는 Web API이다.
복잡한 문자열 리터럴을 만드는 대신 이 메서드를 사용하여 ?page=1&query=a 와 같은 파라미터 문자열을 가져올 수 있다.
다음으로 사용자의 입력에 따라 매개변수 문자열을 설정한다.
입력이 비어있으면 삭제한다.
/app/ui/search.tsx
'use client';

import { MagnifyingGlassIcon } from '@heroicons/react/24/outline';
import { useSearchParams } from 'next/navigation';

export default function Search() {
  const searchParams = useSearchParams();

  function handleSearch(term: string) {
    const params = new URLSearchParams(searchParams);
    if (term) {
      params.set('query', term);
    } else {
      params.delete('query');
    }
  }
  // ...
}
이제 쿼리 문자열이 생겼다.
Next.js의 useRouter 및 usePathname hooks를 사용하여 URL을 업데이트할 수 있다.
next/navigation 모듈에서 usePathname 과 useRouter 를 import하고 handleSearch 내부에서 useRouter() 의 replace 메서드를 사용한다.
/app/ui/search.tsx
'use client';

import { MagnifyingGlassIcon } from '@heroicons/react/24/outline';
import { useSearchParams, usePathname, useRouter } from 'next/navigation';

export default function Search() {
  const searchParams = useSearchParams();
  const pathname = usePathname();
  const { replace } = useRouter();

  function handleSearch(term: string) {
    const params = new URLSearchParams(searchParams);
    if (term) {
      params.set('query', term);
    } else {
      params.delete('query');
    }
    replace(`${pathname}?${params.toString()}`);
  }
}
현재상황은 다음과 같습니다.
${pathname}은 현재 path이며 여기서는/dashboard/invoices입니다.- 사용자가 검색창에 입력하면
params.toString()이 사용자 입력을 URL에 맞는 포맷으로 변환한다. replace(${pathname}?${params.toString()})은 현재 URL을 사용자의 검색 데이터로 업데이트 한다. 예를 들어 "Lee" 라고 입력했다면/dashboard/invoices?query=lee가 된다.- 페이지 재로딩없이 URL이 업데이트된다. (Next.js의 클라이언트측 navigation 때문)
3. Keeping the URL and input in sync
입력 필드가 URL과 동기화되고 공유할 때 입력 필드가 채워지도록 하려면 searchParams 에서 defaultValue 를 읽어 입력에 전달하면 된다.
/app/ui/search.tsx
<input
  className="peer block w-full rounded-md border border-gray-200 py-[9px] pl-10 text-sm outline-2 placeholder:text-gray-500"
  placeholder={placeholder}
  onChange={(e) => {
    handleSearch(e.target.value);
  }}
  defaultValue={searchParams.get('query')?.toString()}
/>
defaultValuevsvalue/ Controlled vs Uncontrolled
state를 사용해 입력 값을 관리하는 경우,valueattribute를 사용해 controlled 컴포넌트로 만들 수 있다. 즉, 리액트가 입력의 상태를 관리한다는 뜻이다.
그러나 우리는 state를 사용하지 않으므로defaultValue를 사용할 수 있다. 즉, native input이 자체적으로 상태를 관리한다. state 대신 URL에 검색 쿼리를 저장하기 때문에 괜찮다.
4. Updating the table
마지막으로 검색 쿼리를 반영하도록 테이블 컴포넌트를 업데이트 해야한다.
invoices page로 이동한다.
Page 컴포넌트는 searchParams 라는 props를 전달 받으므로 현재 URL 매개변수를 <Table /> 로 전달할 수 있다.
/app/dashboard/invoices/page.tsx
import Pagination from '@/app/ui/invoices/pagination';
import Search from '@/app/ui/search';
import Table from '@/app/ui/invoices/table';
import { CreateInvoice } from '@/app/ui/invoices/buttons';
import { lusitana } from '@/app/ui/fonts';
import { Suspense } from 'react';
import { InvoicesTableSkeleton } from '@/app/ui/skeletons';

export default async function Page({
  searchParams,
}: {
  searchParams?: {
    query?: string;
    page?: string;
  };
}) {
  const query = searchParams?.query || '';
  const currentPage = Number(searchParams?.page) || 1;

  return (
    <div className="w-full">
      <div className="flex w-full items-center justify-between">
        <h1 className={`${lusitana.className} text-2xl`}>Invoices</h1>
      </div>
      <div className="mt-4 flex items-center justify-between gap-2 md:mt-8">
        <Search placeholder="Search invoices..." />
        <CreateInvoice />
      </div>
      <Suspense key={query + currentPage} fallback={<InvoicesTableSkeleton />}>
        <Table query={query} currentPage={currentPage} />
      </Suspense>
      <div className="mt-5 flex w-full justify-center">
        {/* <Pagination totalPages={totalPages} /> */}
      </div>
    </div>
  );
}
<Table /> 컴포넌트로 이동하면 두 개의 props를 볼 수 있다.
query, currentPage 이다.
이 둘은 fetchFilteredInvoices() 함수로 전달되며 이 정보를 기반으로 데이터를 반환한다.
/app/ui/invoices/table.tsx
// ...
export default async function InvoicesTable({
  query,
  currentPage,
}: {
  query: string;
  currentPage: number;
}) {
  const invoices = await fetchFilteredInvoices(query, currentPage);
  // ...
}
변경 사항이 적용되었으니 테스트해보자.
용어를 검색하면 URL이 업데이트되어 서버에 새 요청이 전송되고 서버에서 데이터를 가져와서 쿼리와 일치하는 invoices만 반환된다.
useSearchParams()hook vssearchParamsprop
query parameters를 추출하는 데 두 가지 다른 방법을 사용했다.
어느 쪽을 사용할지 여부는 클라이언트에서 작업하는지 서버에서 작업하는지에 따라 다르다.
<Search />은 클라이언트 컴포넌트이므로useSearchParams()hook을 사용했다.
<Table />은 자체 데이터를 가져오는 서버 컴포넌트이므로 페이지에서 컴포넌트로searchParams프로퍼티를 전달할 수 있다.
Best practice: Debouncing
검색 기능을 구현했지만 최적화하기 위한 작업이 남아있다.
handleSearch 함수에 console.log 를 추가해보자.
/app/ui/search.tsx
function handleSearch(term: string) {
console.log(`Searching... ${term}`);
const params = new URLSearchParams(searchParams);
if (term) {
params.set('query', term);
} else {
params.delete('query');
}
replace(`${pathname}?${params.toString()}`);
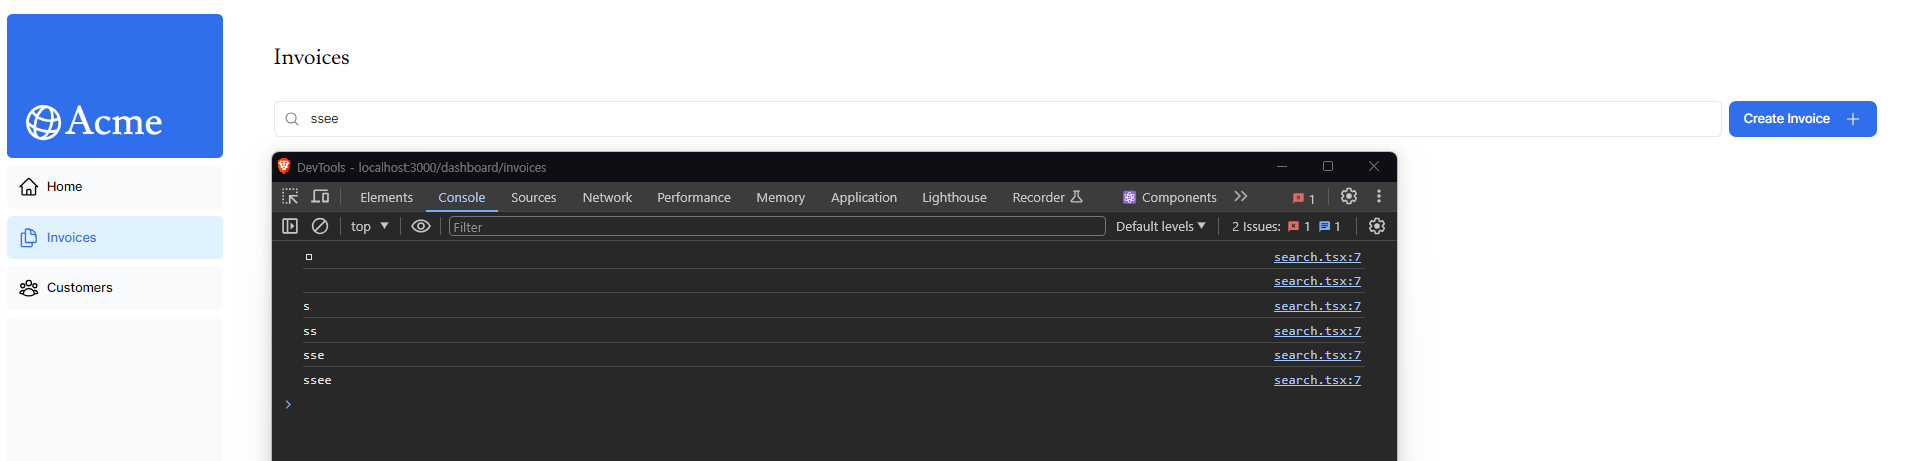
}그런 다음 검색창에 "Emil"을 입력하고 개발자 도구에서 콘솔을 확인해보자.
무슨일이 일어나나?
Searching... E
Searching... Em
Searching... Emi
Searching... Emil
키 입력시마다 URL을 업데이트하고, 따라서 키 입력 시마다 데이터베이스를 쿼리하고 있다.
이 프로젝트는 규모가 작기 때문에 문제가 되지 않지만, 수천명의 사용자가 있고 각 사용자가 키 입력시마다 데이터베이스에 새 요청을 보낸다고 상상해보자.
Debouncing은 함수가 실행될 수 있는 속도를 제한하는 프로그래밍 기법이다.
이 사례에서는 사용자가 입력을 중단했을 때만 데이터베이스를 쿼리하려고 한다.
Debouncing의 동작 방식
1. Trigger Event : 검색창의 키 입력과 같이 디바운스해야 하는 이벤트가 발생하면 타이머가 시작된다.
2. Wait : 타이머가 만료되기 전에 새 이벤트가 발생하면 타이머가 재설정된다.
3. Execution : 타이머가 카운트다운 종료에 도달하면 디바운스된 함수가 실행된다.
디바운스 함수를 수동으로 생성하는 등 몇 가지 방법으로 디바운스를 구현할 수 있다.
간단하게 하기 위해 use-debounce 라는 라이브러리를 사용한다.
use-debounce 를 설치하자.
npm i use-debounce<Search /> 컴포넌트에 useDebouncedCallback 라는 함수를 import 한다.
/app/ui/search.tsx
// ...
import { useDebouncedCallback } from 'use-debounce';

// Inside the Search Component...
const handleSearch = useDebouncedCallback((term) => {
  console.log(`Searching... ${term}`);

  const params = new URLSearchParams(searchParams);
  if (term) {
    params.set('query', term);
  } else {
    params.delete('query');
  }
  replace(`${pathname}?${params.toString()}`);
}, 300);
이 함수는 handleSearch 의 내용을 래핑하고 사용자가 입력을 중지한 후 특정 시간(300밀리초)이 지난 후에만 코드를 실행한다.
이제 다시 개발자 도구를 열어 확인해보자.
Searching... Emil디바운스는 DB로 전송하는 요청의 개수를 줄여 리소스를 절약할 수 있다.
Adding pagination
검색 기능을 도입한 후에는 테이블에 한 번에 6개의 송장만 표시되는 것을 볼 수 있다.
이는 data.ts 의 fetchFilteredInvoices() 함수가 페이지당 최대 6개의 인보이스를 반환하기 때문이다.
pagination을 추가하면 사용자가 여러 페이지를 탐색하여 모든 invoices를 볼 수 있다.
URL 매개변수를 사용하여 pagination을 구현하는 방법을 알아보자.
<Pagination /> 컴포넌트로 이동하면 클라이언트 컴포넌트란 것을 알 수 있다.
클라이언트측에서 data fetching하는 것은 DB를 노출하는 것이기 때문에(API계층을 사용하지 않고있음) 원하지 않는다.
대신에 data fetching을 서버에서 하고 prop으로 넘겨준다.
/dashboard/invoices/page.tsx 에서 fetchInvoicesPages 를 import하고 searchParams 의 query 를 함수의 argument로 전달한다.
/app/dashboard/invoices/page.tsx
// ...
import { fetchInvoicesPages } from '@/app/lib/data';

export default async function Page({
  searchParams,
}: {
  searchParams?: {
    query?: string,
    page?: string,
  },
}) {
  const query = searchParams?.query || '';
  const currentPage = Number(searchParams?.page) || 1;

  const totalPages = await fetchInvoicesPages(query);

  return (
    // ...
  );
}
fetchInvoicesPages 는 검색 쿼리를 기준으로 총 페이지 수를 반환한다.
예를 들어 검색 쿼리와 일치하는 invoices가 12개 있고 각 페이지에 6개의 invoices가 표시되는 경우 총 페이지 수는 2개가 된다.
다음으로 totalPages 를 <Pagination /> 의 prop으로 전달한다.
/app/dashboard/invoices/page.tsx
// ...

export default async function Page({
  searchParams,
}: {
  searchParams?: {
    query?: string;
    page?: string;
  };
}) {
  const query = searchParams?.query || '';
  const currentPage = Number(searchParams?.page) || 1;

  const totalPages = await fetchInvoicesPages(query);

  return (
    <div className="w-full">
      <div className="flex w-full items-center justify-between">
        <h1 className={`${lusitana.className} text-2xl`}>Invoices</h1>
      </div>
      <div className="mt-4 flex items-center justify-between gap-2 md:mt-8">
        <Search placeholder="Search invoices..." />
        <CreateInvoice />
      </div>
      <Suspense key={query + currentPage} fallback={<InvoicesTableSkeleton />}>
        <Table query={query} currentPage={currentPage} />
      </Suspense>
      <div className="mt-5 flex w-full justify-center">
        <Pagination totalPages={totalPages} />
      </div>
    </div>
  );
}
<Pagination /> 컴포넌트로 이동하여 usePathname, useSearchParams hooks를 가져온다.
이를 사용하여 현재 페이지를 가져오고 새 페이지를 설정한다.
이 컴포넌트에서 코드의 주석도 해제해야 한다.
아직 <Pagination /> 로직을 구현하지 않아서 애플리케이션이 일시적으로 중단할 것이다.
지금 구현해보자.
/app/ui/invoices/pagination.tsx
'use client';

import { ArrowLeftIcon, ArrowRightIcon } from '@heroicons/react/24/outline';
import clsx from 'clsx';
import Link from 'next/link';
import { generatePagination } from '@/app/lib/utils';
import { usePathname, useSearchParams } from 'next/navigation';

export default function Pagination({ totalPages }: { totalPages: number }) {
  const pathname = usePathname();
  const searchParams = useSearchParams();
  const currentPage = Number(searchParams.get('page')) || 1;

  // ...
}
다음으로 <Pagination /> 컴포넌트 안에 createPageURL 이라는 새 함수를 만든다.
검색과 마찬가지로 URLSearchParams 를 사용하여 새 페이지 번호를 설정하고 pathName을 사용하여 URL문자열을 만든다.
/app/ui/invoices/pagination.tsx
'use client';

import { ArrowLeftIcon, ArrowRightIcon } from '@heroicons/react/24/outline';
import clsx from 'clsx';
import Link from 'next/link';
import { generatePagination } from '@/app/lib/utils';
import { usePathname, useSearchParams } from 'next/navigation';

export default function Pagination({ totalPages }: { totalPages: number }) {
  const pathname = usePathname();
  const searchParams = useSearchParams();
  const currentPage = Number(searchParams.get('page')) || 1;

  const createPageURL = (pageNumber: number | string) => {
    const params = new URLSearchParams(searchParams);
    params.set('page', pageNumber.toString());
    return `${pathname}?${params.toString()}`;
  };

  // ...
}
현재상황은 다음과 같다.
createPageURL이 현재 검색 매개변수의 인스턴스를 생성한다.- 그런 다음, "page" parameter를 제공된 페이지 번호로 업데이트한다.
- 마지막으로 pathname과 업데이트된 search parameters를 사용하여 전체 URL을 구성한다.
<Pagination /> 컴포넌트의 나머지 부분들은 스타일링을 다룬다.
first, last, active, disabled, etc...별로 스타일이 다르다.
설명하지 않으니 궁금하면 코드를 보기 바란다.
마지막으로 사용자가 새 검색어를 입력하면 페이지 번호를 1로 재설정하려고 한다.
<Search /> 컴포넌트의 handleSearch 함수를 업데이트하여 이를 수행할 수 있다.
/app/ui/search.tsx
'use client';

import { MagnifyingGlassIcon } from '@heroicons/react/24/outline';
import { usePathname, useRouter, useSearchParams } from 'next/navigation';
import { useDebouncedCallback } from 'use-debounce';

export default function Search({ placeholder }: { placeholder: string }) {
  const searchParams = useSearchParams();
  const { replace } = useRouter();
  const pathname = usePathname();

  const handleSearch = useDebouncedCallback((term) => {
    const params = new URLSearchParams(searchParams);
    params.set('page', '1');
    if (term) {
      params.set('query', term);
    } else {
      params.delete('query');
    }
    replace(`${pathname}?${params.toString()}`);
  }, 300);
Summary
- 클라이언트 상태 대신 URL 검색 매개변수를 사용하여 검색 및 pagination을 처리했다
- 서버에서 데이터를 가져왔다.
- 보다 원활한 클라이언트 측 페이지 전환을 위해
useRouterhook을 사용했다.
12. Mutating Data
In this chapter...
- 리액트 Server Actions 이란 무엇이며, 이를 사용하여 데이터를 변경하는 방법
- Form과 Server Components로 작업하는 방법
- Type validation을 포함한 네이티브
formData객체로 작업하는 모범 사례 revalidatePathAPI를 사용하여 client 캐시를 revalidate 하는 방법- 특정 IDs로 dynamic route segments를 만드는 방법
What are Server Actions?
리액트 Server Actions를 사용하면서버에서 직접 비동기 코드를 실행할 수 있다.
데이터를 변경하기 위해 API 엔드포인트를 만들 필요가 없다.
그 대신, 서버에서 실행되는 비동기 함수를 작성하고 클라이언트 또는 서버 컴포넌트에서 호출할 수 있다.
웹 어플리케이션은 다양한 위협에 취약할 수 있으므로 보안이 최우선 과제이다.
바로 이 점이 Server Actions가 필요한 이유이다.
Server Actions은 효과적인 보안 솔루션을 제공한다.
Diffent types of attacks을 방어하고, 데이터를 보호하고, 권한 접근을 보장한다.
이를 달성하기 위해 Server Actions POST requests, encrypted closures, strict input checks, error message hashing, host restrictions와 같은 기술들을 이용한다.
이 기술들은 함께 동작하며 앱의 안전성을 크게 향상시킨다.
Using forms with Server Actions
리액트에서는 <form /> 엘리먼트의 action attribute을 사용하여 action을 호출할 수 있다.
action은 자동으로 네이티브 FormData 객체를 전달받는다.
이 객체에는 캡처된 데이터가 포함되어 있다.
예를 들어보자.
// Server Component
export default function Page() {
  // Action
  async function create(formData: FormData) {
    'use server';

    // Logic to mutate data...
  }

  // Invoke the action using the "action" attribute
  return <form action={create}>...</form>;
}
Server Component에서 Server Action을 호출하면 클라이언트에서 자바스크립트가 비활성화 되어 있어도 form이 제대로 동작하는 개선 효과가 있다.
Next.js with Server Actions
Server Actions은 Next.js 캐싱과도 긴밀하게 연결되어 있다.
Server Action을통해 form이 제출될 때 mutate data 뿐만아니라 revalidatePath 및 revalidateTag 과 같은 API를 사용하여 관련 캐시의 유효성을 다시 검사할 수도 있다.
Creating an invoice
새 Invoice를 생성하는 단계는 다음과 같다.
- 사용자의 입력을 capture할 form을 만든다.
- Server Action을 만들고 form에서 호출한다.
- Server Action에서
formData객체로부터 데이터를 추출한다. - DB에 삽입할 데이터의 유효성을 검사하고 준비한다.
- 데이터를 삽입하고 오류를 처리한다.
- 캐시의 유효성을 revalidate하고 사용자를 invoices page로 redirect한다.
1. Create a new route and form
/invoices 폴더에 /create 라는 새 route segment를 추가하고 page.tsx 파일을 생성한다.

이 route를 이용하여 새 invoice를 만들 것이다.
page.tsx 파일에 다음의 코드를 복붙하자.
/dashboard/invoices/create/page.tsx
import Form from '@/app/ui/invoices/create-form';
import Breadcrumbs from '@/app/ui/invoices/breadcrumbs';
import { fetchCustomers } from '@/app/lib/data';

export default async function Page() {
  const customers = await fetchCustomers();

  return (
    <main>
      <Breadcrumbs
        breadcrumbs={[
          { label: 'Invoices', href: '/dashboard/invoices' },
          {
            label: 'Create Invoice',
            href: '/dashboard/invoices/create',
            active: true,
          },
        ]}
      />
      <Form customers={customers} />
    </main>
  );
}
customers 데이터를 fetching하여 <Form /> 컴포넌트로 전달하는 Server Component이다.
<Form /> 컴포넌트는 미리 만들어 제공된다.
<Form /> 컴포넌트를 살펴보면 다음과 같다.
- Customers를 나타내는 하나의
<select />엘리먼트가 있다. - Amount를 나타내기 위한
type="number"인 한 개의<input />엘리먼트가 있다. - Status를 나타내기 위한
type="radio"인 두 개의<input />엘리먼트가 있다. - 폼을 제출할 버튼이 있다.
2. Create a Server Action
lib 디렉토리로 이동하여 actions.ts 라는 이름의 새 파일을 만든다.
이 파일의 맨 위에 use server 지시문을 추가한다.
use server 를 추가하면 파일 내에서 내보낸 모든 함수를 서버 함수로 표시할 수 있다.
이 서버 함수들은 client 컴포넌트와 server 컴포넌트에서 import 할 수 있으므로 매우 다양하게 활용할 수 있다.
또한 server 컴포넌트 내부에서 use server 를 추가하여 다이렉트로 server action을 작성할 수도 있다.
하지만 여기서는 별도의 파일에 정리하는 것으로 한다.
actions.ts 파일에서 formData 를 전달받는 새로운 비동기 함수를 만든다.
/app/lib/actions.ts
'use server';

export async function createInvoice(formData: FormData) {}
<Form /> 컴포넌트에서 createInvoice 함수를 import한다.
그 후 <form /> 엘리먼트의 createInvoice 를 호출하는 action attribute 추가한다.
/app/ui/invoices/create-form.tsx
import { customerField } from '@/app/lib/definitions';
import Link from 'next/link';
import {
  CheckIcon,
  ClockIcon,
  CurrencyDollarIcon,
  UserCircleIcon,
} from '@heroicons/react/24/outline';
import { Button } from '@/app/ui/button';
import { createInvoice } from '@/app/lib/actions';

export default function Form({
  customers,
}: {
  customers: customerField[];
}) {
  return (
    <form action={createInvoice}>
      // ...
  )
}
HTML에서는
actionattribute에 URL을 전달해야 한다.
이 URL은 데이터가 제출되는 목적지이다.(대부분 API endpoint이다.)
그러나 리액트에서actionattribute는 특별한 prop으로 간주된다.
이는 actions가 호출되도록 리액트가 그 위에 빌드된다는 것을 의미한다.
뒷단에서, Server Actions은POSTAPI endpoint를 생성한다.
그렇기 때문에 Server Actions을 사용할 때 API endpoint를 수동으로 생성할 필요가 없다.
3. Extract the data from formData
actions.ts 파일로 돌아가보자.
formData 값을 추출해야 하는데, 사용할 수 있는 몇 가지 메서드가 있다.
여기서는 get(name) 메서드를 사용한다.
/app/lib/actions.ts
'use server';

export async function createInvoice(formData: FormData) {
  const rawFormData = {
    customerId: formData.get('customerId'),
    amount: formData.get('amount'),
    status: formData.get('status'),
  };
  // Test it out:
  console.log(rawFormData);
}
팁 : 필드가 많은 forms로 작업하는 경우, Javascript의
Object.fromEntries()와entries()메서드를 사용하는 것을 고려해보자.
예를 들어,const rawFormData = Object.fromEntries(formData.entries())
모든 것이 올바르게 연결되었는지 확인하려면 사용자 입력을 통해 form 제출을 해보자.
터미널에 로그가 남는 것을 확인할 수 있다.
4. Validate and prepare the data
form 데이터를 DB로 보내기 전에 데이터가 올바른 형식과 올바른 타입으로 되어있는지 확인해야 한다.
Invoices 테이블은 다음과 같은 타입의 데이터를 전달받아야 한다.
/app/lib/definitions.ts
export type Invoice = {
  id: string; // Will be created on the database
  customer_id: string;
  amount: number; // Stored in cents
  status: 'pending' | 'paid';
  date: string;
};
지금까지는 form에서 customer_id , amount , status 만 확인할 수 있었다.
Type validation and coercion(강제 입력)
form 데이터가 DB의 예상 타입과 일치하는지 확인하는 것이 중요하다.
예를 들어, actions 안에 console.log 를 추가할 경우 다음과 같이 작성할 수 있다.
console.log(typeof rawFormData.amount);amount 가 number 타입이 아닌 string 타입인 것을 알 수 있다.
type="number" 인 <input /> 엘리먼트는 사실상 string을 반환하기 때문이다.
type validation을 처리하는 데 몇 가지 옵션이 있다.
수동으로 각각 처리할 수도 있지만, 타입 유효성 검사 라이브러리를 사용하면 시간과 노력을 절약할 수 있다.
여기서는 Typescript-first validation 라이브러리인 Zod를 사용한다.
actions.ts 파일에서 Zod를 import 하여 form object의 모양과 일치하는 스키마를 정의한다.
이 스키마는 formData를 DB에 저장하기 전에 유효성을 검사한다.
/app/lib/actions.ts
'use server';

import { z } from 'zod';

const FormSchema = z.object({
  id: z.string(),
  customerId: z.string(),
  amount: z.coerce.number(),
  status: z.enum(['pending', 'paid']),
  date: z.string(),
});

const CreateInvoice = FormSchema.omit({ id: true, date: true });

export async function createInvoice(formData: FormData) {
  // ...
}
amount 필드는 유형을 검사하는 것과 동시에 특별히 string을 number로 강제변환하도록 설정했다.
그런 다음 rawFormData 를 CreateInvoice 에 전달하여 타입에 대한 유효성을 검사할 수 있다.
/app/lib/actions.ts
// ...
export async function createInvoice(formData: FormData) {
  const { customerId, amount, status } = CreateInvoice.parse({
    customerId: formData.get('customerId'),
    amount: formData.get('amount'),
    status: formData.get('status'),
  });
}
cents 단위로 값 저장
일반적으로 DB에 화폐 값을 센트 단위로 저장하는 것이 자바스크립트 부동 소수점 오류를 없애고 정확성을 높이는 좋은 습관이다.
/app/lib/actions.ts
// ...
export async function createInvoice(formData: FormData) {
  const { customerId, amount, status } = CreateInvoice.parse({
    customerId: formData.get('customerId'),
    amount: formData.get('amount'),
    status: formData.get('status'),
  });
  const amountInCents = amount * 100;
}
Creating new dates
마지막으로 invoices의 creation date에 'YYYY-MM-DD" 형식의 새 날짜를 생성해보자.
/app/lib/actions.ts
// ...
export async function createInvoice(formData: FormData) {
  const { customerId, amount, status } = CreateInvoice.parse({
    customerId: formData.get('customerId'),
    amount: formData.get('amount'),
    status: formData.get('status'),
  });
  const amountInCents = amount * 100;
  const date = new Date().toISOString().split('T')[0];
}
5. Inserting the data into your database
이제 DB에 필요한 모든 값을 확보했으므로 새 invoice를 DB에 삽입하는 SQL쿼리를 만들고 변수를 전달할 수 있다.
/app/lib/actions.ts
import { z } from 'zod';
import { sql } from '@vercel/postgres';

// ...

export async function createInvoice(formData: FormData) {
  const { customerId, amount, status } = CreateInvoice.parse({
    customerId: formData.get('customerId'),
    amount: formData.get('amount'),
    status: formData.get('status'),
  });
  const amountInCents = amount * 100;
  const date = new Date().toISOString().split('T')[0];

  await sql`
    INSERT INTO invoices (customer_id, amount, status, date)
    VALUES (${customerId}, ${amountInCents}, ${status}, ${date})
  `;
}
지금은 오류를 처리하고 있지 않다.
오류는 다음장에서 다루도록 한다.
6. Revalidate and redirect
Next.js에는 사용자 브라우저에 일정 시간동안 route segments를 저장하는 client-side router cache가 있다.
prefetching과 함께하는 이 캐시는 서버로의 요청 횟수를 줄여주므로 routes사이를 빠르게 탐색할 수 있도록 해준다.
Invoices route에 표시되는 데이터를 업데이트 하고 있으므로, 캐시를 지우고 서버에 새 요청을 트리거 하려고 한다.
이 작업은 revalidatePath 를 사용하여 수행할 수 있다.
/app/lib/actions.ts
'use server';

import { z } from 'zod';
import { sql } from '@vercel/postgres';
import { revalidatePath } from 'next/cache';

// ...

export async function createInvoice(formData: FormData) {
  const { customerId, amount, status } = CreateInvoice.parse({
    customerId: formData.get('customerId'),
    amount: formData.get('amount'),
    status: formData.get('status'),
  });
  const amountInCents = amount * 100;
  const date = new Date().toISOString().split('T')[0];

  await sql`
    INSERT INTO invoices (customer_id, amount, status, date)
    VALUES (${customerId}, ${amountInCents}, ${status}, ${date})
  `;

  revalidatePath('/dashboard/invoices');
}
DB가 업데이트 되면 /dashboard/invoices route의 유효성이 다시 검사되고 서버에서 새 데이터를 가져온다.
이 시점에서 사용자를 /dashboard/invoies 페이지로 다시 리다이렉션 하고 싶을 수도 있다.
이 작업은 redirect 를 사용해 할 수 있다.
방금 첫 번째 작업을 구현했다.
새 Invoices를 추가하여 모든것이 올바르게 작동하는지 테스트하자.
/dashboard/invoices로 리다이렉트 되는지 확인- 테이블에 새 invoice가 상단에 표시되어야 한다.
Updating an invoice
업데이트를 위한 form은 생성을 위한 form과 비슷하지만 invoice의 id 를 DB의 record를 업데이트하기 위해 DB로 전달해야 한다는 점이 다르다.
invoic의 id 를 가져와서 DB로 전달하는 방법을 살펴보자.
다음은 invoice를 업데이트 하는 단계이다.
- invoice의
id로 새로운 dynamic route segment를 만든다. - Page params로부터
id를 읽어온다. - DB로부터 특정 invoice를 가져온다.
- form에 invoice 데이터를 미리 입력(Pre-populate)한다.
- DB에서 invoice 데이터를 업데이트 한다.
1. Create a Dynamic Route Segment with the invoice id
정확한 segment 이름을 모르거나 데이터를 기반으로 route를 생성하려는 경우 동적 route segment를 생성할 수 있다.
블로그 게시물 제목, 상품 페이지 등이 이에 해당된다.
폴더의 이름을 대괄호로 묶어 동적 route segment를 만들 수 있다.
예를 들어 [id] , [post] , [slug] 등이 있다.
/invoices 폴더에서 [id] 라는 새 동적 route를 만든 다음 edit 이라는 route를 만든다.
파일 구조는 다음과 같다.

<Table /> 컴포넌트를 보자.
테이블 레코드에 invoice의 id 를 수신하는 <UpdateInvoice /> 버튼이 있는 것을 확인할 수 있다.
/app/ui/invoices/table.tsx
export default async function InvoicesTable({
  query,
  currentPage,
}: {
  query: string;
  currentPage: number;
}) {
  return (
    // ...
    <td className="flex justify-end gap-2 whitespace-nowrap px-6 py-4 text-sm">
      <UpdateInvoice id={invoice.id} />
      <DeleteInvoice id={invoice.id} />
    </td>
    // ...
  );
}
<UpdateInvoice /> 컴포넌트로 이동하여 Link 의 href 를 id prop을 받도록 업데이트한다.
/app/ui/invoices/buttons.tsx
import { PencilIcon, PlusIcon, TrashIcon } from '@heroicons/react/24/outline';
import Link from 'next/link';

// ...

export function UpdateInvoice({ id }: { id: string }) {
  return (
    <Link
      href={`/dashboard/invoices/${id}/edit`}
      className="rounded-md border p-2 hover:bg-gray-100"
    >
      <PencilIcon className="w-5" />
    </Link>
  );
}
2. Read the invoice id from page params
<Page /> 컴포넌트로 돌아가서 다음 코드를 복붙하자.
/app/dashboard/invoices/[id]/edit/page.tsx
import Form from '@/app/ui/invoices/edit-form';
import Breadcrumbs from '@/app/ui/invoices/breadcrumbs';
import { fetchCustomers } from '@/app/lib/data';
export default async function Page() {
return (
<main>
<Breadcrumbs
breadcrumbs={[
{ label: 'Invoices', href: '/dashboard/invoices' },
{
label: 'Edit Invoice',
href: `/dashboard/invoices/${id}/edit`,
active: true,
},
]}
/>
<Form invoice={invoice} customers={customers} />
</main>
);
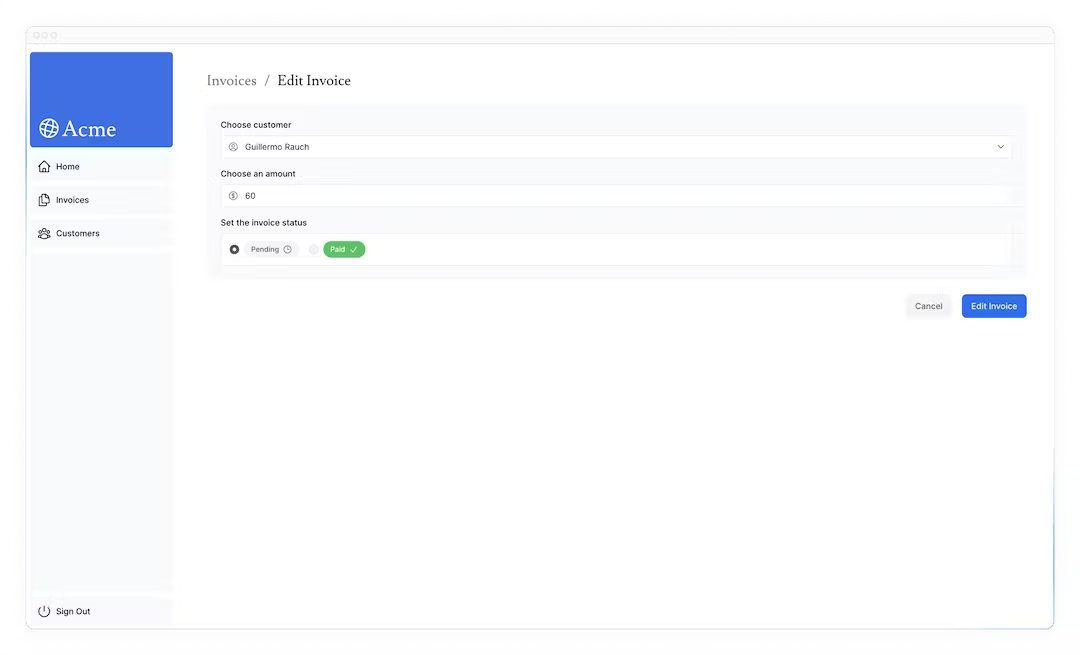
}이 form은 defaultValue(customer's name, invoice amount, status)로 pre-populated되어 있어야 한다.
pre-populate the form field를 위해 id 로 특정 invoice를 fetch할 필요가 있다.
Page 컴포넌트는 searchParams 외에도 id 에 접근하는데 사용할 수 있는 params 라는 프로퍼티를 전달받는다.
해당 프로퍼티를 전달받도록 prop을 수정하자.
/app/dashboard/invoices/[id]/edit/page.tsx
import Form from '@/app/ui/invoices/edit-form';
import Breadcrumbs from '@/app/ui/invoices/breadcrumbs';
import { fetchCustomers } from '@/app/lib/data';

export default async function Page({ params }: { params: { id: string } }) {
  const id = params.id;
  // ...
}
3. Fetch the specific invoice
fetchInvoiceById라는 새 함수를 가져오고id를 argument로 전달한다.fetchCustomers를 가져와서 dropdown에 사용할 고객 이름을 가져온다.
Promise.all 을 사용하여 invoice와 customers 을 동시에 가져올 수 있다.
/dashboard/invoices/[id]/edit/page.tsx
import Form from '@/app/ui/invoices/edit-form';
import Breadcrumbs from '@/app/ui/invoices/breadcrumbs';
import { fetchInvoiceById, fetchCustomers } from '@/app/lib/data';

export default async function Page({ params }: { params: { id: string } }) {
  const id = params.id;
  const [invoice, customers] = await Promise.all([
    fetchInvoiceById(id),
    fetchCustomers(),
  ]);
  // ...
}
invoice prop에 대한 일시적인 타입스크립트 에러가 발생할 것이다.
invoice 잠재적으로 undefined 가 될 수 있기 때문이다.
다음장에서 오류 처리 기능을 추가할 때 이 문제를 해결할 것이다.
이제 연결이 잘 되었는지 테스트해보자.
연필 아이콘을 눌러보자.
URL도 http://localhost:3000/dashboard/invoice/uuid/edit 과 같이 변경되어야 한다.
UUID vs Auto-incrementing Keys
여기서는 incrementing keys 대신에 uuid를 사용한다.
이로 인해 url이 길어지지만, uuid는 id 충돌의 위험을 없애고 전 세계적으로 고유하며 enumeration attacks의 위험을 줄여 대규모 데이터베이스에 이상적이다.
그러나 더 깔끔한 URL을 선호한다면 auto incrementing key를 사용하는 것이 좋다.
4. Pass the id to the Server Action
마지막으로 DB에서 올바른 레코드를 업데이트할 수 있도록 server action에 id를 전달하자.
다만, 아래와 같이 id 를 전달할 수는 없다.
/app/ui/invoices/edit-form.tsx
// Passing an id as argument won't work
<form action={updateInvoice(id)}>
대신 Javascript의 bind 를 사용하여 server action에 id 를 전달할 수 있다.
이렇게 하면 server action에 전달된 모든 값이 인코딩된다.
bind메서드를 사용하면 첫 번째 인수로 전달할 객체를 지정할 수 있다.
bind 메서드는 다음과 같은 역할을 한다.
함수 실행 컨텍스트 설정
bind메서드는 첫 번째 인수로 전달된 객체를 함수 실행 시 this 키워드가 참조하도록 설정한다.
부분 적용
bind메서드는 첫 번째 인수 이후에 전달된 인수들을 함수의 인수로 미리 설정하여 부분적으로 적용된 새로운 함수를 생성한다.
참고
bind메서드는 함수를 실행하지 않고 새로운 함수를 생성한다.
apply메서드는 바인딩된 함수를 즉시 실행하고 인수를 배열로 전달한다.
call메서드는 바인딩된 함수를 즉시 실행하고 인수를 개별적으로 전달한다.
/app/ui/invoices/edit-form.tsx
// ...
import { updateInvoice } from '@/app/lib/actions';

export default function EditInvoiceForm({
  invoice,
  customers,
}: {
  invoice: InvoiceForm;
  customers: CustomerField[];
}) {
  const updateInvoiceWithId = updateInvoice.bind(null, invoice.id);

  return (
    <form action={updateInvoiceWithId}>
      <input type="hidden" name="id" value={invoice.id} />
    </form>
  );
}
form에 hidden input을 추가하여 전달 할 수도 있다.
예:<input type="hidden" name="id" value={invoice.id} />
그러나 값이 HTML 소스에서 전체 텍스트로 표시되므로 IDs와 같은 민감한 데이터에는 적합하지 않다.
그런 다음 actions.ts 파일에서 updateInvoice 라는 새 actions을 만든다.
/app/lib/actions.ts
// Use Zod to update the expected types
const UpdateInvoice = FormSchema.omit({ id: true, date: true });

// ...

export async function updateInvoice(id: string, formData: FormData) {
  const { customerId, amount, status } = UpdateInvoice.parse({
    customerId: formData.get('customerId'),
    amount: formData.get('amount'),
    status: formData.get('status'),
  });

  const amountInCents = amount * 100;

  await sql`
    UPDATE invoices
    SET customer_id = ${customerId}, amount = ${amountInCents}, status = ${status}
    WHERE id = ${id}
  `;

  revalidatePath('/dashboard/invoices');
  redirect('/dashboard/invoices');
}formData에서 데이터를 추출한다.- Zod로 타입 유효성을 검사한다.
- 금액을 센트 단위로 변경한다.
- 변수를 SQL 쿼리에 전달한다.
revalidatePath를 호출하여 클라이언트 캐시를 지우고 새 서버 요청을 한다.redirect를 호출하여 invoice 페이지로 리다이렉션한다.
테스트해보자.
Deleting an invoice
server action을 이용해서 invoice를 삭제하기위해 삭제 버튼을 <form /> 으로 래핑하고 bind 메소드를 사용하여 server action에 id 를 전달한다.
/app/ui/invoices/buttons.tsx
import { deleteInvoice } from '@/app/lib/actions';

// ...

export function DeleteInvoice({ id }: { id: string }) {
  const deleteInvoiceWithId = deleteInvoice.bind(null, id);

  return (
    <form action={deleteInvoiceWithId}>
      <button className="rounded-md border p-2 hover:bg-gray-100">
        <span className="sr-only">Delete</span>
        <TrashIcon className="w-4" />
      </button>
    </form>
  );
}
actions.ts 파일 내에 deleteInvoice 라는 새 action을 만든다.
/app/lib/actions.ts
export async function deleteInvoice(id: string) {
  await sql`DELETE FROM invoices WHERE id = ${id}`;
  revalidatePath('/dashboard/invoices');
}
이 작업은 /dashboard/invoices route에서 호출되므로 redirect 를 호출할 필요가 없다.
revalidatePath 를 호출하면 새 서버 요청이 트리거되고 테이블이 다시 렌더링된다.
13. Handling Errors
이번에는 Javascript의 try/catch 문과 next.js API를 사용하여 오류를 우아하게 처리하는 방법을 살펴보자.
In this chapter...
- 특별한 파일인
error.tsx를사용하여 route segment에서 오류를 포착하고 사용자에게 대체 UI를 표시하는 방법을 알아보자. notFound함수와not-found파일을 사용하여 404오류(존재하지 않는 리소스의 경우)를 처리하는 방법을 알아보자.
Adding try/catch to Server Actions
먼저 server action에 자바스크립트의 try/catch 문을 추가하여 오류를 원할하게 처리할 수 있도록 한다.
/app/lib/actions.ts
export async function createInvoice(formData: FormData) {
  const { customerId, amount, status } = CreateInvoice.parse({
    customerId: formData.get('customerId'),
    amount: formData.get('amount'),
    status: formData.get('status'),
  });

  const amountInCents = amount * 100;
  const date = new Date().toISOString().split('T')[0];

  try {
    await sql`
      INSERT INTO invoices (customer_id, amount, status, date)
      VALUES (${customerId}, ${amountInCents}, ${status}, ${date})
    `;
  } catch (error) {
    return {
      message: 'Database Error: Failed to Create Invoice.',
    };
  }

  revalidatePath('/dashboard/invoices');
  redirect('/dashboard/invoices');
}
/app/lib/actions.ts
export async function updateInvoice(id: string, formData: FormData) {
  const { customerId, amount, status } = UpdateInvoice.parse({
    customerId: formData.get('customerId'),
    amount: formData.get('amount'),
    status: formData.get('status'),
  });

  const amountInCents = amount * 100;

  try {
    await sql`
        UPDATE invoices
        SET customer_id = ${customerId}, amount = ${amountInCents}, status = ${status}
        WHERE id = ${id}
      `;
  } catch (error) {
    return { message: 'Database Error: Failed to Update Invoice.' };
  }

  revalidatePath('/dashboard/invoices');
  redirect('/dashboard/invoices');
}
/app/lib/actions.ts
export async function deleteInvoice(id: string) {
  try {
    await sql`DELETE FROM invoices WHERE id = ${id}`;
    revalidatePath('/dashboard/invoices');
    return { message: 'Deleted Invoice.' };
  } catch (error) {
    return { message: 'Database Error: Failed to Delete Invoice.' };
  }
}
redirect 가 try/catch 블록 외부에서 호출되는 것을 유의하자.
redirect 는 try 가 성공한 경우에만 실행되어야 한다.
이제 server action에서 오류가 발생하면 어떤 일이 발생하는지 확인해보자.
앞서 오류를 던지면 이 작업을 수행할 수 있다.
예를 들어 삭제 invoice action에서 함수 맨 위에 오류를 던진다.
/app/lib/actions.ts
export async function deleteInvoice(id: string) {
  throw new Error('Failed to Delete Invoice');

  // Unreachable code block
  try {
    await sql`DELETE FROM invoices WHERE id = ${id}`;
    revalidatePath('/dashboard/invoices');
    return { message: 'Deleted Invoice' };
  } catch (error) {
    return { message: 'Database Error: Failed to Delete Invoice' };
  }
}
invoice를 삭제하려고 하면 localhost에 오류가 표시된다.
이러한 오류를 확인하면 잠재적인 문제를 조기에 발견할 수 있으므로 개발 중에 도움이 된다.
또한 사용자에게 오류를 보여주는 것을 방지하고 애플리케이션이 계속 실행될 수 있도록 하려는 목적도 있다.
오류가 발생하면 error.tsx 파일이 실행된다.
Handling all errors with error.tsx
error.tsx 파일은 route segment의 UI boundary를 정의하는 데 사용할 수 있다.
이 파일은 예기치 않은 오류에 대한 포괄적인 역할을 하며 사용자에게 Fallback UI를 표시할 수 있다.
/dashboard/invoice 폴더에 error.tsx 라는 새 파일을 만들고 다음 코드를 복붙하자.
/dashboard/invoices/error.tsx
'use client';
import { useEffect } from 'react';
export default function Error({
error,
reset,
}: {
error: Error & { digest?: string };
reset: () => void;
}) {
useEffect(() => {
// Optionally log the error to an error reporting service
console.error(error);
}, [error]);
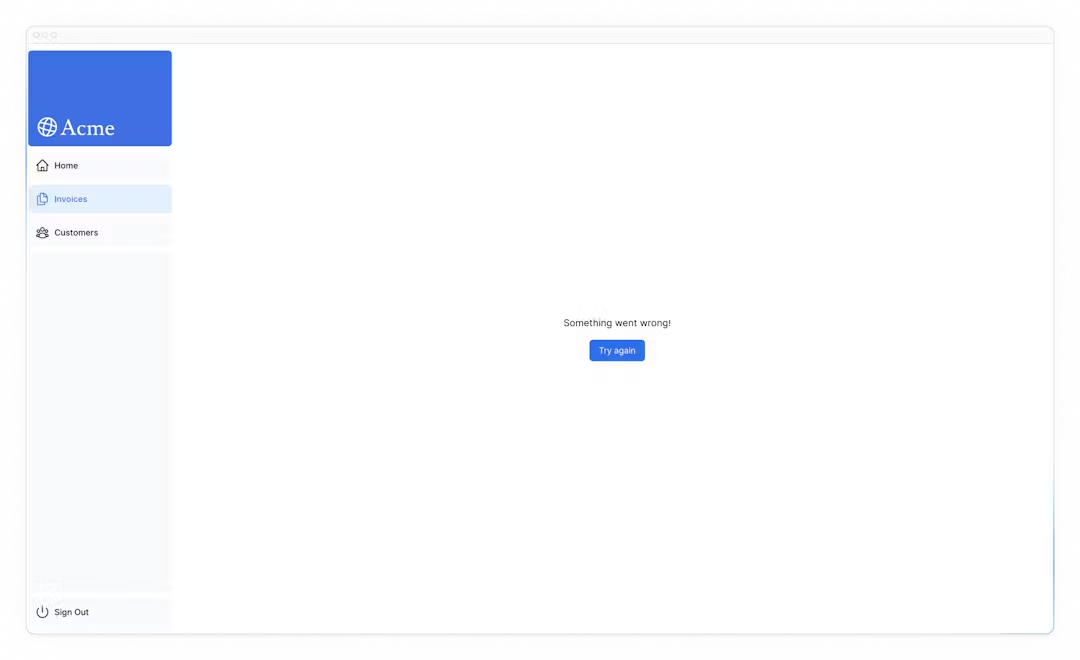
return (
<main className="flex h-full flex-col items-center justify-center">
<h2 className="text-center">Something went wrong!</h2>
<button
className="mt-4 rounded-md bg-blue-500 px-4 py-2 text-sm text-white transition-colors hover:bg-blue-400"
onClick={
// Attempt to recover by trying to re-render the invoices route
() => reset()
}
>
Try again
</button>
</main>
);
}위의 코드에서 눈에 띄는 점이 있다.
use client-error.tsx는 클라이언트 컴포넌트여야 한다.- 두 개의 props를 전달받는다.
error: Javascript의 nativeError객체이다.reset: error boundary를 리셋하는 함수이다. 이 함수를 실행하면 route segment를 다시 랜더링하려고 시도한다.
invoice를 다시 삭제하려고 하면 다음과 같은 UI가 표시된다.
Handling 404 errors with the notFound function
오류를 우아하게 처리할 수 있는 또 다른 방법은 notFound 함수를 사용하는 것이다.
error.tsx 는 모든 오류를 잡아내는 데 유용하지만, notFound 는 존재하지 않는 리소스를 가져오려고 할 때 사용할 수 있다.
예를 들어, http://localhost:3000/dashboard/invoices/2e94d1ed-d220-449f-9f11-f0bbceed9645/edit 를 방문해보자.
이는 가짜 URL이며 DB에 존재하지 않는다.
error.tsx 가 정의된 하위 route로 접근한 것이므로 error.tsx 가 즉시 실행되는 것을 볼 수 있다.
하지만 좀 더 구체적으로 알려주고 싶다면 404 오류를 표시하여 사용자가 액세스하려는 리소스를 찾을 수 없음을 알릴 수 있다.
리소스가 없다는 걸 확인해보고 싶다면 data.ts 파일의 fetchInvoiceById 함수내에 로그를 찍어보자.
/app/lib/data.ts
export async function fetchInvoiceById(id: string) {
  noStore();
  try {
    // ...

    console.log(invoice); // Invoice is an empty array []
    return invoice[0];
  } catch (error) {
    console.error('Database Error:', error);
    throw new Error('Failed to fetch invoice.');
  }
}
이제 invoice가 DB에 존재하지 않는다는 것을 알았으니 notFound 를 사용하여 처리해보자.
/dashboard/invoices/[id]/edit/page.tsx 로 이동하여 next/navigation 모듈로 부터 notFound 를 import하자.
그런 다음 조건문을 사용하여 invoice가 존재하지 않을 경우 notFound 를 호출할 수 있다.
/dashboard/invoices/[id]/edit/page.tsx
import { fetchInvoiceById, fetchCustomers } from '@/app/lib/data';
import { updateInvoice } from '@/app/lib/actions';
import { notFound } from 'next/navigation';

export default async function Page({ params }: { params: { id: string } }) {
  const id = params.id;
  const [invoice, customers] = await Promise.all([
    fetchInvoiceById(id),
    fetchCustomers(),
  ]);

  if (!invoice) {
    notFound();
  }

  // ...
}
이제 특정 Invoice를 찾을 수 없는 경우 <Page /> 에서 오류를 발생시킨다.
사용자에게 오류 UI를 표시하려면 다음과 같이 하자.
/edit 폴더에 not-found.tsx 를 추가한다.

그런 다음 not-found.tsx 파일안에 다음 코드를 복붙한다.
/dashboard/invoices/[id]/edit/not-found.tsx
import Link from 'next/link';
import { FaceFrownIcon } from '@heroicons/react/24/outline';
export default function NotFound() {
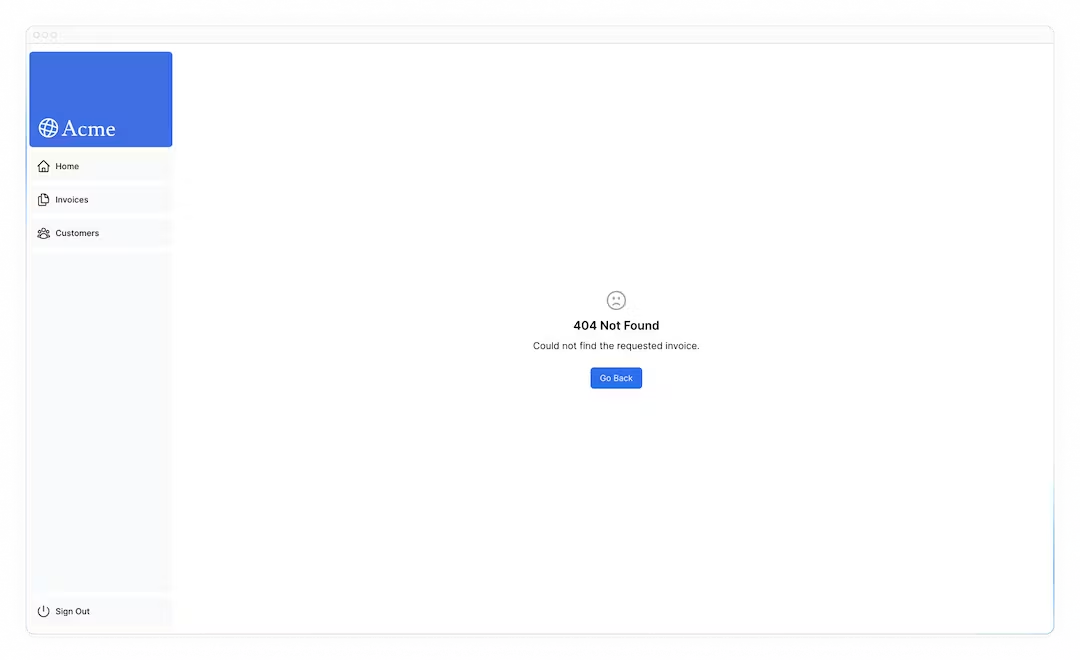
return (
<main className="flex h-full flex-col items-center justify-center gap-2">
<FaceFrownIcon className="w-10 text-gray-400" />
<h2 className="text-xl font-semibold">404 Not Found</h2>
<p>Could not find the requested invoice.</p>
<Link
href="/dashboard/invoices"
className="mt-4 rounded-md bg-blue-500 px-4 py-2 text-sm text-white transition-colors hover:bg-blue-400"
>
Go Back
</Link>
</main>
);
}route를 새로고침하면 다음과 같은 UI가 표시된다.
notFound 가 error.tsx 보다 우선하므로 보다 구체적인 오류를 처리하고 싶을 때 사용할 수 있다는 점을 염두하자.
