Hello World
const express = require("express");
const app = express();
const port = 3000;

app.get("/", (req, res) => {
  return res.send("Hello World!");
});

app.listen(port, () => {
  console.log(`http://localhost:${port}`);
});
app.get() 메서드의 콜백함수에서 return 을 사용한 이유는 콜백함수의 종료를 알리기 위함이다.
위의 코드에서는 쓰나 안쓰나 상관없지만 만약 다음과 같은 상황을 보자.
app.get("/", (req, res) => {
  if(true){
    res.send("Hello World!");
  }
  res.send("Hello World!");
});
이 경우 res.send() 가 두 번 호출되므로 에러가 발생한다.
이런 상황을 원천적으로 차단하기 위해 return 을 사용한다.
바로 위의 코드는 return 을 이용해 다음과 같이 바꿀 수 있다.
app.get("/", (req, res) => {
  if(true){
    return res.send("Hello World!");
  }
  return res.send("Hello World!");
});
Routing
app.get('/', (req, res) => {
  res.send('hello world')
})
app.get() 메서드의 첫 번째 인자로 Path를 지정할 수 있다.
Route methods
// GET method route
app.get('/', (req, res) => {
  res.send('GET request to the homepage')
})

// POST method route
app.post('/', (req, res) => {
  res.send('POST request to the homepage')
})
app.get() 에 사용된 get은 사실 GET 방식의 요청일때 실행되는 것이다.
같은 Path에 post 방식의 요청에서는 app.get() 은 호출되지 않는다.
post 요청에선 app.post() 메서드가 호출된다.
express는 get과 post 말고도 모든 HTTP method 요청에 대해서 메서드를 지원한다.
app.all('/secret', (req, res, next) => {
  console.log('Accessing the secret section ...')
  next() // pass control to the next handler
})
app.all() 메서드는 모든 방식의 요청에 대해 호출된다.
Route paths
app.get('/random.text', (req, res) => {
  res.send('random.text')
})

app.get('/ab?cd', (req, res) => {
  res.send('ab?cd')
})

app.get(/a/, (req, res) => {
  res.send('/a/')
})
Path는 문자열, 문자열 패턴, 정규식으로 구성될 수 있다.
Route parameters
app.get('/users/:userId/books/:bookId', (req, res) => {
  res.send(req.params)
})
Route path: /users/:userId/books/:bookId
Request URL: http://localhost:3000/users/34/books/8989
req.params: { "userId": "34", "bookId": "8989" }Route handlers
미들웨어처럼 동작하는 여러 handler를 설정할 수 있다.
handler 한 개
app.get("/", (req, res) => {
  res.write("Handler 1\n");
  return res.end("End!");
});
// Handler 1
// End!
handler 두 개
app.get(
  "/",
  (req, res, next) => {
    res.write("Handler 1\n");
    next();
  },
  (req, res) => {
    res.write("Handler 2\n");
    return res.end("End!");
  }
);
// Handler 1
// Handler 2
// End!
handler 세 개
app.get(
  "/",
  (req, res, next) => {
    res.write("Handler 1\n");
    next();
  },
  (req, res, next) => {
    res.write("Handler 2\n");
    next();
  },
  (req, res) => {
    res.write("Handler 3\n");
    return res.end("End!");
  }
);
// Handler 1
// Handler 2
// Handler 3
// End!
handler 세 개 - 배열
const handler1 = (req, res, next) => {
  res.write("Handler 1\n");
  next();
};
const handler2 = (req, res, next) => {
  res.write("Handler 2\n");
  next();
};
const handler3 = (req, res, next) => {
  res.write("Handler 3\n");
  return res.end("End!");
};
app.get("/", [handler1, handler2, handler3]);
// Handler 1
// Handler 2
// Handler 3
// End!
하나의 경로에 두 개의 라우터
app.get(
  "/",
  (req, res, next) => {
    res.write("Handler 1\n");
    next();
  },
  (req, res, next) => {
    res.write("Handler 2\n");
    next();
  },
  (req, res, next) => {
    res.write("Handler 3\n");
    next();
  }
);
app.get(
  "/",
  (req, res, next) => {
    res.write("Handler 4\n");
    next();
  },
  (req, res, next) => {
    res.write("Handler 5\n");
    next();
  },
  (req, res) => {
    res.write("Handler 6\n");
    return res.end("End!");
  }
);
// Handler 1
// Handler 2
// Handler 3
// Handler 4
// Handler 5
// Handler 6
// End!
라우터 건너뛰기
app.get(
  "/",
  (req, res, next) => {
    res.write("Handler 1\n");
    next('route');
  },
  (req, res, next) => {
    res.write("Handler 2\n");
    next();
  },
  (req, res, next) => {
    res.write("Handler 3\n");
    next();
  }
);
app.get(
  "/",
  (req, res, next) => {
    res.write("Handler 4\n");
    next();
  },
  (req, res, next) => {
    res.write("Handler 5\n");
    next();
  },
  (req, res) => {
    res.write("Handler 6\n");
    return res.end("End!");
  }
);
// Handler 1
// Handler 4
// Handler 5
// Handler 6
// End!
next() 함수에 route 문자열을 전달하면 다음 라우터로 건너뛴다.
라우터에서 에러 일으키기
const handler1 = (req, res, next) => {
  res.write("Handler 1\n");
  next("Error");
};
const handler2 = (req, res, next) => {
  res.write("Handler 2\n");
  next();
};
const handler3 = (req, res, next) => {
  res.write("Handler 3\n");
  res.end("End!");
};
app.get("/", [handler1, handler2, handler3]);
app.use((err, req, res, next) => {
  res.write(err);
  return res.end("\nSomething broke!");
});
// Handler1
// Error
// Something broke!
next() 함수에 "route" 또는 "router" 문자열을 제외한 다른 값들을 전달한다면 에러가 발생된다.
에러핸들러는 기존의 핸들러와 달리 4개의 매개변수를 가지며 그 중 첫 번째 매개변수에 에러값이 전달된다.
이 때, 에러값은 next() 함수에 전달한 값이다.
위의 코드에서는 "Error" 문자열이 next() 함수의 argument이므로 app.use() 에 전달된 에러 핸들러의 첫 번째 매개변수인 err 은 "Error" 문자열 값을 갖게 된다.
에러 핸들러에
next매개변수가 필요 없을 것으로 보인다고 매개변수를 3개만 정의하면 에러가 발생하므로 무조건 4개의 매개변수를 정의해야 한다.
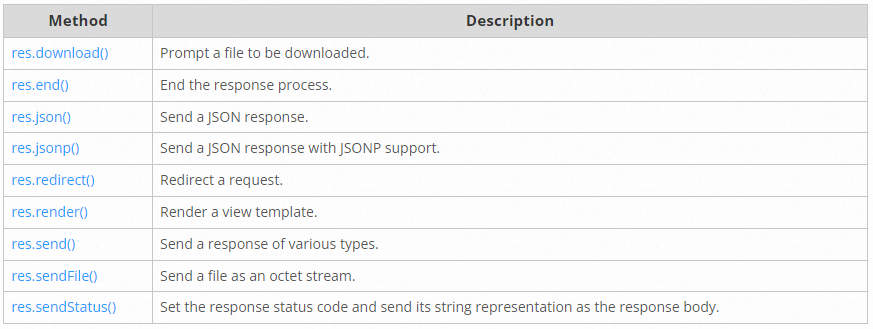
Response methods
아래에 나오는 메서드를 호출해야만 request-response 사이클이 끝난다.
그렇지 않으면 request 가 중단된 상태로 쭉 유지된다.
app.route()
하나의 경로에 여러 HTTP Method를 연결하려면 다음과 같이 코드를 작성할 수 있다.
app.get('/', hander1);
app.post('/', hander2);
app.patch('/', hander3);
경로를 반복해서 넣어야 한다.
app.route() 를 사용해서 중복을 제거하고 가독성있게 바꿀 수 있다.
app.route('/').get(hander1).post(hander2).patch(hander3);express.Router
express.Router 클래스를 이용해 라우터를 모듈화 시킬 수 있다.
아래의 코드는 myRouter.js 라는 이름을 갖는 모듈이다.
const express = require('express')
const router = express.Router()

router.use((req, res, next) => {
  console.log('Router module');
  next()
})
router.get('/', (req, res) => {
  res.send('home page')
})
router.get('/about', (req, res) => {
  res.send('about page')
})

module.exports = router
const routerModule = require('./myRouter')
app.use('/module', routerModule)/module 경로로 접속할 때마다 routerModule 모듈이 실행되고
다음의 두 개의 페이지 주소를 갖게 된다.
app.use()에서의/module와router.get()에서의/가 합쳐져서
/module페이지app.use()에서의/module와router.get()에서의/about가 합쳐져서
/module/about페이지
Router-level middleware 에서는 라우터 내의 미들웨어를 건너뛸 때
next("route")가 아닌next("router")를 사용한다.
Middleware
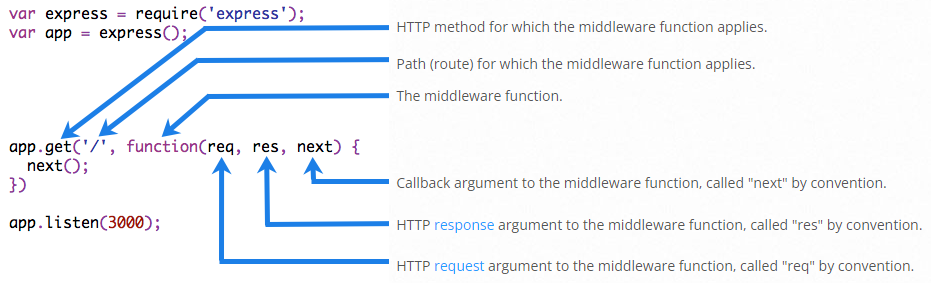
위에서 살펴본 핸들러 부분에서 핸들러는 사실 미들웨어이다.
미들웨어의 기본 구조는 다음과 같다.
미들웨어의 주요 다음과 같은 일들을 주로 한다.
- 특정 코드를 실행한다.
- request 객체와 response 객체를 변경한다.
- request-response 사이클을 종료한다.
- request 객체와 response 객체를 뒤의 미들웨어에 전달하며 뒤의 미들웨어를 호출한다.
LOGGED를 출력하는 간단한 미들웨어
const express = require('express')
const app = express()

const myLogger = function (req, res, next) {
  console.log('LOGGED')
  next()
}

app.use(myLogger)

app.get('/', (req, res) => {
  res.send('Hello World!')
})

app.listen(3000)
미들웨어를 호출 할땐 app.use() 를 사용하여 호출한다.
requestTime을 측정하는 미들웨어
const express = require('express')
const app = express()

const requestTime = function (req, res, next) {
  req.requestTime = Date.now()
  next()
}

app.use(requestTime)

app.get('/', (req, res) => {
  let responseText = 'Hello World!<br>'
  responseText += `<small>Requested at: ${req.requestTime}</small>`
  res.send(responseText)
})

app.listen(3000)
request 객체에 requestTime 속성을 추가하여 다음 미들웨어로 전달했다.
마지막 미들웨어(컨트롤러) 에서 req.requestTime 값을 사용한 것을 볼 수 있다.
쿠키의 유효성을 판단하는 미들웨어
const express = require('express')
const cookieParser = require('cookie-parser')

const app = express()

async function cookieValidator (cookies) {
  try {
    await externallyValidateCookie(cookies.testCookie)
  } catch {
    throw new Error('Invalid cookies')
  }
}

async function validateCookies (req, res, next) {
  await cookieValidator(req.cookies)
  next()
}

app.use(cookieParser())

app.use(validateCookies)

// error handler
app.use((err, req, res, next) => {
  res.status(400).send(err.message)
})

app.listen(3000)
비동기 함수도 미들웨어가 될 수 있다.
환경변수를 설정하는 미들웨어
// my-middleware.js
module.exports = function (options) {
  return function (req, res, next) {
    // Implement the middleware function based on the options object
    next()
  }
}
// app.js
const mw = require('./my-middleware.js')

app.use(mw({ option1: '1', option2: '2' }))
옵션 object나 파라미터를 매개변수로 받아서 그것들을 기준으로 구현된 미들웨어를 리턴하는 식이다.
cookie-session 또는 compression 미들웨어가 이러한 미들웨어 중 하나이다.
Built-in middleware
- express.static
- express.json
- express.urlencoded
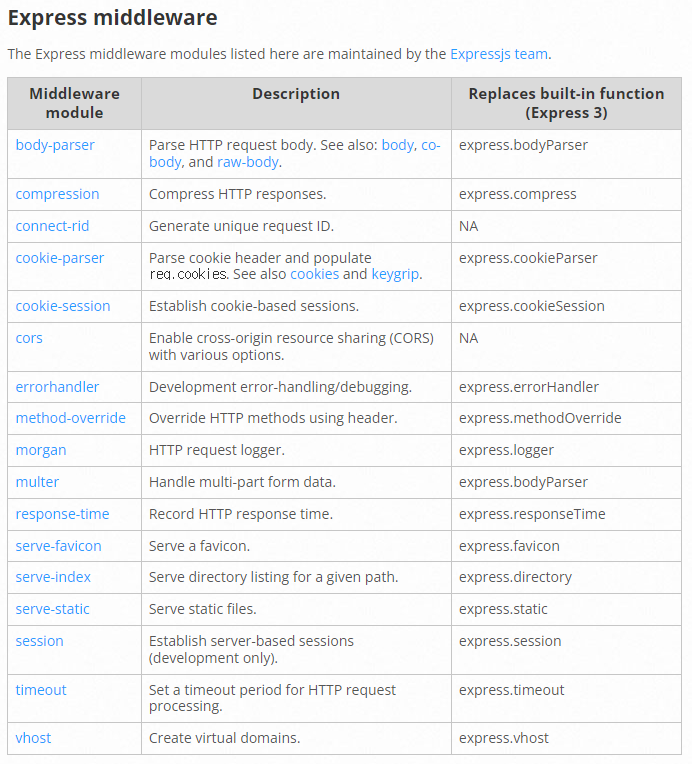
Third-party middleware
다음과 같은 서드파티 미들웨어들이 있다.
Static Files
이미지 파일, CSS 파일, JS 파일과 같은 파일들은 정적 파일들이다.
이러한 정적 파일들을 클라이언트에게 전달하기 위해서 Express에서는 express.static 이라는 built-in 미들웨어를 제공한다.
app.use(express.static('public'))static() 메서드의 인자는 Path를 의미하며 해당 폴더내에서 정적 파일들을 검색해라는 뜻이다.
즉, 서버의 public 폴더 내에 imges/kitten.jpg , css/style.css , js/app.js 파일이 있다고 가정한다면,
클라이언트에서
http://localhost:3000/images/kitten.jpg ,
http://localhost:3000/css/style.css ,
http://localhost:3000/js/app.js
로 접근했을 때 각각의 파일을 제공받을 수 있다는 뜻이다.
app.use(express.static('public'))
app.use(express.static('files'))
와 같이 두 개 이상의 정적 파일 디렉토리를 지정할 수도 있다.
이럴 경우 위에서 부터 순차적으로 디렉토리를 검색하여 정적 파일을 찾아낸다.
express.static() 로 제공되는 정적 파일에 대해 virtual path prefix를 설정하려면
다음과 같이 작성한다.
app.use('/static', express.static('public'))virtual path prefix는 실제 서버 파일 구조상에는 없는 가상의 path이다.
이럴 경우 정적 파일에 접근하기 위해 다음과 같이 작성한다.
http://localhost:3000/static/images/kitten.jpg ,
http://localhost:3000/static/css/style.css ,
http://localhost:3000/static/js/app.js
이는 실제 서버의 파일 구조를 숨김으로서 보안성을 높이는 작업 중 하나이다.
static() 메서드로 전달되는 path는 relative하기 때문에 노드 프로세스를 실행하는 위치에 따라 달라진다.
따라서 absolute 하게 변경해야 다른 위치에서 노드를 실행해도 오류가 발생하지 않는다.
app.use('/static', express.static(path.join(__dirname, 'public')))