.png)
(이 글은 Probably this is the easiest to understand React + Redux flow illustration 을 번역한 글입니다.)
React Redux
들어가면서
오늘은 그동안 리덕스를 통해 알음알음 써오던 것들을 정리하는 TIL을 써보고자 한다.
리액트로 프로젝트를 2번 진행하면서 알게된 것은...
다음과 같은 상황이 매우 빈번하다는 것..
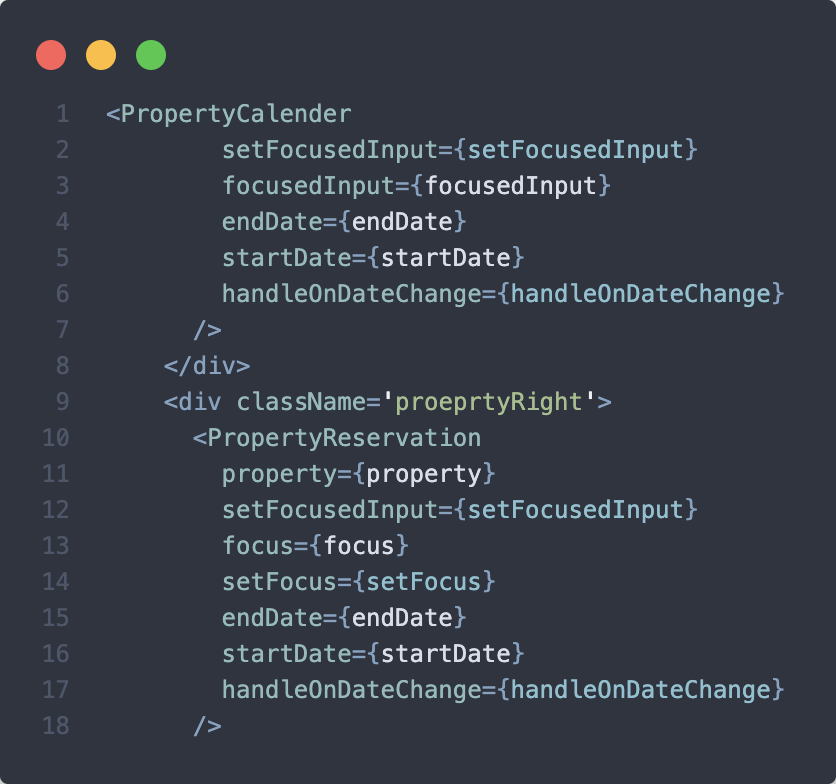
(props로 뚱뚱해진 나의 컴포넌트.jpg)
사실 이 정도 뚱뚱해진 것은 아무 것도 아닐지도 모른다.
그나마 복잡하지 않은 페이지를 작성했기 때문이지 실제로 현업에서는 이렇게 상태관리를 한다면 컴포넌트 이동, 유지, 보수하는 데에 불편함이 따를 것.
이런 상황에서 만나게 된 리덕스는 매우 획기적인 친구였다..
다음의 사진을 보자.
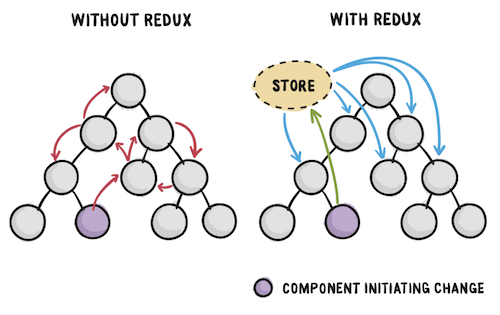
Redux is a Flux framework with three principles: Single Store, immutable State, and side-effect-free Reducer.
즉 리덕스의 3가지 중요한 규칙은:
- 하나의 저장소: 기존 component에 산발해있던 저장소를 하나의 Store라는 곳에 저장한다.
- 변하지 않는 상태: state는 오직 읽기만 가능하다. 변경은 action을 통해 변경한다.
- 부작용이 없는 리듀서: 리듀서 안에는 부작용이 발생할 로직을 써서는 안된다.
리덕스는 대략 이런 친구다!
React와 React-Redux의 차이
-
In the case of React alone, the React component itself manages the status individually. (React는 React 컴포넌트 자신이 개별적으로 상태관리)
-
In the case of React + Redux, the state is managed in a dedicated place (store) for state management, and the React component only reflects it. (Redux는 상태 관리를 하는 전용 장소(store)에서 상태를 관리하고, React 컴포넌트는 그걸 보여주기만 하는 용도로 쓰인다.)
Redux의 상태 관리 플로우
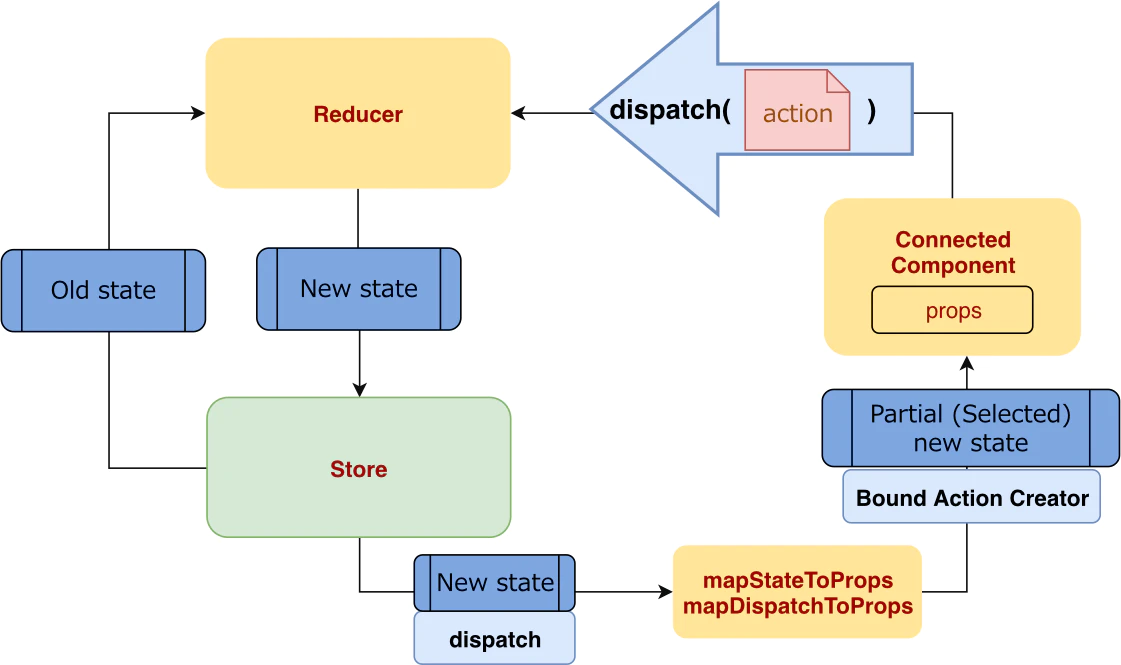
Store
All states are basically centrally managed here. The image is "a huge JSON chunk". When the scale is large, it is common to classify the states by category. . 모든 상태들은 기복적으로 다음과 같은 JSON chunk 형태로 집중적으로 관리된다. 규모가 커지면 category를 기준으로 상태를 분류하는 것이 일반적이다.
{
    // Session-related
    session :  {
        loggedIn :  true ,
        user :  {
            id :  " 114514 " ,
            screenName :  " @mpyw " ,
        },
    },

    // Timeline-related
    timeline :  {
        type :  " home " ,
        statuses :  [
            { id :  1 ,  screenName :  " @mpyw " ,  text :  "hello " },
            { id :  2 ,  screenName :  " @mpyw " ,  text :  " bye " },
        ],
    },

    // Notification related
    notification :  [],
}
Action and Action Creator
Store와 States는 매우 sacred하다. (holy한 불가침의 영역이라고 생각...🤔) React components 같은 lower world에 있는 것들은 (감히) 직접 접근할 수 없다. 접근하기 위해서는 Action이라고 부르는 의례를 밟아야 한다. 이것은 event driven과 같은 개념이다.
1. Anyone who wants to do something to the Store issues an Action
Store에 무언가 하고 싶다면 Action을 발행한다.
2. State is updated when the gatekeeper of Store detects the occurrence of Action
Store의 게이트키퍼가 Action의 생성을 감지하면 State가 업데이트 된다.
Action은 기본적으로 다음과 같은 object 형태이다.
{
    type :  "a string or symbol that can uniquely identify the type of action " ,
    payload :  " any data needed to perform an action " ,
}
{
type : " @@ myapp / ADD_VALUE " ,
payload : 2 ,
}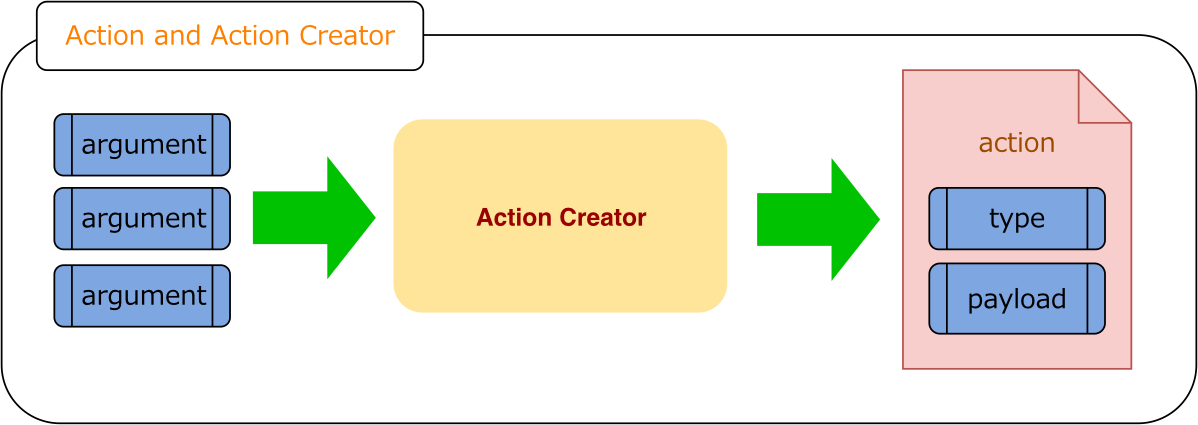
그런데 이런 오브젝트를 하나 하나 만드는 것은 어렵다. 그래서 보통 이런 경우, 외부 파일에다가 상수를 만들어서 export해주는 방식이 일반적이다.
export const ADD_VALUE = '@@myapp/ADD_VALUE';
export const addValue = amount => ({type: ADD_VALUE, payload: amount});
Reducer
앞에서 언급한 Gatekeeper of Store와 비슷한 역할을 하는 것이 Reducer이다.
In functional programming, the term Reduce means a convolution operation. In Redux, the operation is to create a new state by combining the previous state and the action as follows .
함수형 프로그래밍에서 Reduce는 합성곱 연산을 뜻한다. Redux에서는 이전 상태와 Action을 합쳐서 새로운 State를 만드는 operation을 뜻한다.

import { ADD_VALUE } from './actions';
export default (state = {value: 0}, action) => {
switch (action.type) {
case ADD_VALUE:
return { ...state, value: state.value + action.payload };
default:
return state;
}
}여기서 주의해서 봐야할 점은,
- The initial state is defined by the default argument of Reducer (초기 상태는 Reducder의 디폴트 인자로 정의된다.)
- When changing the state state, write to synthesize a new one without rewriting the passed itself (상태를 변경할 때의 State는 전달된 상태 자체를 다시 쓰는 것이 아니라 새로운 상태를 합성해서 쓴다.
If you want to subdivide the Reducer in a large-scale development like the example of Twitter combineReducers, write as follows using the function provided by Redux .
import  {  CombineReducers  }  from  ' redux ' ;

const  SessionReducer  =  ( state  =  { loggedIn :  false ,  user :  null },  action )  =>  {
    / * omitted * /
};
const  TimelineReducer  =  ( state  =  { type :  " home " ,  statuses :  []},  action )  =>  {
    / * omitted * /
};
const  notificationReducer  =  ( state  =  [],  action )  =>  {
    / * omitted * /
};

export  default  combineReducers ({
    session :  sessionReducer ,
    timeline :  timelineReducer ,
    notification :  notificationReducer ,
})
CombineReducer 참고자료 클릭!
Component connected to pure Component
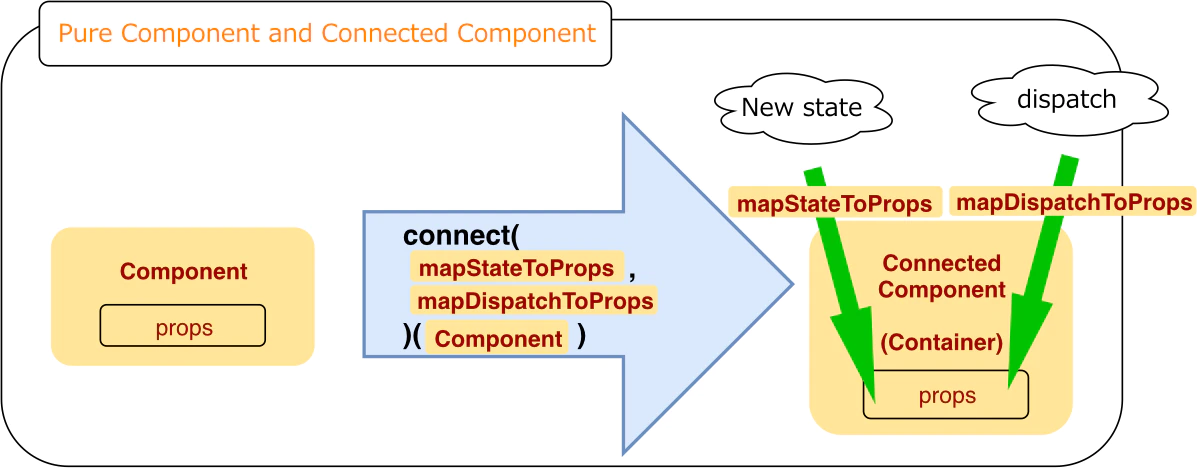
React's Component alone cannot follow the flow of Redux. To participate connect, write as follows, using the function provided by ReactRedux . The function version and the class version are shown respectively.
Counter.js (functional version)
import  React ,  {  Component  }  from  ' the react ' ;
import  {  the connect  }  from  ' the react-redux ' ;
import  {  addValue  }  from  ' ./Actions ' ;

const  Counter  =  ({  value ,  DispatchAddValue  })  =>  (
    < div >
        Value : { value }
        < a  href = "#" onClick = { e  =>  DispatchAddValue ( 1 ) } > +1 </ a >
        < a  href = "#"  onClick = { e  =>  DispatchAddValue ( 2 ) } > +2 </ a >
    </ div >
);

export  default  connect (
    state  =>  ({  value :  state . value  }),
    dispatch  => ({  dispatchAddValue :  amount  =>  dispatch ( addValue ( amount ))  })
) ( Counter )
Counter.js (class version)
import  React ,  {  Component  }  from  ' the react ' ;
import  {  the connect  }  from  ' the react-redux ' ;
import  {  addValue  }  from  ' ./Actions ' ;

class  Counter  the extends  Component  {
    render ()  {
        const  {  value ,  DispatchAddValue  }  =  this . props ;
        return  (
            <div >
                Value: { value }
                < a  href = "#"  onClick = { e  =>  DispatchAddValue ( 1 ) } > +1 </ a >
                < a  href = "#"  onClick = { e  =>  DispatchAddValue ( 2 ) } > +2 </ a >
            </ div >
        );
    }
}

export  default connect (
    state  =>  ({  value :  state . value  }),
    dispatch  =>  ({  dispatchAddValue :  amount  =>  dispatch ( addValue ( amount ))  })
) ( Counter )
First, when a Component receives some information from the Store, it is props passed through. props Is immutable. Every time the state is updated, a new one props is recreated and the render method is executed each time . With that in mind, connect let's take a look at the surrounding code that is running.
먼저, component가 store를 통해서 정보를 받을 때, props를 통해 받는다. props는 변하지 않는다. 매번 상태가 업데이트 되면서 새로운 상태가 만들어지고 각각 렌더링된다. 그 점을 염두에 두고 connect를 실행하는 주변 코드를 보자.
- Decide state how props to mix the state of the Store
(the function that defines this behavior is mapStateToPropscalled) - Decide dispatch how props to mix the function that notifies the Reducer of the action
(the function that defines this behavior is mapDispatchToPropscalled) - props Decide which Component you want to receive with the above two points mixed
- The return value is a Component crafted to connect with the Store and Reducer.
Development
Introducing Redux Saga
실제로 React + Redux는 문제점을 가지고 있다.
Reducer 안에 부작용을 일으키는 로직을 쓰면 안된다는 원칙으로 인해서
- Processing that stochastically changes the result for the same input
- Delay processing
- HTTP request processing
이러한 것들은 Reducer 안에 쓸 수 없다. 그렇다면 어디에 쓸 수 있을까?
- In Component
- In Action Creator
- mapDispatchToProps in
아니다. 이것들은 모두 anti-patterns다. 정답은 Saga다.
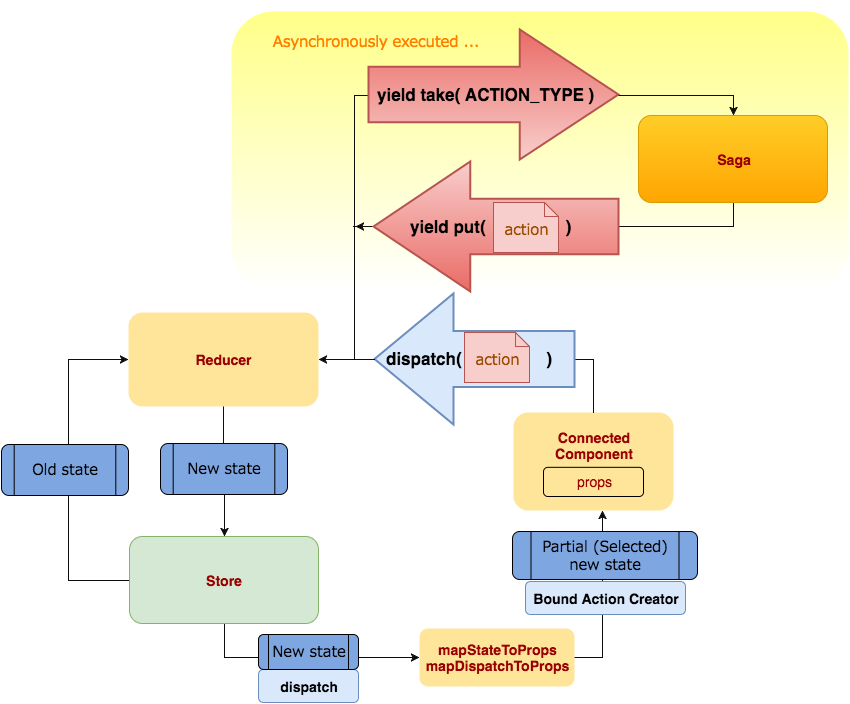
이제까지 dispatch는 컴포넌트에서 발생한 action으로 실행되고 Reducer로 간다고 말했다. Saga는 여기서 새로운 방식을 제안한다.
Since all Saga are generator functions, asynchronous processing can be handled easily.
Saga는 제너레이터 함수이기 때문에 비동기 프로세스를 쉽게 처리할 수 있다.
- yield take(ACTION_TYPE) Monitor the occurrence of the action specified in
- Boil or bake with the action you took
- yield put(action) Discharge the result as another action
글이 길었다. 여기까지 마무리하고,
다음 편에서는 Redux Saga와 thunk를 비롯한 비동기 처리에 대해서 정리해보겠다.
참고 자료