
- 해당 게시물은 인프런 - "스프링 MVC 1편 - 백엔드 웹 개발 핵심 기술" 강의를 참고하여 작성한 글 입니다.
- 유료강의이므로 자세한 내용은 없고, 간단한 설명 위주로 정리했습니다.
강의 링크 -> 김영한 - 스프링 MVC 1편 - 백엔드 웹 개발 핵심 기술(유료강의)
📖 스프링 MVC - 기본 기능
📒 프로젝트 생성
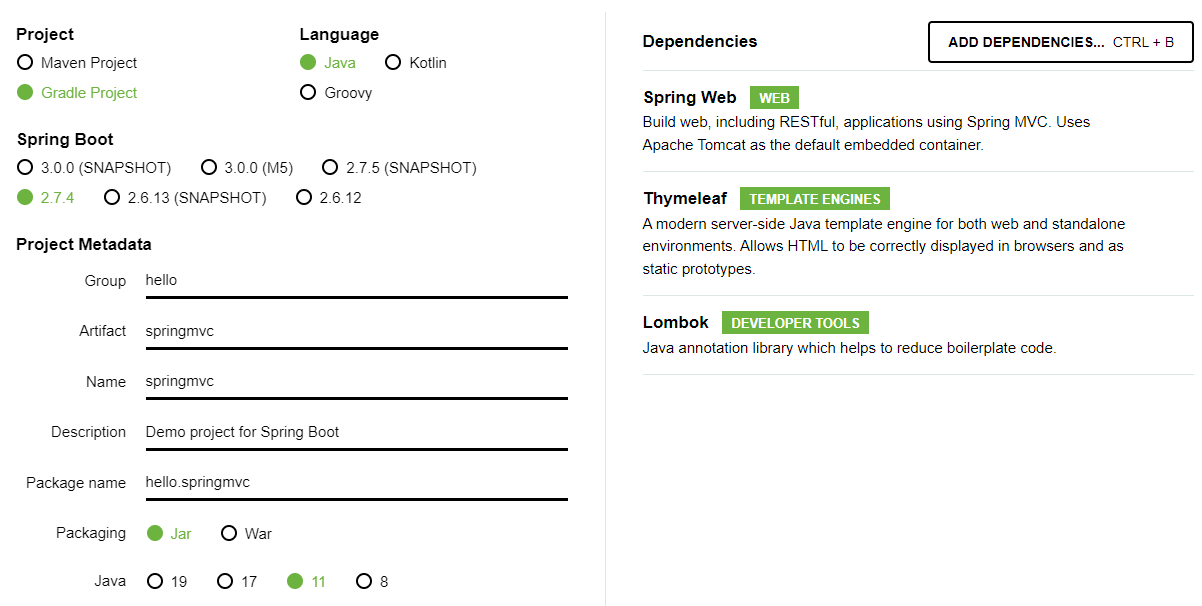
스프링부트 스타터에서 스프링 프로젝트를 생성한다.
📒 요청 매핑 - API 예시
회원 관리를 HTTP API로 만든다고 할 때,
매핑 정보를 어떻게 설정할지 알아 볼 것이다.
회원 관리 API
- 회원 목록 조회: GET /users
- 회원 등록: POST /users
- 회원 조회: GET /users/{userId}
- 회원 수정: PATCH /users/{userId}
- 회원 삭제: DELETE /users/{userId}
✏️ 회원 관리 API 매핑
main/java/hello/springmvc/basic/requestmapping/MappingClassController
@Controller는 반환 값으로 view를 찾는 반면,
@RestController는 반환 값을 HTTP 메시지 바디에 바로 입력할 수 있다.
@RequestMapping 으로 인해 "/mapping/users"로 URL 호출이 오면
아래에 있는 메서드가 실행되도록 매핑해준다.
@RestController
@RequestMapping("/mapping/users")
public class MappingClassController {
회원 목록 조회은 GET 방식으로
@RequestMapping(method = RequestMethod.GET) 어노테이션을 붙여도 되지만,
@GetMapping 으로 축약이 가능하다.
이외에도 Post, Put, Patch, Delete 등 매핑 축약 어노테이션들이 있다.
@GetMapping
public String user() {
return "get user";
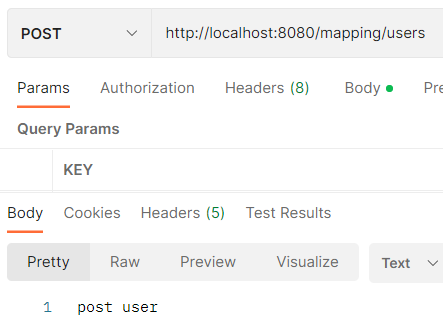
}같은 방식으로 활용하여 회원 등록을 만들 수 있다.
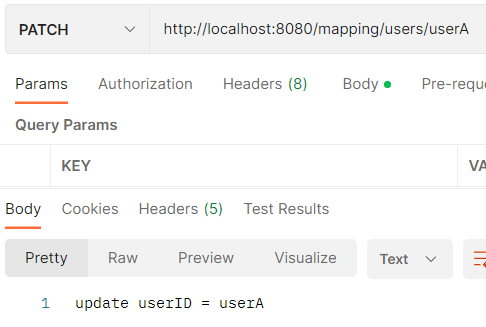
회원 수정은 Patch 방식으로 @PatchMapping 어노테이션을 붙여주며,
PathVariable(경로 변수) 사용한다.
그러면 "/{userId}" 자리에 아무 변수가 와도 해당 메서드가 매핑이 된다.
@PatchMapping("/{userId}")
public String updateUser(@PathVariable String userId) {
	return "update userID = " + userId;
}

같은 방식으로 회원 조회, 회원 삭제 매핑을 만들 수 있다.
📒 HTTP 요청 - 기본, 헤더 조회
기본 정보와 헤더 정보를 가져오는 방법에 대해 알아 볼 것이다.
main/java/hello/springmvc/basic/request/requestHeaderController
모든 헤더 정보를 MultiValueMap(하나의 키에 여러 값 받음) 형식으로 조회하고,
특정 헤더 정보를 조회할 때엔 @RequestHeader의 value 값으로 "특정 정보"를 넣는다.
또한 @RequestHeader와 @CookieValue에 required 속성으로 필수 값 여부를 설정하고, defaultValue 속성으로 기본 값도 설정할 수 있다.
public String headers(HttpServletRequest request, // request 정보
                      HttpServletResponse response, // response 정보
                      HttpMethod httpMethod, // method 정보
                      Locale locale, // 언어 정보
                      @RequestHeader MultiValueMap<String, String> headerMap, // 모든 헤더 정보
                      @RequestHeader("host") String host, // host 정보
                      @CookieValue(value="myCookie", required = false) String cookie // 쿠키 정보
                      ) {
해당 정보에 대한 log를 찍어보면 아래와 같은 결과가 나온다.
2022-09-28 13:33:12.041  INFO 24092 --- [nio-8080-exec-1] h.s.b.request.requestHeaderController    : request=org.apache.catalina.connector.RequestFacade@70625f7
2022-09-28 13:33:12.043  INFO 24092 --- [nio-8080-exec-1] h.s.b.request.requestHeaderController    : response=org.apache.catalina.connector.ResponseFacade@5caf316e
2022-09-28 13:33:12.043  INFO 24092 --- [nio-8080-exec-1] h.s.b.request.requestHeaderController    : httpMethod=GET
2022-09-28 13:33:12.043  INFO 24092 --- [nio-8080-exec-1] h.s.b.request.requestHeaderController    : locale=ko_KR
2022-09-28 13:33:12.043  INFO 24092 --- [nio-8080-exec-1] h.s.b.request.requestHeaderController    : headerMap={content-type=[application/json], user-agent=[PostmanRuntime/7.29.2], accept=[*/*], postman-token=[14479efb-3975-42ed-8d34-24ff0374b1e7], host=[localhost:8080], accept-encoding=[gzip, deflate, br], connection=[keep-alive], content-length=[31]}
2022-09-28 13:33:12.043  INFO 24092 --- [nio-8080-exec-1] h.s.b.request.requestHeaderController    : header host=localhost:8080
2022-09-28 13:33:12.043  INFO 24092 --- [nio-8080-exec-1] h.s.b.request.requestHeaderController    : myCookie=null
추가적으로 파라미터로 넣을 수 있는 값은 아래 링크에서 확인할 수 있다.
공식 메뉴얼에서 확인
📒 HTTP 요청 파라미터 - 쿼리 파라미터, HTML Form
쿼리 파라미터
- 메시지 바디 없이, URL의 쿼리 파라미터에 데이터를 포함해서 전달
- /url?username=hello&age=20
- ex) 검색, 필터, 페이징
HTML Form
- 메시지 바디에 쿼리 파리미터 형식으로 전달
- username=hello&age=20
- ex) 회원 가입, 상품 주문, HTML Form
GET 쿼리 파리미터 전송 방식과 POST HTML Form 전송 방식 둘다 형식이 같아 구분없이 조회할 수 있다.
✏️ 쿼리 파라미터
main/java/hello/springmvc/basic/request/requestParamController
@RequestMapping("/request-param-v1")
public void requestParamV1(HttpServletRequest req, HttpServletResponse res)
            throws IOException {
파라미터의 값을 가져와 log를 출력하는 코드를 작성한다.
String username = ...
int age = Integer.parseInt(req.getParameter("age"));

log.info("username = {}, age = {}", username, age);

res.getWriter().write("ok");
그러면 http://localhost:8080/request-param-v1?username=hello&age=20 에 들어가면 정상적으로 로그가 찍히는 것을 볼 수 있다.

✏️ HTML Form
form 정보를 입력받아야 하기 때문에 form을 작성해준다.
main/resources/static/basic/hello-form.html
<form action="/request-param-v1" method="post">
    username: <input type="text" name="username" />
    age: <input type="text" name="age" />
    <button type="submit">전송</button>
</form>
위에서 작성한 쿼리 파라미터와 전송 방식이 같아 바로 실행을 해주면
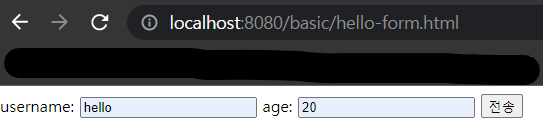
정상적으로 작동하고 log가 찍히는 것을 확인할 수 있다.

📒 HTTP 요청 파라미터 - @RequestParam
스프링이 제공하는 @RequestParam 을 사용하면 요청 파라미터를 매우 편리하게 사용할 수 있다.
main/java/hello/springmvc/basic/request/requestParamController
@RequestParam를 사용하여
username, age 라는 요청 파라미터의 값을 각각 변수 memberName, memberAge에 담을 수 있게 되어,
보다 쉽고 편리하게 사용할 수 있다.
또한 return 값으로 view 페이지 대신 HTTP message body에 값을 넣어 주고 싶을 때
@RestController 를 사용하지 않고 해당 메서드에 @ResponseBody를 붙여줘도 된다.
@ResponseBody
@RequestMapping("/request-param-v2")
public String requestParamV2(@RequestParam("username") String memberName,
                             @RequestParam("age") int memberAge) {

	// log 출력 코드

	return "ok";
}
그러면 http://localhost:8080/request-param-v2?username=hello&age=20에 들어가면 정상적으로 로그가 찍히는 것을 볼 수 있다.

✏️ @RequestParam 생략
위에서 작성한 코드를 조금 더 간편하게 개선할 수 있다.
HTTP 파라미터 이름과 변수 이름이 같을 경우, HTTP 파라미터 이름를 생략할 수 있다.
@RequestMapping("/request-param-v3")
public String requestParamV3(@RequestParam String username,
                             @RequestParam int age) {
또한 여기서 더 생략할 수 있다.
HTTP 파라미터가 String, int 등의 단순 타입이면 @RequestParam을 생략 할 수 있다.
@RequestMapping("/request-param-v4")
public String requestParamV4(String username, int age) {
순서대로
http://localhost:8080/request-param-v3?username=hello&age=20,
http://localhost:8080/request-param-v4?username=hello&age=20 에 들어가면 정상적으로 작동되는 것을 볼 수 있다.
✏️ 파라미터 필수 여부
파라미터 값을 필수로 받을 지, 안 받을 지 required를 통해 확인할 수 있다.
required의 기본 값은 true이며, 이를 설정하지 않으면 자동으로 해당 파라미터를 필수로 받아야 한다.
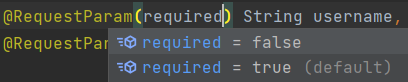
그래서 필수로 받고 싶지 않을 때, @RequestParam(required = false) 로 설정을 한다.
@RequestMapping("/request-param-required")
public String requestParamRequired(
		@RequestParam(required = true) String username,
		@RequestParam(required = false) Integer age) {
username을 파라미터로 받지 않을 경우,
http://localhost:8080/request-param-required?age=20 에 들어가면 아래와 같이 Bad Request가 뜨는 것을 볼 수 있다.

그리고 위에 코드를 보면 age의 변수형이 int가 아닌 Integer인 것을 볼 수 있다.
왜냐하면 null을 int에 입력하는 것은 불가능하므로, Integer로 변경해야 하기 때문이다.
age를 파라미터로 받지 않고 필수값인 username만 파라미터로 받을 경우,
http://localhost:8080/request-param-required?username=hello
정상적으로 실행되는 것을 볼 수 있다.
✏️ 기본 값 적용
defaultValue를 사용하여 파라미터의 값에다가 기본 값을 적용할 수 있다.
@RequestMapping("/request-param-default")
public String requestParamDefault(
		@RequestParam(required = true, defaultValue = "guest") String username,
		@RequestParam(required = false, defaultValue = "-1") int age) {
그래서 순서대로
http://localhost:8080/request-param-default?username=hello&age=20
http://localhost:8080/request-param-default?username=hello
http://localhost:8080/request-param-default?age=10
http://localhost:8080/request-param-default
에 들어가면 아래와 같은 결과가 나오며, 이미 기본 값이 있기 때문에 required 는 의미가 없다

✏️ Map으로 파라미터 조회
파라미터를 한 번에 조회하기 위해 Map을 사용한다.
@RequestMapping("/request-param-map")
public String requestParamMap(@RequestParam Map<String, Object> paramMap) {
http://localhost:8080/request-param-map?username=hello&age=20 에 들어가 확인을 하면,
정상적으로 Map에 파라미터 값이 들어간 것을 볼 수 있다.

📒 HTTP 요청 파라미터 - @ModelAttribute
요청 파라미터를 받아서 필요한 객체를 만들고 그 객체에 값을 넣어주어야 하는데,
이 과정을 @ModelAttribute를 통해 자동화 할 수 있다.
main/java/hello/springmvc/basic/HelloData
우선 객체 HelloData를 만들어 준다.
@Date라는 lombok 어노테이션을 사용하면
@Getter, @Setter, @ToString, @EqualsAndHashCode, @RequiredArgsConstructor 이 자동 적용된다.
@Data
public class HelloData {
    private String username;
    private int age;
}
main/java/hello/springmvc/basic/request/requestParamController
@ModelAttribute를 사용하면 HelloData 객체를 생성하고, 요청 파라미터에 대한 setter를 찾아 값을 넣어준다.
추가적으로 @ModelAttribute를 생략할 수도 있다.
@RequestMapping("/model-attribute-v1")
public String modelAttributeV1(@ModelAttribute HelloData helloData) {
http://localhost:8080/model-attribute-v1?username=hello&age=20 에 들어가면 정상적으로 동작하는 것을 볼 수 있다.


지금까지 김영한 - 스프링 MVC 1편 - 백엔드 웹 개발 핵심 기술(유료강의) 강의를 참고하여 스프링 MVC - 기본 기능 1 에 대해 공부하였다.
