1. 네이버 로그인
구글 로그인을 마무리하고 네이버 로그인을 적용해보겠다.
네이버 디벨로퍼를 검색창에 검색 후 접속해 주면 오픈 API를 설정할 수 있는 화면이 나온다. 해당 화면에서 네이버 로그인을 이용할 수 있도록 오픈 API를 설정해준다.
1) 정보 등록
네이버 API 설정이 완료 되면 서비스를 이용할 수 있는 ID와 패스워드를 받는데 해당 아이디와 패스워드를 application-oauth.properties에 등록해준다.
application-oauth.properties
# registration
spring.security.oauth2.client.registration.naver.client-id=클라이언트 id
spring.security.oauth2.client.registration.naver.client-secret=클라이언트 pw
spring.security.oauth2.client.registration.naver.redirect-uri={baseUrl}/{action}/oauth2/code/{registrationId}
spring.security.oauth2.client.registration.naver.authorization_grant_type=authorization_code
spring.security.oauth2.client.registration.naver.scope=name,email,profile_image
spring.security.oauth2.client.registration.naver.client-name=Naver

#provider
spring.security.oauth2.client.provider.naver.authorization_uri=https://nid.naver.com/oauth2.0/authorize
spring.security.oauth2.client.provider.naver.token_uri=https://nid.naver.com/oauth2.0/token
spring.security.oauth2.client.provider.naver.user_info_uri=https://openapi.naver.com/v1/nid/me
spring.security.oauth2.client.provider.naver.user-name_attribute=response
스프링 시큐리티 설정 등록
OAuthAttributes에 다음과 같이 네이버인지 판단하는 코드와 네이버 생성자를 추가해준다.
OAuthAttributes
@Getter
public class OAuthAttributes {
    private Map<String, Object> attributes;
    private String nameAttributeKey;
    private String name;
    private String email;
    private String picture;

    @Builder
    public OAuthAttributes(Map<String, Object> attributes, String nameAttributeKey, String name, String email, String picture){
        this.attributes = attributes;
        this.nameAttributeKey = nameAttributeKey;
        this.name = name;
        this.email = email;
        this.picture = picture;
    }

    public static OAuthAttributes of(String registrationId, String userNameAttributeName, Map<String, Object> attributes){
        if("naver".equals(registrationId)){
            return ofNaver("id", attributes);
        }

        return ofGoogle(userNameAttributeName, attributes);
    }

    private static OAuthAttributes ofGoogle(String userNameAttributeName, Map<String, Object> attributes){
        return OAuthAttributes.builder()
                .name((String) attributes.get("name"))
                .email((String) attributes.get("email"))
                .picture((String) attributes.get("picture"))
                .attributes(attributes)
                .nameAttributeKey(userNameAttributeName)
                .build();
    }

    private static OAuthAttributes ofNaver(String userNameAtrributeName, Map<String, Object> attributes){
        Map<String, Object> response = (Map<String, Object>) attributes.get("response");

        return OAuthAttributes.builder()
                .name((String) response.get("name"))
                .email((String) response.get("email"))
                .picture((String) response.get("profile_image"))
                .attributes(response)
                .nameAttributeKey(userNameAtrributeName)
                .build();
    }

    public User toEntity(){
        return User.builder()
                .name(name)
                .email(email)
                .picture(picture)
                .role(Role.GUEST)
                .build();
    }
}
마지막으로 index.mustache에 네이버 로그인 버튼을 추가해준다.
index.mustache
   {{^userName}}
                <a href="/oauth2/authorization/google" class="btn btn-success active" role="button">Google Login</a>
                <a href="/oauth2/authorizatoin/naver" class="btn btn-secondary active" role="button">Naver Login</a>
{{/userName}}- /oauth2/authorization/naver : 네이버 로그인 URL은 application-oauth.properties에 등록한 redirect-uri 값에 맞춰 자동으로 등록된다.
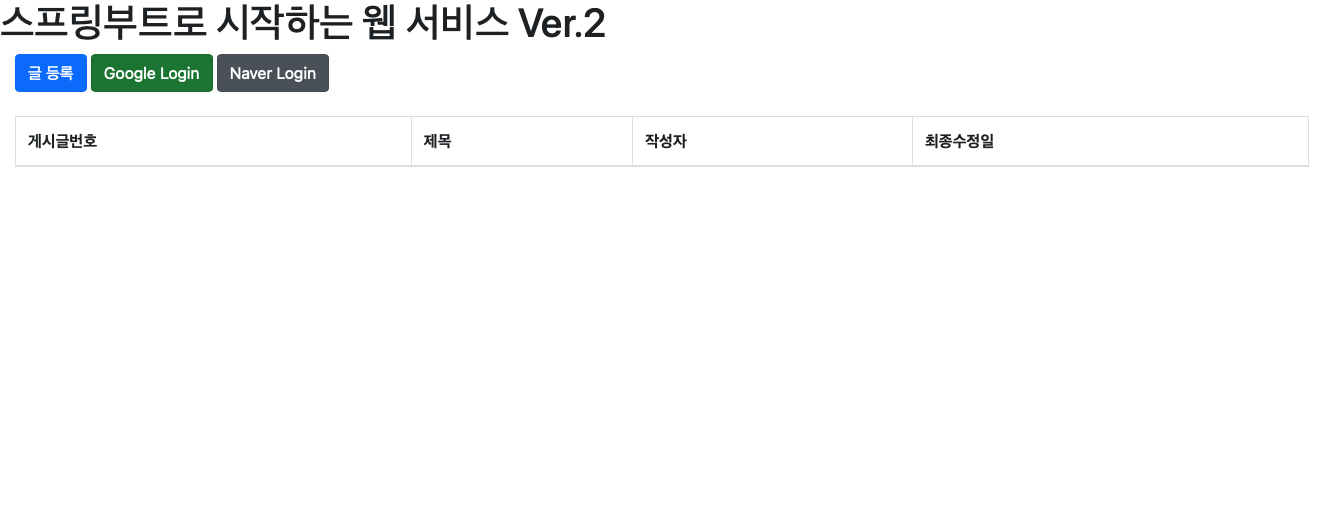
이렇게 로그인 버튼이 생긴 것을 확인할 수 있고
해당 버튼을 눌러보면 정상적으로 로그인이 실행되는 것을 확인할 수 있다.

2. 기존 테스트에 시큐리티 적용하기
TDD에 익숙하지 않다보니 새롭게 어려움을 느꼈던 파트였다.
기존 테스트 코드는 바로 API를 호출하여 테스트를 하는 방식으로 진행했다. 하지만 시큐리티를 적용시킨 이후 인증된 사용자만 API를 호출할 수 있기에 정상적으로 테스트가 작동되지 않는다. 테스트 코드마다 인증한 사용자가 호출한 것처럼 코드를 수정할 것이다.
1. 테스트 실행
인텔리제이 오른쪽 상단에 Gradle 버튼으로 TEST를 진행하면 7개의 테스트가 실패 되었다는 에러 메시지를 호출하는 것을 확인할 수 있다.
한가지씩 살펴보고 해결해본다.
1) CustomOAuth2UserService을 찾을 수 없음
해당 메시지를 확인해보면 "hello가_리턴된다"에서 발생하는 것을 확인할 수 있고 해당 에러 메시지는 소셜 로그인 관련 설정값이 없기 때문에 발생하는 에러 메시지이다. main쪽에는 application.properties를 통해 관련 설정값을 정해주었지만 test에는 설정해주지 않아 발생함을 의미한다. 이러한 에러 메시지를 해결하기 위해 test쪽에 가짜 설정값을 등록해준다.
application.properties(test)
spring.jpa.show_sql=true
spring.jpa.properties.hibernate.dialect=org.hibernate.dialect.MySQL5InnoDBDialect
spring.h2.console.enabled=true
spring.session.store-type=jdbc

# Test OAuth

spring.security.oauth2.client.registration.google.client-id=test
spring.security.oauth2.client.registration.google.client-secret=test
spring.security.oauth2.client.registration.google.scope=profile,email
이렇게 등록해주면 해당 에러 메시지가 해결되는 것을 확인할 수 있다.
2) 추가 에러
책에서는 여기까지하면 "메인페이지_로딩" 부분이 해결되는 것을 확인할 수 있었지만 나는 정상적으로 확인되지 않았다. 에러를 해결하기 위해 여러 블로그를 확인해보았지만 에러는 해결되지 않았고 테스트 코드를 다시 한번 확인했다.
에러 원인은

다음과 같이 "메인페이지_로딩"에서 테스트를 위해 contains로 해당 문자열이 존재하는지 확인하는 부분에서 띄어쓰기가 되어 있어서 발생하는 에러였다. 코드상에는 "스트링부트"로 되어 있는데 나는 "스트링 부트"로 해당 문자열이 있는지 비교하니 당연히 에러가 발생했던 것이다.
이러한 사소한 문제를 2주동안 찾았고 해당 에러를 확인하고는 긴장이 확 풀려버렸다.
3) 302 Status Code
"Posts_등록된다"에서 발생하는 에러 메시지인데 인증되지 않은 사용자의 요청으로 인한 에러 메시지이다. 해당 에러 메시지를 해결하기 위해 스프링 시큐리티 테스트를 위한 코드를 build.gradle에 추가해주었다.
build.gradle
testImplementation('org.springframework.security:spring-security-test')그리고 PostsApiControllerTest의 2개 테스트 메소드에 임의 사용자 인증을 추가해준다.
PostsApiControllerTest
@WithMockUser(roles = "USER")
    public void Posts_등록된다() throws Exception{
    ...
    }

@Test
    @WithMockUser(roles = "USER")
    public void Posts_수정된다() throws Exception{
    ...
}- @WithMockUser(roles="USER") : 인증된 모의 사용자를 만들어서 사용한다. roles에 권한을 추가할 수 있다.
PostsApiControllerTest는 @SpringBootTest로만 되어 있어서 MockMvc를 사용할 수 없다 @SpringBootTest에서 MockMvc를 사용하기 위해 코드를 수정한다.
PostsApiController
import com.fasterxml.jackson.databind.ObjectMapper;
import com.ybkim.springstudy.springboot.domain.posts.Posts;
import com.ybkim.springstudy.springboot.domain.posts.PostsRepository;
import com.ybkim.springstudy.springboot.web.dto.PostsSaveRequestDto;
import com.ybkim.springstudy.springboot.web.dto.PostsUpdateRequestDto;
import org.junit.After;
import org.junit.Before;
import org.junit.Test;
import org.junit.runner.RunWith;
import org.springframework.beans.factory.annotation.Autowired;
import org.springframework.boot.test.context.SpringBootTest;
import org.springframework.boot.test.web.client.TestRestTemplate;
import org.springframework.boot.web.server.LocalServerPort;
import org.springframework.http.MediaType;
import org.springframework.security.test.context.support.WithMockUser;
import org.springframework.test.context.junit4.SpringRunner;
import org.springframework.test.web.servlet.MockMvc;
import org.springframework.test.web.servlet.setup.MockMvcBuilders;
import org.springframework.web.context.WebApplicationContext;

import java.util.List;

import static org.assertj.core.api.Assertions.assertThat;
import static org.springframework.security.test.web.servlet.setup.SecurityMockMvcConfigurers.springSecurity;
import static org.springframework.test.web.servlet.request.MockMvcRequestBuilders.post;
import static org.springframework.test.web.servlet.request.MockMvcRequestBuilders.put;
import static org.springframework.test.web.servlet.result.MockMvcResultMatchers.status;

import java.util.List;
import java.util.Objects;

import static org.assertj.core.api.Assertions.assertThat;

@RunWith(SpringRunner.class)
@SpringBootTest(webEnvironment = SpringBootTest.WebEnvironment.RANDOM_PORT)
public class PostsApiControllerTest {

    @LocalServerPort
    private int port;

    @Autowired
    private TestRestTemplate restTemplate;

    @Autowired
    private PostsRepository postsRepository;

    @Autowired
    private WebApplicationContext context;

    private MockMvc mvc;

    @Before
    public void setup(){
        mvc = MockMvcBuilders
                .webAppContextSetup(context)
                .apply(springSecurity())
                .build();
    }
     @After
    public void tearDown() throws Exception{
        postsRepository.deleteAll();
    }

    @Test
    @WithMockUser(roles = "USER")
    public void Posts_등록된다() throws Exception{
        //given
        String title = "title";
        String content = "content";
        PostsSaveRequestDto requestDto = PostsSaveRequestDto.builder()
                .title(title)
                .content(content)
                .author("author")
                .build();

        String url = "http://localhost:" + port + "/api/v1/posts";

        //when
        mvc.perform(post(url)
                .contentType(MediaType.APPLICATION_JSON_UTF8)
                .content(new ObjectMapper().writeValueAsString(requestDto)))
                .andExpect(status().isOk());


        //then
        List<Posts> all = postsRepository.findAll();
        assertThat(all.get(0).getTitle()).isEqualTo(title);
        assertThat(all.get(0).getContent()).isEqualTo(content);
    }

    @Test
    @WithMockUser(roles = "USER")
    public void Posts_수정된다() throws Exception{
        //given
        Posts savedPosts = postsRepository.save(Posts.builder()
                .title("title")
                .content("content")
                .author("author")
                .build());

        Long updateId = savedPosts.getId();
        String expectedTitle = "title2";
        String expectedContent = "content2";

        PostsUpdateRequestDto requestDto = PostsUpdateRequestDto.builder()
                .title(expectedTitle)
                .content(expectedContent)
                .build();

        String url = "http://localhost:" + port + "/api/v1/posts/" + updateId;

        //when
        mvc.perform(put(url)
                .contentType(MediaType.APPLICATION_JSON_UTF8)
                .content(new ObjectMapper().writeValueAsString(requestDto)))
                .andExpect(status().isOk());

        //then
        List<Posts> all = postsRepository.findAll();
        assertThat(all.get(0).getTitle()).isEqualTo(expectedTitle);
        assertThat(all.get(0).getContent()).isEqualTo(expectedContent);
    }
} - @Before : 매번 테스트가 시작되기 전에 MockMvc 인스턴스를 생성
- mvc.perform : 생성된 MockMvc를 통해 API를 테스트 한다.
4) @WebMvcTest에서 CustomOAuth2UserService을 찾을 수 없음
첫번째 에러 메시지와 동일한 에러가 발생하는데 그 이유는 HelloControllerTest는 @WebMvcTest를 사용하기에 CustomOAuth2UserService를 스캔하지 않기 때문이다.
이러한 문제를 해결하기 위해서 스캔 대상에서 SecurityConfig를 제거해준다.
HelloControllerTest
@WebMvcTest(controllers = HelloController.class,
        excludeFilters = {
        @ComponentScan.Filter(type = FilterType.ASSIGNABLE_TYPE, classes = SecurityConfig.class)
        }


 @WithMockUser(roles = "USER")
    @Test
    public void hello가_리턴된다() throws Exception{
    ...
    }

 @WithMockUser(roles = "USER")
    @Test
    public void helloDto가_리턴된다() throws Exception{
    ...
    }
여기도 @WithMockUser를 사용해서 가짜로 인증된 사용자를 생성해준다.
해당 코드를 수정 후 TEST를 진행해보면
java.lang.IllegalArgumentException: At least one JPA metamodel must be present!해당 에러 메시지가 호출되는데 이 에러는 @EnableJpaAuditing으로 인해 발생한다.
@SpringBootApplication과 @WebMvcTest를 분리해준다.
Application.java에서 @EnableJpaAuditing을 삭제해주고
config 패키지에 JpaConfig를 생성해준다.
@JpaConfig
@Configuration
@EnableJpaAuditing //JPA Auditing 활성화
public class JpaConfig {
}
다시 테스트를 진행해보면

다음과 같이 테스트가 모두 통과하는 것을 확인할 수 있다.
