MM Detection란?

- 칭화 대학(중국, 베이징시)의 주도로 만들어진 Computer vision Open Source
project인 OpenMMLab에서 출발 - 2018년 MS-COCO Challenge에서 우승 후 모듈을 확장하여 다수의 알고리즘
수용 - 최신의 다양한 Object Detection, Segmentation 알고리즘을 Package로 구현
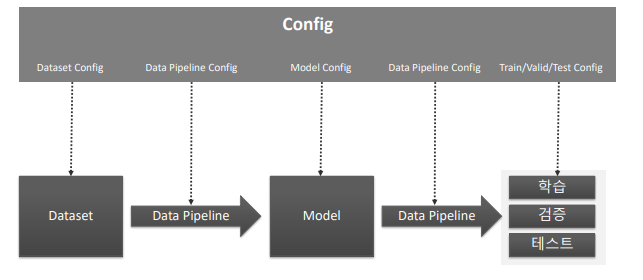
제공 - 뛰어난 구현 성능, 효율적인 모듈 설계, Config 기반으로 데이터부터 모델
학습/평가 까지 이어지는 간편한 파이프라인 적용 - Pytorch 기반으로 구현
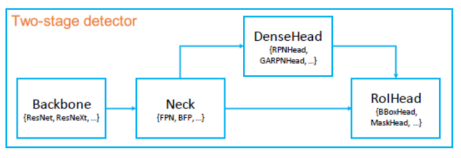
MM Detection 모델 아키텍처
-
Backbone
Feature Extractor(이미지->Feature Map) -
Neck
Backbone과 Heads를 연결하면서 heads가 feature map의 특성을 보다 잘 해석하고 처리할 수 있도록 정제 작업 수행. -
DenseHead (AnchorHead/AnchorFreeHead)
Feature Map에서 Object의 위치와 Classification을 처리하는 부분

-
RoIExtractor
Feature Map에서 ROI 정보를 뽑아내는 부분 -
RoIHead (BBoxHead/MaskHead)
ROI정보를 기반으로 Object 위치와 Classification을 수행하는 부분
MMDetectinon 주요 구성요소
MM Detection Training Pipeline

- Hook(Callback)을 통해 학습에 필요한 여
러 설정들을 Customization 가능 - 대부분 Configuration에서 이를 설정함.
Inference 돌려보기
미리 학습된 모델과 config로 inference를 돌려보겠습니다. 이는 mmdetection github의 demo에 가도 볼 수 있습니다.
1. 설치
!pip install mmcv-full

!git clone https://github.com/open-mmlab/mmdetection.git
!cd mmdetection; python setup.py install- import
MS-COCO 데이터 기반으로 Faster RCNN Pretrained 모델을 활용하여 Inference 수행합니다.
- Faster RCNN Pretrained 모델 다운로드
- Faster RCNN용 Config 파일 설정.
- Inference 용 모델을 생성하고, Inference 적용
# checkpoint directory 생성 후(코드에 없음) 모델 다운로드
!wget -O /opt/ml/hw/checkpoints/faster_rcnn_r50_fpn_1x_coco_20200130-047c8118.pth http://download.openmmlab.com/mmdetection/v2.0/faster_rcnn/faster_rcnn_r50_fpn_1x_coco/faster_rcnn_r50_fpn_1x_coco_20200130-047c8118.pth

# config 파일을 설정하고, 다운로드 받은 pretrained 모델을 checkpoint로 설정.
config_file = '/opt/ml/detection/mmdetection/configs/faster_rcnn/faster_rcnn_r50_fpn_1x_coco.py'
checkpoint_file = '/opt/ml/hw/checkpoints/faster_rcnn_r50_fpn_1x_coco_20200130-047c8118.pth'

# config 파일과 pretrained 모델을 기반으로 Detector 모델을 생성.
from mmdet.apis import init_detector, inference_detector

model = init_detector(config_file, checkpoint_file, device='cuda:0')- inference
import cv2
import matplotlib.pyplot as plt
img = '/opt/ml/detection/mmdetection/demo/demo.jpg'

img_arr  = cv2.cvtColor(cv2.imread(img), cv2.COLOR_BGR2RGB)
plt.figure(figsize=(12, 12))
plt.imshow(img_arr)

img = '/opt/ml/detection/mmdetection/demo/demo.jpg'
# inference_detector의 인자로 string(file경로), ndarray가 단일 또는 list형태로 입력 될 수 있음.
results = inference_detector(model, img)
원본이미지

- 시각화
from mmdet.apis import show_result_pyplot
# inference 된 결과를 원본 이미지에 적용하여 새로운 image로 생성(bbox 처리된 image)
# Default로 score threshold가 0.3 이상인 Object들만 시각화 적용. show_result_pyplot은 model.show_result()를 호출.
show_result_pyplot(model, img, results)
이렇게 하면 coco data set으로 pretrained된 모델과 config로 inference하는 것이 끝났습니다. inference 자체는 매우 쉽습니다. 결과를 자세히 해석해보겠습니다.
- 결과해석
type(results), len(results) # (list, 80)

print(results)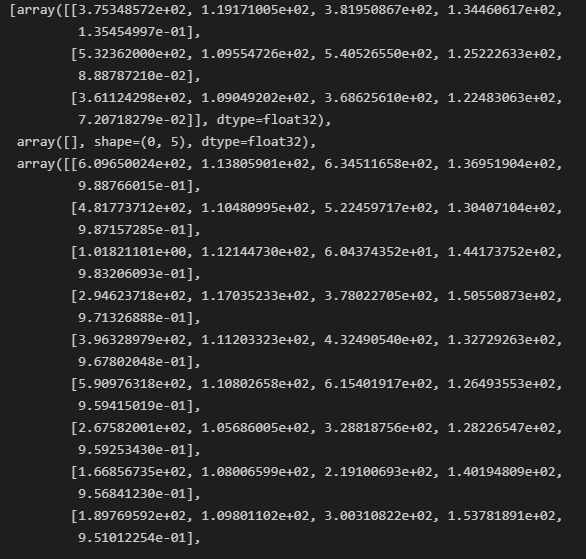
inference_detector(model, img)는 길이가 80인 list를 반환합니다. 80인 이유는 coco dataset의 class 갯수가 80개이기 때문입니다. 따라서 전체 list의 각 index는 class에 해당합니다. list[0]은 coco data에서 class 0인 person 객체를 뜻합니다.
list를 출력해보면 array안에 2차원의 list가 있습니다. 2차원 list의 행 갯수는 다 다르고, 열 갯수는 5개로 고정입니다.
이 때 행은 해당 class에 해당하는 객체가 이미지안에 몇개가 있는지를 뜻합니다. result[0]의 2차원 행렬의 행 갯수는 3이므로 이미지 안에서 person object가 3개 detect 되었음을 알 수 있습니다.
열은 bounding box의 좌상단, 우하단, confidence score를 뜻합니다.
즉 [xmin, ymin, xmax, ymax, class confidence score] 입니다.
주어진 이미지에 car object가 굉장히 많았으므로 car object index인 2번이 많은 bounding box 예측값(또한 confidence score가 높은 예측값)을 가진것을 볼 수 있습니다.
만약 class confidence score가 높은 result만 보고 싶다면, 다음과 같이 threshold를 지정하여 threshlod 초과하는 행만 추출하면 됩니다.
score_threshold = 0.7
result_filtered = result[np.where(result[:, 4] > score_threshold)]- 모델의 config 설정 확인
#print(model.cfg)
print(model.cfg.pretty_text)
model.cfg로 확인할 수 있지만, 저렇게 출력하면 보기가 힘들기 때문에 pretty_text로 보기 쉽게 출력할 수 있습니다.

Ref
https://arxiv.org/pdf/1906.07155.pdf
https://github.com/open-mmlab/mmdetection
https://www.inflearn.com/course/%EB%94%A5%EB%9F%AC%EB%8B%9D-%EC%BB%B4%ED%93%A8%ED%84%B0%EB%B9%84%EC%A0%84-%EC%99%84%EB%B2%BD%EA%B0%80%EC%9D%B4%EB%93%9C