※본 글은 김영한님의 '자바 스프링 완전정복 시리즈' 강의를 바탕으로 작성한 글입니다.
당연하게도 작성한 코드가 정상적으로 동작하는지 여부를 확인하는 것은 매우 중요합니다.
요즘에는 스프링 프로젝트를 생성하면 src/test 폴더가 자동으로 생성될 정도이고, 대부분의 프로젝트에서 테스트 코드를 필수로 작성하고 있습니다.
이번에는 테스트 코드를 작성하고, 테스트를 진행하는 방법에 대해 정리해보겠습니다.
Test 코드 작성하기
스프링 프로젝트를 생성하면 src/test 폴더가 자동으로 생성되어 있습니다. 이 폴더에 테스트 코드를 작성하면 됩니다.
이제 단위테스트와 통합테스트 두 가지 경우에 대한 테스트 코드를 작성해보겠습니다.
단위테스트
단위테스트는 말그대로 기본 단위에서 진행하는 테스트를 의미합니다. 순수 JAVA 코드로 작성한 클래스, 메서드 등이 정상적으로 동작하는지 확인합니다.
이제 간단한 예시를 살펴보겠습니다.
먼저 src/main 에 temp라는 패키지를 만들고, 덧셈을 수행하는 class인 Adder class를 작성해보겠습니다.
현재 hello.core로 프로젝트를 생성했기 때문에, hello.core.temp.Adder가 됩니다.
package hello.core.temp;

public class Adder {
    public int add2(int a, int b){
        return a+b;
    }

    public int add3(int a, int b, int c){
        return a+b+c;
    }
}
간단하게 2자리 수의 덧셈 결과를 return 해주는 add2 메서드와 3자리 수의 덧셈 결과를 return 해주는 add3 메서드를 제공합니다.
Adder가 정상적으로 동작하는지 테스트하는 방법은 다양한 방법이 있겠지만, JUnit5를 이용한 방법으로 테스트를 진행해보겠습니다.
이번엔 src/test 에서 hello.core.temp.AdderTest 클래스를 작성합니다.
src/test 내에 테스트하고자 하는 코드의 경로와 동일하게 테스트 클래스를 작성하는 것이고, 이때 src/test에서 작성하는 코드는 실제 어플리케이션의 동작에 아무런 영향을 미치지 않습니다.
(※윈도우, IntelliJ를 사용하는 경우 Adder 코드에 커서를 두고 [crtl+shift+T]를 입력하면 자동으로 src/test안에 생성해줍니다.)
package hello.core.temp;

import org.assertj.core.api.Assertions;
import org.junit.jupiter.api.Test;

import static org.junit.jupiter.api.Assertions.*;

class AdderTest {

    @Test
    void add2Test(){
        Adder adder = new Adder();
        int result = adder.add2(2, 3);
        Assertions.assertThat(result).isEqualTo(5);
    }

    @Test
    void add3Test(){
        Adder adder = new Adder();
        int result = adder.add3(2, 3, 4);
        Assertions.assertThat(result).isEqualTo(9);
    }
}
테스트 코드는 위와 같이 작성하면 됩니다.
@Test 어노테이션이 붙은 단위로 테스트를 진행할 수 있습니다.
Assertions.asserThat()의 경우, 작성한 내용이 의도대로 동작하지 않으면 (ex) add2에서 isEqualTo(5), 직관적으로 해석하기 쉽습니다.) 예외를 발생시켜 테스트가 실패하게 됩니다.
우선 현재는 문제가 없기 때문에, 두 테스트 모두 통과하게 됩니다.
만약 add2Test에서 isEqualTo 부분에 들어갈 값을 6으로 바꾸면, 테스트는 실패하고 에러가 다음과 같이 출력됩니다.
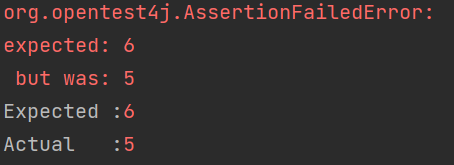
에러 또한 상당히 직관적이고 자세하게 안내되어, 에러를 파악하기 좋습니다.
통합테스트
통합테스트는 보다 큰 범위에서 프레임워크 등이 결합된 상태를 테스트하는 것입니다. 스프링 프레임워크를 통해 작성한 코드의 동작을 확인하는 것이 그 예 입니다.
통합 테스트 코드를 먼저 살펴보겠습니다.
package hello.core.temp;

import org.springframework.beans.factory.annotation.Autowired;
import org.springframework.stereotype.Component;

@Component
public class Calculator {
    public final Adder adder;

    @Autowired
    public Calculator(Adder adder){
        this.adder = adder;
    }
}
package hello.core.temp;


import org.springframework.context.annotation.ComponentScan;
import org.springframework.context.annotation.Configuration;

@ComponentScan
@Configuration
public class TempAppConfig {

}
Adder에 의존하는 Calculator를 생성했고, Autowired를 통해 주입하도록 컴포넌트 스캔, TempAppConfig를 통해 스프링 빈으로 등록하려 합니다.
package hello.core.temp;

import org.assertj.core.api.Assertions;
import org.junit.jupiter.api.Test;
import org.springframework.context.ApplicationContext;
import org.springframework.context.annotation.AnnotationConfigApplicationContext;

import static org.junit.jupiter.api.Assertions.*;

class TempAppConfigTest {

    @Test
    void autowiredTest(){
        ApplicationContext ac = new AnnotationConfigApplicationContext(TempAppConfig.class);
        Calculator calculator = ac.getBean(Calculator.class);
        Adder adder = ac.getBean(Adder.class);
        Assertions.assertThat(calculator.adder).isSameAs(adder);
        Assertions.assertThat(calculator.adder.add2(2,3)).isEqualTo(5);

    }
}
이에 대한 테스트는 위와 같습니다. Calculator에 빈이 제대로 주입되었는지 확인하고, 동작도 제대로 이뤄지는지 확인합니다.
참고로 간단하게 테스트할 때나, spring 기능이 헷갈릴 때(ex) 이렇게 하면 autowired가 되는지) test 코드 안에 config를 작성해서 간단하게 할 수도 있습니다.
package hello.core.temp;

import org.assertj.core.api.Assertions;
import org.junit.jupiter.api.Test;
import org.springframework.context.ApplicationContext;
import org.springframework.context.annotation.AnnotationConfigApplicationContext;
import org.springframework.context.annotation.Bean;
import org.springframework.context.annotation.Configuration;

import static org.junit.jupiter.api.Assertions.*;

class TempAppConfigTest {

    @Test
    void autowiredTest(){
        ApplicationContext ac = new AnnotationConfigApplicationContext(TempAppConfig2.class);
        Calculator calculator = ac.getBean(Calculator.class);
        Adder adder = ac.getBean(Adder.class);
        Assertions.assertThat(calculator.adder).isSameAs(adder);
        Assertions.assertThat(calculator.adder.add2(2,3)).isEqualTo(5);

    }

    @Configuration
    static class TempAppConfig2{
        @Bean
        public Calculator calculator(){
            return new Calculator(adder());
        }

        @Bean
        public Adder adder(){
            return new Adder();
        }
    }
}
static으로 내부에 클래스를 만들어서 테스트를 진행하면 됩니다.
여러 테스트를 동시에 할 때 주의사항
여러 테스트를 한번에 돌리면 하나씩 돌릴 때는 통과하던 테스트들이 통과하지 못하는 경우가 발생할 수 있습니다.
코드를 입력하package hello.core.temp;

import org.assertj.core.api.Assertions;
import org.junit.jupiter.api.Test;
import org.springframework.context.annotation.Configuration;

import java.util.ArrayList;
import java.util.LinkedList;
import java.util.List;
import java.util.Map;

public class MultiTestTest {

    @Test
    void test1(){
        Counter counter = new Counter();
        Assertions.assertThat(counter.count()).isEqualTo(1);
    }

    @Test
    void test2(){
        Counter counter = new Counter();
        Assertions.assertThat(counter.count()).isEqualTo(1);
    }

    static class Counter{
        static int cnt = 0;

        public int count(){
            return ++cnt;
        }
    }
}
test1과 test2를 별도로 실행하면 통과하지만, 한번에 돌리면 나중에 실행된 test는 실패합니다.(순서는 보장되지 않습니다.)
static으로 선언된 변수 때문에 발생한 상황으로, 하나의 테스트를 수행하는 과정에서 생긴 변화가 다음 테스트로 이어지기 때문입니다.
이러한 경우 매 실행마다 다시 초기 상태로 돌리도록 다음과 같이 @BeforeEach 기능을 이용하면 됩니다.
package hello.core.temp;

import org.assertj.core.api.Assertions;
import org.junit.jupiter.api.BeforeEach;
import org.junit.jupiter.api.Test;
import org.springframework.context.annotation.Configuration;

import java.util.ArrayList;
import java.util.LinkedList;
import java.util.List;
import java.util.Map;

public class MultiTestTest {

    @BeforeEach
    void beforeEach(){
        Counter.reset();
    }

    @Test
    void test1(){
        Counter counter = new Counter();
        Assertions.assertThat(counter.count()).isEqualTo(1);
    }

    @Test
    void test2(){
        Counter counter = new Counter();
        Assertions.assertThat(counter.count()).isEqualTo(1);
    }

    static class Counter{
        static int cnt = 0;

        public int count(){
            return ++cnt;
        }

        static public void reset(){
            cnt = 0;
        }
    }
}
매 테스트를 진행하기 이전 @BeforeEach가 붙은 메서드가 호출됩니다. 그 결과 두 테스트를 동시에 돌려도 문제 없이 통과합니다.
그 외에 테스트를 마칠 때 마다 호출되는 @AfterEach나 가장 처음 한 번 호출되는 @BeforeAll 도 존재합니다.
참고로 필드에 선언된 변수는 자동으로 매번 초기화됩니다!
package hello.core.temp;

import org.assertj.core.api.Assertions;
import org.junit.jupiter.api.BeforeEach;
import org.junit.jupiter.api.Test;
import org.springframework.context.annotation.Configuration;

import java.util.ArrayList;
import java.util.LinkedList;
import java.util.List;
import java.util.Map;

public class MultiTestTest {
    int cnt = 0;
//    @BeforeEach
//    void beforeEach(){
//        Counter.reset();
//    }

    @Test
    void test1(){
        Assertions.assertThat(cnt).isEqualTo(0);
        cnt++;
    }

    @Test
    void test2(){
        Assertions.assertThat(cnt).isEqualTo(0);
        cnt++;
    }

    static class Counter{
        static int cnt = 0;

        public int count(){
            return ++cnt;
        }

        static public void reset(){
            cnt = 0;
        }
    }
}
즉, @BeforeEach가 없어도 위 코드를 동시에 돌릴 때 통과합니다.
DB와 연동된 테스트를 할 때 주의사항(@Transactional)
DB와 연동할 경우 조금 더 조심해야합니다.
예를 들어, insert 등을 테스트하면, 실제로 DB를 이용하여 insert를 해야 결과를 확인할 수 있으므로 잘못하면 테스트 코드가 DB에 영향을 미칠 수 있습니다.
이럴 때는 테스트 class 위에 @Transactional 어노테이션을 추가해주면, 테스트만 수행하고 자동으로 다시 롤백해줍니다.
(org.springframework.transaction.annotation.Transactional;)
