
☁️ useReducer() 란 ?
👉 정의
- React에서 상태(state) 관리를 위해 제공되는 훅(Hook) 중 하나이다.
- Redux의 reducer와 유사한 동작을 하며, 복잡한 상태 관리를 간편하게 할 수 있도록 도와준다.
👉 사용법
const [state, dispatch] = useReducer(reducer, initialState);- state : 현재 상태를 나타내는 변수. useReducer를 호출할 때 지정한 초기 상태(initialState)로 초기화된다.
- dispatch : 액션을 발생시키는 함수. 이 함수를 호출하면 reducer가 실행되고, 상태가 업데이트된다.
- useReducer 는 두 개의 매개변수를 받는다
- reducer: 상태를 업데이트하는 로직이 담긴 함수.
initialState: 초기 상태로 사용될 값.
🐶 예시 (카운팅)
import React, { useReducer } from 'react';

// reducer 함수
const reducer = (state, action) => {
  switch (action.type) {
    case 'INCREMENT':
      return state + 1;
    case 'DECREMENT':
      return state - 1;
    case 'RESET':
      return 0;
    default:
      return state;
  }
};

const initialState = 0;

const Counter = () => {
  // useReducer를 사용하여 상태 관리
  const [count, dispatch] = useReducer(reducer, initialState);

  const increment = () => {
    dispatch({ type: 'INCREMENT' });
  };

  const decrement = () => {
    dispatch({ type: 'DECREMENT' });
  };

  const reset = () => {
    dispatch({ type: 'RESET' });
  };

  return (
    <div>
      <h1>Count: {count}</h1>
      <button onClick={increment}>Increment</button>
      <button onClick={decrement}>Decrement</button>
      <button onClick={reset}>Reset</button>
    </div>
  );
};

export default Counter;
☁️ Redux(리덕스) 란 ?
- JavaScript(자바스트립트) 상태관리 라이브러리이다.
- 본질은 Node.js 모듈이다.
🧐 쓰는 이유
- Props 문법을 사용하기 귀찮을 때 사용한다.
- state 상태 관리 할 때 사용한다.
❗️ Redux의 기본 개념 : 세 가지 원칙
- Single source of truth
- 동일한 데이터는 항상 같은 곳에서 가지고 온다.
- 즉, 스토어라는 하나뿐인 데이터 공간이 있다는 의미이다.
- State is read-only
- 리액트에서는 setState 메소드를 활용해야만 상태 변경이 가능하다.
- 리덕스에서도 액션이라는 객체를 통해서만 상태를 변경할 수 있다.
- Changes are made with pure functions
- 변경은 순수함수로만 가능하다.
- 리듀서와 연관되는 개념이다.
- Store(스토어) – Action(액션) – Reducer(리듀서)
❗️Store, Action, Reducer의 의미와 특징
🧺 Store (스토어)
- Store(스토어)는 상태가 관리되는 오직 하나의 공간이다.
- 컴포넌트와는 별개로 스토어라는 공간이 있어서 그 스토어 안에 앱에서 필요한 상태를 담는다.
- 컴포넌트에서 상태 정보가 필요할 때 스토어에 접근한다.
📃 Action (액션) - 컴포넌트가 필요한 액션을 던진다. → 리듀서
- Action(액션)은 앱에서 스토어에 운반할 데이터를 말한다.
- Action(액션)은 자바스크립트 객체 형식으로 되어있다.
- Simple Javascript Object
- useDispatch hook을 사용한다.
🎉 Reducer (리듀서) - 행동지침 같은 역할 → 스토어에 값을 업데이트해준다.
- Action(액션)을 Store(스토어)에 바로 전달하는 것이 아니다.
- Action(액션)을 Reducer(리듀서)에 전달해야한다.
- Reducer(리듀서)가 주문을 보고 Store(스토어)의 상태를 업데이트하는 것이다.
- Action(액션)을 Reducer(리듀서)에 전달하기 위해서는 dispatch() 메소드를 사용해야한다.
- 항상 return 을 해준다.
Action(액션) 객체가 dispatch() 메소드에 전달된다.
dispatch(액션)를 통해 Reducer를 호출한다.
Reducer는 새로운 Store 를 생성한다.
👉 왜 이런 공식을 따를까?
- 이유는 데이터가 한 방향으로만 흘러야하기 때문이다. (FLUX 패턴)
❗️Redux의 장점
- 상태를 예측 가능하게 만든다. (순수함수를 사용하기 때문)
- 유지보수 (복잡한 상태 관리와 비교)
- 디버깅에 유리 (action과 state log 기록 시) → redux dev tool (크롬 확장)
- 테스트를 붙이기 용의 (순수함수를 사용하기 때문)
📌 사용해보기
1 - 7 번까지 차근차근
1. 설치하기
- 설치 해보기
npm install redux- react redux 설치하기
npm install react-redux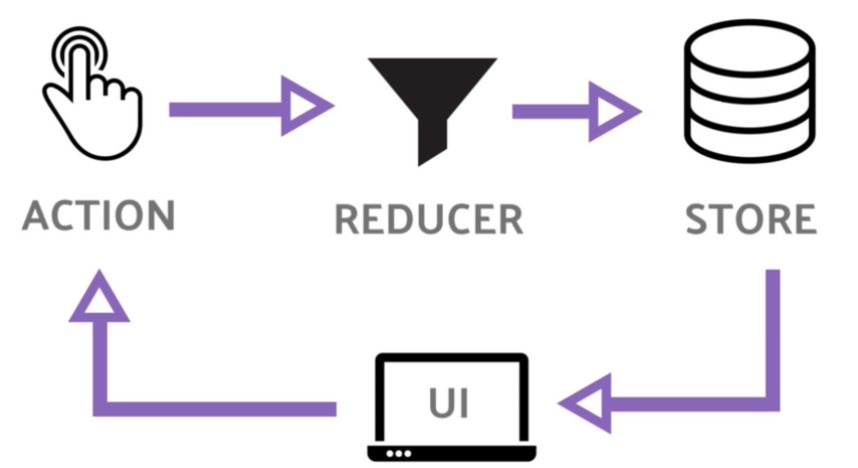
2. index.js
Provider 감싸주기 → Store 를 제공해주기 위해서이다.
const root = ReactDOM.createRoot(document.getElementById('root'));
root.render(
  <Provider store={store}>
		<BrowserRouter>
	    <App />
		<BrowserRouter>
  </Provider>
);
3. Store 만들어주기
리덕스 폴더에 Store.js 파일 만들어주기.
import {createStore} from "redux";

let store = createStore(reducer)
3.1 configureStore를 만든다. ( 3번 createStore 는 이제 안씀)
// let store = createStore(rootReducer, composeWithDevTools(applyMiddleware(thunk)));
let store = configureStore({
  reducer:{
    auth : authenticateReducer,
    product : productReducer
  },
})
4. reducer 만들어 주기
리덕스 폴더 안에 리듀서 폴더를 만들고 그 안에 reducer.js 파일을 만들어 준다.
let initialState = {};

function reducer(state = initialState, action) {

}

export default reducer;
4.1 reducers 폴더를 만든 후 한번에 보낼꺼기 때문에 index.js 파일을 만든 후 거 안에 넣는다.
import { combineReducers } from 'redux';

export default combineReducers({});//컴바인 리듀서 안에는 항상 객체가 들어간다.
// 객체 안에는 리듀서들을 넣는다.
5. action을 던지는 useDispatch
dispatch({type : "ADD_CONTACT", payload : {name,phone}}); //Action 보내기이렇게 action 을 던지면 reducer 에서 받는다.
6. reducer 에서 받기
let initialState = {
  contactList: []
};

function reducer(state = initialState, action) {
  const {type, payload} = action
  switch (type) {
    case "ADD_CONTACT":
      return { ...state, contactList: [...state.contactList, { name: payload.name, phone: payload.phone, },], }
      default :
      return {...state};
  }
}
7. store 읽어 오기 useSelector
const {contact, keyword} = useSelector((state) => state); //store의 contact, keyword를 가져온 것⛏️ 실습
기존에 만들었던 영화 웹 페이지 redux 적용해보기.
✏️ 요구사항
redux toolkit을 사용하여 적용하기.
👾 코드
1. store.js
import { configureStore } from "@reduxjs/toolkit";
import { logger } from "redux-logger";
import MovieStore from "./MovieStore";

const store = configureStore({
  reducer: {
    MovieStore: MovieStore,
  },
  middleware: (getDefaultMiddleware) => getDefaultMiddleware().concat(logger),
});

export default store;- configureStore 함수를 store에 할당한다.
- configureStore 는 예전 문법에 사용했던 combineReducer, thunk 등 다 해주기 때문에 그냥 저 안에 사용하려는 reducer를 넣으면 된다.
2.MovieStore.js
import { createSlice } from "@reduxjs/toolkit";

const initialState = {
  movies: [],
};

const MovieSlice = createSlice({
  name: "movie",
  initialState: initialState,
  reducers: {
    updateMovieStore: (state, action) => {
      state.movies = action.payload
    }
  },
});

export const { updateMovieStore }  = MovieSlice.actions;
export default MovieSlice.reducer;

// toolkit- createSlice 는 반드시 3개의 필드가 필요하다.
1. name - 슬라이스 이름
2.initialState - 초기 상태 ( 지금은 movies 배열 )
3.reducers - 객체를 받는다. action이 발생 했을 때 상태를 업뎃해주는 함수들 ( updateMovieStore 액션이 발생 했을 때, movies 배열 안에 action.payload 로 들어온 값을 할당해줌 )
3. useFetchMovies.js
 useEffect(() => {
    setLoading(true);
    fetch(url)
      .then(res => res.json())
      .then(data => {
        dispatch(updateMovieStore(data.data.movies));
        setLoading(false);
      })
      .catch(err => {
        setError(err);
        setLoading(false);
      })
}, [])- dispatch 를 이용해 액션에 updateMovieStore()를 부르고 payload로 res로 들어오는 영화리스트들을 넣어준다.
4. Movies.js
const { movies } = useSelector((state) => state.MovieStore);
...생략- useSelector()를 이용해 MovieStore에 있는 영화 리스트들을 가져온 후 사용한다.
📌 후기
Redux Toolkit을 사용한 후 상태 관리가 훨씬 간편해졌다. Redux Toolkit은 간결한 구문과 개발 생산성을 위한 많은 유틸리티 함수를 제공하여 코드량을 줄이고 개발 속도를 향상시켰다. Slice를 통해 리듀서와 액션 생성자를 한 곳에서 관리할 수 있어 코드의 일관성을 유지할 수 있었다. 또한 불변성을 자동으로 처리해주기 때문에 상태 업데이트에 대한 실수를 방지할 수 있었다. Redux Toolkit는 DevTools 지원과 비동기 작업을 위한 createAsyncThunk도 들어있어서 복잡한 것이 좀 사라졌다. 전반적으로 Redux Toolkit은 Redux의 복잡성을 감소시키고 개발자 경험을 향상시킨 강력한 도구인 것 같다.
본 후기는 유데미-스나이퍼팩토리 10주 완성 프로젝트캠프 학습 일지 후기로 작성 되었습니다.

영차 조와쒀