Spring Cloud Gateway를 이용해서 Micro Service 를 포워딩 하는 방법에 대하여 알아봤습니다.
이번에는 Eureka Service를 사용하여 이러한 Micro Service를 관리해 보고 Gateway를 이용하여 Load Balancing 이 어떻게 이루어지는지 살펴 보겠습니다.
Gateway with Eureka Server
-
Eureka Server 생성
dependency로 eureka-server dependency 가 필요implementation 'org.springframework.cloud:spring-cloud-starter-netflix-eureka-server'@EnableEurekaServer어노테이션의 사용을 통해 Eureka Server 사용@SpringBootApplication @EnableEurekaServer // Eureka Server 사용 설정 public class EcommerceApplication { public static void main(String[] args) { SpringApplication.run(EcommerceApplication.class, args); } }application.yml설정 eureka server project는 eureka server에 등록하는 대상이 아니기 때문에register-with-eureka,fetch-registry옵션은false로 설정server: port: 8761 spring: application: name: spring-eureka-ecommerce eureka: client: register-with-eureka: false fetch-registry: false
-
Gateway Project 와 Service Project 인스턴스 라우팅 설정
-
Service Project 설정
Service Project 는 현재
first-service와second-service두개가 존재한다. 이 두개의 프로젝트를 각 2개씩 총 4개의 인스턴스로 실행first-service,second-service의 설정은 동일-
application.yml수정server: port: 0 spring: application: name: first-service eureka: instance: instance-id: ${spring.application.name}:${spring.application.instance_id:${random.value}} client: fetch-registry: true register-with-eureka: true service-url: defaultZone: http://localhost:8761/eurekafetch-registry,register-with-eureka를true로 변경하여 Eureka Server에 등록- Random Port 사용을 위해
server.port를 0으로 설정 - instance id를 랜덤하게 설정하여 다른 instance id와 겹치지 않게 설정 (
eureka.instance.instance-id설정) - Eureka Server의 주소 설정 (
eureka.client.service-url.defaultZone설정)
-
API 를 이용하여 사용중인 Port 정보 확인을 위한 Controller 수정
@Slf4j @RestController @RequestMapping("/first-service") @RequiredArgsConstructor public class FirstServiceController { private final Environment env; @GetMapping("/welcome") public String welcome() { return "Welcome to the First Service"; } @GetMapping("/message") public String message(@RequestHeader("first-request") String header) { log.info(header); return "Hello World in First Service"; } @GetMapping("/check") public String check(HttpServletRequest request) { log.info("Server port={}", request.getServerPort()); return String.format("Hi, there. This is a message from First Service on PORT %s", env.getProperty("local.server.port")); } }- 실행중인 서버의 환경 정보 (Port 번호) 를 불러와 출력
- 방법 1:
Environment를 이용한 실행 환경 정보 로딩 (env.getProperty(”local.server.port”)) - 방법 2:
HttpServletRequest를 이용하여 API Request 정보에 들어 있는 서버 정보 출력
- 방법 1:
- 실행중인 서버의 환경 정보 (Port 번호) 를 불러와 출력
-
Intellij 의 Run Configuration 변경
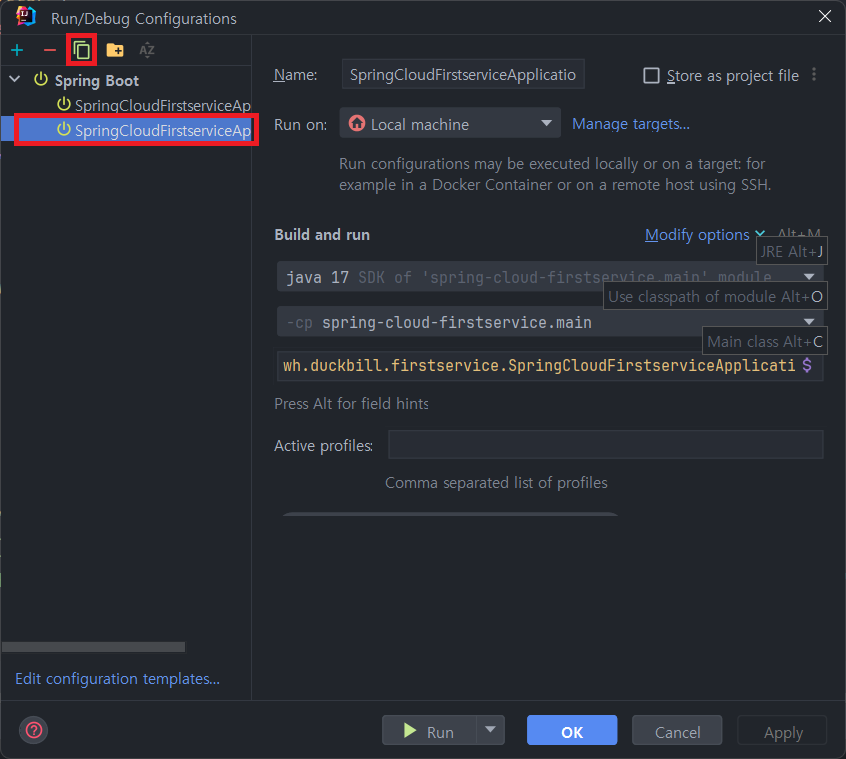
- 두 개의 서버를 실행 시키기 위해 Copy Configuration
-
-
Gateway Project 설정 (
application.yml설정)- Eureka Service 주소 설정 및 서비스 등록
eureka: client: register-with-eureka: true fetch-registry: true service-url: defaultZone: http://localhost:8761/eureka uri주소를 이용한 접근 방식을load balancer를 이용한 접근으로 변경spring.cloud.routes.uri를 변경routes: - id: first-service uri: lb://FIRST-SERVICElb://뒤의 이름은 Client Service의 Name으로 설정
- Eureka Service 주소 설정 및 서비스 등록
-
Gateway with Eureka Server Test
-
우선 Gateway Project와 First Project, Second Project 인스턴스를 한 개씩 실행
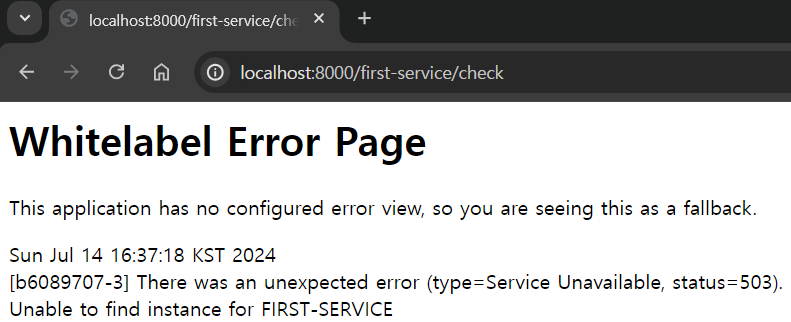
http://localhost:8000/first-service/check에 접속
-
Unable to find instance for FIRST-SERVICE 오류가 발생하는 것을 볼 수 있다.
-
Gateway Project에서 First-service에 접속하는 Url이 기존에는 주소와 포트 번호가 명시되어 있었지만 현재는 Load Balancer을 이용한 설정으로 변경 되었기 때문이다.
-
따라서, 현재 Gateway Project는 다른 Micro Service 들의 주소를 알지 못하는 상태이다.
- 결과적으로 다른 서비스의 주소를 알기 위해서 Eureka Server 가 필요하다.
-
-
추가적으로 Eureka Server과 First Project, Second Project 인스턴스를 하나씩 추가적으로 실행
http://localhost:8761/ Eureka Service Dashboard 접속
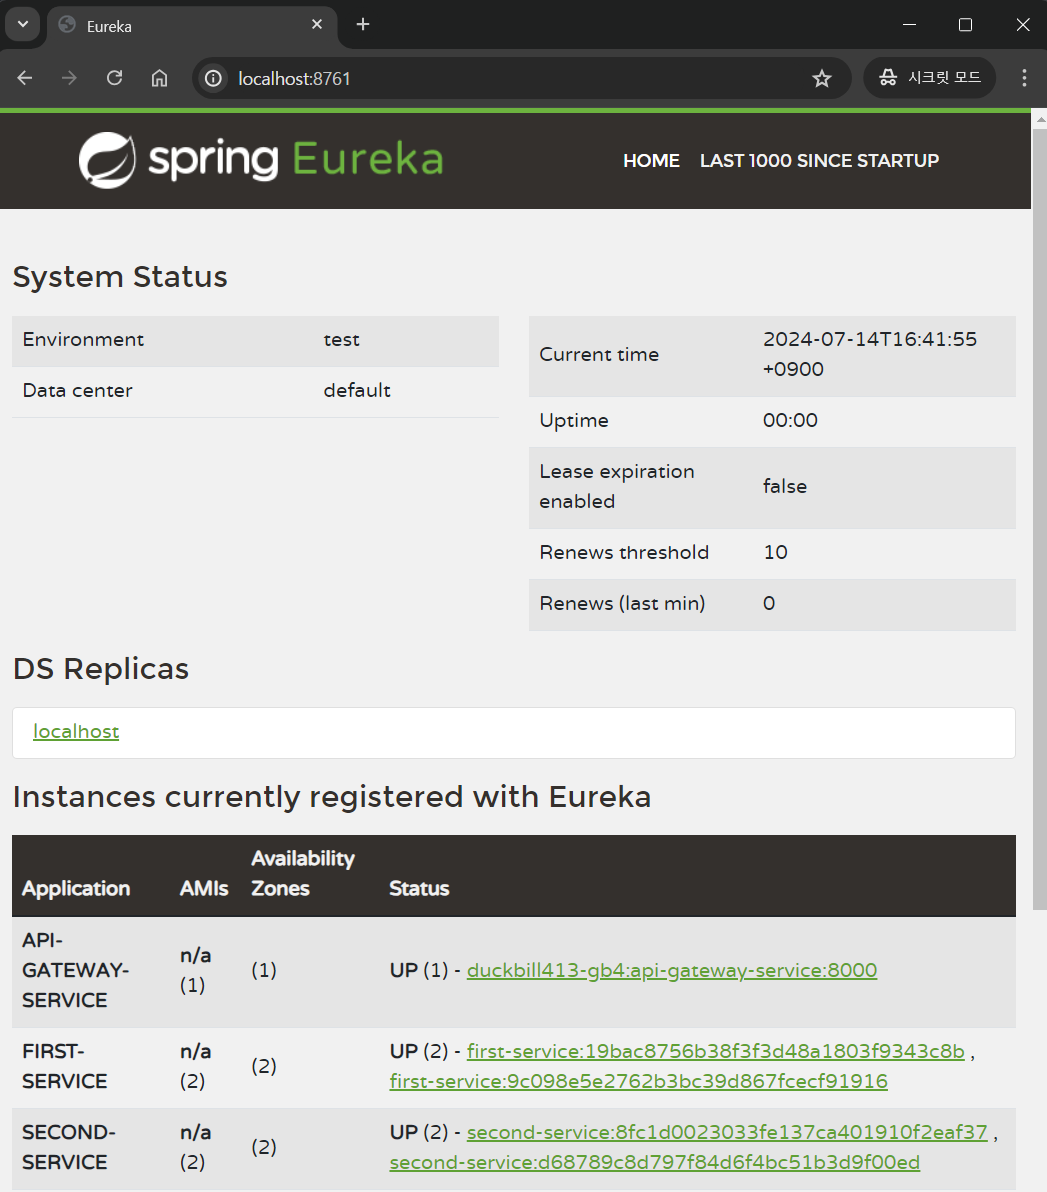
- Gateway 서비스 및 다른 Micro Service가 실행중인 것을 확인할 수 있다.
- 다른 마이크로 서비스는 두 개씩 인스턴스가 실행되고 있으며 각자 다른 instance-id를 가진 것을 확인할 수 있다.
-
다시 http://localhost:8000/first-service/check에 접속
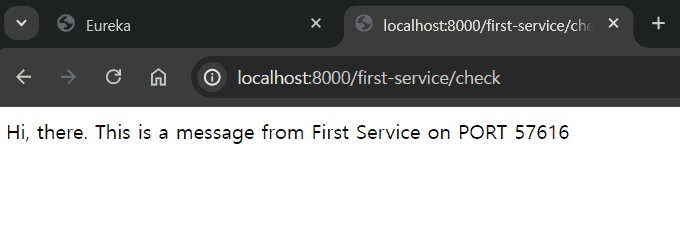
- 정상적으로 접속되는 것을 확인할 수 있다.
- 현재 두 개의 First Service가 존재한다. 새로고침시 Load Balancer가 라운드 로빈에 따라 접속하는 것을 확인할 수 있다.
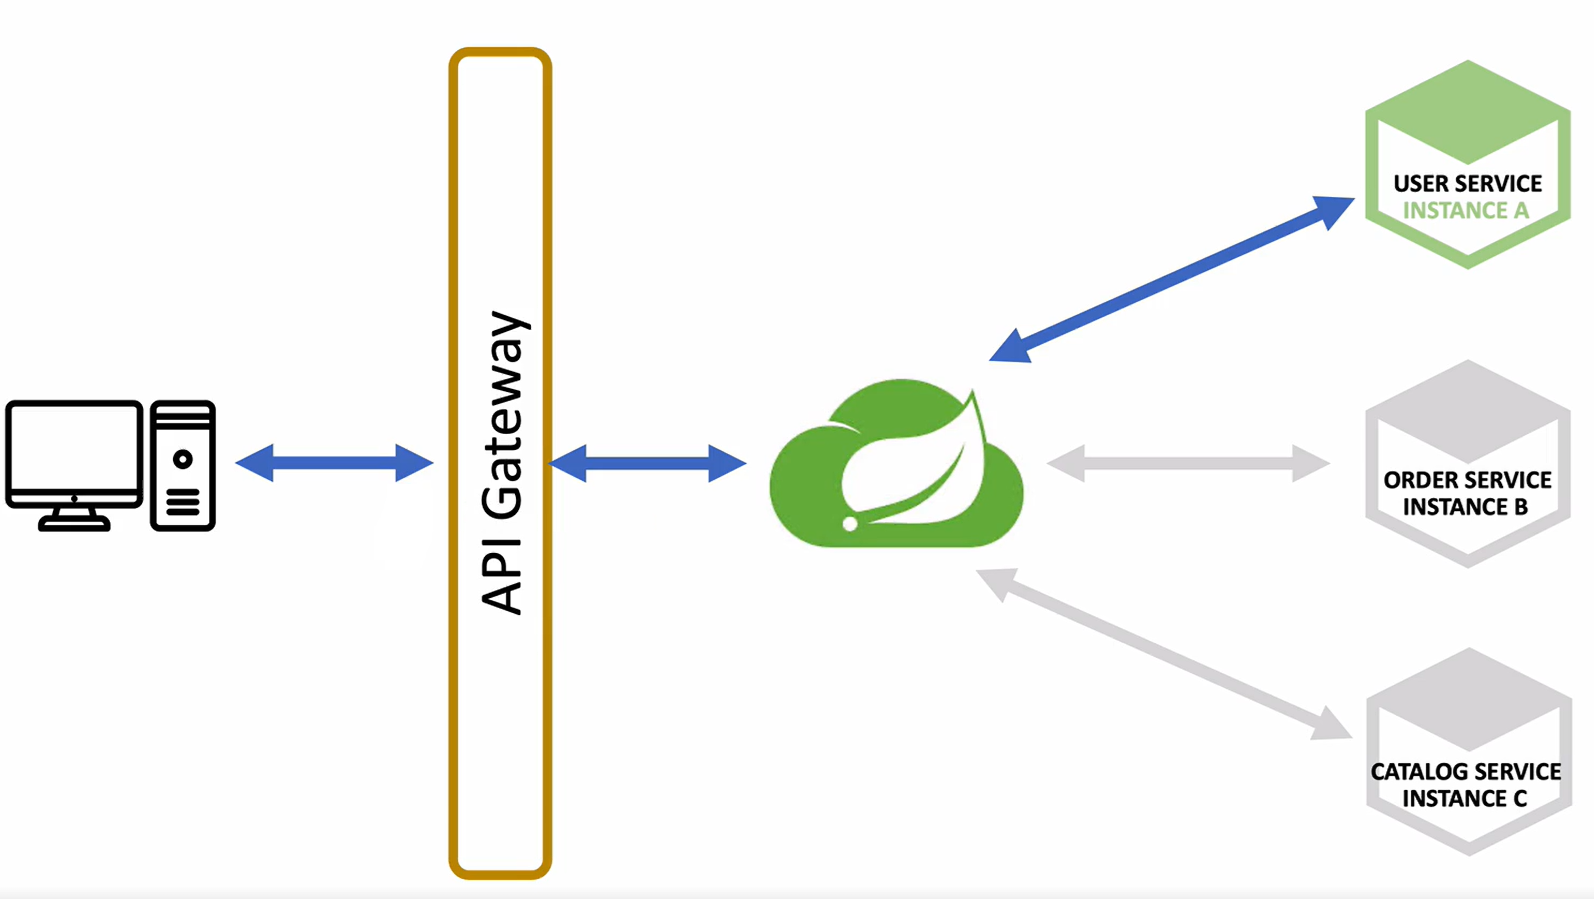
- Gateway Service에는 First-Service, Second-Service의 주소가 매핑되어 있지 않지만, Eureka Server에 등록된 Service 의 정보를 가져와서 Load Balancing을 수행하게 된다.