오늘의 목표
- OAuth란?
- Google API
- SpringSecurity OAuth
- PrincipalDetails
내용
Oauth란?
Oauth는 웹 애플리케이션이 사용자에게 직접 회원가입 등 사용자 신원정보를 요구하기 보단, 대중적으로 이미 많이 사용 중인 SNS나 글로벌 웹 사이트의 서버를 통하여 사용자의 정보를 획득하는 방법입니다.
하지만 사용자의 정보가 웹 애플리케이션에 저장되는 것은 변함 없습니다. Authentication을 다른 서비스에 맡기고 토큰을 받아 올 뿐, Authorizaiton는 여전히 웹 애플리케이션이 관리해야 합니다.
OAuth를 사용함으로써 Authentication은 대중적으로 많이 사용중인 서비스에서 관리하므로 사용자 입장에서는 자신이의 아이디와 비밀번호를 노출 시키지 않아도 해당 웹 애플리케이션을 사용할 수 있는 장점이 존재합니다.
Oauth 용어
Resource Owner: 리소스를 가진 유저입니다. 사용자가 App을 구글 계정으로 로그인할 경우사용자에 해당합니다.Client: 서버와 클라이언트의 대상은 상대적입니다. 서버와 서버간에도 데이터를 요구하면클라이언트응답하면서버가 됩니다. 사용자가 App을 구글 계정으로 로그인 시App이Client에 해당합니다.Resource Server:Client의 요청에 데이터를 넘겨주는서버측 서비스의 데이터 서버입니다. 토큰에 내재되어 있는 권한만 데이터로 전송해줍니다.Authorization Server:Client에서 요청이 오면ResourceOwner에게 본인 확인 후 토큰을 발급(정책에 따라 조금씩 다름)하는 인증 서버 입니다. 사용자가 App을 구글 계정으로 로그인 할 경우구글이Resource Server와Authorization Server이 됩니다.Authorization Grant: 클라이언트가 서버로 부터 엑세스 토큰을 얻는 방법을 의미합니다.Authroization Code Grant Type,Client Credentials Grant Type,Implicit Grant Type,Respirce Owner Credentials Grant Type이 존재합니다.
Authorization Code:Authroization Code Grant Type에서 Authorization Server가Resource Owner로 부터 본인인증 후 클라이언트에게 전송하는 토큰을 발급받기 위한 Code입니다. 후에 다시 토큰을 발급받지만 굳이Authorization Code를 먼저 받는 이유는 보안상 이유 때문입니다.Access Token:Authroization Server에서Client에게 전송하는Resource Server의 접근 권한을 포함한 토큰입니다. 해당 토큰으로Resource Server에 자원에 접근가능합니다.Scope: 토큰을 가지고 있다고 해서Resource Server의 모든 자원에 접근할 수 있는 것은 아닙니다. 토큰에 존재하는 접근권한의Scope내에서만Resource Server의 자원에 접근 가능합니다.
OAuth2 동작 방식
Authorization Grant Type에 따라 인증을 받는 방법이 달라지게 됩니다. 더 많은 인증 과정이 있는 것 부터 간략화 된 순으로 많이 사용 되는 4가지 인증 방식을 나열하겠습니다.
Authorization Code Grant
Authroization Code는 가장 많이 사용되고 기본이 되는 방식입니다. 토큰을 받기전 Authorization Code을 받고 다시 인증을 거치는 작업을 수행합니다. 또한 리프레시 토큰 사용이 가능합니다.
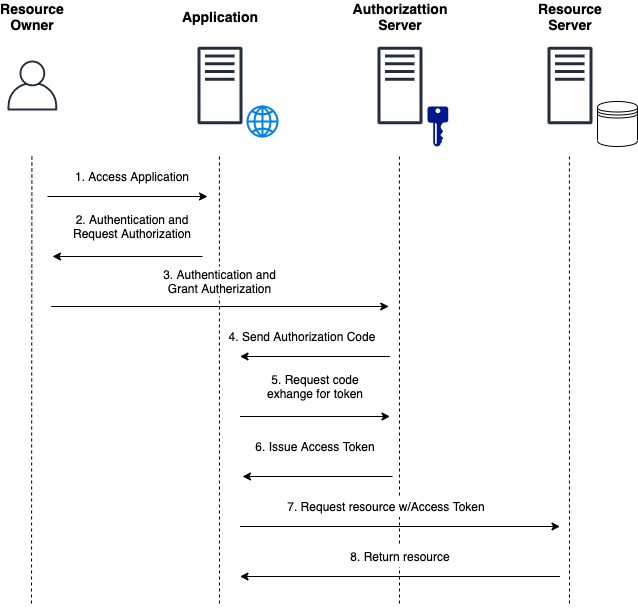
- Resource Owner(유저)는 Client(애플리케이션)에 소셜 로그인 버튼을 누르는 등의 서비스 요청을 보냅니다.
- Client는 Authorization Server에 Authorization Code를 요청합니다. 이 때 미리 생성한 Client ID, Redirect URI, 응답 타입을 함께 전송합니다.
- 로그인 팝업을 통해 Resource Owner는 로그인을 진행합니다.
- 로그인이 확인되면 Authorization Server는 Authorization Code를 Client에 전달합니다. (이전에 요청과 함께 전달한 Redirect URI로 Code를 전달합니다.)
- Client는 전달받은 Authorization Code를 이용해 액세스 토큰 발급을 요청합니다. 액세스 토큰을 발급할 땐 미리 생성한 Client Secret, Redirect URI, 권한 부여 방식, 액세스 토큰을 함께 전송합니다.
- 요청 정보를 확인한 후 Redirect URI로 액세스 토큰을 발급합니다.
- Client는 발급받은 액세스 토큰을 이용해 Resource Server에 자원을 요청합니다.
- 액세스 토큰을 확인한 후 요청 받은 자원을 전달합니다.
Implicit Grant
Authorizatoin Code를 먼저 받고 이후 토큰을 요청을 하는 것이 아니라 Authorization Server로 부터 Client는 토큰을 바로 발급받습니다. 자격증명을 언잔하게 저장하기 힘든 클라이언트에 최적된 방식이며, 리프레시 토큰 사용이 불가능합니다.
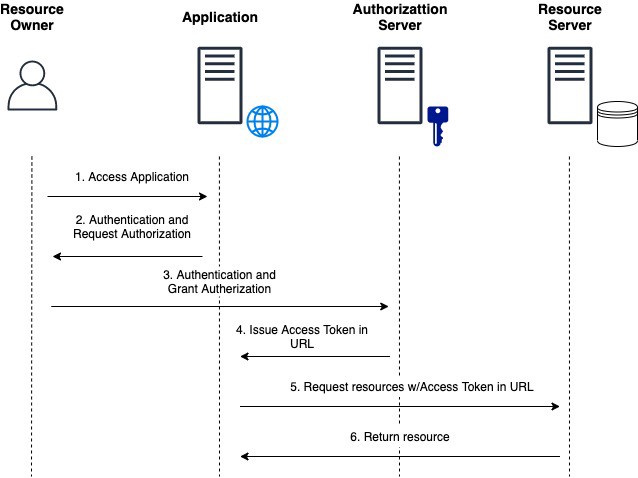
- Resource Owner(유저)는 Client(애플리케이션)에 소셜 로그인 버튼을 누르는 등의 서비스 요청을 보냅니다.
- Client는 Authorization Server에 접근 권한 요청을 합니다. 요청과 함께 미리 생성한 Client ID, Redirect URI, 응답타입을 전송합니다. (Authroization Code를 획득하기 위한 요청이 아닙니다)
- 로그인 팝업을 통해 Resource Owner는 로그인을 진행합니다.
- 로그인이 확인되면 Authorization Server는 Client에게 액세스 토큰을 전달합니다.
- Client는 액세스 토큰을 이용해 Resource Server에 자원을 요청합니다.
- 액세스 토큰을 확인한 후 요청 받은 자원을 전달합니다.
Resource Owner Password Credentials Grant
Resource Owner가 Authorization Server에게 본인 인증을 하지 않아도 되는 방식입니다. Authorizatoin Server가 Client에 접근하려는 사용자가 누구인지 안 다는 것은 Authorization Server와 Client, Resource Server가 모두 같은 서비스에 있는 서버들이란 뜻입니다. 즉 카카오라는 서비스에 카카오톡 서버와 카카오 택시 서버, 카카오 기프티콘 서버등 같은 유저정보를 공유하는 서버들간에 사용합니다.
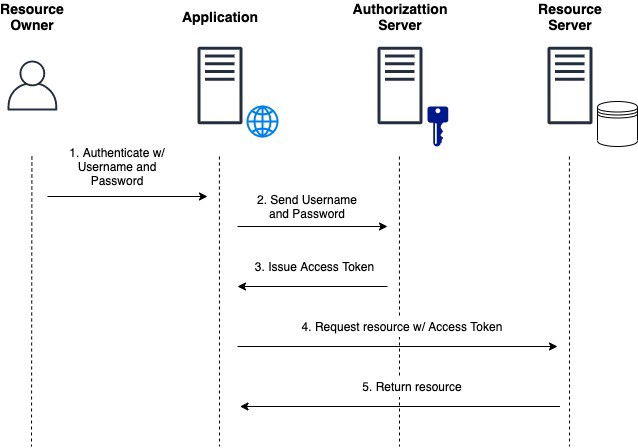
- Resource Owner(유저)는 Client(애플리케이션)에 로그인 버튼을 누르는 등의 서비스 요청을 보냅니다. 이 때 로그인에 필요한 정보(username, password)를 이용해 요청합니다.
- Client에서는 Resource Owner에게서 전달받은 로그인 정보를 통해 Authorization Server에 액세스 토큰을 요청합니다. 미리 생성한 Client ID, 권한 부여 방식, 로그인 정보를 함께 전달합니다.
- 요청과 함께 온 정보들을 확인한 후 Client에게 액세스 토큰을 전달합니다.
- Client는 액세스 토큰을 이용하여 Resource Server에 자원 획득 요청을 보냅니다.
- 액세스 토큰을 확인한 후 요청 받은 자원을 전달합니다.
Client Credentials Grant
Authorization Code도 본인 인증도 취하지 않는 방식입니다. 단순히 Client가 Authorization Server에 토큰을 요청하여 받고 바로 사용할 수 있습니다. 자격증명 보안이 철저한 클라이언트에게 제한된 리소스만 접근 권한이 허가 되며 리프레시 토큰은 사용이 불가능합니다.
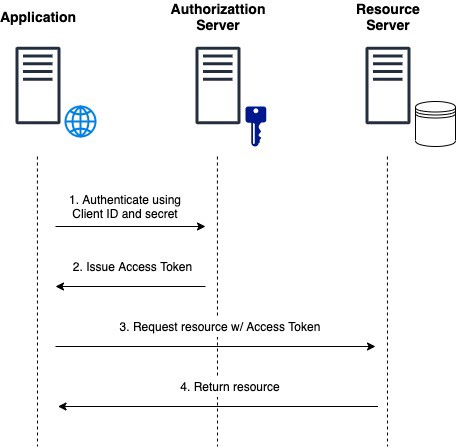
- Authorization Server에 액세스 토큰을 요청합니다.
- 요청과 함께 온 정보들을 확인한 후 Client에게 액세스 토큰을 전달합니다.
- Client는 액세스 토큰을 이용하여 Resource Server에 자원 획득 요청을 보냅니다.
- 액세스 토큰을 확인한 후 요청 받은 자원을 전달합니다.
Google API
구글은 클라우드 플렛폼이라는 클라우드 서버를 활용한 다양한 서비스를 제공합니다. 그 중 하나로 Oauth2라는 토큰을 이용한 구글 계정으로 로그인을 활용하기 위해선 우선 구글로 부터 API를 받아와야 합니다.
https://console.cloud.google.com/apis 에 접속하여 본인의 구글 계정으로 로그인 합니다.
Google 클라우드 플랫폼 설정은 블로그 주제와 조금 빗나가서 코드스테이츠 선배님의 링크를 걸겠습니다.
https://velog.io/@tkdfo93/%EA%B5%AC%EA%B8%80-OAuth2.0-Final-Project
출처 : https://velog.io/@tkdfo93
SpringSecurity OAuth
이전에 만들어 두었던 https://velog.io/@ds02168/60%EC%9D%BC%EC%B0%A8에서 추가합니다.
스프링에서 Oauth2를 실행하기 위해서는 build.gradle에 외부 의존 라이브러리를 추가해야 합니다.
dependencies{
	...
	implementation 'org.springframework.boot:spring-boot-starter-oauth2-client'
}
application.yml에 설정을 추가하여 스프링이 Google API에서 정의해두었던 OAuth2를 활용할 수 있도록 합니다.
spring:
	security:
    	oauth2:
        	client:
            	registration:
                	google:
                    	clientId: 구글API아이디
                        clientSecret: 구글API비밀번호
                        scope:
                        	- email
- profileclientId와 clientSecret은 구글 API Console에서 발급받은 값을 입력합니다. Scope는 Oauth2로그인시 사용할 수 있는 구글의 접근 권한정보입니다.
loginForm.html에 Oauth2로 로그인할 수 있도록 링크를 추가합니다.
</form>
<a href="/oauth2/authorization/google">구글 로그인</a>
<a href="join">회원가입</a>SecurityConfig에 Oauth2 로그인기능을 추가해 줍니다.
	.and()
    .oauth2Login()
    .loginPage("/login");

return http.build();
루그인 후에는 필요한 후처리 작업들을 해주어야 합니다.
로그인 버튼을 클릭하면 구글 로그인 창이 떳고 계정을 선택하여 로그인할 수 있었습니다. 리턴한 code를 받아 토큰을 요청해야 합니다.
@Service
public class OAuth2서비스 extends DefaultOAuth2UserService{
	public OAuth2User loadUser(OAuth2UserRequest userRequest) throws OAuth2AuthenticationException{
    	return super.loadUser(userRequest);
    }
}
OAuth2UserRequest 오면 loadUser함수를 호출하여 구글로부터 회원 프로필 정보를 받아옵니다.
@Configuration
@EnableWebSecurity
public class 설정클래스{
	@Autowired
    private OAuth2서비스 oAuth2서비스;

    @Bean
    public SecurityFilterChain filterChain(HttpSecurity http) throws Exception{
    	http.
        	...
            .userInfoEndpoint()
            .userService(oAuth2서비스);
    }
}
UserDetails를 구현한 클래스에 @Data 애너테이션을 추가합니다.
@Data
public class PincipalDetails implements UserDetails{
	...
}IndexController에 URI매핑을 추가하여 테스트할 수 있도록 합니다.
@GetMapping("/loginTest")
public @ResponseBody String loginTest(Authentication authentication){
	System.out.println("============/loginTest===========");
    PrincipalDetails principalDetails = (PrincipalDetails) authentication.getPrincipal();
    System.out.println("authentication : " + principalDetails.getMember());
    return "loginTest";
}

@GetMapping("/loginTest2")
public @ResponseBody String loginTest2(@AuthenticationPrincipal PrincipalDetails principalDetails){
	System.out.println("============/loginTest2===========");
    System.out.println("userDetails : " + principalDetails.getMember());
    return "loginTest2";
}

@GetMapping("/loginTest3")
public @ResponseBody String loginTest3(
	Authentication authentication,
    @AuthenticationPrincipal OAuth2User oauth){
	System.out.println("============/loginOAuthTest===========");
    OAuth2User oauth2User = (Oauth2User) authentication.getPrincipal();
    System.out.println("authenticaion : " + oauth2User.getAttributes());
	System.out.println("oauth2User : " + oauth.getAttributes());
    return "loginTest3";
}
loginTest1 은 Authentication객체에서 PrinciaplDetals객체를 추출하여 출력하고, loginTest2는 @AuthenticationPrincipal 애너테이션을 이용하여 Authentication객체를 PrincipalDetails로 추출하였습니다. loginTest3는 둘다 모두 사용하였으며 .getPrincipal()메서드로 추출하였지만 (Oauth2User)로 업케스팅하여 받았습니다.
PrincipalDetails
기존의 일반적인 로그인은 UserDetails를 구현한 PrincipalDetails로 구현하였으나 OAuth 로그인이라는 새로운 방법은 기존의 방법과 다른 방법으로 OAuth2User를 처리해야 합니다. 두 로그인 방법 모두 PrincipalDetails로 합친다면 한번에 모두 처리할 수 있을 것입니다.
@Data
public class PrincipalDetails implements userDetails, OAut2User{
	...
    private Map<String, Object> attributes;

    public PrincipalDetails(Member member, Map<String,Objet> attributes){
    	this.member = member;
        this.attributes = attributes;
    }

    public Map<String,Objedct> getAttributes(){
    	return attributes;
    }

    public String getName(){
    	return null;
    }
}
OAuth2User 인터페이스를 추가로 구현하면서 getAttributes()메서드와 getName()메서드도 추가적으로 오버라이딩 합니다.
getAttributes()는 Map<String,Object>를 반환하므로 Map<String,Objedct> attributes 필드가 필요하고, 해당 필드도 객체 생성시 초기화 해야 하므로 생성자에 attributes 필드를 추가적으로 구현해 줍니다.
후처리를 위해선 model 엔티티도 수정되어야 합니다.
@Entity
@NoArgsConstructor
public class 엔티티{
	@Builder
    public 엔티티(String username, String email, String role ,String provider, String providerId){
    	this.username = username;
        this.email = email;
        this.role = role;
        this.provider = provider;
        this.providerId = providerId;
    }
    ...
}
후처리에서 추가적인 정보가 필요하므로 엔티티에도 필드를 추가하고 생성자를 추가합니다.
@Service
public class Oauth2User서비스 extends DefaultOAuth2UserService{
	@Autowired
    private 레포지토리 레포지토리;

    public OAuth2User loadUser(OAuth2UserRequest userRequest) throws OAuth2AuthenticationExceptino{
    	OAuth2User oauth2User = super.loadUser(userRequest);

        String provider = userRequest.getClientRegistration().getClientId();
        String providerId = oauth2User.getAttribute("sub");
        String username = oauth2User.getAttribute("name");
        String email = oatuh2User.getAttribute("email");
        String role = "ROLE_USER";

        엔티티 엔티티 = 레포지토리.findByUsername(username);

        if(엔티티 == null){
        	엔티티 = 엔티티.builder()
            	.username(username)
                .eamil(email)
                .role(role)
                .provider(provider)
                .providerId(providerId)
                .build()
            레포지토리.save(엔티티);
        }

        return new PrincipalDetails(엔티티,oauth2User.getAttributes());
    }
}UserDetailsService를 구현한 서비스처럼 DefaultOAuth2UserService를 상속받은 Oauth2User서비스도 메서드를 오버라이딩하고 레포지토리를 상속받아서 데이터베이스에 엔티티를 저장하거나 불러오고, 또 PrincipalDetails 객체를 반환합니다. 여기서 PrincipalDetails 객체는 위에서 UserDetails를 구현하는 것 뿐만 아니라 OAuth2User도 구현함으로써 두개의 서비스에서 같은 PrincipalDetails객체를 반환하여 동일한 후처리를 진행할 수 있습니다.
IndexController에 추가합니다.
@GetMapping("/user")
public @ResponseBody String user(@AuthenticationPrincipal PrincipalDetails principalDetails){
	System.out.println(principalDetails.getMember());
        return "user";
}

@GetMapping("/")
public String index(@AuthenticationPrincipal PrincipalDetails principalDetails, Model model){
	try{
    	if(principalDetails.getUsername() != null){
        	model.addAttribute("username",principalDetails.getUsername());
        }
    }catch(NullPointException e){}

    return "index";
}Model클래스가 매개변수로 추가되었습니다. Model은 View(.html로 끝나는파일)에 전달할 속성을 담을 수 있습니다. username이라는 키에 principalDetails.getUsername()값 쌍을 속성에 추가하였습니다. index.html에서 Model객체에 추가된 속성을 꺼내서 사용할 수 있습니다.
<!DOCTYPE html>
<html>
<head>
    <meta charset="UTF-8">
    <title>Index Page 입니다.</title>
</head>
<body>
<h1>Index 페이지 입니다.</h1>
{{#username}}
    <h1>{{username}} 사용자입니다.</h1>
    <a href="/user">유저</a>
    <a href="/logout">로그아웃</a>
{{/username}}
{{^username}}
    <h3>로그인되지 않았습니다.</h3>
    <a href="/login">로그인 페이지로 이동</a>
    <a href="/join">회원가입 페이지로 이동</a>
{{/username}}
</body>
</html>
index.html에 추갛여 결과를 확인합니다. EL표현식을 사용합니다.
후기
많은 웹사이트에서 카카오,네이버,구글,페이스북 등등 다른 계정으로 로그인하는 기능을 요즘 많이 볼 수 있습니다. 그 기능을 구글로 구현해 보았고 OAuth2가 영원하지는 않겠지만 이런 유형의 기능은 앞으로도 많이 사용될 것입니다.
GitHub
https://github.com/ds02168/CodeStates_Spring/tree/main/section4-week1-FRI