오늘의 목표
- Swagger
- Spring Rest Docs
내용
API 문서라는것을 먼저 알아야 할 것 같습니다.
Spring의 API 계층에서 HTTP request URL을 클라이언트의 요청을 통하여 전달받고 API계층 -> 비즈니스 계층 -> 데이터 엑세스 계층 -> 비즈니스 계층 -> API계층 -> 클라이언트에 다시 전달하게 됩니다.
이때 어떤 데이터를 클라이언트와 서버가 어떤 데이터를 주고받는지를 사전에 개발자들의 합의하여 문서로서 정의해 놓은 것을 API 문서 또는 API 스펙 라고 합니다.
시림이 직접 API 문서를 작성할 수도 있으나, 개발 도중이나 유지보수중 API가 수정될 수도 있고, 실수로 잘못 적을 수도 있으므로 프론트엔드와 백엔드의 API 스펙 정보가 달라서 에러가 발생할 수도 있습니다.
이런 사건을 방지하고자 API 문서 자동화를 통하여 작업시간을 단축하고, 옳바르게 일치시킬 수 있습니다.
Swagger
Java 기반의 애플리케이션에서는 Swagger라는 API문서 자동화 오픈 소스를 많이 사용해 왔습니다.
Swagger 준비
Swagger를 실행하기전에 몇가지 의존과 설정이 필요합니다.
dependencies{
	implementation 'io.springfox:springfox-boot-starter:3.0.0'
}
build.gradle
org.springframework.context.ApplicationContextException: Failed to start bean 'documentationPluginsBootstrapper'; nested exception is java.lang.NullPointerException
에러가 발생하면 application.yml에 속성 추가
spring:
	mvc:
    	pathmatch:
        	matching-strategy: ant_path_matcher
Swagger Controller, Dto
Swagger는 @ApiXXX에너테이션을 많이 추가해야하는 단점이 있습니다. 또 Controller 뿐만 아니라 DTO클랫에도 추가해주어야 합니다.
@ApiOperation(value ="회원 정보 API", tags = {"Member Controller"})
@RestController
@RequestMapping("URL")
@Validated
@Slf4j
public class 컨트롤러{
	private final 서비스 서비스;
    private final Mapper mapper;

    public 컨트롤러(서비스 서비스, Mapper mapper){
    	this.서비스 = 서비스;
        this. mapper = mapper;
    }

    @ApiOperation(value = "회원 정보 등록", notes = "회원 정보를 등록합니다.")
    @ApiResponses(value ={
    	@ApiResponse(code = 201, message = "회원 등록 완료"),
        @ApiResponse(code = 404, message = "Member not found")
    })
    @PostMapping
    public ResponseEntity post엔티티(@Valid @RequestBody MemberDto.Post memberDto){
    	//엔티티 등록
    }

    @ApiOperation(value = "회원 정보 조회", notes = "회원 식별자(memberId)에 해당하는 회원을 조회합니다.")
    @GetMapping("/{member-id}")
    public ResponseEntity get엔티티(
    		@ApiParam(name = "member-id", value = "회원 식별자", example = "1")
        	@PathVairable("member-id") @Positive long memberId){
    	//엔티티 조회
    }
}
Controller 클래스
@ApiModel("Member Post")
@Getter
public class Dto{
	@ApiModelProperty(notes = "회원 이메일", example = "xxx@gmail.com", required = true)
    @NotBlank
    @Email
    private String email;

    @ApiModelProperty(notes = "회원 이름", example = "홍길동", required = true)
    @NotBlank(message = "이름은 공백이 아니어야 합니다.")
    private String name;

    @ApiModelProperty(notes = "회원 휴대폰 번호", example = "010-1111-1111", required = true)
    @Pattern(regexp = "^010-\\d{3,4}=\\d{4}$",
    		message = "휴대폰 번호는 010으로 시작하는 11자리 숫자와 '-'로 구성되어야 합니다.")
    privaet String phone;
}
Dto 클래스
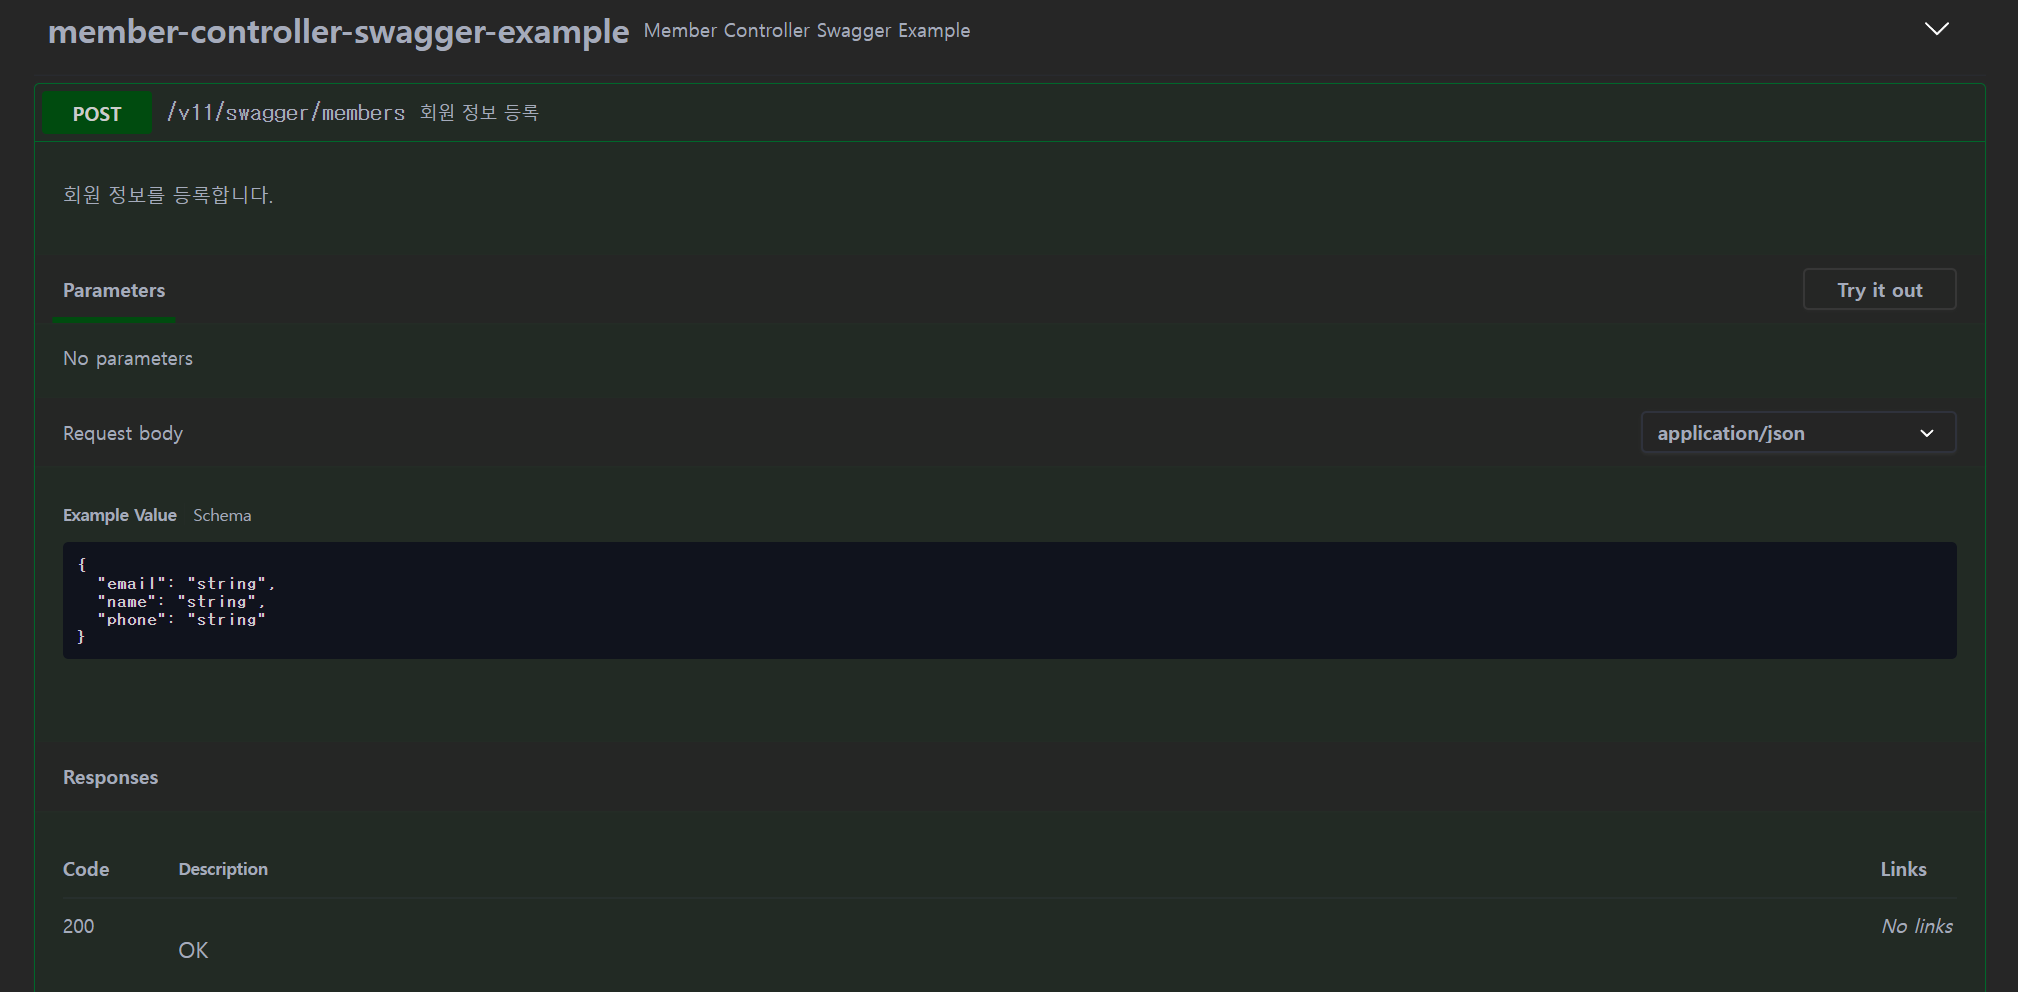
서버를 실행시킨 후 해당 링크로 접속시 Swagger 에너테이션 기반으로 자동으로 만들어진 API 문서를 확인할 수 있습니다.
Spring Rest Docs
Swagger의 경우 실제 기능 구현 로직에 에너테이션이 많이 추가되면서 가독성도 떨어지고 불필요하게 코드가 길어지는 문제점이 있었습니다.
이와 반대로 Spring Rest Docs는 실제 기능 로직이 아닌 test에 추가합니다.
기능 로직에 에너테이션을 추가할 필요도 없고, API문서를 만들기 위해서는 테스트도 통과해야 만들어지기 때문에 오류가 발생할 확률도 현저히 줄어듭니다.
Spring Rest Docs 과정
-
Spring Rest docs는 기존의 슬라이스 테스트에서API 스펙 정보 코드를 추가하여passed면 다음 작업을 진행합니다. -
Gradle의 빌드 테스크중 하나인 test task를 실행시켜 API문서 스니핏(.adoc)을 일괄 생성합니다.
-
만약 프론트엔드 개발자나, 다른 부서의 직원들과 공유하기 위해선 스니핏을 하나로 모아
HTML를 생성하는 과정도 필요할 것입니다.
Spring Rest Docs 설정
plugins {
	...
	id "org.asciidoctor.jvm.convert" version "3.3.2" //1
}
//2
ext {
	set('snippetsDir', file("build/generated-snippets"))
}
//3
configurations {
	asciidoctorExtensions
}

dependencies{
	//4
	testImplementation 'org.springframework.restdocs:spring-restdocs-mockmvc'
    //5
    asciidoctorExtensions 'org.springframework.restdocs:spring-restdocs-asciidoctor'
    ...
}
//6
tasks.named('test'){
	output.dir snippetsDir
    useJUnitPlatform()
}
//7
tasks.named('asciidoctor'){
	configurations "asciidoctorExtensions"
    inputs.dir snippetsDir
    dependsOn test
}
//8
task copyDocument(type: Copy){
	dependsOn asciidoctor	//8-1
    from file("${asciidoctor.outputDir}") //8-2
    into file("src/main/resources/static/docs") //8-3
}

//9
build {
	dependsOn copyDocument
}
//10
bootJar{
	dependsOn copyDocument //10-1
    from("${asciidoctor.outputDir}"){ //10-2
    	into 'static/docs' //10-3
    }
}- .adoc 파일 확장자를 가지는 문서를 생성해주는 Asciidoctor를 사용하기 위한 플러그인
- ext변수의 set() 메서드를 API 문서 스니핏이 생성될 경로를 지정합니다.
asciidoctorExtension이라는 의존그룹을 지정합니다.- rest docs 의존 라이브러리를 추가합니다.
- asciidoctor 의존 라이브러리를 추가합니다.
- :test task 실행 시 API 문서 생성 스니핏 디렉토리 경로를 설정합니다.
- :asciidoctor task 실행 시 asciidoctorExtension을 설정합니다.
- :copyDocument task가 실행되면 index.html파일이 src/main/resources/static/docs에 copy되며 copy된 index.html파일은 API 문서를 파일 형태로 외부에 제공하기 위한 용도입니다.
8-1. :asciidoctor task가 실행 된 후에 실행되도록 의존성을 설정합니다.
8-2. build/docs/asciidoc/ 경로에 생성되는 index.html을 복사
8-3. src/main/resource/static/docs 경로에 index.html 추가 - :build task가 실행되기 전에 :copyDocument task가 먼저 실행 됩니다.
- :bootJar task는 어플리케이션 실행 파일을 생성합니다.
10-1. :bootJar task실행 전에 :copyDocument task가 실행됩니다.
10-2. intdex.html 파일을 jar파일 안에 추가합니다.
application.yml에 h2,jpa,log등 설정정보도 추가합니다.
spring:
  h2:
    console:
      enabled: true
      path: /h2
  datasource:
    url: jdbc:h2:mem:test
  jpa:
    hibernate:
      ddl-auto: create
    show-sql: true
    properties:
      hibernate:
        format_sql: true
  sql:
    init:
      data-locations: classpath*:db/h2/data.sql
logging:
  level:
    org:
      springframework:
        orm:
          jpa: DEBUG
server:
  servlet:
    encoding:
      force-response: true
기존의 application.yml설정과 동일합니다.
Spring Rest Docs 테스트 케이스
@EnableJpaAuditing
@SpringBootApplication
public class 어플리케이션{
	public static void main(String[] args){
    	어플리케이션.run();
    }
}
어플리케이션 설정정보 클래스에 @EnableJpaAuditing을 추가하면 JPA와 관련된 Bean을 필요로 하기 때문에 @WebMvcTest 에너테이션을 사용해서 테스트를 진행할경우 @MockBean(JpaMetamodelMappingContext.class)를 추가하여야 합니다.
@WebMvcTest(컨트롤러.class)
@MockBean(JpaMetamodelMappingContext.class)
@AutoConfigureRestDocs
public class 테스트(){
	@Autowired
    private MockMvc mockMvc;

    @MockBean
    private 레포지토리 서비스;

    @MockBean
    privaet mapper mapper;

    @Autowired
    private Gson gson;

    @Test
    public void 테스트() throws Exception{
    	//given
        Dto dto = new Dto(...);
        String content = gson.toJson(dto);

        Response response = new Response(...);

        given(mapper.Mocking1(Mockito.any(dto.class))).willReturn(new 엔티티));
        given(서비스.Mocking2(Mockito.any(엔티티.class))).willReturn(new 엔티티));
        given(mapper.Mocking3(Mockito.any(엔티티.class))).willReturn(response);

        //when
        ResultActions actions =
        	mockMvc.perform(
            	post("URI")
                	.accept(MediaType.APPLICATION_JSON)
                    .contentType(MediaType.APPLICATION_JSON)
                    .content(content)
            );
        //then
        actions
        	.andExpect(status().isCreated())
            .andExpect(jsonPath("$.필드").value(dto.get필드())
            .andDo(document(
            			"post",
                        getRequestPreProcessor(),
                        getResponsePreProcessor(),
                        requestFields(
                        	List.of(
                            	fieldWithPath("필드1").type(JsonFieldType.STRING).description("필드1),
                                fieldWithPath("필드2").type(JsonFieldType.NUMBER).description("필드2")
                            )
                        ),
                        responseFields(
                        	List.of(
                            	fieldWithPath("필드1").type(JsonFieldType.STRING).description("필드1),
                                fieldWithPath("필드2").type(JsonFieldType.NUMBER).description("필드2")
                                fieldWithPath("필드3").type(JsonFieldType.NUMBER).description("필드3")
                            )
                        )
    }
}
public interface ApiDocumentUtils{
static OperationRequestPreprocessor getRequestPreProcessor(){
return preprocessRequest(prettyPrint());
}
static OperationResponsePreprocessor getResponsePreProcessor(){
return preprocessResponse(prettyPrint());
}
}-
@WebMvcTest(컨트롤러.class): 컨트롤러를 테스트 하기 위한 전용 에너테이션입니다. 테스트에 필요한 Bean만 ApplicationContext에 등록하기 때문에 실행 속도는 상대적으로 바릅니다. -
@MockBean(JpaMetamodelMappingContext.class): JPA에서 사용하는 Bean들을 Mock객체로 주입해주는 설정입니다. -
@AutoConfigureRestDocs: Spring Rest Docs에 대한 자동 설정을 구성해줍니다. -
.andDo(): API 스팩 정보를 입력하는 부분입니다. -
document("스니핏 식별자",getRequestPreProcessor(),getResponsePreProcessor(),requestFields(),responseFields()): API 스팩 정보에 대한 명세를 기술합니다."스니핏 식별": API 스니핏 문서를 식별할 식별자를 지정합니다.getRequestPreProcessor():preprocessRequest(prettyPrint())를 반환합니다. 해당 메서드는 문서에 표시되는 JSON포맷의 request body를 예쁘게 표현해줍니다.getResponsePreProcessor():preprocessResponse(prettyPrint())를 반환합니다. 해당 메서드는 문서에 표시되는 JSON포맷의 response body를 예쁘게 표현해줍니다.requestFields(): request body를 의미합니다.파라미터로List<FieldDescriptor>를 전달합니다.List<FieldDescriptor>: JSON 포맷으로 표현 했을 때, 하나의 프로퍼티를 의미하는FieldDescriptor입니다.
responseFields(): response body를 의미합니다. 파라미터로List<FieldDescriptor>를 전달합니다.List<FieldDescriptor>: JSON 포맷으로 표현 했을 때, 하나의 프로퍼티를 의미하는FieldDescriptor입니다.
pathMarameters(): 만약 파라미터가 존재한다면 추가할 수 있습니다.parameterWithName("파라미터명").description("설명")으로FieldDescriptor와 같이 하나의 파라미터를 의미하며 복수개가 올 수 있습니다.
-
fieldWithPath("필드").type(JsonFieldType.STRING).description("필드"): JSON으로 표현될 수 있는 하나의 프로퍼티를 나타냅니다.(FieldDescriptor).ignored(),.optional()등의 메서드를 맨뒤에 붙혀 무시, 선택조건등을 추가할 수 있습니다.
타입으로는 JsonFieldType.STRING 외에도 JsonFieldType.OBJECT, JsonFieldType.NUMBER등이 올 수 있습니다.
fieldWithPath("A.B.C")의 경우 A프로퍼티의 하위 프로퍼티 B의 하위 프로퍼티 C를 나타냅니다.

테스트가 통과하면 build/generated-snippets/스니핏 식별자/ 경로에 .adoc API 문서들이 생성됩니다.
Spring Rest Docs 문서
만약 만든 API문서를 공유하거나 배포를 해야한다면 .adoc 파일 여러개보다 하나의 HTML문서로 만들면 쉽게 종합적으로 비교가 가능할것입니다.
Gradle 프로젝트의 경우 템플릿 문서는 src/docs/asciidoc으로 디폴트 경로가 지정됩니다.src/docs/asciidoc경로에 index.adoc 파일을 생성합니다. (해당경로로 만들어야 합니다!)
= 템플릿 문서 이름
:sectnums:
:toc: left
:toclevels: 4
:toc-title: Table of Contents
:source-highlighter: prettify

작 성 자 <이메일>

v버전, 날짜

***
== 컨트롤러
=== 헨들러 메서드
.curl-request
include::{snippets}/식별자/curl-request.adoc[]

.http-request
include::{snippets}/식별자/http-request.adoc[]

.request-fields
include::{snippets}/식별자/request-fields.adoc[]

.http-response
include::{snippets}/식별자/http-response.adoc[]

.response-fields
include::{snippets}/식별자/response-fiedls.adoc[]
include::{snippets}/스니핏 문서가 위치한 디렉터리/스니핏 파일문서명.adoc[]가 .adoc의 스니핏 자료를 템플릿 문서로 불러들이는 명령어 입니다.
build 시키면 src/main/resource/static/docs 디렉터리에 index.html파일이 생성됩니다.
애플리케이션을 실행시키고 URL로 접속도 가능합니다.

후기
API문서를 생성하는 방법에 대하여 배웠습니다. 대표적으로 Swagger와 Spring Rest Docs가 존재하고 각각 사용해보았습니다. 특히 Spring Rest Docs에 대해 더욱 중점적으로 배웠는데 이것을 활용하여 나중에 프로젝트를 할때 프론트엔드 개발자들과 의사소통을 원할히 할 수 있는 창구로 유용하게 사용할 수 있으면 좋겠습니다.
GitHub
private!