🔗 설치
yarn 새로운 프로젝트 생성
yarn create react-app [파일명]redux
$ yarn add redux react-redux

아래와 같은 의미
$ yarn add redux
$ yarn add react-redux
styled-components
$ yarn add styled-componentsstyled-reset
$ yarn add styled-resetsass
$ yarn add sassreact-router-dom
$ yarn add react-router-domredux toolkit
$ yarn add react-redux @reduxjs/toolkitjson-server
$ yarn add json-serverAxios
$ yarn add axiosreact-query
$ yarn add react-query🔗 폴더 구조
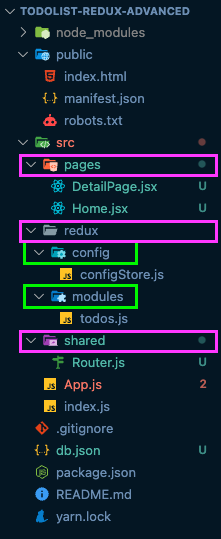
위의 이미지와 같이 폴더 구조를 생성하세요.
-
src폴더 안에pages,redux,shared폴더를 생성 -
pages폴더 안에 컴포넌트 생성 -
redux폴더 안에config,modules폴더를 생성config폴더 안에configStore.js파일을 생성modules: 우리가 만들 State들의 그룹. 예를 들어투두리스트를 만든다고 한다면, 투두리스트에 필요한state들이 모두 모여있을todos.js가 곧 하나의 모듈
-
shared폴더 안에Router.js파일
redux : 리덕스와 관련된 코드를 모두 모아 놓을 폴더
config : 리덕스 설정과 관련된 파일들을 놓을 폴더
configStore.js : “중앙 state 관리소" 안 Store를 만드는 설정 코드들이 있는 파일
🔗 설정 코드
src/configStore.js
state 를 store 로 모아주고,
import { createStore } from "redux";
import { combineReducers } from "redux";

const rootReducer = combineReducers({});
const store = createStore(rootReducer);

export default store;
index.js
index.js 에서 모든 컴포넌트들이 거쳐야하는 최상위 컴포넌트 App.js 로 store 를 내려주고,
import React from "react";
import ReactDOM from "react-dom/client";
import App from "./App";
import reportWebVitals from "./reportWebVitals";
import store from "./redux/config/configStore";
import { Provider } from "react-redux";

const root = ReactDOM.createRoot(document.getElementById("root"));
root.render(
  <Provider store={store}>
    <App />
  </Provider>
);

reportWebVitals();
App.js
모든 컴포넌트들이 거쳐야하는 App.js 에서 router 를 반환해
모든 사용자가 항상 App.js → Router.js 거치도록 하고,
import React from "react";
import Router from "./shared/Router";

const App = () => {
  return <Router />;
};

export default App;
만약 라우터를 사용하지 않는다면, App.js 에서 하위 컴포넌트들로 이루어진 구조를 return 하면 됨
shared/Router.js
Router.js 에서 Routes 를 BrowserRouter 로 감싸고,
(브라우저가 깜빡이지 않고 다른 페이지로 이동하게 해줌 - SPA기반인 react의 장점)
Routes 안에서 path 로 각 컴포넌트를 연결한다.
Dynamic Route 즉, 동적 라우팅을 사용시,
path 에 유동적인 값을 넣어 element에 설정된 같은 컴포넌트를 렌더링하는 /:id 를 넣어준다.
( :id 는 useParams 훅에서 조회하는 값)
import React from "react";
import { BrowserRouter, Route, Routes } from "react-router-dom";
import Home from "../components/Home";
import About from "../pages/About";
import DetailPage from "../components/DetailPage";

const Router = () => {
  return (
    <BrowserRouter>
      <Routes>
        <Route path="/" element={<Home />} />
        <Route path="about" element={<About />} />
        <Route path="/:id" element={<DetailPage />} />
      </Routes>
    </BrowserRouter>
  );
};

export default Router;
🔗 모듈 생성
src/modules 내부에 새로운 .js 파일로 생성
initial State
Action Value
Action Creator
Reducer
export
// ex : src/modules/todos.js
// 투두리스트에 필요한 모든 state 들이 모여있는 todo.js 모듈입니다.

import { v4 as uuidv4 } from "uuid";

// 초기 상태값 - initial State
const initialState = {
  todos: [
    {
      title: "Redux",
      contents: "투두리스트 리팩토링",
      isDone: false,
      id: uuidv4(),
    },
    {
      title: "Work out",
      contents: "헬스장 가기",
      isDone: false,
      id: uuidv4(),
    },
    {
      title: "React",
      contents: "투두리스트 완성하기",
      isDone: true,
      id: uuidv4(),
    },
  ],
};

// 액션밸류 - Action Value
const ADD_TODO = "ADD_TODO";
const DELETE_TODO = "DELETE_TODO";
const SWITCH_BUTTON = "SWITCH_BUTTON";

// 액션 크리에이터 - Action Creator
export const addTodo = (title, contents) => {
  return {
    type: ADD_TODO,
    payload: { title, contents },
  };
};

export const deleteTodo = (payload) => {
  return {
    type: DELETE_TODO,
    payload,
  };
};

export const switchButton = (id, isDone) => {
  return {
    type: SWITCH_BUTTON,
    payload: { id, isDone },
  };
};

// 리듀서 - Reducer
const todos = (state = initialState, action) => {
  switch (action.type) {
    case ADD_TODO: {
      const newTodoList = {
        title: action.payload.title,
        contents: action.payload.contents,
        isDone: false,
        id: uuidv4(),
      };
      return {
        ...state,
        todos: [...state.todos, newTodoList],
      };
    }
    case DELETE_TODO: {
      return {
        ...state,
        todos: [...state.todos].filter((t) => t.id !== action.payload),
      };
    }
    case SWITCH_BUTTON: {
      return {
        ...state,
        todos: [...state.todos].map((t) => {
          if (t.id === action.payload.id) {
            return { ...t, isDone: !action.payload.isDone };
          } else {
            return t;
          }
        }),
      };
    }
    default:
      return state;
  }
};

// 모듈파일에서는 리듀서를 export default 한다.
export default todos;
🔗 서버열기
프론트 서버 열기
$yarn startjson-server 열기
$yarn json-server --watch db.json --port 3001db.json 파일에 데이터 생성하기
    {
      "todos": [
        {
          "id": 1,
          "title": "제목",
          "content": "내용"
        }
      ]
    }
서버 url 뒤에 데이터 이름 넣어서 GET 요청하기
http://localhost:3001/todos
🔗 env
env 는 API key / port / DB 등 민감한 정보를 환경변수에 담아 관리하는 방법
[React] .env (환경변수 관리)

알록달록 정리 너무잘해... 이쁘게 하셨네요 !!