
기업 인턴 과정을 진행중에 설계한 API를 swagger를 이용해 documents로 만들어보라고 CTO님께서 피드백을 주셨다.
document작성 왜 필요하지..?
API를 설계하고 항상 외면하면서 안하고 넘어가는 부분이 document 작성이었다.
그냥 뭔가 없어도 괜찮을거 같다는 생각이 들고 그래서 그런지, 그냥 넘어갔다.
하지만, 현업에서는 말이 달라진다.
내가 설계한 API는 당연히 내가 봤을때는 요청시 뭐가 필요한지, 어떤식으로 요청을 해야하는지, API의 목적이 뭔지 다 알고있다.
하지만 나를 제외한 다른분들은 이 API를 어따 쓰는지, 어떻게 사용해야하는지,
response로 어떤 데이터가 오는지 알 방도가 없다.
그렇기 때문에 설명서의 역할을 해주는 api-doc을 작성해서 같이 넘겨줌으로써
API를 사용하는 개발자분들이 조금 더 쉽게 이해하고 사용할수 있도록 도움을 주는 용도인것이다.
근데 왜 swagger?
notion같은 툴을 이용해서 하나하나 정리해서 주는것도 방법이긴 하지만,
swagger는 코드안에서 적용 시킬수 있다는 장점이 있다.
그리고 또한 swagger는 자체 UI를 제공해서 한눈에 쉽게 볼수 있고,
각각의 API별로 테스트까지 진행 해볼수 있다.
유지보수 또한 쉽다.
어떻게 써요?
npm i swagger-ui-express yamljs --save-dev우선 패키지를 다운 받고
app.js
const swaggerUI = require('swagger-ui-express');
...
app.use('/api-docs', swaggerUI.serve, swaggerUI.setup(openAPIDocument));
요렇게 세팅을 해주면 된다. endpoint는 뭐 각자 알아서
이제 진짜 document 파일을 작성해서 저 setup 메서드의 인자로 넣어주기만 하면, swagger documents 작업은 끝나게 된다.
yaml파일 작성
openapi: 3.0.3
info:
title: API 이름
description: 설명
contact:
email: 이메일
version: 1.0.0
servers:
- url: http://localhost:8000
tags:
- name: events (이름)
description: 태그 설명
- name: test
description: 태그 설명
paths:
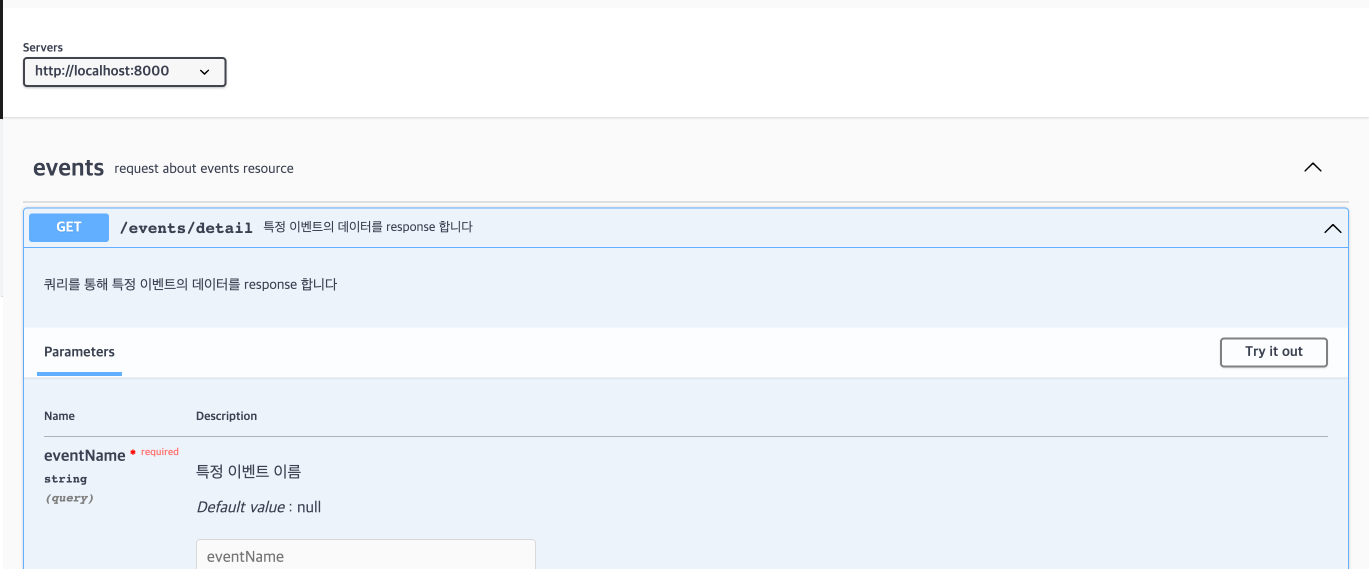
/events/detail:
get:
tags:
- events <- 요런식으로 위에 정의 해놓은 태그를 달면된다.
summary: 특정 이벤트의 데이터를 response 합니다
description: 쿼리를 통해 특정 이벤트의 데이터를 response 합니다
operationId: get event
parameters: <- 요렇게 path param, query param도 정의 가능하다
- name: eventName
in: query
description: 특정 이벤트 이름
required: true
explode: true
schema:
type: string
default: null
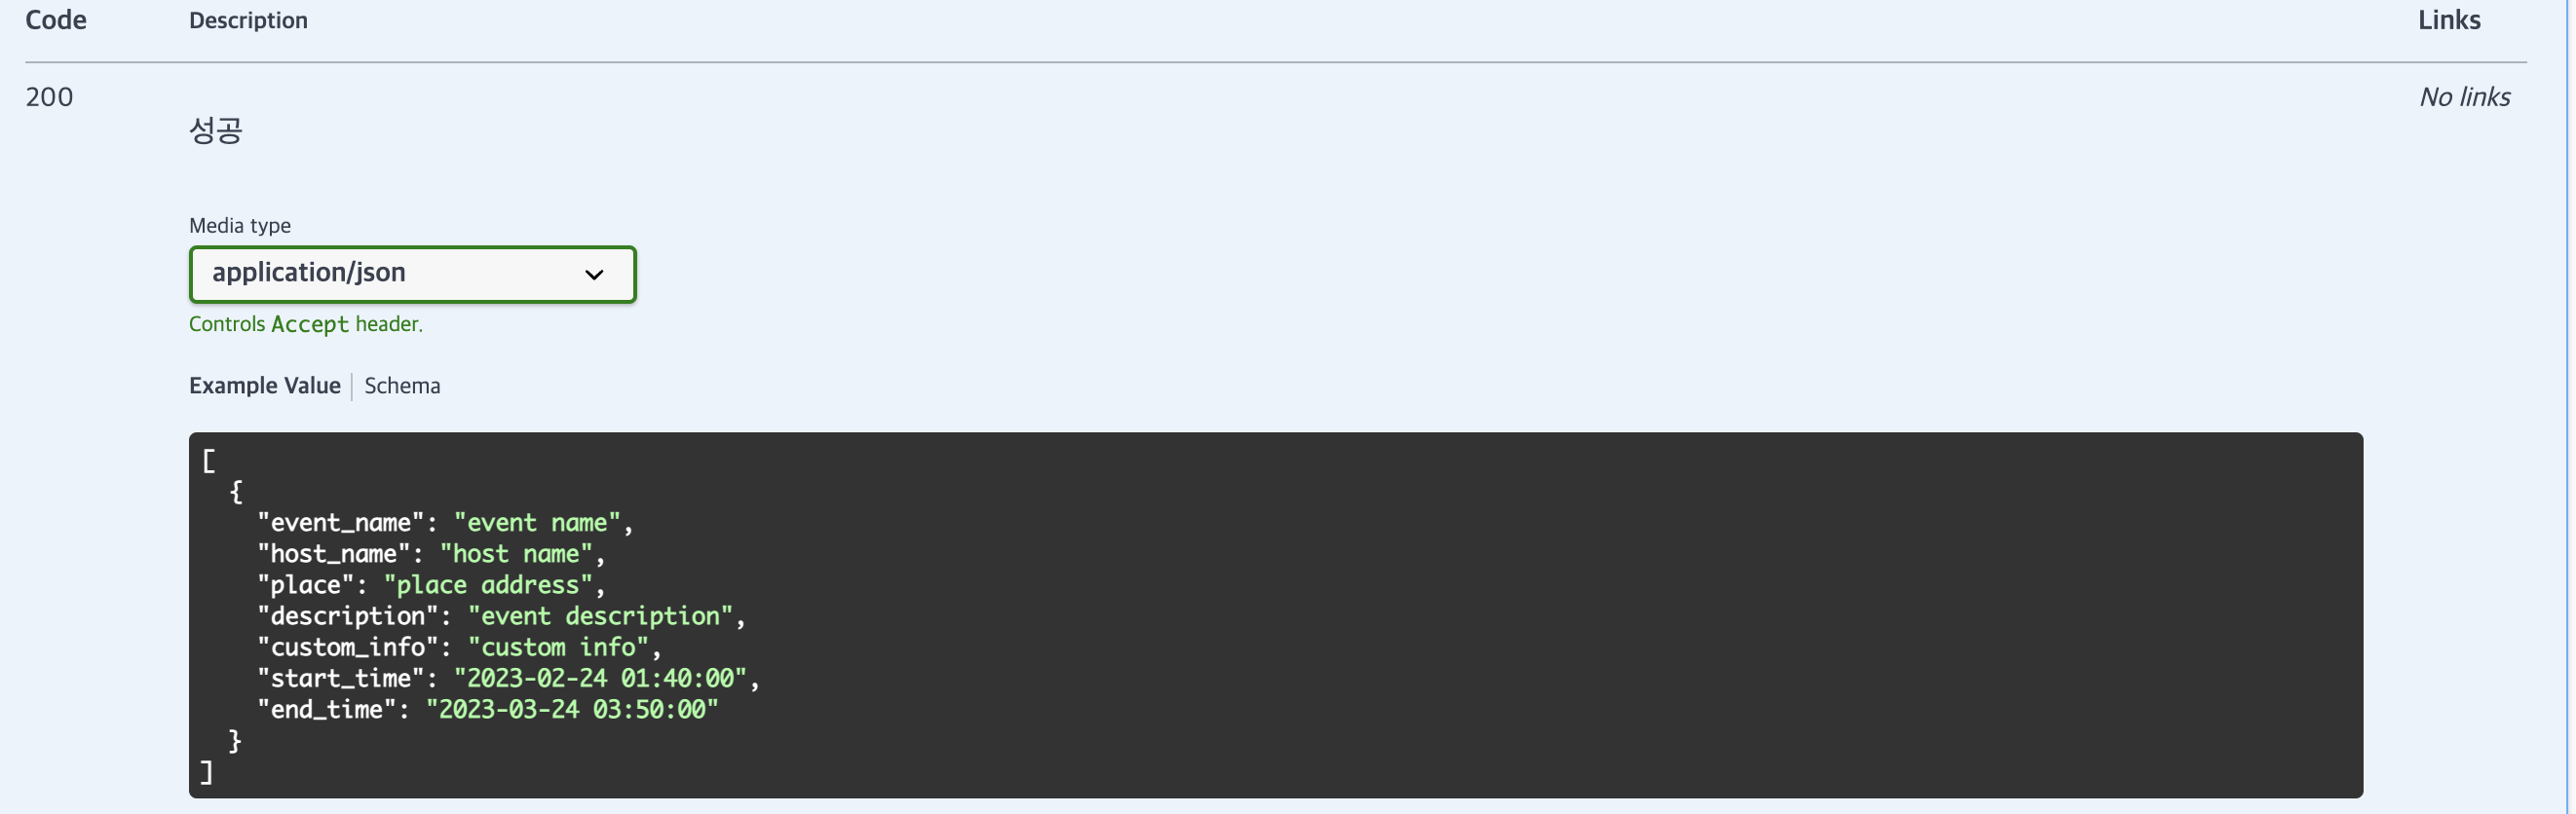
responses:
'200':
description: 성공
content:
application/json:
schema:
type: array
items:
$ref: '#/components/schemas/Detail'
이렇게 작성을 하고 난뒤 맨밑에 보이는 저 schema 또한 만들어줘야 reference를 성사 시킬수 있겠죠?
components:
  schemas:
    Detail:
      type: object
      properties:
        event_name:
          type: string
          example: event name
        host_name:
          type: string
          example: host name
        place:
          type: string
          example: place address
        description:
          type: string
          example: event description
        custom_info:
          type: string
          example: custom info
        start_time:
          type: string
          example: '2023-02-24 01:40:00'
        end_time:
          type: string
          example: '2023-03-24 03:50:00'
요로코롬 schema를 만들고, 위에 처럼 $ref를 걸어주면 완성이다.
이렇게 다 작성한 yaml파일을 yamljs 패키지를 이용해서 setup인자로 넣어주면 끝이다.
const yaml = require('yamljs');
const openAPIDocument = yaml.load('./documents/openapi.yaml');
app.use('/api-docs', swaggerUI.serve, swaggerUI.setup(openAPIDocument));
이제 설정한 endpoint로 가보면 요렇게 document가 나온다
아까 작성한 schema도 잘 나오고 있는거 볼 수 있다.
나처럼 document작성을 처음부터 끝까지 yaml파일로 작성하는 방법도 있지만,
swagger-jsdoc 패키지를 추가적으로 설치해서 route 부분에 주석으로 api document를 작성하고, component만 따로 yaml파일로 작성하는 방법도 있었다.
다음에는 두번째 방법을 적용 시켜볼 예정이다.
