C# RestAPI 강좌-1
c# 최신버전으로 Rest API 를 작성하는 강좌입니다. 지극히 주관적이면 제가 아는 Knowhow의 입각한 강좌입니다.
Project 생성
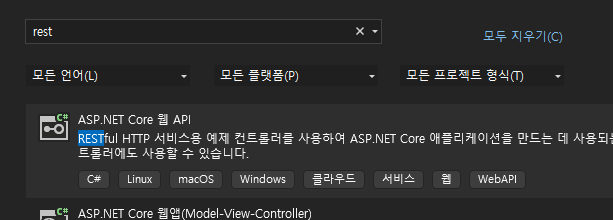
당연히 API 프로젝트를 생성합니다.

프로젝트명과 이름은 알맞게 지어주세요
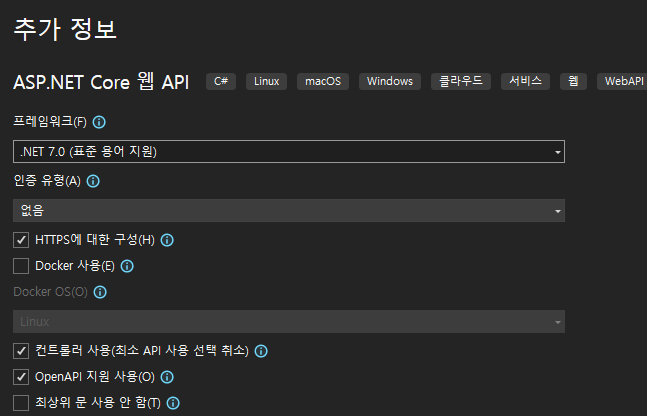
.Net 7.0을 사용하고 option 위와 같이 하겠습니다.
Solution
프로젝트를 생성하고 솔루션 구조는 아래와 같습니다. 지극히 주관적이고 저의 knowhow
입각한 구조입니다.
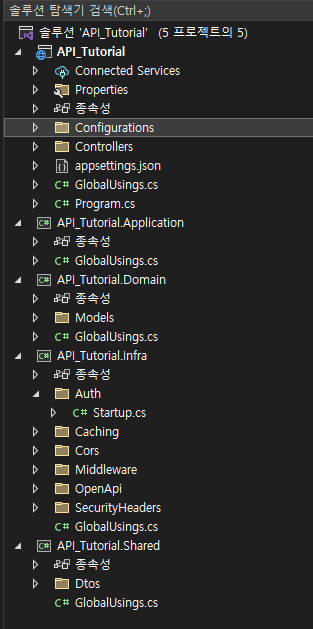
설명
| 프로젝트명 | 설명 |
|---|---|
| API_Tutorial | Controller 모음 api의 노출 프로젝트 |
| API_Tutorial.Application | Business Logic 을 구성 |
| API_Tutorial.Domain | Database 의 Model 구성 |
| API_Tutorial.Infra | 이 솔루션의 기반 사용하는 library의 설정 |
| API_Tutorial.Shared | API 구독자와의 contract model |
강좌를 위해 최대한 간략한 구조입니다. 컨셉은 Clean Archtecture 입니다.
(https://jasontaylor.dev/clean-architecture-getting-started/)
정석은 아닐지 몰라도 저 나름대로의 해석과 이해를 바탕으로 구성했습니다.
Nuget USE
이제 당연히 library 구성해야겠죠? 자세한 nuget구성은 github 소스를 참조해주세요
대표적인 library는
AutoMapper,Dapper,MediatR, Mapster,Serilog 등등이 있습니다.
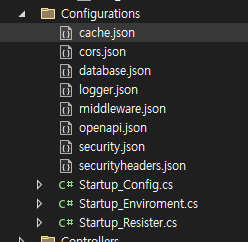
Cofiguration 구성
보통 appsettings.json 모든 설정을 합쳐 구성하지만 저는 가독성과 유지보수를 위해서 config 를 분할합니다.
 internal static ConfigureHostBuilder AddConfigurations(this ConfigureHostBuilder host)
    {
        host.ConfigureAppConfiguration((context, config) =>
        {
            const string configurationsDirectory = "Configurations";
            var env = context.HostingEnvironment;
            config.AddJsonFile("appsettings.json", optional: false, reloadOnChange: true)
                .AddJsonFile($"appsettings.{env.EnvironmentName}.json", optional: true, reloadOnChange: true)
                .AddJsonFile($"{configurationsDirectory}/logger.json", optional: false, reloadOnChange: true)
                .AddJsonFile($"{configurationsDirectory}/logger.{env.EnvironmentName}.json", optional: true, reloadOnChange: true)
                .AddJsonFile($"{configurationsDirectory}/cache.json", optional: false, reloadOnChange: true)
                .AddJsonFile($"{configurationsDirectory}/cache.{env.EnvironmentName}.json", optional: true, reloadOnChange: true)
                .AddJsonFile($"{configurationsDirectory}/cors.json", optional: false, reloadOnChange: true)

                .AddEnvironmentVariables();
        });
        return host;
    }
이런식으로 config json을 한개씩 참조하고 각설정을 json으로 분산했습니다.
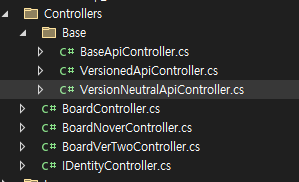
Base Class
상속받는 class 를 정의하겠습니다.
[ApiController]
public class BaseApiController : ControllerBase
{
    private ISender _mediator = null!;
    protected ISender Mediator => _mediator ??= HttpContext.RequestServices.GetRequiredService<ISender>();
}
모든 Controller가 상속 받는 class 입니다. 당연히 ControllerBase
CQRS 패턴을 위해 _mediator 종속성을 넣겠습니다.
또 base class를 당시 상속 받아
VersionedApiController.cs
[Route("api/v{version:apiVersion}/[controller]")]
public class VersionedApiController : BaseApiController
{
}

VersionNeutralApiController.cs
[Route("api/[controller]")]
[ApiVersionNeutral]
public class VersionNeutralApiController : BaseApiController
{
}
별다른 차이없는 class를 다시 두개로 정의한 이유는 version 관리를 위해
일단 분류했다고 보면 됩니다.
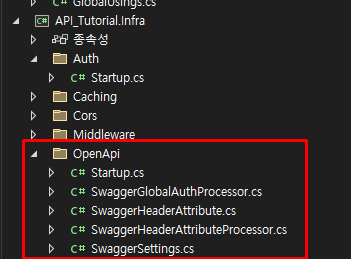
Swagger 구성
기본적으로 project 생성시에 swaggr 생성이 default 로 깔리나
좀더 강력한 기능을 위해 custom 구성을 해보겠습니다. 설명이 자세하지 못한것은
이것 하나로도 강좌가 하나 나올정도로 양이 좀 많은점 이해 바랍니다.
 public static IServiceCollection AddOpenApiDocumentation(this IServiceCollection services, IConfiguration config)
    {
        var settings = config.GetSection(nameof(SwaggerSettings)).Get<SwaggerSettings>();
        if (settings.Enable)
        {
            services.AddVersionedApiExplorer(o => o.SubstituteApiVersionInUrl = true);
            services.AddEndpointsApiExplorer();
            services.AddOpenApiDocument((document, serviceProvider) =>
            {
                document.PostProcess = doc =>
                {
                    doc.Info.Title = settings.Title;
                    doc.Info.Version = settings.Version;
                    doc.Info.Description = settings.Description;
                    doc.Info.Contact = new()
                    {
                        Name = settings.ContactName,
                        Email = settings.ContactEmail,
                        Url = settings.ContactUrl
                    };
                    doc.Info.License = new()
                    {
                        Name = settings.LicenseName,
                        Url = settings.LicenseUrl
                    };
                };
                document.AddSecurity(JwtBearerDefaults.AuthenticationScheme, new OpenApiSecurityScheme
                {
                    Name = "Authorization",
                    Description = "Input your Bearer token to access this API",
                    In = OpenApiSecurityApiKeyLocation.Header,
                    Type = OpenApiSecuritySchemeType.Http,
                    Scheme = JwtBearerDefaults.AuthenticationScheme,
                    BearerFormat = "JWT",
                });
                document.OperationProcessors.Add(new AspNetCoreOperationSecurityScopeProcessor());
                document.OperationProcessors.Add(new SwaggerGlobalAuthProcessor());
                document.TypeMappers.Add(new PrimitiveTypeMapper(typeof(TimeSpan), schema =>
                {
                    schema.Type = NJsonSchema.JsonObjectType.String;
                    schema.IsNullableRaw = true;
                    schema.Pattern = @"^([0-9]{1}|(?:0[0-9]|1[0-9]|2[0-3])+):([0-5]?[0-9])(?::([0-5]?[0-9])(?:.(\d{1,9}))?)?$";
                    schema.Example = "02:00:00";
                }));
                document.OperationProcessors.Add(new SwaggerHeaderAttributeProcessor());
                var fluentValidationSchemaProcessor = serviceProvider.CreateScope().ServiceProvider.GetService<FluentValidationSchemaProcessor>();
                document.SchemaProcessors.Add(fluentValidationSchemaProcessor);
            });
            services.AddScoped<FluentValidationSchemaProcessor>();
        }
        return services;
    }


    public static IApplicationBuilder UseOpenApiDocumentation(this IApplicationBuilder app, IConfiguration config)
    {
        if (config.GetValue<bool>("SwaggerSettings:Enable"))
        {
            app.UseOpenApi();
            app.UseSwaggerUi3(options =>
            {
                options.DefaultModelsExpandDepth = -1;
                options.DocExpansion = "none";
                options.TagsSorter = "alpha";
            });
        }
        return app;
    }
이와같이 구성하고
 public static IServiceCollection AddInfrastructure(this IServiceCollection services, IConfiguration config)
    {
        var assembly = Assembly.GetExecutingAssembly();
        services.AddValidatorsFromAssembly(assembly)
            .AddMediatR(assembly)
            .AddApplicationInfrastructure(config);
        return services
            .AddApiVersioning()
            .AddOpenApiDocumentation(config)
            .AddRouting(options => options.LowercaseUrls = true);
    }


    public static IApplicationBuilder UseInfrastructure(this IApplicationBuilder builder, IConfiguration config)
    {
        return builder
                   .UseRequestLocalization()
                   .UseStaticFiles()
                   .UseHttpsRedirection()
                   .UseRouting()
                   .UseAuthentication()
                   .UseAuthorization()
                   .UseOpenApiDocumentation(config);
    }
program.cs에서 사용선언을 합니다.
최초 Controller 작성
BoardController.cs 를 한번 작성해보겠습니다.
public class BoardController : VersionedApiController
{
    [HttpGet]
    [Route("t1")]
    [AllowAnonymous]
    public async Task<IActionResult> Get1()
    {
        return Ok("Hello world");
    }
}
VersionedApiController 을 상속하고
Method는 그냥 hellow world를 찍게 작성하겠습니다.
최초 실행
여기까지 하고 ctlr+f5 실행하면
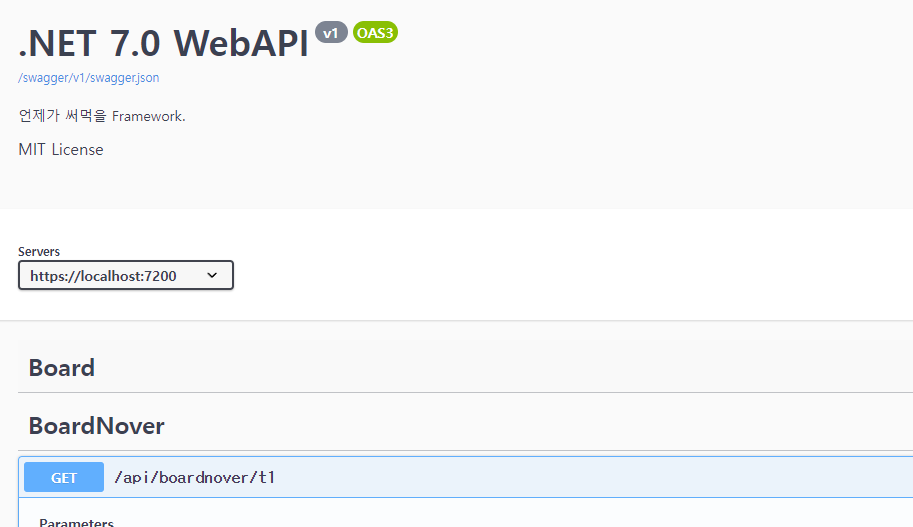
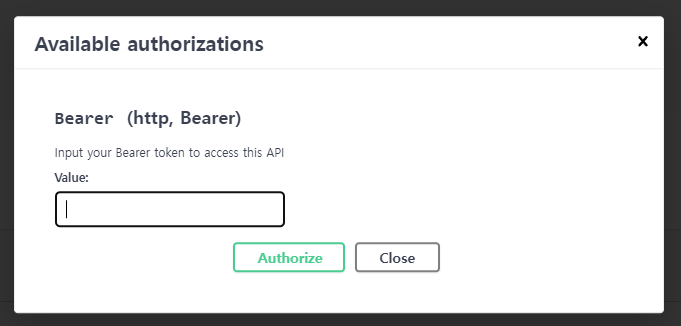
swagger api ui 가 나옵니다. 좀 다른점이 있다면 header 설정이 가능한 ui 죠
처음에 의욕차게 한번에 끝내볼려고 했던 강좌이나 너무너무 방대해져서 며칠에 걸쳐
하나씩 완성해나가야할것 같습니다. 하다보니까 강좌가 10개는 넘게 나올것 같군요 ㅎㅎ

님아 저기 확장자 application이나 domain 처럼 어떻게 하나요....?
저렇게 하니까 C# 아이콘이 아니라 전혀 다른 애들이 생성되는데...