Yeoman을 사용하는 이유
폴더구조, DB커넥션, 의존성설정, 로그인, 띄어쓰기, 깃 설정 등 작은 기능들을 반복적으로 같은 프로젝트를 만들게 된다. 요먼은 위와 같이 프로젝트마다 설정해줘야 하는 프로젝트의 틀을 약간의 설정만으로 만들어주는 도구이다.
요먼?
요먼(Yeoman)은 웹 애플리케이션을 위한 오픈 소스 클라이언트 사이드 스캐폴드 도구이다. Yeoman은 Node.js로 작성된 명령 줄 인터페이스로 실행되며 여러 기능(스타터 템플릿 생성, 의존성 관리, 유닛 테스트 실행, 로컬 디플로이먼트 서버 제공, 디플로이먼트를 위한 운영 코드 최적화 등)을 한 곳에 병합해놓았다.
구글 I/O 2012에서 공개되었다. from [위키백과](https://ko.wikipedia.org/wiki/%EC%9A%94%EB%A8%BC_(%EC%86%8C%ED%94%84%ED%8A%B8%EC%9B%A8%EC%96%B4)
Generator 만들기
yeoman에서 generator를 쉽게 만들 수 있는 모듈을 제공합니다.
가이드 링크: Writing Your Own Generator
가이드대로 따라해봅시다.
먼저 원하는 경로에 만들고자 하는 프로젝트명으로 빈 폴더를 만듭니다.
$ mkdir -p generator-생성자
$ cd generator-생성자
$ npm init
npm init 으로 package.json을 생성해준 후 아래 내용을 추가해줍니다.
yeoman-generator가 되기 위해서 package.json에 필수 규칙이 있습니다.
- name이
generator-로 시작해야 한다. - keywords에
"yeoman-generator"가 있어야 한다.
{
  "name": "generator-dhkim"
  ...
  "main": "generators/index.js",
  ...
  "files": [
    "generators",
  ],
  "keywords": ["yeoman-generator"],
  ...
}
generator 명령어입니다.
yo [appname]
[appname]에 generator-부분을 뺀 이름을 입력하여 generator를 사용합니다.
yeoman generator 의 실행 순서
이젠 yeoman generator을 실행하기 위한 index.js를 작성해봅시다.
yeoman generator 는 다음 순서로 함수를 실행합니다.
- initializing - 초기화 과정입니다. 프로젝트 상태나 설정값 등을 불러옵니다.
- prompting - 프롬프트 과정입니다. 사용자로부터 입력을 받습니다.
- configuring - 설정을 저장하고 프로젝트를 설정합니다.(.editorconfig 파일과 메타데이터 등을 만 듭니다.)
- default 이름이 default 가 아닙니다. 사전 정의된 함수를 제외한 다른 함수는 이 시점에 실행됩니다.
- writing - 이 시점에서 파일을 작성하게 됩니다.(router, controllers 등등등)
- confilcts - 충돌 발생 시 대응합니다.(내부적으로 실행됩니다)
- install - 설치 작업을 실행합니다.(npm install, pip install 등)
- end - 마무리입니다. 파일 정리 및 안녕 인삿말 등을 넣습니다.
이 순서대로 진행되므로 구현하고 싶은 함수들을 구현하시면 되겠습니다. 내가 호출할 때 이외에 실행 시키기 싫다면 private 함수라고 선언하시면 됩니다. JS 에선 딱히 선언방법이 없으므로 함수명 앞에 _ 를 넣으면 됩니다.
사용자 입력 받기
예시 코드
// generators/index.js
module.exports = class extends Generator {
  async prompting() {
    const answers = await this.prompt([
      {
        type: "input",
        name: "name",
        message: "Your project name",
        default: this.appname // Default to current folder name
      },
      {
        type: "confirm",
        name: "cool",
        message: "Would you like to enable the Cool feature?"
      }
    ]);

    this.log("app name", answers.name);
    this.log("cool feature", answers.cool);
  }
};
이렇게 하면 실행하였을 때 두 질문을 하게 되고 질문 결과가 저장됩니다.
명령을 실행한 디렉터리에 파일 저장하기
this.destinationRoot()- 명령을 실행한 디렉터리this.destinationPath(path)- 명령을 실행한 디렉터리와 path 를 합칩니다.this.sourceRoot()- 템플릿 파일이 위치한 경로입니다. 제네레이터 디렉터리의 templates 디렉터리를 나타냅니다.this.templatePath(path)- 템플릿 디렉터리와 path 를 합칩니다.
실습
generators/templates 안에 index.html 하나 만들어봅시다.
<html>
  <head>
    <title><%= title %></title>
  </head>
</html>
그 다음 generators/index.js 파일을 작성해줍시다.
// generators/index.js
const Generator = require('yeoman-generator');

module.exports = class extends Generator {
  constructor(args, opts) {
    super(args, opts);
  }

  async prompting() {
    this.answers = await this.prompt([
      {
        type: 'input',
        name: 'title',
        message: '제목을 입력하세요.',
      },
    ]);
  }

  writing() {
    const templateHtmlPath = this.templatePath('index.html');
    const destHtmlPath = this.destinationPath('public/index.html');
    this.fs.copyTpl(templateHtmlPath, destHtmlPath, {
      title: this.answers.title,
    });
  }
};
위와 같이 작성 후 yo appname 실행 후
폴더 구조로 나타내면 다음과 같습니다.
/
|____ path/to/.../node_modules
|      |____ generator-name
|             |____ generators
|                    |____ templates <- this.sourceRoot();
|                           |____ foobar.json <- this.templatePath('foobar.json');
|                    |____ index.js
|
|
|
|____ project <- this.destinationRoot();
       |____ index.js <- this.destinationPath('index.js');
위와 같이 실행 후 project/index.js로 파일이 저장됩니다.
실행방법
generator는 로컬에서 개발 중이므로 아직 전역 npm모듈로 사용할 수 없습니다. npm을 사용하여 전역 모듈을 만들고 로컬모듈에 심볼릭 링크를 할 수 있습니다.
우선, generator 프로젝트의 경로에서 다음을 입력합니다.
npm link그러면 프로젝트 종속성이 설치되고 전역 모듈을 로컬 파일에 심볼릭 링크합니다.
npm이 완료되면 yo appname 으로 generator를 실행할 수 있습니다.
yeoman으로 만든 자동화시스템 예시
다음 자동화시스템은 Restful API를 개발하기 위한 controller, test코드의 기본적인 틀을 제공한다.
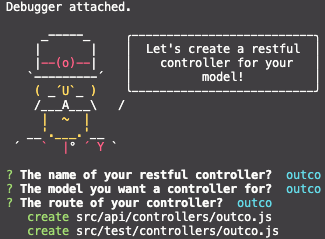
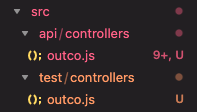
위와 같이 질문에 맞게 답을 쓰게되면 아래와 같이 generator에서 자동화를 해준다.
// src/api/controllers/outco.js
import outco from '../../models/outco';
import {
  respondWithResult,
  handleError,
  handleEntityNotFound,
  patchUpdates,
  removeEntity,
} from './helpers';

// Gets a list of persons
export function indexoutco(req, res) {
  return outco.find().exec()
    .then(respondWithResult(res))
    .catch(handleError(res));
}

// Gets a specific outco by id
export function showoutco(req, res) {
  return outco.findById(req.swagger.params.id.value).exec()
    .then(handleEntityNotFound(res))
    .then(respondWithResult(res))
    .catch(handleError(res));
}

// Creates a outco
export function createoutco(req, res) {
  return outco.create(req.body)
    .then(respondWithResult(res, 201))
    .catch(handleError(res));
}

// upsert(put) a specific outco
export function upsertoutco(req, res) {
  return outco.findOneAndUpdate({
    _id: req.swagger.params.id.value,
  },
  req.body,
    {
      new: true,
      upsert: true,
      setDefaultsOnInsert: true,
      runValidators: true,
    }).exec()
  .then(respondWithResult(res, 200))
  .catch(handleError(res));
}

// patch a specific outco
export function patchoutco(req, res) {
  return outco.findById(req.swagger.params.id.value).exec()
    .then(handleEntityNotFound(res))
    .then(patchUpdates(req.body))
    .then(respondWithResult(res))
    .catch(handleError(res));
}

// destroy a specifix outco
export function destroyoutco(req, res) {
  return outco.findById(req.swagger.params.id.value).exec()
    .then(handleEntityNotFound(res))
    .then(removeEntity(res))
    .catch(handleError(res));
}
// src/test/controllers/outco.js
import should from 'should';
import request from 'supertest';
import server from '../../index';
import outco from '../../models/person';
describe('controllers', () => {
describe('outco', () => {
describe('GET outco', () => {
it('should return a list with outcos', (done) => {
done();
});
});
describe('POST outco', () => {
it('should create a outco', (done) => {
done();
})
});
describe('GET outco/:id', () => {
it('should return the correct outco', (done) => {
done();
});
});
describe('PUT outco/:id', () => {
it('should update a outco', (done) => {
done();
});
});
describe('DELETE outco/:id', () => {
it('should delete a outco', (done) => {
done();
});
});
});
});
위와 같이 약간의 설정 과정만 거치면 개발환경을 자동화 해주는 generator 처럼 여러가지 형태의 generator를 개발할 수 있다.
마침
api양이 많아지면서 swagger로 api문서를 작성하기 점점 버거워 지기 시작했다. 그래서 api문서를 자동화할 수 있는 툴인 yeoman을 찾게 됐고 학습하다보니 swagger 자동화 뿐만 아니라 프로젝트 기본 틀을 구성하는 등 여러 곳에서 쓰일 수 있을 것 같다. 꽤나 유용한 툴인것 같아 swagger자동화를 개발한 후에도 이용할 생각이다.
출처