Redis가 뭘까?
처음, 업무중에 Redis를 써서 업무를 진행하라는 말을 들었다.
"그래서 Redis가 뭔데..?"
좀 벙쪘지만 어쩔 수 있나 찾아봐야지!
찾아본 결과 내 결론은 이와 같았다
"메모리에 올려서 사용할 수 있는 key-value 형태의 DB서버"
뭐 정확히 말하면 DB는 아니라고 할 수도 있으나 초보인 나에게는 이정도의 요약이 적당했다.
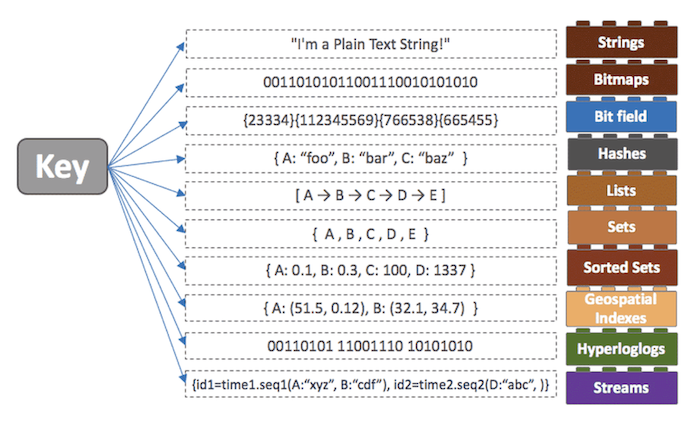
Redis에 저장할 수 있는 값은 다양했다.

단순히 String을 저장 할 수도 있고, Hash, List, Set 등 다양한 형식을 지원했다.
이것이 Redis가 지닌 강점이라고 한다.
Redis는 윈도우보다는 리눅스 친화적이라고 한다. 윈도우에서도 사용은 가능하나 리눅스에서 좀 더 사용하기 쉽다고 한다.
사용에는 두 가지가 필요하다. Redis-Server와 Redis-Cli
맥에서는 brew를 이용해서도 설치가 가능하고, https://redis.io/download/ 에서도 설치가 가능하다.
윈도우에서는 Redis-server를 직접 실행하거나 서비스에 등록해서 서버를 가동시키고, 이 서버에 데이터를 저장하고 사용하는 것은 Redis-cli에서 한다.
Redis-cli 사용법은 구글에 검색하면 많이 나오니까... 나는 잘 안나오는 SpringBoot 연결부분을 다루도록 할 예정!
SpringBoot와의 연결!
Redis 연결을 위해서는 Redis 설정을 위해 Config와 application.properties 이렇게 2개를 설정해주어야 하고
실제 사용을 위해서는 이를 사용하는 Controller가 하나 필요하다.
gradle 의존성을 하나 추가하자.
implementation 'org.springframework.boot:spring-boot-starter-data-redis'
먼저 application.properties를 보자
spring.data.redis.port = 26379
spring.data.redis.host = 192.168.85.49
spring.data.redis.password = 1234
port는 기본적으로 6379가 기본이며 나처럼 변경할 수 있다.
host도 127.0.0.1이 기본이지만 변경이 가능하고, passWord도 설정이 가능하다.
특징으로는
기존에는 'spring.redis.port = 6379' 와 같이 사용을 했는데 deprecated 되었다고 해서 'spring.data.redis.port = 6379' 식으로 사용을 하고 있다.
그리고 Config 설정을 보자
import org.springframework.beans.factory.annotation.Value;
import org.springframework.cache.annotation.EnableCaching;
import org.springframework.context.annotation.Bean;
import org.springframework.context.annotation.Configuration;
import org.springframework.data.redis.connection.RedisConnectionFactory;
import org.springframework.data.redis.connection.RedisStandaloneConfiguration;
import org.springframework.data.redis.connection.lettuce.LettuceConnectionFactory;
import org.springframework.data.redis.core.RedisTemplate;
import org.springframework.data.redis.serializer.StringRedisSerializer;

@EnableCaching
@Configuration
public class RedisConfig {

    @Value("${spring.data.redis.host}")
    private String host;

    @Value("${spring.data.redis.port}")
    private String port;

    @Value("${spring.data.redis.password}")
    private String password;

    @Bean
    public RedisConnectionFactory redisConnectionFactory() {
        RedisStandaloneConfiguration redisStandaloneConfiguration = new RedisStandaloneConfiguration();
        redisStandaloneConfiguration.setHostName(host);
        redisStandaloneConfiguration.setPort(Integer.parseInt(port));
        redisStandaloneConfiguration.setPassword(password);
        LettuceConnectionFactory lettuceConnectionFactory = new LettuceConnectionFactory(redisStandaloneConfiguration);
        return lettuceConnectionFactory;
    }

    @Bean
    public RedisTemplate<String, Object> redisTemplate() {
        RedisTemplate<String, Object> redisTemplate = new RedisTemplate<>();
        redisTemplate.setConnectionFactory(redisConnectionFactory());
        redisTemplate.setKeySerializer(new StringRedisSerializer());
        redisTemplate.setValueSerializer(new StringRedisSerializer());
        return redisTemplate;
    }
}
위의 설정에 대해서 설명을 추가해보자면
- Config이기 때문에 이를 인식시키기 위해서 @Configuration 어노테이션을 추가해 주었다.
- application.properties에서 값을 가져다 사용하기 위해서 @Value 어노테션을 추가했고 해당 경로를 입력해주었다.
- Redis 연결을 위해 RedisConnectionFactory를 사용하였다. 여기에 RedisStandaloneConfiguration 객체를 생성하여 setHostName, setPort, setPassWord로 connection에 대한 정보를 입력해줌!
- key와 value를 입력하고 사용하기 위해서 하나의 Template를 생성해주었다. 앞에 들어가는 String이 key이고 뒤에 들어가는 Object가 value이며 setConnectionFactory를 진행하여 내가 연결한 조건에 맞추어 연결이 된다.
- 이 모두는 @Bean으로 수동 Bean 등록을 진행해준다.
이렇게 하면 연결은 끝이다! 적어도 Redis-server를 켰을 때 인식을 못 할 염려는 없다.
사용을 위한 Controller 세팅
그럼 이걸 사용해보기 위해서 값을 add, get 하는 Controller를 하나 만들어보자 코드는 다음과 같다.
import com.darsgateway.ViewInfo.Model.ViewInfoModel;
import lombok.RequiredArgsConstructor;
import org.springframework.data.redis.core.RedisTemplate;
import org.springframework.data.redis.core.ValueOperations;
import org.springframework.http.HttpStatus;
import org.springframework.http.ResponseEntity;
import org.springframework.web.bind.annotation.*;

@RestController
@RequiredArgsConstructor
public class RedisController {

    private final RedisTemplate<String, String> redisTemplate;

    @PostMapping("/redisTest")
    public ResponseEntity<?> addRedisKey(@RequestBody ViewInfoModel vo) {
        ValueOperations<String, String> valueOperations = redisTemplate.opsForValue();
        valueOperations.set(vo.getCallId(), vo.getOpenedAt());
        return new ResponseEntity<>(HttpStatus.CREATED);
    }
    @GetMapping("/redisTest/{key}")
    public ResponseEntity<?> getRedisKey(@PathVariable String key) {
        ValueOperations<String, String> valueOperations = redisTemplate.opsForValue();
        String value = valueOperations.get(key);
        return new ResponseEntity<>(value, HttpStatus.OK);
    }
}- 먼저 앞에서 만들었던 RedisTemplate를 불러온다. 여기서는 String, String으로 썼네
- ValueOperation Method는 redis에서 String 값을 처리하기 위해 사용하는 Method이다.
만일 List를 사용하고 싶으면 ListOperation, Set을 사용하고 싶으면 SetOperation을 사용하면 된다! (opsForList, opsForSet을 함께 사용하면 된다)
이정도만 세팅해주면 SpringBoot와 연결하여 api는 기본적으로 세팅이 되었다고 본다.
까먹지 말고 다음에도 사용해보자!😌