
개요
const Variant = {
    Title: "title",
    Body: "body"
}
얼마전에 프로젝트를 진행하다가 Object의 값들을 타입으로 써야하는 상황이 생겼다.
type KeysOfVariant = keyof typeof Variant그러다 이런 코드가 만들어졌는데
도대체 keyof가 뭐고 typeof는 왜써야하는지 너무 혼란스러운 상황이 발생했다.🚨 (아 물론 나 혼자 혼란스러웠음)
또, keyof라는 키워드 하나로 어떻게 object type의 keys를 가져오는지 동작 원리가 궁금해졌다.

백도훈
패시브: 그냥 외우라고 하면 못본척하기
학생때부터 모르는게 생기면 항상 구글, 네이버 선생님한테 질문하고, 책 뒤져서라도 이해하고 나야 외워지는 올바른 학생이었다. (뻔뻔)
이렇게 직접 찾아보고 공부해야 오래오래 기억에 남기때문에 이번에도 찾아보기로 했다.

이때만해도 금방찾을 줄 알았지…
학습 목표
- Typescript의 컴파일 과정에 대해 간략하게 알아본다.
- Typescript가 keyof 키워드를 만났을 때 어떻게 동작하는지 찾아보고 정리한다.
1. Typescript 컴파일 과정
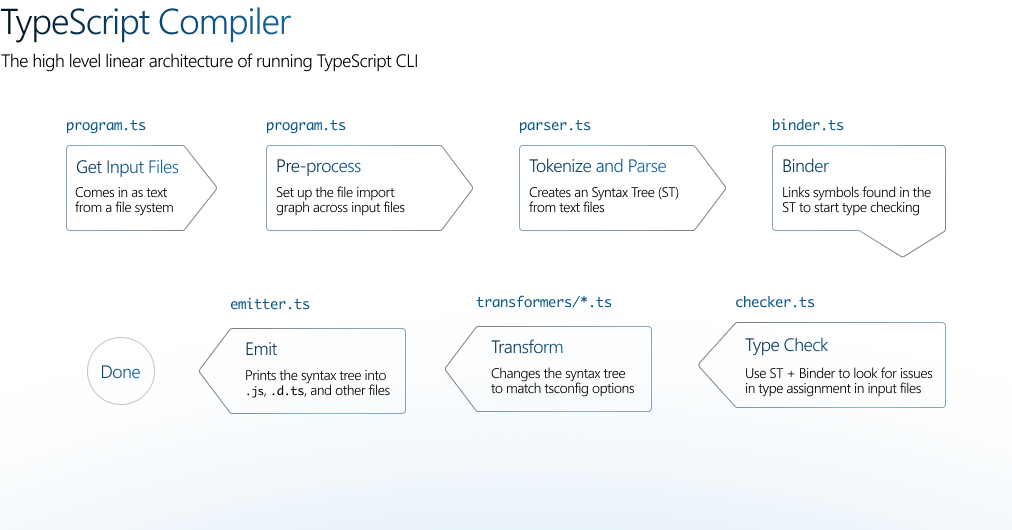
1-1. Source Code to Data
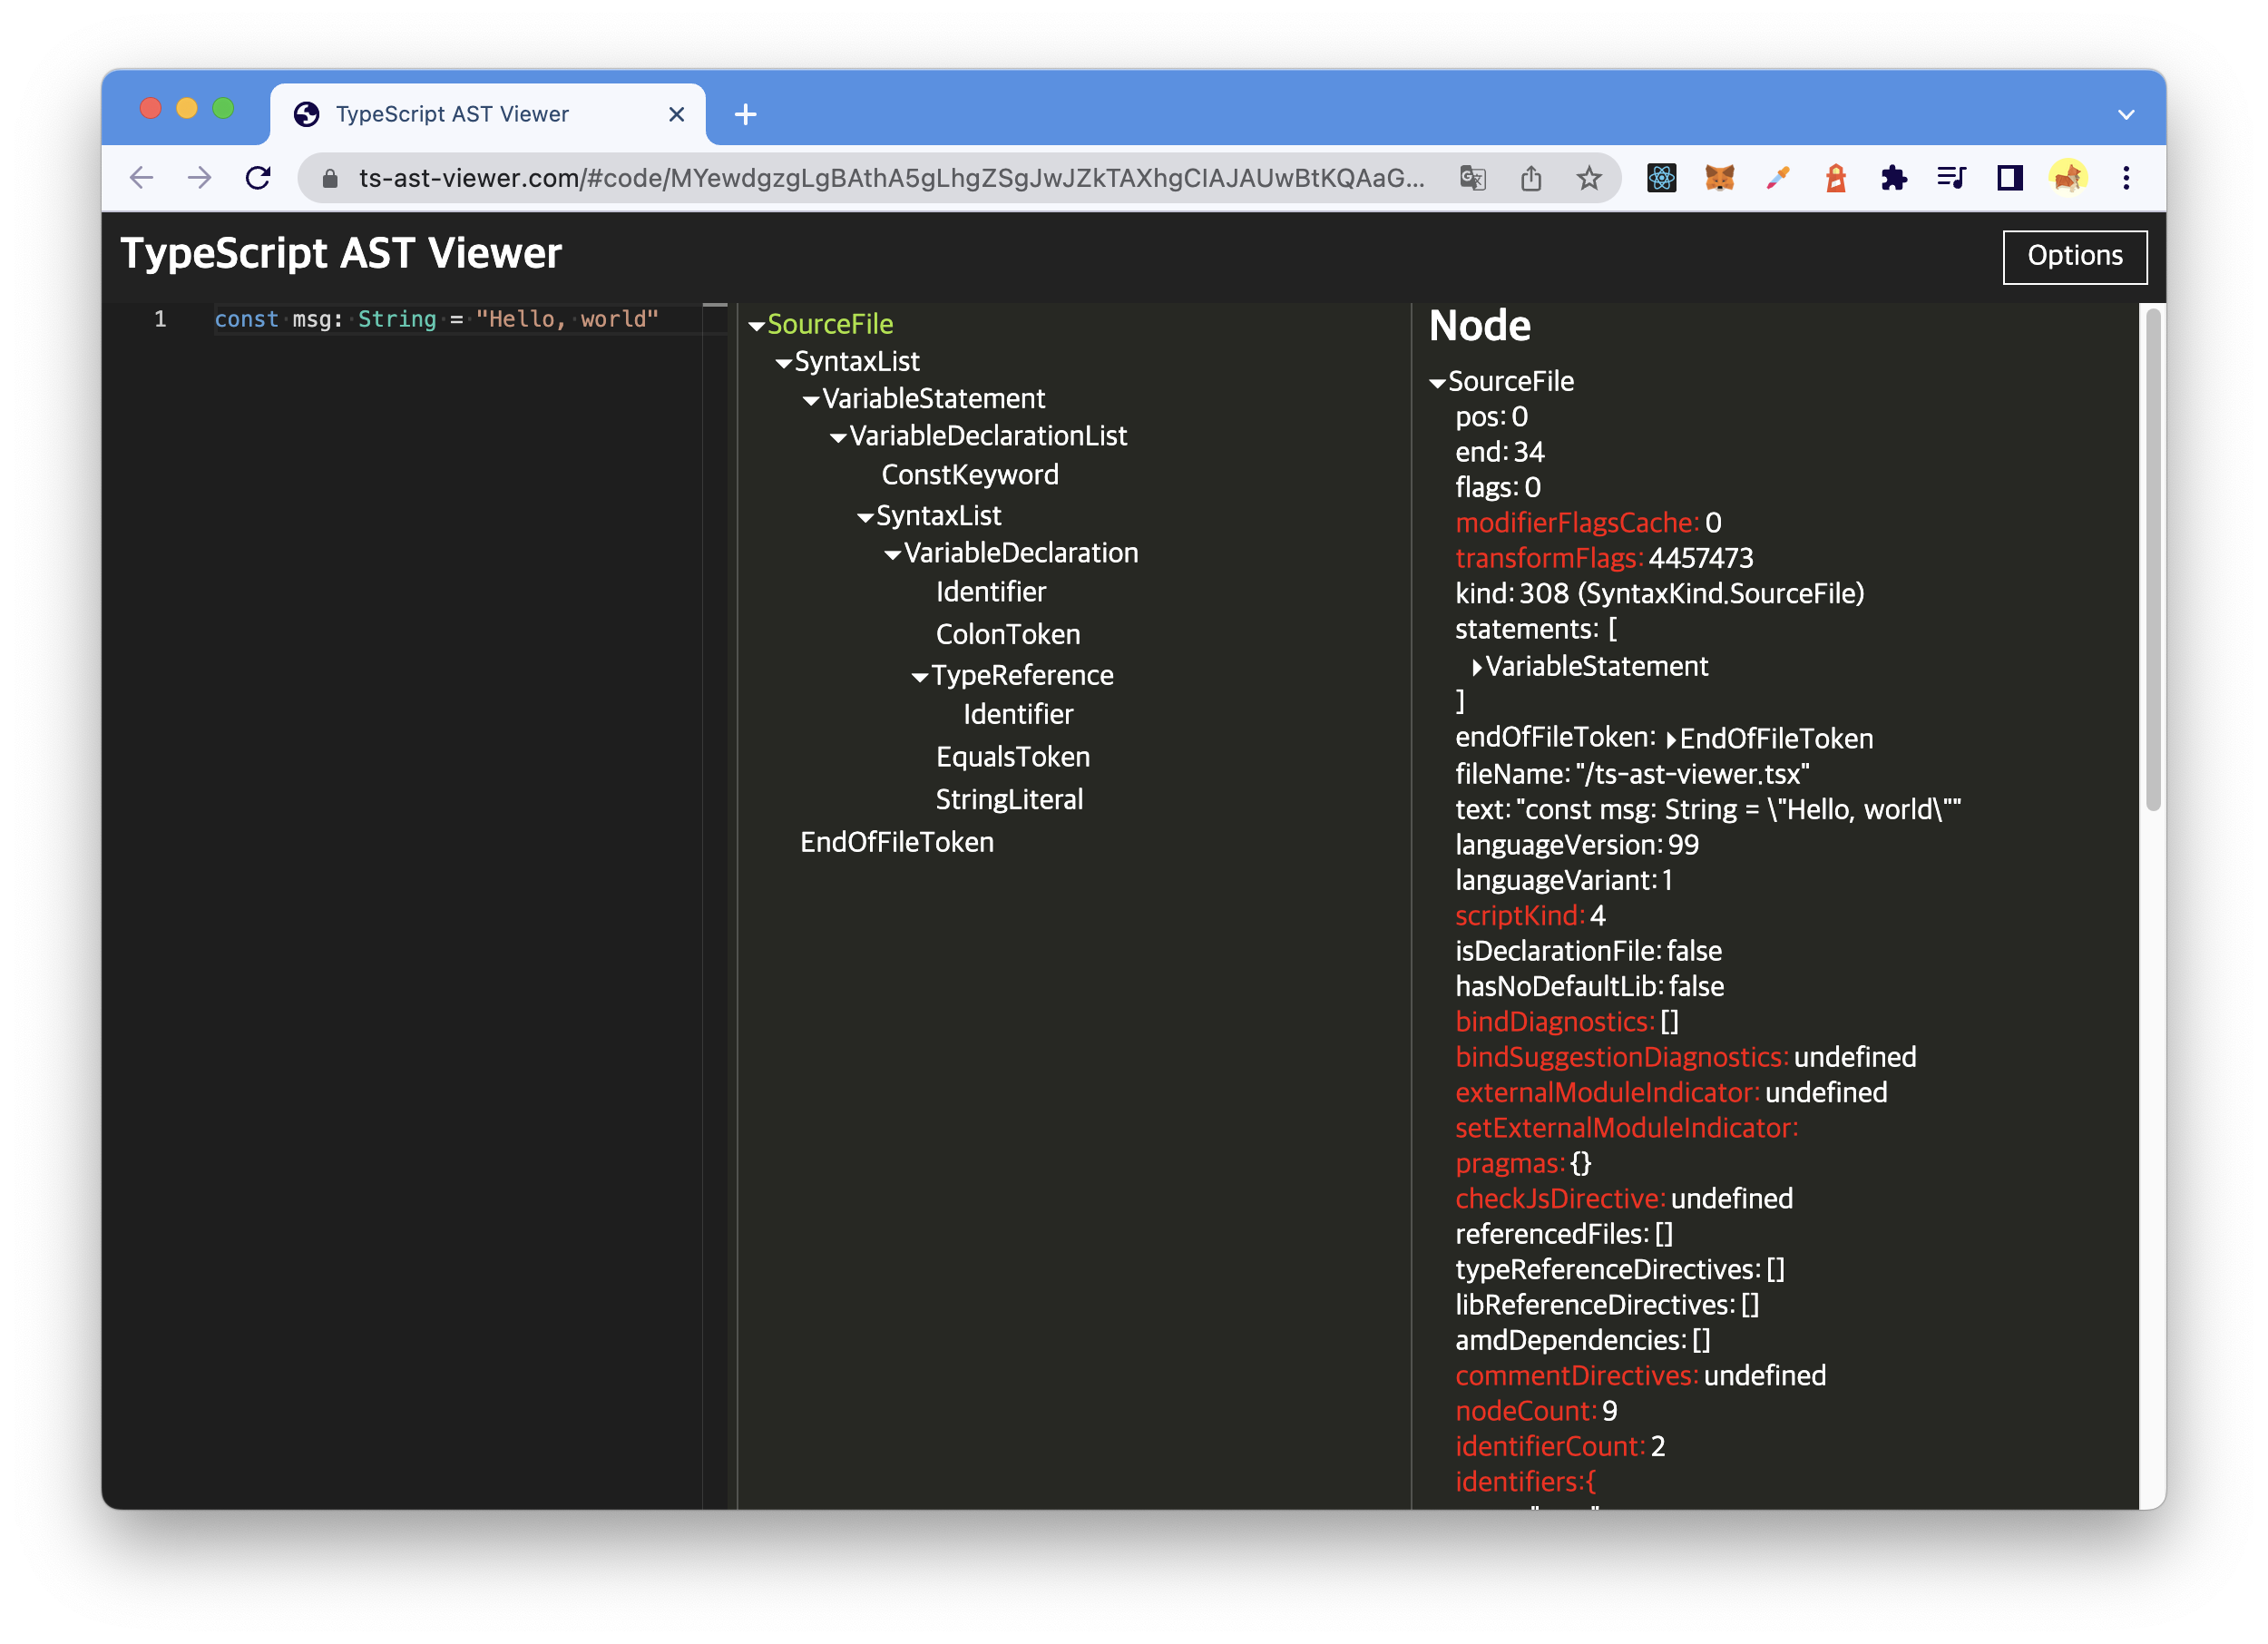
const msg: string = "Hello, world"
welcome(msg)

function welcome(str: string) {
	console.log(str)
}
위와 같은 코드를 3개의 문(statement)으로 나눌 수 있다.
- 변수
'msg'를 선언하는 문 - 함수
'welcome'을 호출하는 문 - 함수
'welcome'을 선언하는 문
그리고 각 문들을 아래와 같이 chunk 단위로 나눈다.

이렇게 자른 chunk들을 Tree의 노드로 표현한 것이 추상구문트리(AST)이다.
Typescript가 AST를 만들기 위해선 다음 2가지가 필요하다.
🔦 Scanner
코드의 왼쪽에서 오른쪽까지 문자열을 읽으면서 chunk들이 어떤 토큰인지 분류해준다.
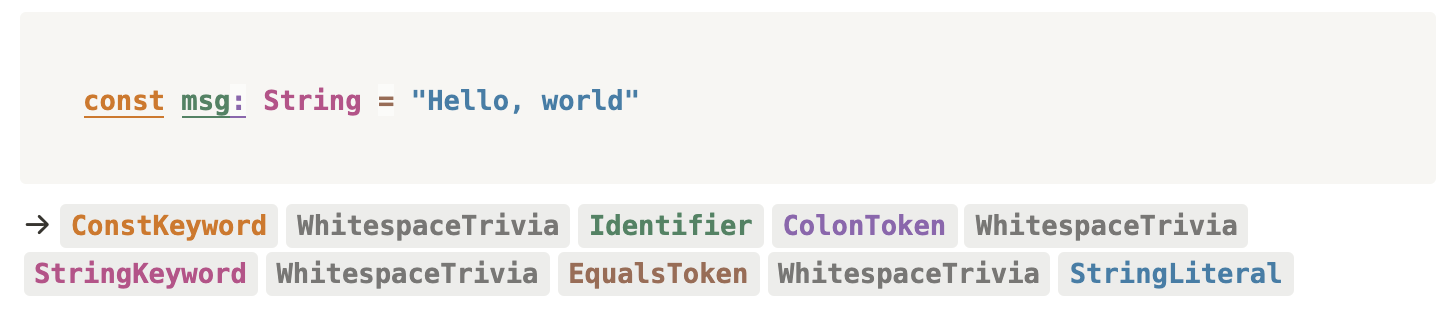
👯♂️ Parser
Scanner가 만든 token들로 Tree를 만든다.

1-2. Type Checking
Type Checking에 대해 알아보기전에 Symbol에 대해서 먼저 알아야한다.
Typescript에는 다음과 같이 정의되어 있다.
export interface Symbol {
	flags: SymbolFlags;                     // Symbol flags
  escapedName: __String;                  // Name of symbol
  declarations?: Declaration[];           // Declarations associated with this symbol
  valueDeclaration?: Declaration;         // First value declaration of the symbol
  members?: SymbolTable;                  // Class, interface or object literal instance members
  exports?: SymbolTable;                  // Module exports
  globalExports?: SymbolTable;            // Conditional global UMD exports
  /** @internal */ id: SymbolId;          // Unique id (used to look up SymbolLinks)
  /** @internal */ mergeId: number;       // Merge id (used to look up merged symbol)
  /** @internal */ parent?: Symbol;       // Parent symbol
  /** @internal */ exportSymbol?: Symbol; // Exported symbol associated with this symbol
  /** @internal */ constEnumOnlyModule: boolean | undefined; // True if module contains only const enums or other modules with only const enums
  /** @internal */ isReferenced?: SymbolFlags; // True if the symbol is referenced elsewhere. Keeps track of the meaning of a reference in case a symbol is both a type parameter and parameter.
  /** @internal */ isReplaceableByMethod?: boolean; // Can this Javascript class property be replaced by a method symbol?
  /** @internal */ isAssigned?: boolean;  // True if the symbol is a parameter with assignments
  /** @internal */ assignmentDeclarationMembers?: Map<number, Declaration>; // detected late-bound assignment declarations associated with the symbol
}escapedName: Symbol의 이름declarations: 해당 Symbol의 선언문 배열members: 해당 Symbol내에 선언되어 있는 Symbol들
이렇게 코드만 봐선 Symbol이 어떤건지 바로 파악하긴 어려워 예시를 들고왔다.
Typescript AST Viewer로 조금 더 개발자친화적(?)으로 확인해본 후 Binder에 대해 알아보자.
interface Variant {
    Title: string,
    Body: string,
}
해당 코드에서 Variant의 Symbol은 아래와 같다.
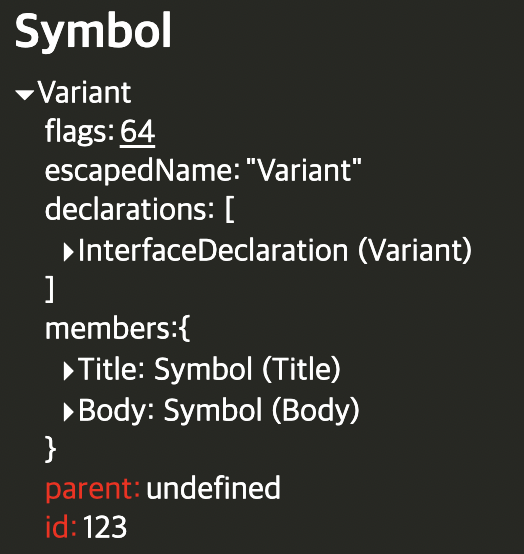
escapedName:'Variant'declarations:[InterfaceDeclaration(Variant)]members:{ Title: Symbol(Title), Body: Symbol(Body) }
🔗 Binder
Binder는 Scanner와 Parser가 만든 전체 파일(Syntax Tree)을 읽어 타입 검사에 필요한 정보를 수집해 Symbol을 만든다.
그리고 Tree를 순회하면서 필요한 Scope를 정의하는 등 타입 체크에 필요한 메타 데이터들을 수집한다.
const msg: string = "Hello, world"
welcome(msg)

function welcome(str: string) {
	console.log(str)
}-
Tree를 순회하다
‘msg’Identifer를 만남 -
Global Scope에 msg 추가

-
‘welcome’Identifier를 만남 -
Global Scope에 welcome 추가
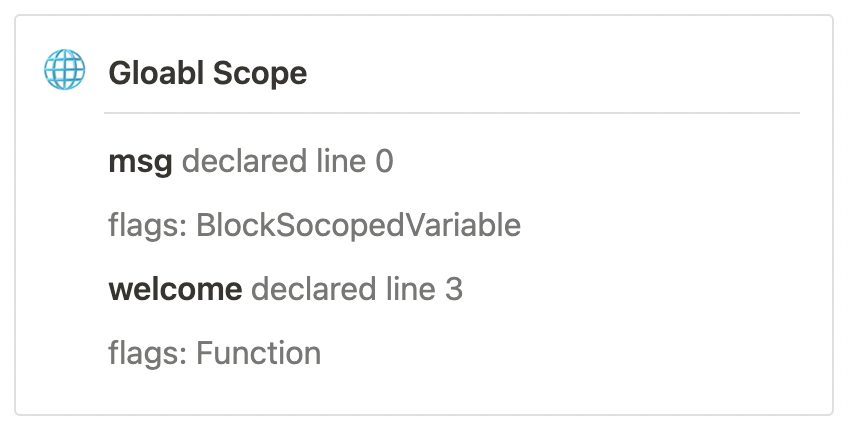
-
‘welcome’Definition을 만남 -
Function Scope에 해당 Definition 추가

-
‘welcome’함수의 str 파라미터를 만남 -
Function Scope에 해당 str 추가

🥸 Checker
Checker는 Typescript에서 마치 아이돌 센터처럼 제일 중요한 역할을 하는 놈이다.
타입 체크타입 비교타입 추론
깊게 파고들면 끝도없이 어려워져서 간단하게만(사실은 더 알고 싶어도 선생님께서 저렇게만 알려주신다.) 알아보도록 하자. (뻔뻔)
🔎 타입 체크
이런 추상구문트리가 있을 때 checker는 트리의 모든 노드마다 검사를 한다.

🦋 타입 비교
아래의 Object들을 비교할 때

checker는 바깥부터 점점 안쪽으로 검사한다.
그래서 제일 먼저 Object 구조인지 먼저 파악한다.
두 Object 모두 ‘{', ‘}'로 감싸진 Object인걸 확인하고 안쪽을 검사한다.

hello라는 filed를 가지고 있는지 확인하고 다음 노드를 검사한다.

hello filed의 type을 검사하는데,
왼쪽 Object의 hello의 타입은 number지만 오른쪽 hello의 타입은 string (”world”)이다.

따라서 checker는 두 Object가 다르다고 판단한다.
❌ { hello: number } = { hello: "world" }그럼 여기서 퀴즈하나 내겠습니다. (싫어도 푸셔야해요. 제발 풀어주세요. 쉽다구요 정말)

유퀴즈? (선택지에 No는 없어요)
checker에게 아래 질문을 한다면 checker는 뭐라고 답할까요? ✅ or ❌
Promise<string> = Promise<{ hello: string }>🕵️ 타입 추론
msg에 string이라는 type을 명시해주지 않을때 어떻게 타입 추론을 할까?
const msg = "Hello, World"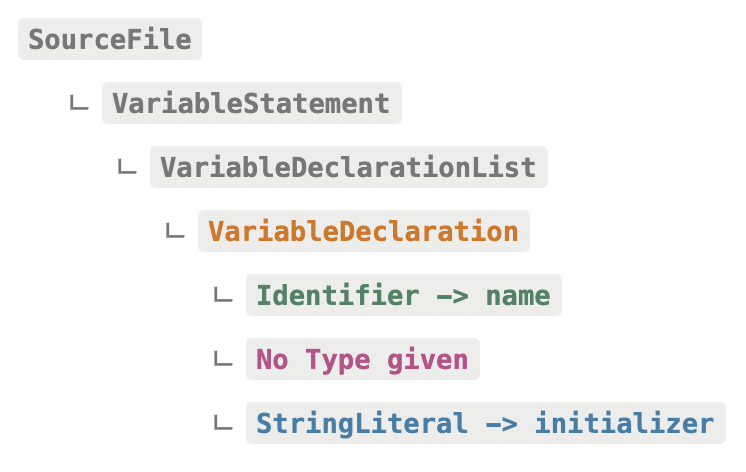
이 경우엔 AST에서 msg에 대한 Type을 찾을 수 없다. 하지만 initializer(StringLIteral)의 type을 name(Identifier)에게 적용하면 간단하게 해결 된다.
그럼 이런 제네릭 함수에선 어떻게 타입 추론을 할 수 있을까?
declare function setup<T>(config: { initial(): T }): T예를 들어, abc는 setup함수에게 “abc”를 반환하는 initial()함수를 파라미터로 전달했다.
const abc = setup({ initial() { return "abc" } })이때 initial함수의 반환 타입은 string ("abc") 이다.
타입 비교하는것 처럼 바깥 노드부터 안쪽 노드까지 탐색하면서 T에 매칭되는 type을 찾아보자.
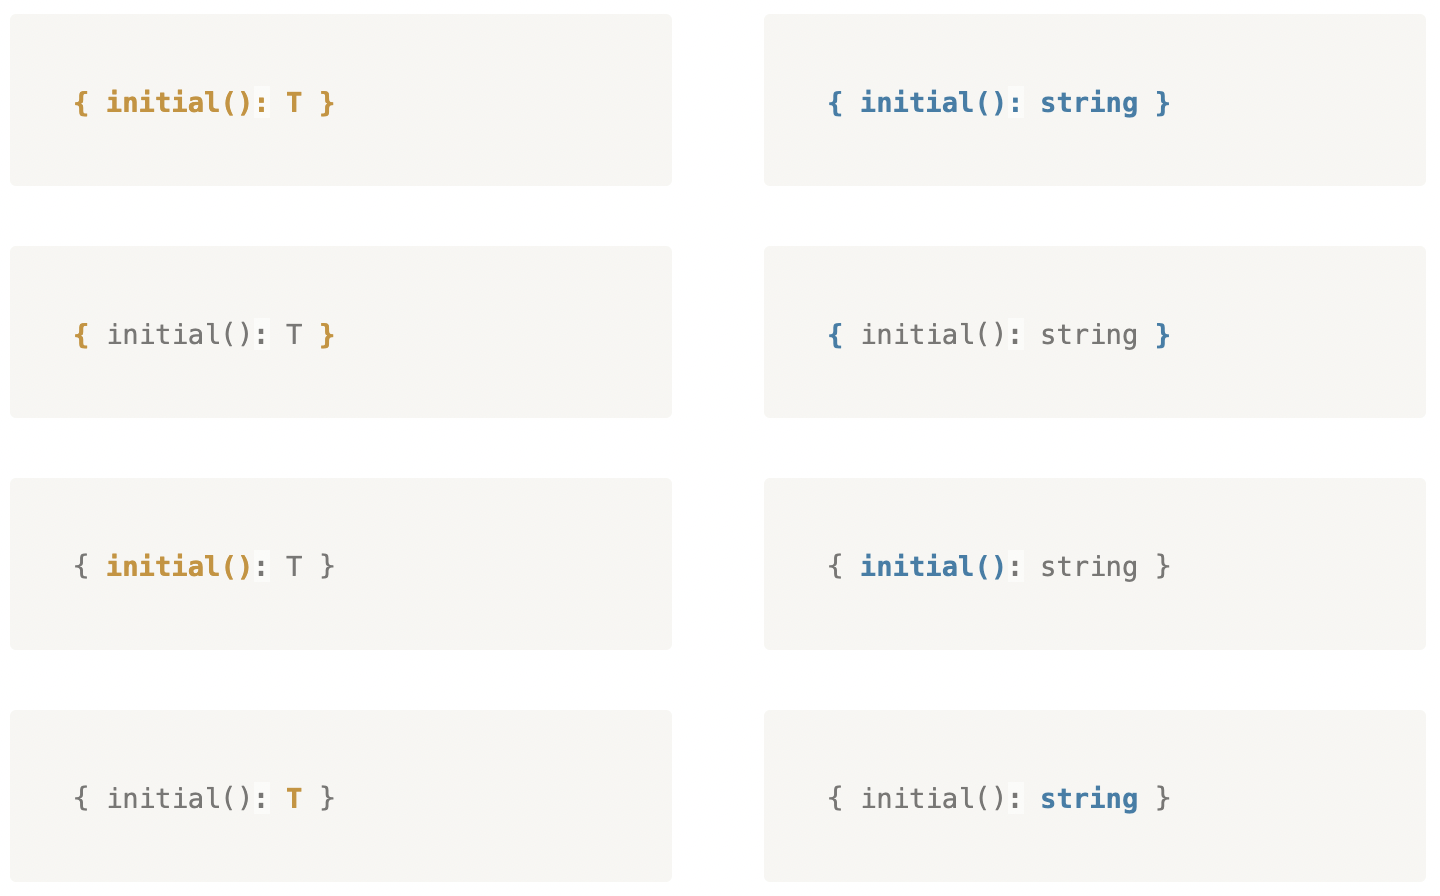
이제 T는 string인것을 알아냈다.
그럼 setup함수에 있던 T에 string을 넣어서 abc가 호출한 setup함수를 완성해보자.
declare function setup<string>(config: { initial(): string }): string그리고 다시 abc변수 선언문을 checker가 검사한다.
const abc = setup({ initial() { return "abc" } })✅ { initial(): string } = { initial(): "abc" } // 성공~그리고 contextual typing이라는것도 checker가 해주는데 여기까지 더 하다간 배보다 배꼽이 커질것 같아서 생략한다.
1-3. Creating Files
Syntax Tree를 만들고, Type Checking까지 끝났다면 이제 Javascript파일을 만들어주어야 한다.
여기는 정말 간단하게만 하고 넘어간다.
🚚 Transformer
Typescript에서만 쓰이는 노드들을 제거하고, Javascript가 이해할 수 있는 Syntax Tree로 만들어준다.
🪄 Emitter
Emitter는 Systax Tree를 file로 만들어준다.
📄 요약
Typescript의 컴파일러는 다음과 같은 순서로 동작한다.
- Source Code to Data
- Scanner:
Text→Tokens - Parser:
Tokens→Tree
- Scanner:
- Type Checking
- Binder:
Syntax→Symbol - Checker:
Type Check
- Binder:
- Creating Files
- Transformer:
Syntax Tree (TS)→Syntax Tree (JS) - Emitter:
Syntax Tree→File
- Transformer:
2. keyof 동작원리 알아보기

드디어 본론입니다.
혹시 지치시나요?
다시 돌아와서 아래와 같은 Variant 객체가 있다. Variant의 keys를 불러오고 싶을 때 어떻게 해야할까?
const Variant = {
    Title: "title",
    Body: "body"
}
이렇게 하면 될까?
type VariantKeys = keyof Variant컴파일러는 다음과 같은 에러를 뱉는다.

🔑 keyof
에러를 해결하기 전에 keyof에 대해 먼저 알아보자.
Typescript 공식문서는 keyof에 대해 다음과같이 말한다.
The
keyofoperator takes an object type and produces a string or numeric literal union of its keys.
여기서 주목해야 하는건 object type이다.
object type이면 위에서 정의한 Variant 아닌가?라고 생각할 수 있다. 필자도 그랬다.
하지만 Variant는 에러메세지가 말하는것처럼 obejct type이 아닌 obejct literal(value)이다.
🍡 object type
그럼 object type은 뭘까?
object type은 다음과 같이 object의 properties의 type들을 정의한 것이다.
type ObjectTypeOfVariant = {
	Title: string,
	Body: number
}
interface ObjectTypeOfVariant {
Title: string;
Body: number;
}❗ 즉, Variant는 object type 인 ObjectTypeOfVariant를 구체화한 인스턴스이다.
따라서 Typescript 컴파일러가 keyof 키워드를 만나면,
Typescript의 checker는 미리 파싱되어 있는 object type의 properties를 반환한다.
interface Variant {
	Title: string;
	Body: number;
}
Variant의 AST를 보면 members로 Title과 Body을 가진다.

아마 members에 있는 Symbol들을 Type의 properties로 만들어 반환하는것 같다.
이렇게만 이해하고 넘어가기엔 코드 레벨의 동작이 너무 너무 궁금해서 거의 일주일동안 Typescript 코드를 계속 찾아봤다.
자세한 코드들은 아래에서 알아보자.
❌ unresolved
properties을 만들고 반환하는 과정을 알아보기전에 에러메세지를 다시 살펴보자.
에러메세지를 보면 /*unresolved*/라는 생소한 단어가 등장한다.
unresolved에 대해선 아무리 찾아봐도 충분한 자료를 찾기 힘들어 ChatGPT에게 물어보았다.
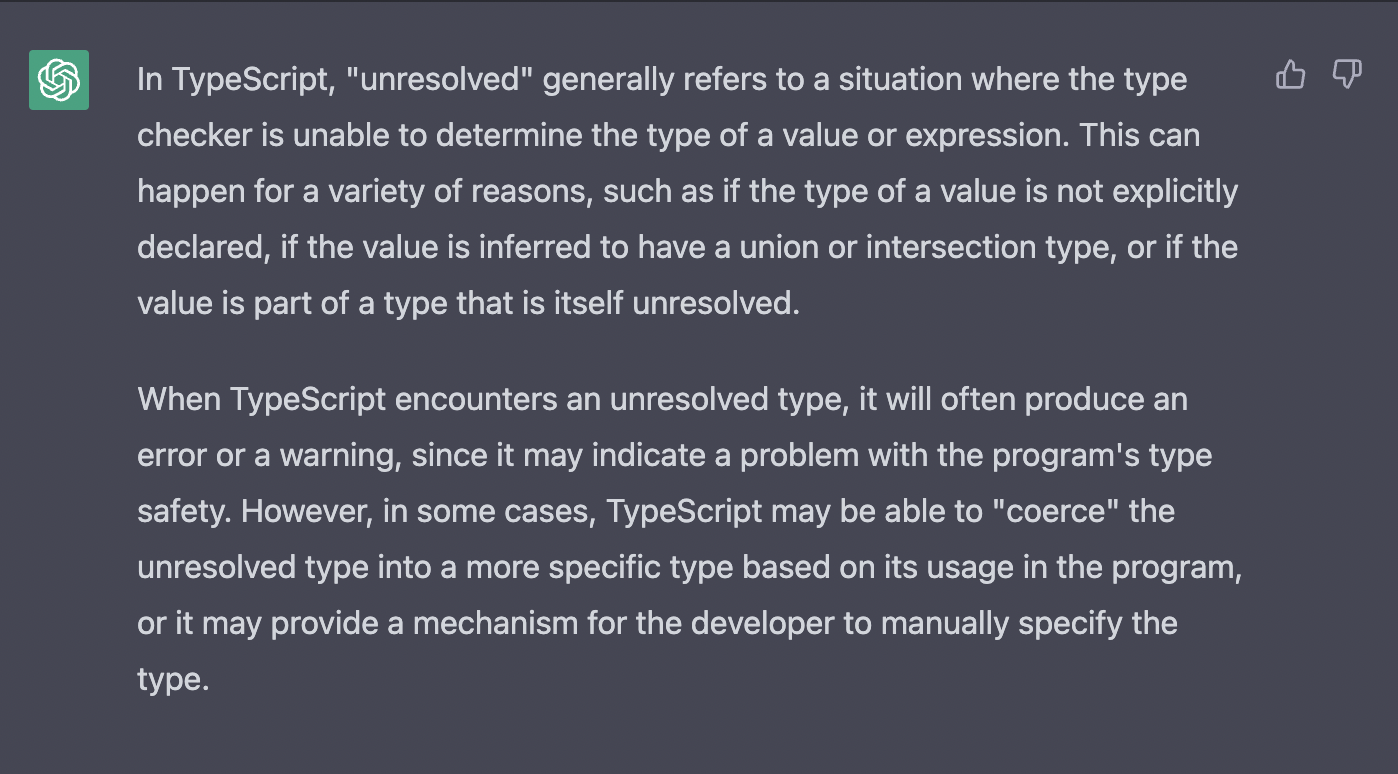
정리하면 unresolved는 checker가 해당 value의 type을 알 수 없는 상황이다.
keyof는 object type의 properties를 반환하는데 Variant는 unresolved한 상태이다.
따라서 다음과 같은 에러가 발생했던 것이다.
✅ resolved
unresolved에 대해 알아봤으니 resolved에 대해서도 알아보자.
Typescript에서 ResolvedType은 다음과 같이 정의되어 있다.
/** @internal */
// Resolved object, union, or intersection type
export interface ResolvedType extends ObjectType, UnionOrIntersectionType {
  members: SymbolTable;             // Properties by name
  properties: Symbol[];             // Properties
  callSignatures: readonly Signature[];      // Call signatures of type
  constructSignatures: readonly Signature[]; // Construct signatures of type
  indexInfos: readonly IndexInfo[];  // Index signatures
}ObjectType에서 members와 properties는 Optional인데 ResolvedType에선 members와 properties가 Optional이 아닌걸로 봐서
export interface ObjectType extends Type {
  objectFlags: ObjectFlags;
  /** @internal */ members?: SymbolTable;             // Properties by name
  /** @internal */ properties?: Symbol[];             // Properties
  /** @internal */ callSignatures?: readonly Signature[];      // Call signatures of type
  /** @internal */ constructSignatures?: readonly Signature[]; // Construct signatures of type
  /** @internal */ indexInfos?: readonly IndexInfo[];  // Index signatures
  /** @internal */ objectTypeWithoutAbstractConstructSignatures?: ObjectType;
}
object type을 처리할 때 해당 Object의 Type을 알기위해 resolved 상태로 만들어준 뒤 해당 type을 사용하는것 같다.
checker가 object type을 resolved 상태로 만들때 다음과 같이 동작한다.
100% 정확하지 않습니다. 너무 궁금해서 직접 찾아보고 도출해낸 가정(if)입니다.
-
resolveStructuredTypeMembers
structuredType을 resolve하기 위해 제일 처음 만나는 함수이다.
-
resolveObjectTypeMembers
symbolTable에서 해당 object의 member들을 가져는 함수이다.
-
setStructuredTypeMembers
struturedType을 ResolvedType으로 변환시켜서 반환한다.
function setStructuredTypeMembers(type: StructuredType, members: SymbolTable, callSignatures: readonly Signature[], constructSignatures: readonly Signature[], indexInfos: readonly IndexInfo[]): ResolvedType {
  const resolved = type as ResolvedType;
  resolved.members = members;
  resolved.properties = emptyArray;
  resolved.callSignatures = callSignatures;
  resolved.constructSignatures = constructSignatures;
  resolved.indexInfos = indexInfos;
  // This can loop back to getPropertyOfType() which would crash if `callSignatures` & `constructSignatures` are not initialized.
  if (members !== emptySymbols) resolved.properties = getNamedMembers(members);
  return resolved;
}
-
getNamedMembers
members에 있는 symbol들을 반환한다.
function getNamedMembers(members: SymbolTable): Symbol[] {
    let result: Symbol[] | undefined;
    members.forEach((symbol, id) => {
        if (isNamedMember(symbol, id)) {
            (result || (result = [])).push(symbol);
        }
    });
    return result || emptyArray;
}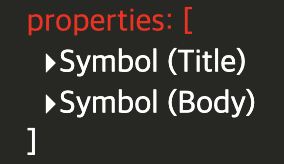
🔑 다시 keyof
앞에서 keyof, object type, object type이 어떻게 resolved되는가에 대해 알아봤다.
마지막으로 진짜 궁금했던 Typescript 컴파일러가 ‘keyof’ 키워드를 만나면 어떻게 동작하는가에 대해 알아보자.
interface Variant {
	Title: string,
	Body: string,
}

type KeysOfVariant = keyof Variant
해당 코드를 토큰으로 분리해 AST를 만들면 아래와 같다.
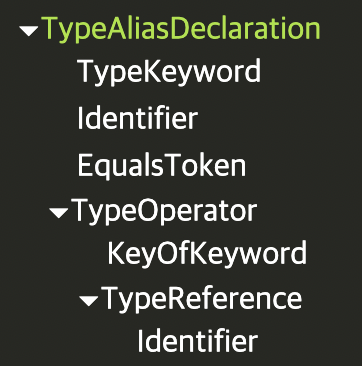
다른건 토큰 이름으로 예상할 수 있는데 TypeOperator는 되게 생소해서 찾아봤다.
export interface TypeOperatorNode extends TypeNode {
    readonly kind: SyntaxKind.TypeOperator;
    readonly operator: SyntaxKind.KeyOfKeyword | SyntaxKind.UniqueKeyword | SyntaxKind.ReadonlyKeyword;
    readonly type: TypeNode;
}
checker로 빙의해서 해당 타입을 추론해보자면 keyof 키워드를 사용하면 TypeOperator라는 타입의 Node가 되는것 같다.
실제 checker.ts의 코드를 살펴보자.
-
getTypeFromTypeNodeWorker
TypeNode의 Type을 가져오는 함수이다.
keyof Variant의 node.kind는SyntaxKind.TypeOperator이기 때문에 다음 분기를 타게된다.function getTypeFromTypeNodeWorker(node: TypeNode): Type { switch (node.kind) { ... case SyntaxKind.TypeOperator: return getTypeFromTypeOperatorNode(node as TypeOperatorNode); ... }
-
getTypeFromTypeOperatorNode
실제로 OperatorNode의 Type을 가져오는 함수이다.
keyof operator를 사용했기 때문에
SyntaxKind.KeyofKeyword분기를 타게 된다.function getTypeFromTypeOperatorNode(node: TypeOperatorNode): Type { ... switch (node.operator) { ... case SyntaxKind.KeyOfKeyword: links.resolvedType = getIndexType(getTypeFromTypeNode(node.type)); break; ... return links.resolvedType; }
-
getTypeFromTypeNode(node.type = TypeReference)
node의 타입을 살펴보면TypeReference이기 때문에 다시getTypeFromTypeNode함수를 호출해서 반환값을 가지고 온다.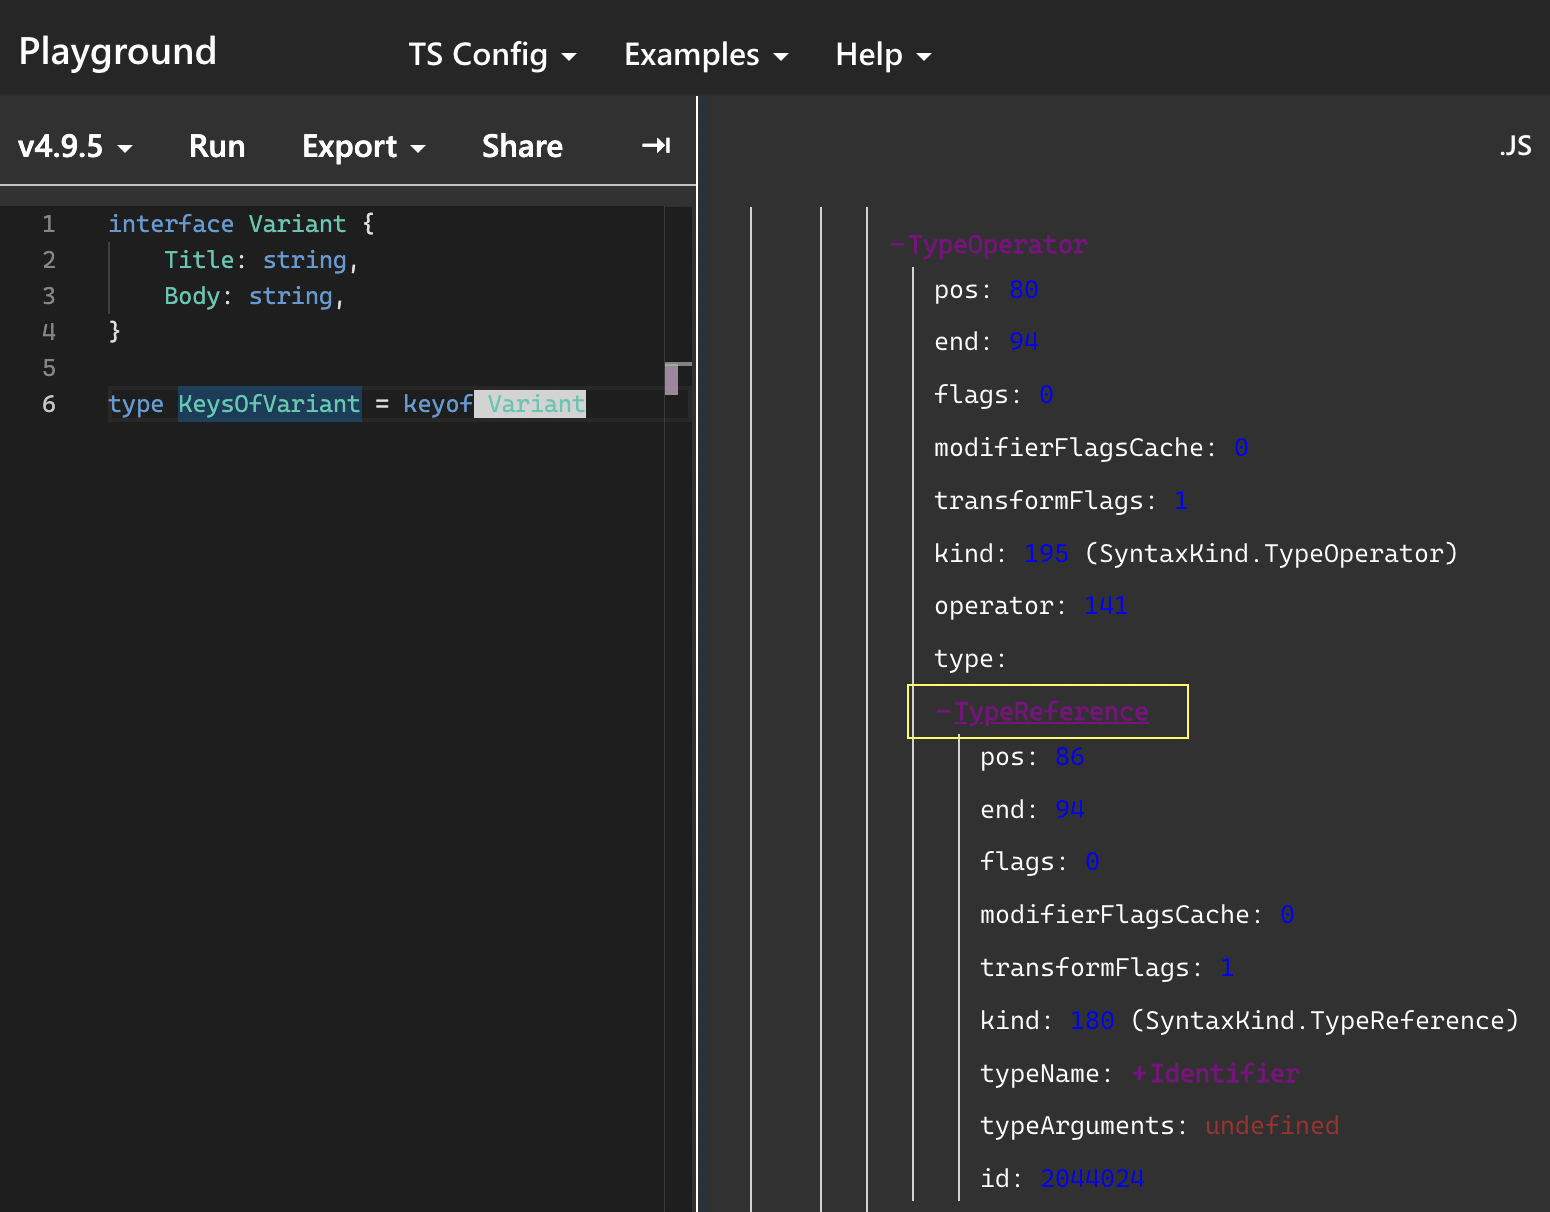
-
getIndexType
TypeReference의 Type을 가져와 index의 타입을 가져오는 함수이다.
function getIndexType(type: Type, stringsOnly = keyofStringsOnly, noIndexSignatures?: boolean): Type {
  type = getReducedType(type);
  return ...
      getLiteralTypeFromProperties(type, (noIndexSignatures ? TypeFlags.StringLiteral : TypeFlags.StringLike) | (stringsOnly ? 0 : TypeFlags.NumberLike | TypeFlags.ESSymbolLike),
          stringsOnly === keyofStringsOnly && !noIndexSignatures);
}
-
getLiteralTypeFromProperties
해당 Type의 Properties로부터 Literal Union Type을 만들어주는 함수이다.
function getLiteralTypeFromProperties(type: Type, include: TypeFlags, includeOrigin: boolean) {
    const origin = includeOrigin && (getObjectFlags(type) & (ObjectFlags.ClassOrInterface | ObjectFlags.Reference) || type.aliasSymbol) ? createOriginIndexType(type) : undefined;
    const propertyTypes = map(getPropertiesOfType(type), prop => getLiteralTypeFromProperty(prop, include));
    const indexKeyTypes = map(getIndexInfosOfType(type), info => info !== enumNumberIndexInfo && isKeyTypeIncluded(info.keyType, include) ?
        info.keyType === stringType && include & TypeFlags.Number ? stringOrNumberType : info.keyType : neverType);
    return getUnionType(concatenate(propertyTypes, indexKeyTypes), UnionReduction.Literal,
        /*aliasSymbol*/ undefined, /*aliasTypeArguments*/ undefined, origin);
}
실제로 Variant의 Type을 보면 Properties에
[Symbol(Title), Symbol(Body)]가 있다.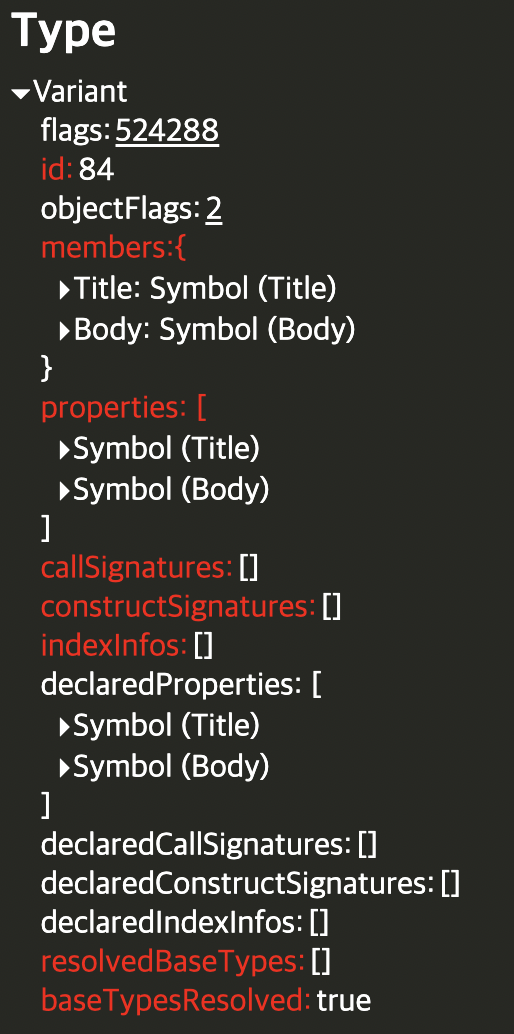
-
getPropertiesOfType
Type의 Properties를 반환해주는 함수이다.
function getPropertiesOfType(type: Type): Symbol[] {
    type = getReducedApparentType(type);
    return type.flags & TypeFlags.UnionOrIntersection ?
        getPropertiesOfUnionOrIntersectionType(type as UnionType) :
        getPropertiesOfObjectType(type);
}
-
getPropertiesOfObjectType
object type을 resolved로 만들어주고 properties를 반환한다.
위의 resolved 에서 봤던 그 함수다!
function getPropertiesOfObjectType(type: Type): Symbol[] {
    if (type.flags & TypeFlags.Object) {
        return resolveStructuredTypeMembers(type as ObjectType).properties;
    }
    return emptyArray;
}
❗ 정리하면 TypeOperator.Type은 ObjectType.properties로 만든 Union Type이다.
이젠 아래 코드에서 keyof typeof를 써야하는 이유에 대해 답할 수 있어야 한다.
const Variant = {
    Title: "title",
    Body: "body"
}

type KeysOfVariant = keyof typeof Variant
Variant가 object type이 아니어서 keyof 키워드를 사용할 수 없기 때문에, typeof로 Variant의 object type을 가져온 후 keyof키워드를 사용해 TypeOperator의 type을 가져오는 것이다.
마무리
저번에 Recoil 코드를 읽다가 너무 힘들었던 기억에 오픈소스에 대한 두려움이 매우 컸는데,
거의 일주일씩 시간써서 코드를 읽으니까 그래도 코드가 조금씩 읽히는게 너무 기분이 좋았다.

오픈소스.. 무섭지 않아요
떨고 있다구요?
쉿. 기분탓입니다.
여기까지 다 읽으신분들 너무 감사합니다. 칭찬 스티커 하나씩 드립니다. 👍
네…분량을 줄이려고 노력했는데, 실제로도 많이 줄였는데 여전히 분량이 많아서 저도 놀랬어요.
아무튼 다들 행복한 Typescript 하세요.
호기심 쿨타임이 다시 찬다면 Typescript나라로 다시 관광하러 갑니다.
Reference
https://github.com/microsoft/TypeScript
https://yceffort.kr/2022/05/how-typescript-compiler-works#타입-검사

스크롤의 압박이 ㅎㄷㄷ 하군요. 이렇게 타입스크립트를 잘 정리하신 분도 드문 것 같습니다. 저도 요즘 공부 중이라 반가운 마음에 댓글 달고 가요~!! ㅎㅎ