안녕하세요. 마인드카페 JP 앱을 새로 개발 중에 기존의 홈 화면을 iOS 13부터 도입한 Compositional Layout과 Diffable DataSource를 활용하여 리팩토링 하는 작업을 진행해보았습니다. 그 결과, 메모리 사용량이 약 68.71% 개선되었고 이에 대한 경험과 결과를 공유해보겠습니다.
문제인식
기존의 홈 화면에서는 데이터 및 뷰 업데이트 시 많은 메모리 사용과 성능 문제가 발생했습니다. 특히 뷰가 점점 늘어나면서 큰 데이터셋을 처리하고 동적인 레이아웃을 관리하는 데 어려움을 겪었습니다. 원인은 UITableView 및 UICollectionView의 nested 구조로 구성된 홈 화면의 구조 때문이라고 생각했습니다. 이유는 아래와 같습니다.
- Nested 뷰는 매우 복잡하고 렌더링 및 이벤트 처리에 추가적인 layer를 추가하면서 성능에 영향을 줄 수 있다.
- 각 뷰는 메모리 할당이 필요한데 nested 뷰는 더 많은 메모리를 소비한다. 따라서 뷰가 적었을 때는 괜찮았지만 현재 시점에서는 불필요한 메모리 낭비가 발생할 우려가 있다.
- 레이아웃 크기 조정하는 부분에서도 많이 까다롭고 업데이트 하는 시점이 불확실해 디버그와 수정에 시간을 많이 투자해야한다.
솔루션 도입
Compositonal Layout
iOS 13 이후 도입된 시스템으로, 복잡한 레이아웃을 구성하고 관리하기 쉽게 펼칩니다. 하나의 컬렉션 뷰로 다양한 레이아웃을 구성할 수 있고 빠른 속도의 장점이 있습니다.
Diffable DataSource
Hashable 기반으로 동작하며 기존의 DataSource와 reloadData()를 호출하는 것보다 데이터 관리와 업데이트 프로세스를 간소화하여 더 효율적이고 유지 관리 가능하며 시각적으로 매력적인 사용자 인터페이스를 구축하는 데 도움을 줍니다.
장점:
-
스냅샷 기반 접근:
- IndexPath 대신 Unique identifier (Hashable을 준수) 를 사용하여 데이터 상태의 스냅샷을 생성. 이러한 스냅샷 기반 특성은 실행 취소/다시 실행 기능, 다른 데이터 상태 저장 및 복원을 단순화 함.
- IndexPath 대신 Unique identifier (Hashable을 준수) 를 사용하여 데이터 상태의 스냅샷을 생성. 이러한 스냅샷 기반 특성은 실행 취소/다시 실행 기능, 다른 데이터 상태 저장 및 복원을 단순화 함.
-
자동 애니메이션:
- apply()를 사용하여 snapshot에 데이터 상태를 반영하여 UI 업데이트. 기존에는 reloadData()를 호출해야 했는데 그럼 모든 셀을 다시 그리며 애니메이션이 끊겨 부자연스럽게 변경이 됨.
snapshot은 데이터 변경을 스스로 파악해 자동으로 처리 → 부드러운 전환 효과로 사용자 경험 향상.
- apply()를 사용하여 snapshot에 데이터 상태를 반영하여 UI 업데이트. 기존에는 reloadData()를 호출해야 했는데 그럼 모든 셀을 다시 그리며 애니메이션이 끊겨 부자연스럽게 변경이 됨.
-
⭐️ 아래와 같은 기존의 synchronization crash 발생을 예방.
- Centrailized Truth를 사용해 데이터 업데이트 시 크래시가 발생할 경우가 없음.
// UI와 DataSource간의 truth가 맞지않을때 크래시 오류

*** Terminating app due to uncaught exception
‘NSInternalInconsistencyException’, reason: ‘Invalid update: invalid number
of sections. The number of sections contained in the collection view after
the update (10) must be equal to the number of sections contained in the
collection view before the update (10), plus or minus the number of sections
inserted or deleted (0 inserted, 1 deleted).’
***
😃 마인드카페 JP 홈 레이아웃 구현
Grid Section (Category) 구현
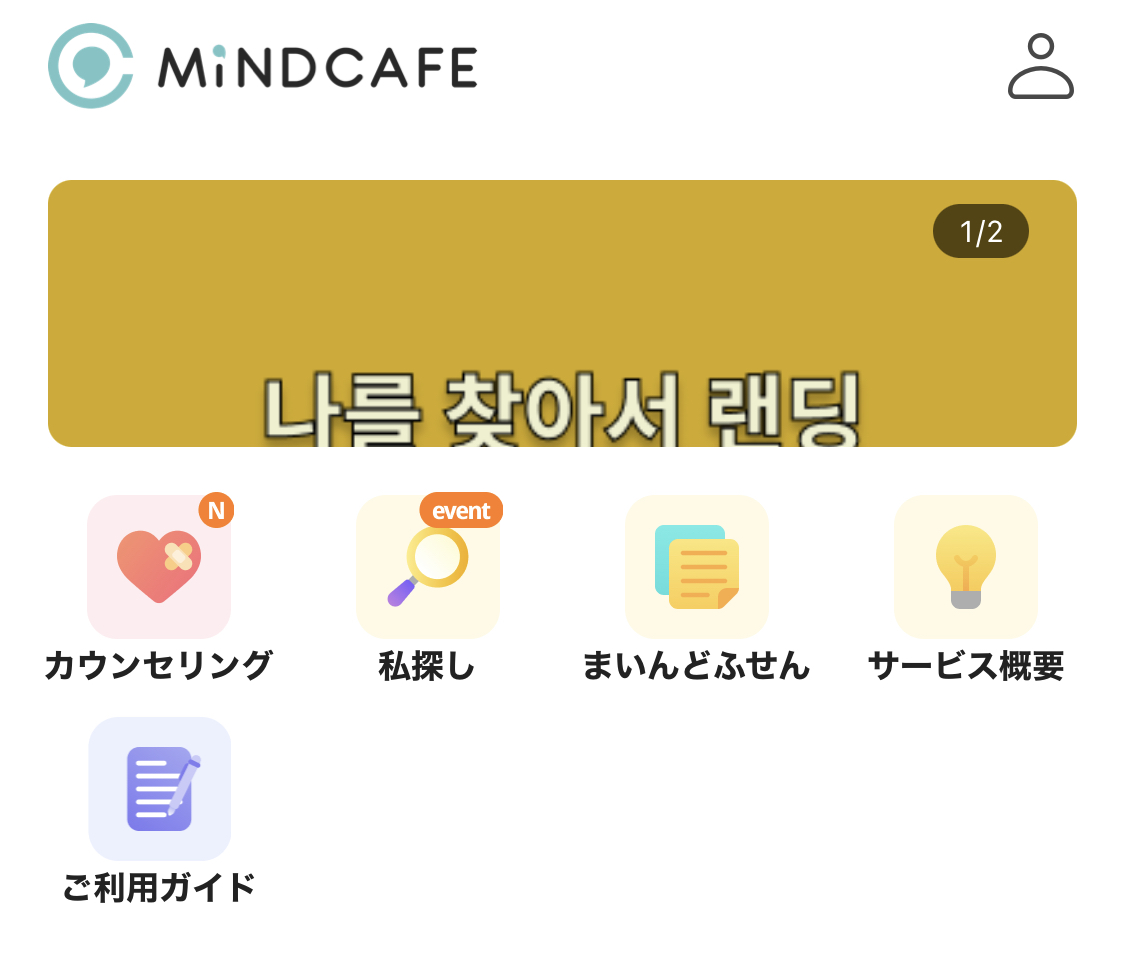
카테고리 섹션은 group에 5개의 item을 가지고 있고 화면 가로 넓이에 맞게 구성되어있습니다.
// item
let itemSize = NSCollectionLayoutSize(widthDimension: .fractionalWidth(0.25), heightDimension: .fractionalHeight(1))
let item = NSCollectionLayoutItem(layoutSize: itemSize)
item.contentInsets = .init(top: 0, leading: 4, bottom: 0, trailing: 4)

// group
let groupSize = NSCollectionLayoutSize(widthDimension: .fractionalWidth(1), heightDimension: .estimated(70))
let group = NSCollectionLayoutGroup.horizontal(layoutSize: groupSize, subitems: [item])

// section
let section = NSCollectionLayoutSection(group: group)
section.contentInsets = .init(top: 16, leading: 8, bottom: 16, trailing: 8)
section.interGroupSpacing = 4
Group에 4개의 item이 들어가도록 itemSize를 .fractionalWidth(0.25)로 설정하고 group에는 .horizontal layout으로 적용했습니다.
Orthogonal Section 구현 (좌우 스크롤 되는 레이아웃)
기존에는 홈에서 좌우 스크롤되는 아이템에서 페이징 애니메이션을 적용하려면 scrollViewWillEndDragging() 에서 계산을 따로 해줘야하고, 애니메이션이 뚝뚝 끊겨 부자연스러웠는데 compositional layout에서는 orthogonalScrollingBehavior로 자유롭게 스크롤이 가능합니다.
// item
let itemSize = NSCollectionLayoutSize(widthDimension: .fractionalWidth(1), heightDimension: .fractionalHeight(1))
let item = NSCollectionLayoutItem(layoutSize: itemSize)
item.contentInsets = .init(top: 0, leading: 5, bottom: 0, trailing: 5)

// group
let groupSize = NSCollectionLayoutSize(widthDimension: .absolute(254), heightDimension: .estimated(234))
let group = NSCollectionLayoutGroup.horizontal(layoutSize: groupSize, subitems: [item])

// section
let section = NSCollectionLayoutSection(group: group)
section.contentInsets = NSDirectionalEdgeInsets(top: 16, leading: 11, bottom: 16, trailing: 11)
section.supplementariesFollowContentInsets = false

// 좌우 스크롤 설정 값 + paging 애니메이션 선택
section.orthogonalScrollingBehavior = .groupPaging
group에 원하는 사이즈에 각각 section contentInset 값을 더한 값을 주고 item은 그걸 따르는 fractional 1.0으로 설정했습니다.
OrthogonalScrollingBehavior 종류
// default behavior. Section will layout along main layout axis (i.e. configuration.scrollDirection)
case none = 0

// NOTE: For each of the remaining cases, the section content will layout orthogonal to the main layout axis (e.g. main layout axis == .vertical, section will scroll in .horizontal axis)

// Standard scroll view behavior: UIScrollViewDecelerationRateNormal
case continuous = 1

// Scrolling will come to rest on the leading edge of a group boundary
case continuousGroupLeadingBoundary = 2

// Standard scroll view paging behavior (UIScrollViewDecelerationRateFast) with page size == extent of the collection view's bounds
case paging = 3

// Fractional size paging behavior determined by the sections layout group's dimension
case groupPaging = 4

// Same of group paging with additional leading and trailing content insets to center each group's contents along the orthogonal axis
case groupPagingCentered = 5
Supplementary Header & Footer & Decoration View 구현
Compositional Layout에서는 section 배경색은 decoration view로 구현 가능합니다.

// item, group 관련 코드 생략..

let section = NSCollectionLayoutSection(group: group)
section.contentInsets = NSDirectionalEdgeInsets(top: 16, leading: 16, bottom: 16, trailing: 16)
section.supplementariesFollowContentInsets = false
section.orthogonalScrollingBehavior = .groupPaging

// header
let headerSize = NSCollectionLayoutSize(widthDimension: .fractionalWidth(1.0), heightDimension: .absolute(43))
let headerElement = NSCollectionLayoutBoundarySupplementaryItem(layoutSize: headerSize,
                                                                 elementKind: HomeTitleHeaderView.homeHeaderElementKind,
                                                                 alignment: .topLeading)
section.boundarySupplementaryItems = [headerElement]

// Background
let sectionBackgroundDecoration = NSCollectionLayoutDecorationItem.background(elementKind: GrayBackgroundView.elementKind)
section.decorationItems = [sectionBackgroundDecoration]

// Register decoration view
let layout = UICollectionViewCompositionalLayout(section: section)
layout.register(
		GrayBackgroundView.self,
		forDecorationViewOfKind: GrayBackgroundView.elementKind)
❗️**주의점:**
header / footer 의 supplementary view는 collectionView 내에서 register()를 해야하고
decoration view는 UICollectionViewCompositionalLayout 내에서 register()를 해야 됩니다.
더 자세한 내용은 여기에 정리해놨습니다.
Header & Footer register()
최근 후기 section 같은 경우엔 header(제목)와 footer(회색뷰)가 같이 있는 경우입니다.

// .. 생략

let headerSize = NSCollectionLayoutSize(widthDimension: .fractionalWidth(1.0), heightDimension: .absolute(43))
let headerElement = NSCollectionLayoutBoundarySupplementaryItem(layoutSize: headerSize,
                                                                 elementKind: HomeTitleHeaderView.homeHeaderElementKind,
                                                                 alignment: .topLeading)

let footerSize = NSCollectionLayoutSize(widthDimension: .fractionalWidth(1.0), heightDimension: .absolute(19))
let footerElement = NSCollectionLayoutBoundarySupplementaryItem(layoutSize: footerSize,
                                                                 elementKind: UICollectionView.elementKindSectionFooter,
                                                                 alignment: .bottom)

section.boundarySupplementaryItems = [headerElement, footerElement]

// registration

let headerRegistration = UICollectionView.SupplementaryRegistration
			<HomeTitleHeaderView>(elementKind: HomeTitleHeaderView.homeHeaderElementKind)
	{ supplementaryView, kind, index in
			// ... 생략
	}

let footerRegistration = UICollectionView.SupplementaryRegistration
			<GrayBackgroundView>(elementKind: UICollectionView.elementKindSectionFooter)
	{ supplementaryView, kind, index in
			// ... 생략
	}

// 헤더랑 풋터 register 함수를 각각 따로 같이 호출하면 exception 에러남.
// 한 function 안에서 kind로 비교해서 dequeue 해줘야 함.
viewModel.datasource.supplementaryViewProvider = { collectionView, kind, index in
	if kind == HomeTitleHeaderView.homeHeaderElementKind {
		return collectionView.dequeueConfiguredReusableSupplementary(using: headerRegistration, for: index)
	} else {
		return collectionView.dequeueConfiguredReusableSupplementary(using: footerRegistration, for: index)
	}
}
section의 boundarySupplementayItems에 각각 headerElement와 footerElement를 넣어주고, dataSource supplementaryViewProvider에 register() 해줍니다.
(* elementKind는 헤더와 풋터를 구분짓는 string 값인데 구분 잘 해줘야 함!)
CellRegistration, SupplementaryRegistration, DequeueConfiguredReusableSupplementary(using:) 는 iOS 14 이상에서만 가능합니다.
그 이하 버전은 기존처럼 컬렉션뷰 내에 register()를 해주고 dequeueReusableCell(withReuseIdentifier) 를 사용하셔야 합니다.
😃 Diffable DataSource 구현
구현부분을 간단한 버전으로 정리해보면,
enum HomeSection: Int, Hashable, CaseIterable, CustomStringConvertible {
    case topBanner
    case category
    case macapick

    var description: String {
        switch self {
        case .topBanner: return "TopBanner"
        case .category: return "Category"
        case .macapick: return "마카's PICK"
        }
    }
}

enum HomeDataItem: Hashable {
    case topBanner([Banner])
    case category(HomeServiceMenu)
    case macapick(Story)
}
마인드카페 홈은 약 17개의 section이 있기 때문에 관리를 쉽게 하기 위해 enum으로 생성했습니다. Diffable datasource는 hashable을 준수하기 때문에 section과 item은 hashable을 채택해야합니다. item이 갖고 있는 모델 또한 hashable을 채택하고 있어야 합니다.
var datasource: UICollectionViewDiffableDataSource<HomeSection, HomeDataItem>!
var snapshot = NSDiffableDataSourceSnapshot<HomeSection, HomeDataItem>()

viewModel.datasource = UICollectionViewDiffableDataSource<HomeSection, HomeDataItem>(collectionView: collectionView, cellProvider: { collectionView, indexPath, listItem in
	switch listItem {
	case .topBanner(let banners):
		let cell = collectionView.dequeueConfiguredReusableCell(using: topBannerCellRegistration, for: indexPath, item: banners)
		return cell
	case .category(let homeMenu):
		let cell = collectionView.dequeueConfiguredReusableCell(using: categoryCellRegistration, for: indexPath, item: homeMenu)
		return cell
	case .macapick(let story):
		let cell = collectionView.dequeueConfiguredReusableCell(using: macapickCellRegistration, for: indexPath, item: story)
		return cell
	}
})

// section 순서 세팅
let sections = HomeSection.allCases

// snapshot에 section data 추가
snapshot.appendSections(sections)

// snapshot에 item data 추가
snapshot.appendItems([.topBanner(banners), .category(category)])

// snapshot 반영
datasource.apply(snapshot, animatingDifferences: false)
Datasource 생성 시, item enum 값에 따라 cell을 return 하도록 구현했습니다. snapshot을 생성하고 section 과 item을 추가한 후 apply()를 호출해 데이터를 반영하여 UI를 업데이트 합니다.
👍🏻 이번 리팩토링으로 얻은 Output
- 복잡성
기존 코드로는 테이블 뷰 셀 안에 컬렉션 뷰를 중첩해야 했지만 UICollectionViewCompositionalLayout으로 하나의 컬렉션 뷰 안에서 여러 layout으로 구현할 수 있었습니다.
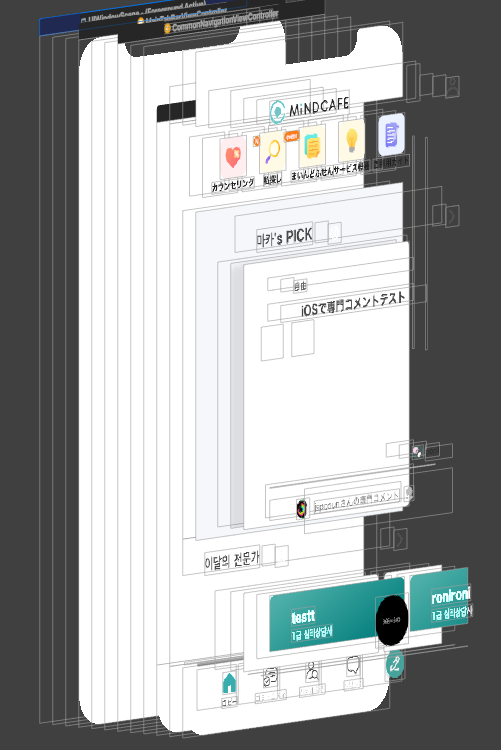
Debug View Hierarchy 로 비교해 봤을때도 리팩토링 이후에 상당히 view depth가 줄어든 것을 확인할 수 있습니다.
리팩토링 전:
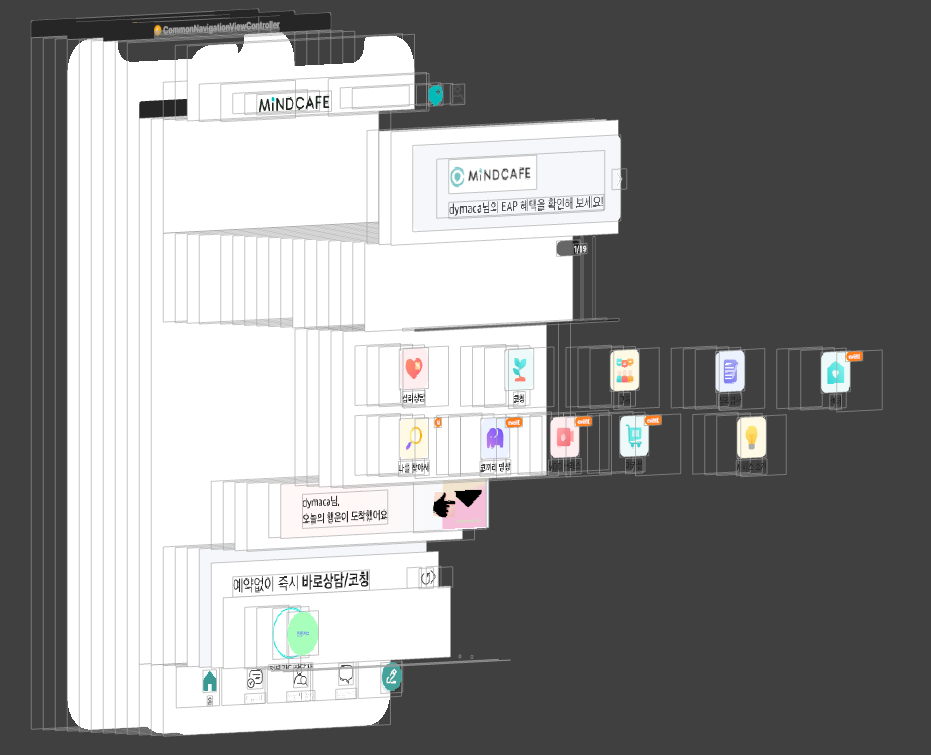 리팩토링 후:
- 동적 콘텐츠 크기 조정:
기존에는 cell 높이가 비동기적으로 변경될 경우에 cell이 제대로 보이지 않는 경우가 있었는데 Compositional Layout은 항목, 섹션 및 그룹의 적응적 크기 조정을 지원하면서 더 유동적이고 동적인 UI를 제공합니다.
또한 스크롤 지점을 유지하기 위해 높이나 contentOffset을 캐싱하여 관리할 필요도 없어 편리했습니다.
- 효율적인 셀 구성:
cellProvider 클로저를 사용하여 셀을 구성할 수 있으며, 이를 통해 위치, 내용 또는 데이터에 기반하여 셀을 사용자 지정할 수 있습니다. 이는 셀 구성을 간소화하고 데이터와 UI 로직 사이의 깔끔한 분리를 유지하는 데 도움을 줬습니다.
4. ⭐️⭐️⭐️ 메모리 사용량 개선 ⭐️⭐️⭐️
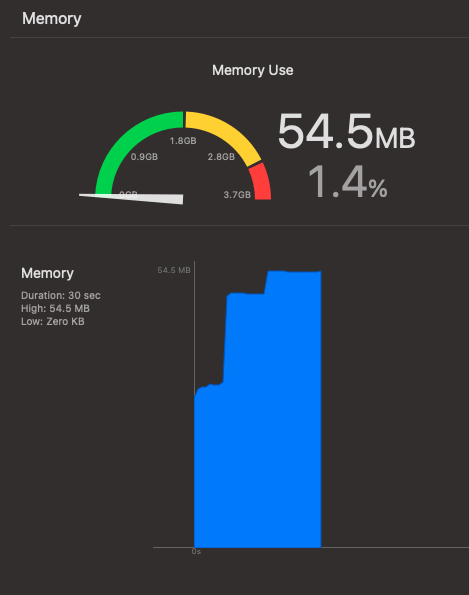
리팩토링 이후 메모리 사용량이 얼마나 개선 되었는지 확인해보기 위해 리팩토링 바로 직전의 운영버전과 리팩토링 된 버전을 동일한 환경과 조건에서 메모리 사용량 측정을 해보았습니다.
[테스트 환경 및 조건]
Device - iPhone 11 Pro
0~30sec - 홈 화면 진입 후 아무것도 하지 않음
30sec - 하단으로 스크롤 시작
30sec ~ 1min - 최하단 도착 시 아무것도 하지 않음
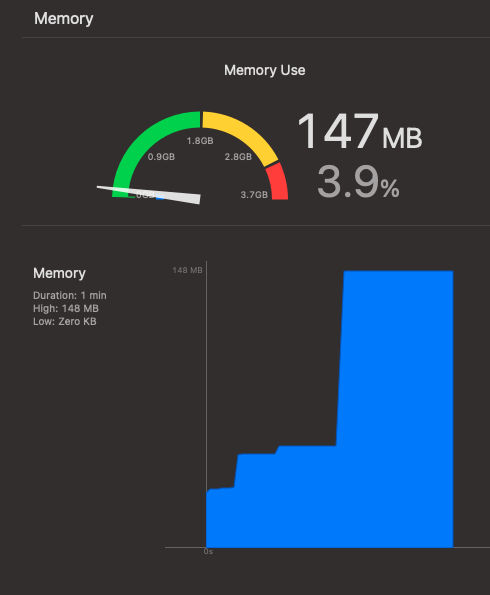
리팩토링 전 메모리 점유율 테스트:
리팩토링 후 메모리 점유율 테스트:
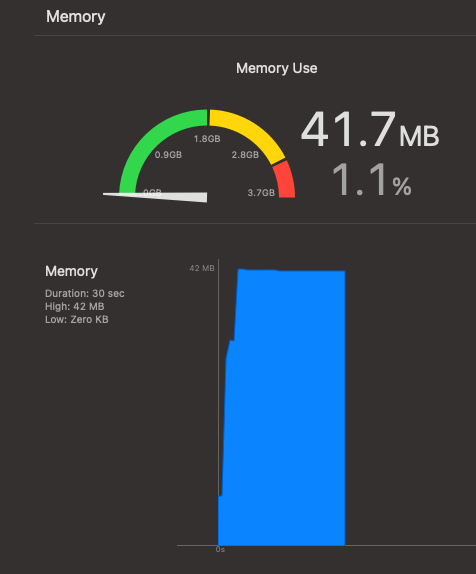
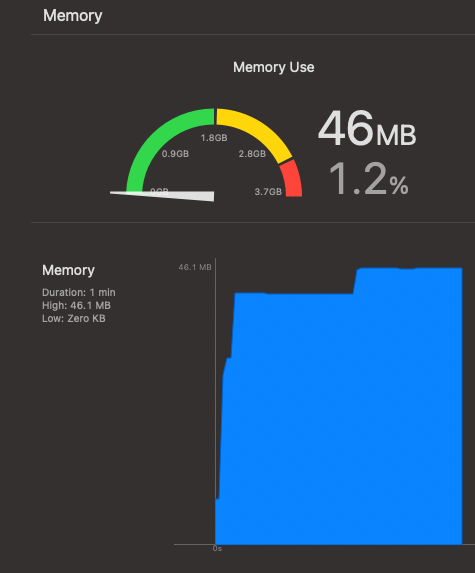
- 홈 화면 진입: 기존 대비 약 23.49% 감소
- 홈 화면 맨 아래까지 스크롤: 기존 대비 약 68.71% 감소
아직 일본앱 홈 화면에만 적용해 보았지만 성능도 수치상 굉장히 개선된 것을 확인 할 수 있고 앱 크래시도 예방할 수 있어 비정상 종료도 줄일 수 있다는 면에서 추후 한국 앱에서도 고려해보면 좋겠다는 생각이 들었습니다.
참고자료
- https://developer.apple.com/videos/play/wwdc2019/220
- https://developer.apple.com/videos/play/wwdc2021/10252
- https://developer.apple.com/documentation/uikit/views_and_controls/collection_views/updating_collection_views_using_diffable_data_sources
- https://developer.apple.com/documentation/uikit/views_and_controls/collection_views/implementing_modern_collection_views
