2024.03.21(목)
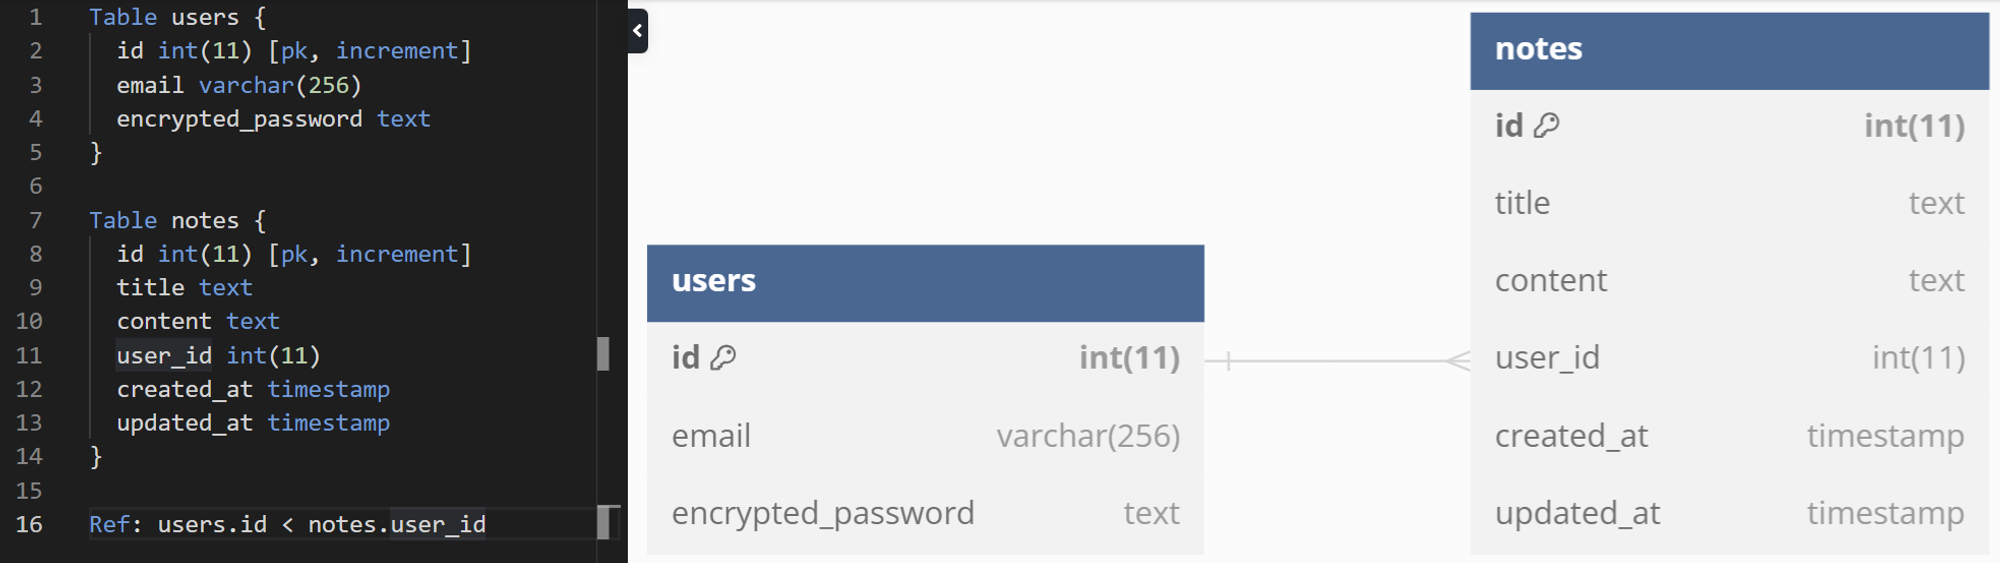
🎨ERD(Entity Relationship Diagram)
🖋️API 설계
- 👤회원 API
- 로그인
- 로그아웃
- 사용자 자신의 정보 조회
- 회원가입
- 📒노트 API
- 사용자가 작성한 노트 목록
- 노트 상세 조회
- 노트 생성
- 노트 업데이트
- 노트 삭제
☸️쿠버네티스(Kubernetes, k8s) 객체 설정
notes-db.yaml: db라는 namespace에 Deployment 및 Service 생성notes-db-volume.yaml: db라는 namespace에 PV 및 PVC 생성
kubectl create namespace db
kubectl apply -f notes-db-volume.yaml
kubectl apply -f notes-db.yaml- 네임스페이스(namespace): Kubernetes 클러스터 내에서 리소스를 구분하고 격리하기 위한 논리적인 그룹을 정의
- 네임스페이스 조회
kubectl get namespace - 네임스페이스 내 모든 객체 조회
kubectl get all -n <namespace>- 개별 조회 시에는
-n,--namespace옵션으로 네임스페이스 명시 (명시하지 않는 경우 default라는 namespace 사용)
- 개별 조회 시에는
- 네임스페이스 조회
- 로컬 컴퓨터(셸)로부터 접근하는 경우
- localhost:30036 (NodePort 서비스를 통해서)
- 클러스터 안의 다른 포드에서 접근하는 경우
- notes-db.db.svc.cluster.local (CoreDNS 를 통해서)
🛢️데이터베이스 설정
init-db.sql: prgms_notes라는 데이터베이스 생성CREATE SCHEMA IF NOT EXISTS `prgms_notes` DEFAULT CHARACTER SET utf8mb4; USE `prgms_notes` -- 사용자 테이블 생성 CREATE TABLE IF NOT EXISTS users ( id INT NOT NULL AUTO_INCREMENT, email VARCHAR(256) NOT NULL, encrypted_password text NOT NULL, PRIMARY KEY (id), UNIQUE INDEX users_unique_email (email) USING BTREE ); -- 노트 테이블 생성 CREATE TABLE IF NOT EXISTS notes ( id INT NOT NULL AUTO_INCREMENT, title text NOT NULL, content text NOT NULL, user_id INT, created_at TIMESTAMP DEFAULT CURRENT_TIMESTAMP, updated_at TIMESTAMP DEFAULT CURRENT_TIMESTAMP ON UPDATE CURRENT_TIMESTAMP, PRIMARY KEY (id), CONSTRAINT note_user_id FOREIGN KEY (user_id) REFERENCES users (id) ON DELETE SET NULL ON UPDATE CASCADE );init-user.sql-- 작업할 데이터베이스를 mysql로 설정 USE mysql; -- username: 'prgms', password: 'prgms'인 사용자를 'localhost'에서 접속 가능하도록 생성 (존재하지 않는 경우에만 생성) CREATE USER IF NOT EXISTS 'prgms'@'localhost' IDENTIFIED BY 'prgms'; -- username: 'prgms', password: 'prgms'인 사용자를 '%'(모든 호스트)에서 접속 가능하도록 생성 (존재하지 않는 경우에만 생성) CREATE USER IF NOT EXISTS 'prgms'@'%' IDENTIFIED BY 'prgms'; -- 'prgms_notes' 데이터베이스에 대한 모든 권한을 'localhost'에서 접속하는 'prgms' 사용자에게 부여 GRANT ALL PRIVILEGES ON prgms_notes.* TO 'prgms'@'localhost'; -- 'prgms_notes' 데이터베이스에 대한 모든 권한을 어떤 호스트에서든 접속 가능한 'prgms' 사용자에게 부여 GRANT ALL PRIVILEGES ON prgms_notes.* TO 'prgms'@'%'; -- 권한 변경 사항을 즉시 적용하기 위해 MySQL의 권한 캐시를 지우기 FLUSH PRIVILEGES;init-test-db.sql: 테스트 데이터 주입DROP DATABASE IF EXISTS `prgms_notes`; CREATE SCHEMA `prgms_notes` DEFAULT CHARACTER SET utf8mb4; USE `prgms_notes` -- -- Table structure for table `users` -- CREATE TABLE `users` ( `id` int(11) NOT NULL AUTO_INCREMENT, `email` varchar(256) NOT NULL, `encrypted_password` text NOT NULL, PRIMARY KEY (`id`), UNIQUE KEY `users_unique_email` (`email`) USING BTREE ) ENGINE=InnoDB AUTO_INCREMENT=2 DEFAULT CHARSET=utf8mb4 COLLATE=utf8mb4_general_ci; -- -- Table structure for table `notes` -- CREATE TABLE `notes` ( `id` int(11) NOT NULL AUTO_INCREMENT, `title` text NOT NULL, `content` text NOT NULL, `user_id` int(11) DEFAULT NULL, `created_at` timestamp NULL DEFAULT current_timestamp(), `updated_at` timestamp NULL DEFAULT current_timestamp() ON UPDATE current_timestamp(), PRIMARY KEY (`id`), KEY `note_user_id` (`user_id`), CONSTRAINT `note_user_id` FOREIGN KEY (`user_id`) REFERENCES `users` (`id`) ON DELETE SET NULL ON UPDATE CASCADE ) ENGINE=InnoDB AUTO_INCREMENT=3 DEFAULT CHARSET=utf8mb4 COLLATE=utf8mb4_general_ci; -- -- Dumping data for table `users` -- LOCK TABLES `users` WRITE; INSERT INTO `users` VALUES (1,'test@example.com','$2b$10$432oW5OwXPcHPcmyQghkxeICMi65DGPdFnDv21dJ2QU3CSj.xFbi6'); UNLOCK TABLES; -- -- Dumping data for table `notes` -- LOCK TABLES `notes` WRITE; INSERT INTO `notes` VALUES (1,'Test (1)','<p>This note is for testing.</p><p>Note number: 1</p>',1,'2024-01-24 05:47:47','2024-01-24 05:48:04'),(2,'Test (2)','<p>This note is for testing.</p><p>Note number: 2</p>',1,'2024-01-24 05:48:08','2024-01-24 05:48:23'); UNLOCK TABLES;
💡 mariadb server를 컴퓨터에 설치하고 mysql.exe 파일의 경로(ex.
C:\Program Files\MariaDB 10.11\bin)를 시스템 환경 변수에 등록해야 mysql 명령어 사용 가능!!
mysql --protocol tcp -P 30036 -u root -p < init-user.sql
mysql --protocol tcp -P 30036 -u root -p < init-db.sql
mysql --protocol tcp -P 30036 -u prgms -p
💾개발 환경 셋업
- 프로젝트 디렉토리 생성
mkdir backend cd backend npm init -y - 기본 패키지 설치
npm i dotenv express express-async-errors npm i -D typescript @types/express nodemon- modules
- npm: express
- npm: express-async-errors
전에는 직접
try-catchwrapper를 만들어서 error handling에 사용했었는데 얘는 그냥 async로만 감싸주면 알아서 error를 error handler로 보내줘서 굉장히 편한 모듈인 것 같다. - npm: dotenv
- npm: nodemon
- npm: typescript
- npm: @types/express
이것뿐만 아니라 사용할 모듈 이름 앞에
@types/를 붙여서 찾으면 typescript를 위해 정의해둔 type들이 나오기 때문에-D(--save-dev) 옵션으로 설치하면 된다.
- modules
- 프로젝트 기본 설정
- 컴파일 환경, 서비스 스크립트
package.json,nodemon.json,tsconfig.json
- 환경 설정
.env파일에 기록 및 이것을 읽어들여 적용하는settings.ts파일
- 응용 기본 구조 구현
app.ts에 기본 응용 구현하고, 이것을 이용한 리스너를index.ts에 구현
- 명령어
- 실행
npm start - 빌드 및 테스트
(bash: serve: command not found 발생 시npm run build && serve -s buildnpm install -g serve후 다시 시도)
- 실행
🔐암호화 모듈: crypto & bcrypt
저번 Book Store backend 프로젝트에서는
crypto모듈을 사용해 비밀번호를 암호화했었다.
👉 작성했었던 🔒암호화 원리 관련 TIL
이번 backend 프로젝트에서는bcrypt모듈을 사용하게 되었는데 두 모듈의 차이점에 대해 알아보자.
- crypto (Node.js 내장 모듈)
- 해시 생성, HMAC(keyed-hash message authentication code), 암호화 및 복호화, 서명 및 검증 등 다양한 기능을 지원하는 다목적 암호화 도구
- 개발자가 직접 해싱 알고리즘을 선택하고 구현해야 하는 저수준 API
- bcrypt (외부 모듈/라이브러리)
- Blowfish(블로피시) 암호에 기반을 둔 암호화 해시 함수
- 비밀번호 해싱과 salting을 자동으로 처리 (반환된 해시에 salt가 포함되어 있어서 DB에 따로 salt를 저장할 필요 없이 해시만 저장하면 됨)
- 간편한 사용
결론적으로 비밀번호와 같은 민감한 정보를 암호화할 때에는 bcrypt가 더 적합한 것 같다.
프로젝트 백엔드 폴더: https://github.com/do0ori/web-editor-project/tree/main/backend
저번 백엔드 프로젝트는 자바스크립트로 진행했었는데 이번에는 타입스크립트로 해서 좋다. 확실히 자바스크립트로 만들어 둔 프로젝트를 타입스크립트로 마이그레이션하는 것 보다는 처음부터 아예 타입스크립트로 시작하는 게 쉽고 좋은 것 같다.