Provider
Provider는 크게 생성부분과 소비부분으로 나누어진다.
생성은 상태를 관리할 데이터를 만들고, 해당 데이터에대한 Provider를 만든다.
소비는 Provider를 통해 만들어진 데이터를 읽기 및 수정하는 부분이다.
import
Provider는 패키지를 직접 설치해서 적용해야하기에 먼저 설치 방법을 설명합니다.
flutter 콘솔로 프로젝트의 위치로 가서 다음과 같이 명령어를 실행합니다.
$ flutter pub add providerpath를 설정하지않았다면 FlutterSDK파일에서 flutter_console.bat을 실행해서 flutter 콘솔을 엽니다.
그러면 pubspec.yaml파일에 자동으로 다음과 같이 종속성을 주입하는 문구가 삽입됩니다.
dependencies:
  flutter:
    sdk: flutter


  # The following adds the Cupertino Icons font to your application.
  # Use with the CupertinoIcons class for iOS style icons.
  cupertino_icons: ^1.0.2
  provider: ^6.0.0
이후 dart 파일에 설치된 Provider를 import 합니다.
import 'package:provider/provider.dart';Provider - 생성
데이터를 관리할 State를 생성하는 부분으로
- ChangeNotifier
- ChangeNotifierProvider
두가지 클래스를 제공합니다.
ChangeNotifier
리스너에게 변경 알림을 제공합니다.
무언가가 ChangeNotifier 타입이면 우리는 그것의 변화들을 구독할 수 있는 Observable과 같은 것으로 앱 상태를 캡슐화 해서 Provider가 사용 할 수있게 합니다.
class CartModel extends ChangeNotifier {
  /// Internal, private state of the cart.
  final List<Item> _items = [];

  /// An unmodifiable view of the items in the cart.
  UnmodifiableListView<Item> get items => UnmodifiableListView(_items);

  /// The current total price of all items (assuming all items cost $42).
  int get totalPrice => _items.length * 42;

  /// Adds [item] to cart. This and [removeAll] are the only ways to modify the
  /// cart from the outside.
  void add(Item item) {
    _items.add(item);
    // This call tells the widgets that are listening to this model to rebuild.
    notifyListeners();
  }

  /// Removes all items from the cart.
  void removeAll() {
    _items.clear();
    // This call tells the widgets that are listening to this model to rebuild.
    notifyListeners();
  }
}
상태를 저장하는 변수인 Items와 이를 변경하는 add(), removeAll()이 있습니다.
또한 이러한 변경이 이루어 질 때notifyListeners()를 호출해서 ChangeNotifierProvider에게 변경을 알립니다.
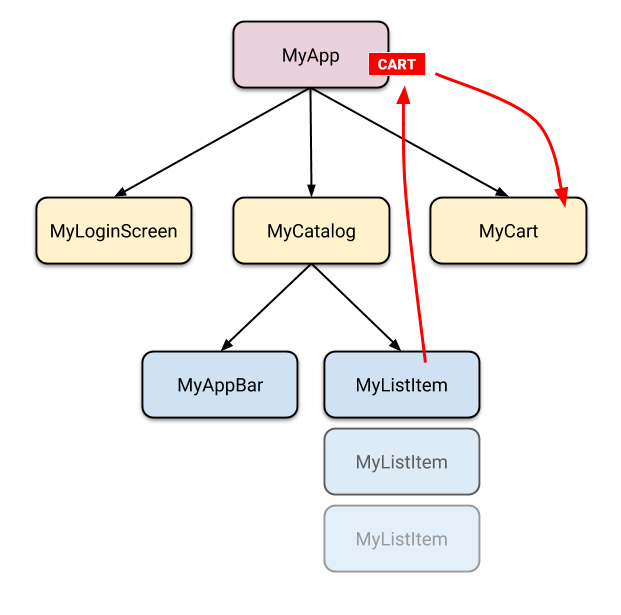
ChangeNotifierProvider
ChangeNotifier의 하위 항목에게 인스턴스를 제공하는 위젯입니다.
변경을 알림받을 앱인 MyApp을 래핑해서 사용합니다.
void main() {
  runApp(
    ChangeNotifierProvider(
      create: (context) => CartModel(), // 데이터를 생성하는 문구
      child: const MyApp(),
    ),
  );
}
Provider - 소비
flutter 4.1.0v 이후부터는 기존의 방법보다 간단한 방법이 다음과 같이 소개되었다.
- BuildContext.watch<T>()
- BuildContext.read<T>()
- BuildContext.select( Lambda )
watch
BuildContext.select<T>()
T에 해당하는(ChangeNotifier Class) Provider 데이터의 변화를 감지해 데이터를 얻고 위젯을 재빌드합니다.
notifyListeners()를 통해 변경 알림이 오면 watch를 포함한 build메서드가 실행됩니다.
그래서 데이터의 변화에 따라 변하는 위젯을 만들 때 사용합니다.
class Counter extends ChangeNotifier {
int count;
...
}
...
Widget build(BuildContext context) {
Text('현재 숫자: ${context.watch<Counter>().count}')
}read
BuildContext.read<T>()
T에 해당하는(ChangeNotifier Class) Provider 데이터를 읽고 사용할 수 있게합니다.
데이터에 접근하지만 변화에 따라 위젯을 재빌드 하지않습니다.
그래서 데이터를 변경하는 이벤트를 위해 사용합니다.
class Counter extends ChangeNotifier {
...
void increment() {
count++;
notifyListeners();
}
}
...
Widget build(BuildContext context) {
ElevatedButton(
child: Text('+'),
onPressed: () {
context.read<Counter>().increment();
});
}select
BuildContext.select(Lambda)
앞서 봤던 watch와 비슷하게 변화를 감지하고 위젯을 재빌드하지만
select는 해당 속성의 변화만을 감지할 수 있습니다.
아래의 예제에서 Person의 name이 변화되었을 경우에만 위젯을 재빌드합니다.
class Person extends ChangeNotifier {
  String name;
  int age;
  ...
}

...

Widget build(BuildContext context) {
  return Text('이름 : ${context.select((Person p) => p.name)}');
}
반환형 명시
다음과 같이 작성하면 반환형을 명시할 수 있다.
context.select<Person, String>((Person p) => p.name