피그마 디자인과 시뮬레이터에서의 보임이 다른 문제발견
-
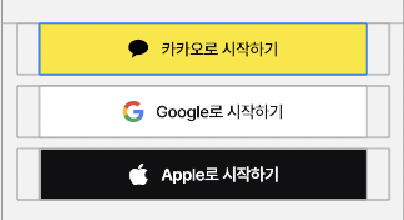
위 시뮬레이터 화면에서 실제 소셜로그인 버튼과
SuperView의inset값은 16인데 생각보다 간격이 크게 보임 -
SE와 같이 작은 사이즈의 기기에서는 간격이 올바르게 나오지만iPhone 15 Pro Max처럼 너비가 큰 디바이스에서 저런식으로 간격이 크게 나옴
XCode Design Debug 툴을 사용해본 결과
- 실제 소셜로그인버튼의
inset값은 잘 적용이 됐지만 내부 이미지 크기가 채울 정도로 충분치않아 디자인상 40정도로 벌어진 문제
UIButton내부 이미지 크기를 어떻게 채울 수 있을까 ?
let socialLoginStackView = UIStackView().then {
	$0.axis = .vertical
    $0.spacing = 12
    $0.isLayoutMarginsRelativeArrangement = true
    $0.layoutMargins = .init(top: .zero, left: 16, bottom: 56, right: 16)
}

let kakaoSignInButton = UIButton().then {
	$0.setImage(UIImage(resource: .kakao), for: .normal)
    $0.layer.cornerRadius = 2
    $0.layer.masksToBounds = true
    $0.contentHorizontalAlignment = .fill
}

let googleSignInButton = UIButton().then {
	$0.setImage(UIImage(resource: .google), for: .normal)
    $0.layer.cornerRadius = 2
    $0.layer.masksToBounds = true
    $0.contentHorizontalAlignment = .fill
}

let appleSignInButton = UIButton().then {
	$0.setImage(UIImage(resource: .apple), for: .normal)
    $0.layer.borderColor = UIColor.gray100.cgColor
    $0.layer.borderWidth = 1
    $0.layer.cornerRadius = 2
    $0.layer.masksToBounds = true
    $0.contentHorizontalAlignment = .fill
}-
소셜로그인버튼 각각에
contentHorizontalAlignment속성값을 이용해서 이미지를SuperView기준 16에 맞춰 채워지게 함 -
허나 이렇게 코드를 작성했을 경우 문제가 있는데 디바이스의 너비가 커질수록 버튼 내부 내용이 맞춰줘서 늘어나는게 아니라 그냥 늘어나는거라 모든 디바이스에 대체하기 힘듬
해결책 - 커스텀 UIButton 만들기
- 프로젝트 iOS버전이 15이상이였기에 UIButton.Configuration을 이용하여 간단한 작업을 통해서 생성
private func getButtonConfiguration(with type: SocialLoginType) -> UIButton.Configuration {
        switch type {
        case .google:
            return configureButton(
                baseBackgroundColor: .googleWhite,
                baseForegroundColor: .gray700,
                image: .google
            )
        case .kakao:
            return configureButton(
                baseBackgroundColor: .kakaoYellow,
                baseForegroundColor: .gray800,
                image: .kakao
            )
        case .apple:
            return configureButton(
                baseBackgroundColor: .gray800,
                baseForegroundColor: .white,
                image: .apple,
                strokeWidth: 1,
                strokeColor: .gray100
            )
        }
    }

private func configureButton(baseBackgroundColor: UIColor, baseForegroundColor: UIColor, image: UIImage, strokeWidth: CGFloat? = nil, strokeColor: UIColor? = nil) -> UIButton.Configuration {
        var configuration = UIButton.Configuration.filled()
        configuration.cornerStyle = .fixed
        configuration.background.cornerRadius = 2
        configuration.imagePadding = 12
        configuration.baseBackgroundColor = baseBackgroundColor
        configuration.baseForegroundColor = baseForegroundColor
        configuration.image = image

        if let strokeColor = strokeColor,
           let strokeWidth = strokeWidth {
            configuration.background.strokeWidth = strokeWidth
            configuration.background.strokeColor = strokeColor
        }
        return configuration
}

    /// SocialLoginType에 따라 자간 & 줄높이 & baseLineOffset을 적용한 라벨을 반환하는 함수
private func configureLabelAttributedText(for type: SocialLoginType) -> UILabel {
        let buttonTitleLabel = UILabel()

        switch type {
        case .google:
            buttonTitleLabel.setAttributedText(font: KRFont.self, string: Strings.socialLoginGoogleButton)
        case .kakao:
            buttonTitleLabel.setAttributedText(font: KRFont.self, string: Strings.socialLoginKakaoButton)
        case .apple:
            buttonTitleLabel.setAttributedText(font: KRFont.self, string: Strings.socialLoginAppleButton)
        }
        return buttonTitleLabel
}

    /// UIButton.Configuration에 사용될 AttributedString을 리턴하는 함수
private func getButtonAttributedString(with type: SocialLoginType) -> AttributedString? {
        let labelWithAttributedText = configureLabelAttributedText(for: type)
        guard let attributedText = labelWithAttributedText.attributedText else { return nil }

        var attributedString = AttributedString(attributedText)
        attributedString.font = KRFont.H2
        return attributedString
}
알게된 점
-
나름 오토레이아웃에 대해 안다고 생각했는데 내가 직접 시뮬레이터 화면을 보더라도 inset값이 다른게 확 띄어 뭔가 잘못알고 있는가 고민에 빠짐
-
UIButton내부 이미지 크기를 채울 수 있는
contentHorizontalAlignment속성에 대해서 알게 됨 -
다시 한번 디자이너에게 화면을 검토받아야 한다는걸 깨달음
-
단순 이미지와 텍스트를 이용한 버튼이라면 UIButton만을 가지고 개발가능하다는 점