📌 실행 결과
📌 activity_main.xml
<?xml version="1.0" encoding="utf-8"?>
<androidx.constraintlayout.widget.ConstraintLayout
	xmlns:android="http://schemas.android.com/apk/res/android"
    android:id="@+id/mainMotionLayout"
    xmlns:app="http://schemas.android.com/apk/res-auto"
    xmlns:tools="http://schemas.android.com/tools"
    android:layout_width="match_parent"
    android:layout_height="match_parent"
    app:layoutDescription="@xml/activity_main_scene"
    tools:context=".MainActivity">
    <com.google.android.material.bottomnavigation.BottomNavigationView
        android:id="@+id/mainBottomNavigationView"
        android:layout_width="0dp"
        android:layout_height="wrap_content"
        app:layout_constraintBottom_toBottomOf="parent"
        app:layout_constraintEnd_toEndOf="parent"
        app:layout_constraintStart_toStartOf="parent"
        app:menu="@menu/bottom_nav_menu" />

    <androidx.recyclerview.widget.RecyclerView
        android:id="@+id/mainRecyclerView"
        android:layout_width="0dp"
        android:layout_height="0dp"
        app:layout_constraintBottom_toBottomOf="parent"
        app:layout_constraintEnd_toEndOf="parent"
        app:layout_constraintStart_toStartOf="parent"
        app:layout_constraintTop_toTopOf="parent" />

    <FrameLayout
        android:id="@+id/fragmentContainer"
        android:layout_width="0dp"
        android:layout_height="0dp"
        app:layout_constraintBottom_toBottomOf="parent"
        app:layout_constraintEnd_toEndOf="parent"
        app:layout_constraintStart_toStartOf="parent"
        app:layout_constraintTop_toTopOf="parent" />

</androidx.constraintlayout.motion.widget.MotionLayout>- BottomNavigation 사용 방법
https://velog.io/@dldmswo1209/NavigationView-사용법
MotionLayout 을 사용하기 이전에 ConstraintLayout 으로 만들어준다.
이 후 Design 탭으로 가서 ConstraintLayout 을 우클릭 하고 convert to MotionLayout 을 눌러준다. 그러면, res/xml 에 scene.xml 이 생성 될 것이다.

📌 fragment_player.xml
<?xml version="1.0" encoding="utf-8"?>
<androidx.constraintlayout.widget.ConstraintLayout xmlns:android="http://schemas.android.com/apk/res/android"
    android:id="@+id/playerMotionLayout"
    xmlns:app="http://schemas.android.com/apk/res-auto"
    android:layout_width="match_parent"
    android:layout_height="match_parent"
    app:layoutDescription="@xml/fragment_player_scene">

    <androidx.constraintlayout.widget.ConstraintLayout
        android:id="@+id/mainContainerLayout"
        android:layout_width="0dp"
        android:layout_height="250dp"
        android:background="@color/purple_200"
        app:layout_constraintEnd_toEndOf="parent"
        app:layout_constraintStart_toStartOf="parent"
        app:layout_constraintTop_toTopOf="parent" />

    <ImageView
        android:id="@+id/playerView"
        android:layout_width="0dp"
        android:layout_height="0dp"
        android:background="#00ff00"
        app:layout_constraintBottom_toBottomOf="@id/mainContainerLayout"
        app:layout_constraintStart_toStartOf="@id/mainContainerLayout"
        app:layout_constraintTop_toTopOf="@id/mainContainerLayout" />

    <ImageView
        android:id="@+id/bottomPlayerControlButton"
        android:layout_width="wrap_content"
        android:layout_height="wrap_content"
        android:layout_marginEnd="24dp"
        app:layout_constraintBottom_toBottomOf="@id/mainContainerLayout"
        app:layout_constraintEnd_toEndOf="@id/mainContainerLayout"
        app:layout_constraintTop_toTopOf="@id/mainContainerLayout" />

    <TextView
        android:id="@+id/bottomTitleTextView"
        android:layout_width="0dp"
        android:layout_height="wrap_content"
        android:layout_marginStart="8dp"
        android:layout_marginEnd="12dp"
        android:ellipsize="end"
        android:maxLines="1"
        android:singleLine="true"
        app:layout_constraintBottom_toBottomOf="@id/bottomPlayerControlButton"
        app:layout_constraintEnd_toStartOf="@id/bottomPlayerControlButton"
        app:layout_constraintStart_toEndOf="@id/playerView"
        app:layout_constraintTop_toTopOf="@id/bottomPlayerControlButton" />

    <androidx.recyclerview.widget.RecyclerView
        android:id="@+id/fragmentRecyclerView"
        android:layout_width="0dp"
        android:layout_height="0dp"
        android:background="@color/white"
        app:layout_constraintBottom_toBottomOf="parent"
        app:layout_constraintEnd_toEndOf="parent"
        app:layout_constraintStart_toStartOf="parent"
        app:layout_constraintTop_toBottomOf="@id/mainContainerLayout" />

</androidx.constraintlayout.motion.widget.MotionLayout>
MotionLayout 으로 바꿔주기 위해 위와 동일한 방법으로 바꾼다.
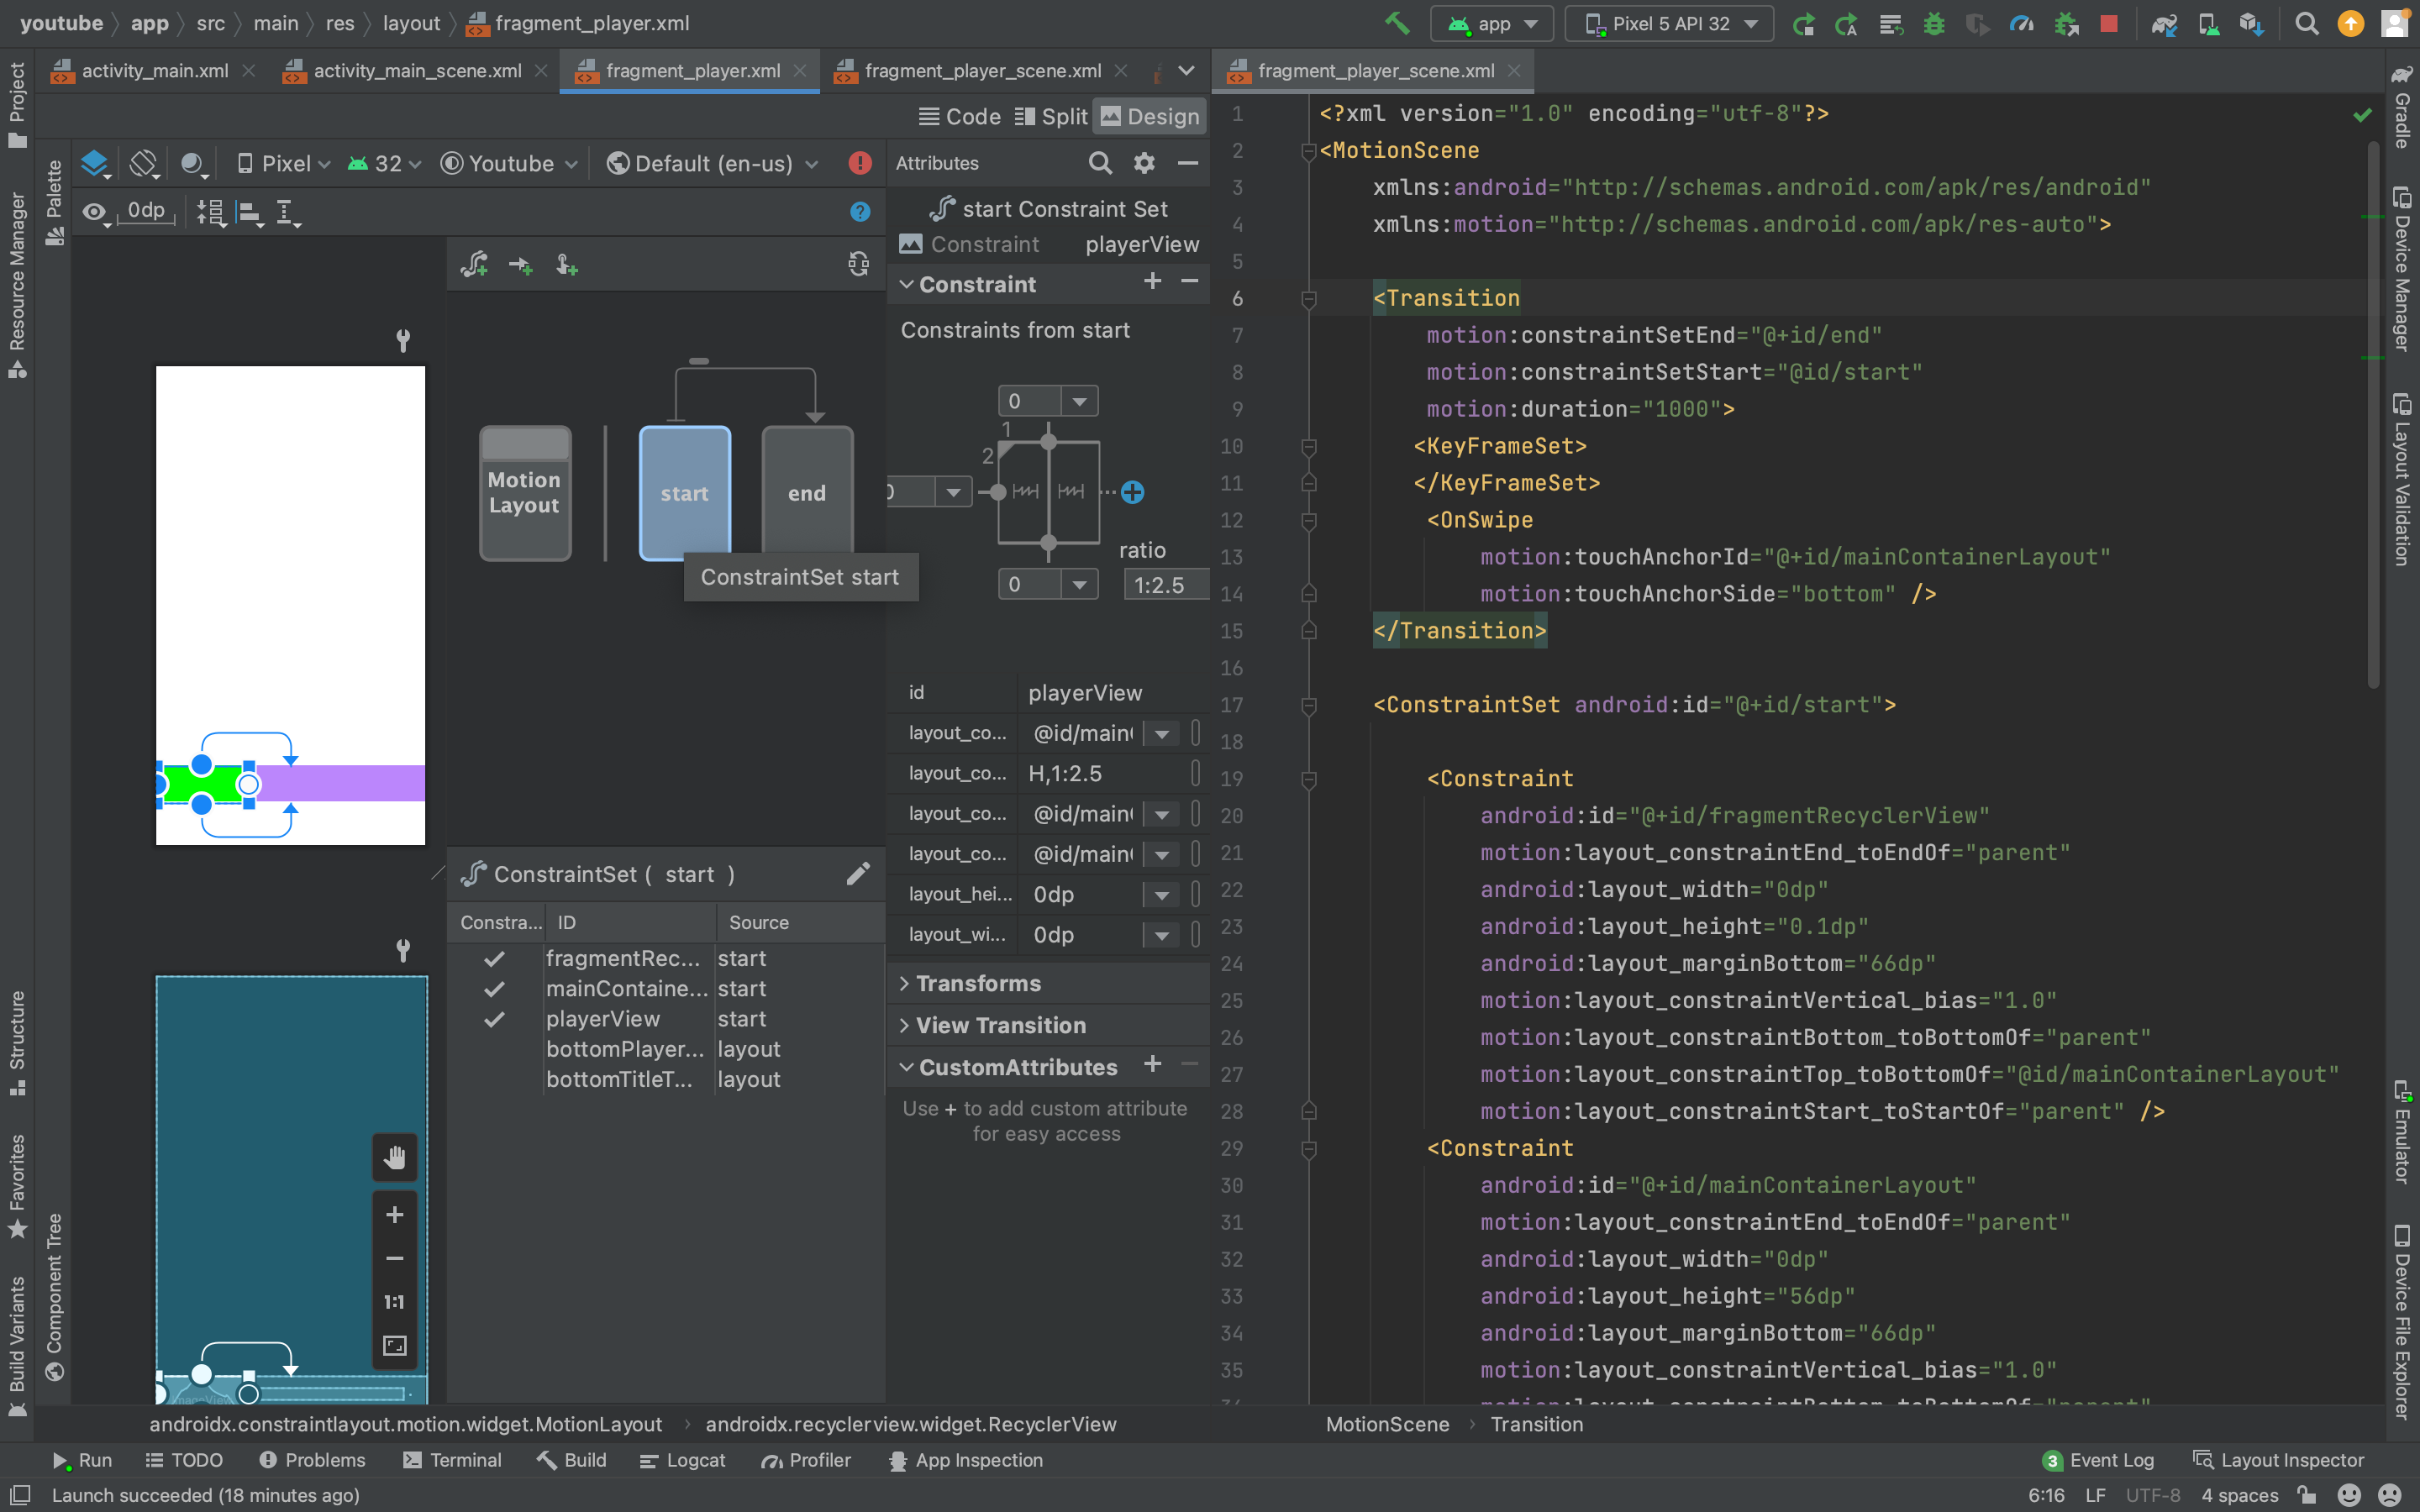
fragment_player_scene.xml 파일 과 fragment_player.xml 파일을 동시에 띄워놓고 fragment_player.xml의 Design 탭에서 Start 와 End의 ConstraintSet 을 각각 추가해준다.
Start -> End 모션과 End -> Start 모션을 어떻게 줄 것인지 이 과정을 통해 정해지게 된다.
📌 fragment_player_scene.xml 전체 코드
<?xml version="1.0" encoding="utf-8"?>
<MotionScene
    xmlns:android="http://schemas.android.com/apk/res/android"
    xmlns:motion="http://schemas.android.com/apk/res-auto">

    <Transition
        motion:constraintSetEnd="@+id/end"
        motion:constraintSetStart="@id/start"
        motion:duration="1000">
       <KeyFrameSet>
       </KeyFrameSet>
        <OnSwipe
            motion:touchAnchorId="@+id/mainContainerLayout"
            motion:touchAnchorSide="bottom" />
    </Transition>

    <ConstraintSet android:id="@+id/start">

        <Constraint
            android:id="@+id/fragmentRecyclerView"
            motion:layout_constraintEnd_toEndOf="parent"
            android:layout_width="0dp"
            android:layout_height="0.1dp"
            android:layout_marginBottom="66dp"
            motion:layout_constraintVertical_bias="1.0"
            motion:layout_constraintBottom_toBottomOf="parent"
            motion:layout_constraintTop_toBottomOf="@id/mainContainerLayout"
            motion:layout_constraintStart_toStartOf="parent" />
        <Constraint
            android:id="@+id/mainContainerLayout"
            motion:layout_constraintEnd_toEndOf="parent"
            android:layout_width="0dp"
            android:layout_height="56dp"
            android:layout_marginBottom="66dp"
            motion:layout_constraintVertical_bias="1.0"
            motion:layout_constraintBottom_toBottomOf="parent"
            motion:layout_constraintStart_toStartOf="parent" />
        <Constraint
            android:id="@+id/playerView"
            android:layout_width="0dp"
            android:layout_height="0dp"
            motion:layout_constraintDimensionRatio="H,1:2.5"
            motion:layout_constraintBottom_toBottomOf="@id/mainContainerLayout"
            motion:layout_constraintTop_toTopOf="@id/mainContainerLayout"
            motion:layout_constraintStart_toStartOf="@id/mainContainerLayout" />
    </ConstraintSet>

    <ConstraintSet android:id="@+id/end">

        <Constraint
            android:id="@+id/playerView"
            android:layout_width="0dp"
            android:layout_height="0dp"
            motion:layout_constraintEnd_toEndOf="@id/mainContainerLayout"
            motion:layout_constraintBottom_toBottomOf="@id/mainContainerLayout"
            motion:layout_constraintTop_toTopOf="@id/mainContainerLayout"
            motion:layout_constraintStart_toStartOf="@id/mainContainerLayout" />
        <Constraint
            android:id="@+id/mainContainerLayout"
            motion:layout_constraintEnd_toEndOf="parent"
            android:layout_width="0dp"
            android:layout_height="250dp"
            motion:layout_constraintTop_toTopOf="parent"
            motion:layout_constraintStart_toStartOf="parent" />
        <Constraint
            android:id="@+id/fragmentRecyclerView"
            motion:layout_constraintEnd_toEndOf="parent"
            android:layout_width="0dp"
            android:layout_height="0dp"
            motion:layout_constraintBottom_toBottomOf="parent"
            motion:layout_constraintTop_toBottomOf="@id/mainContainerLayout"
            motion:layout_constraintStart_toStartOf="parent" />


    </ConstraintSet>
</MotionScene>
📌 스와이프 핸들러 등록하기
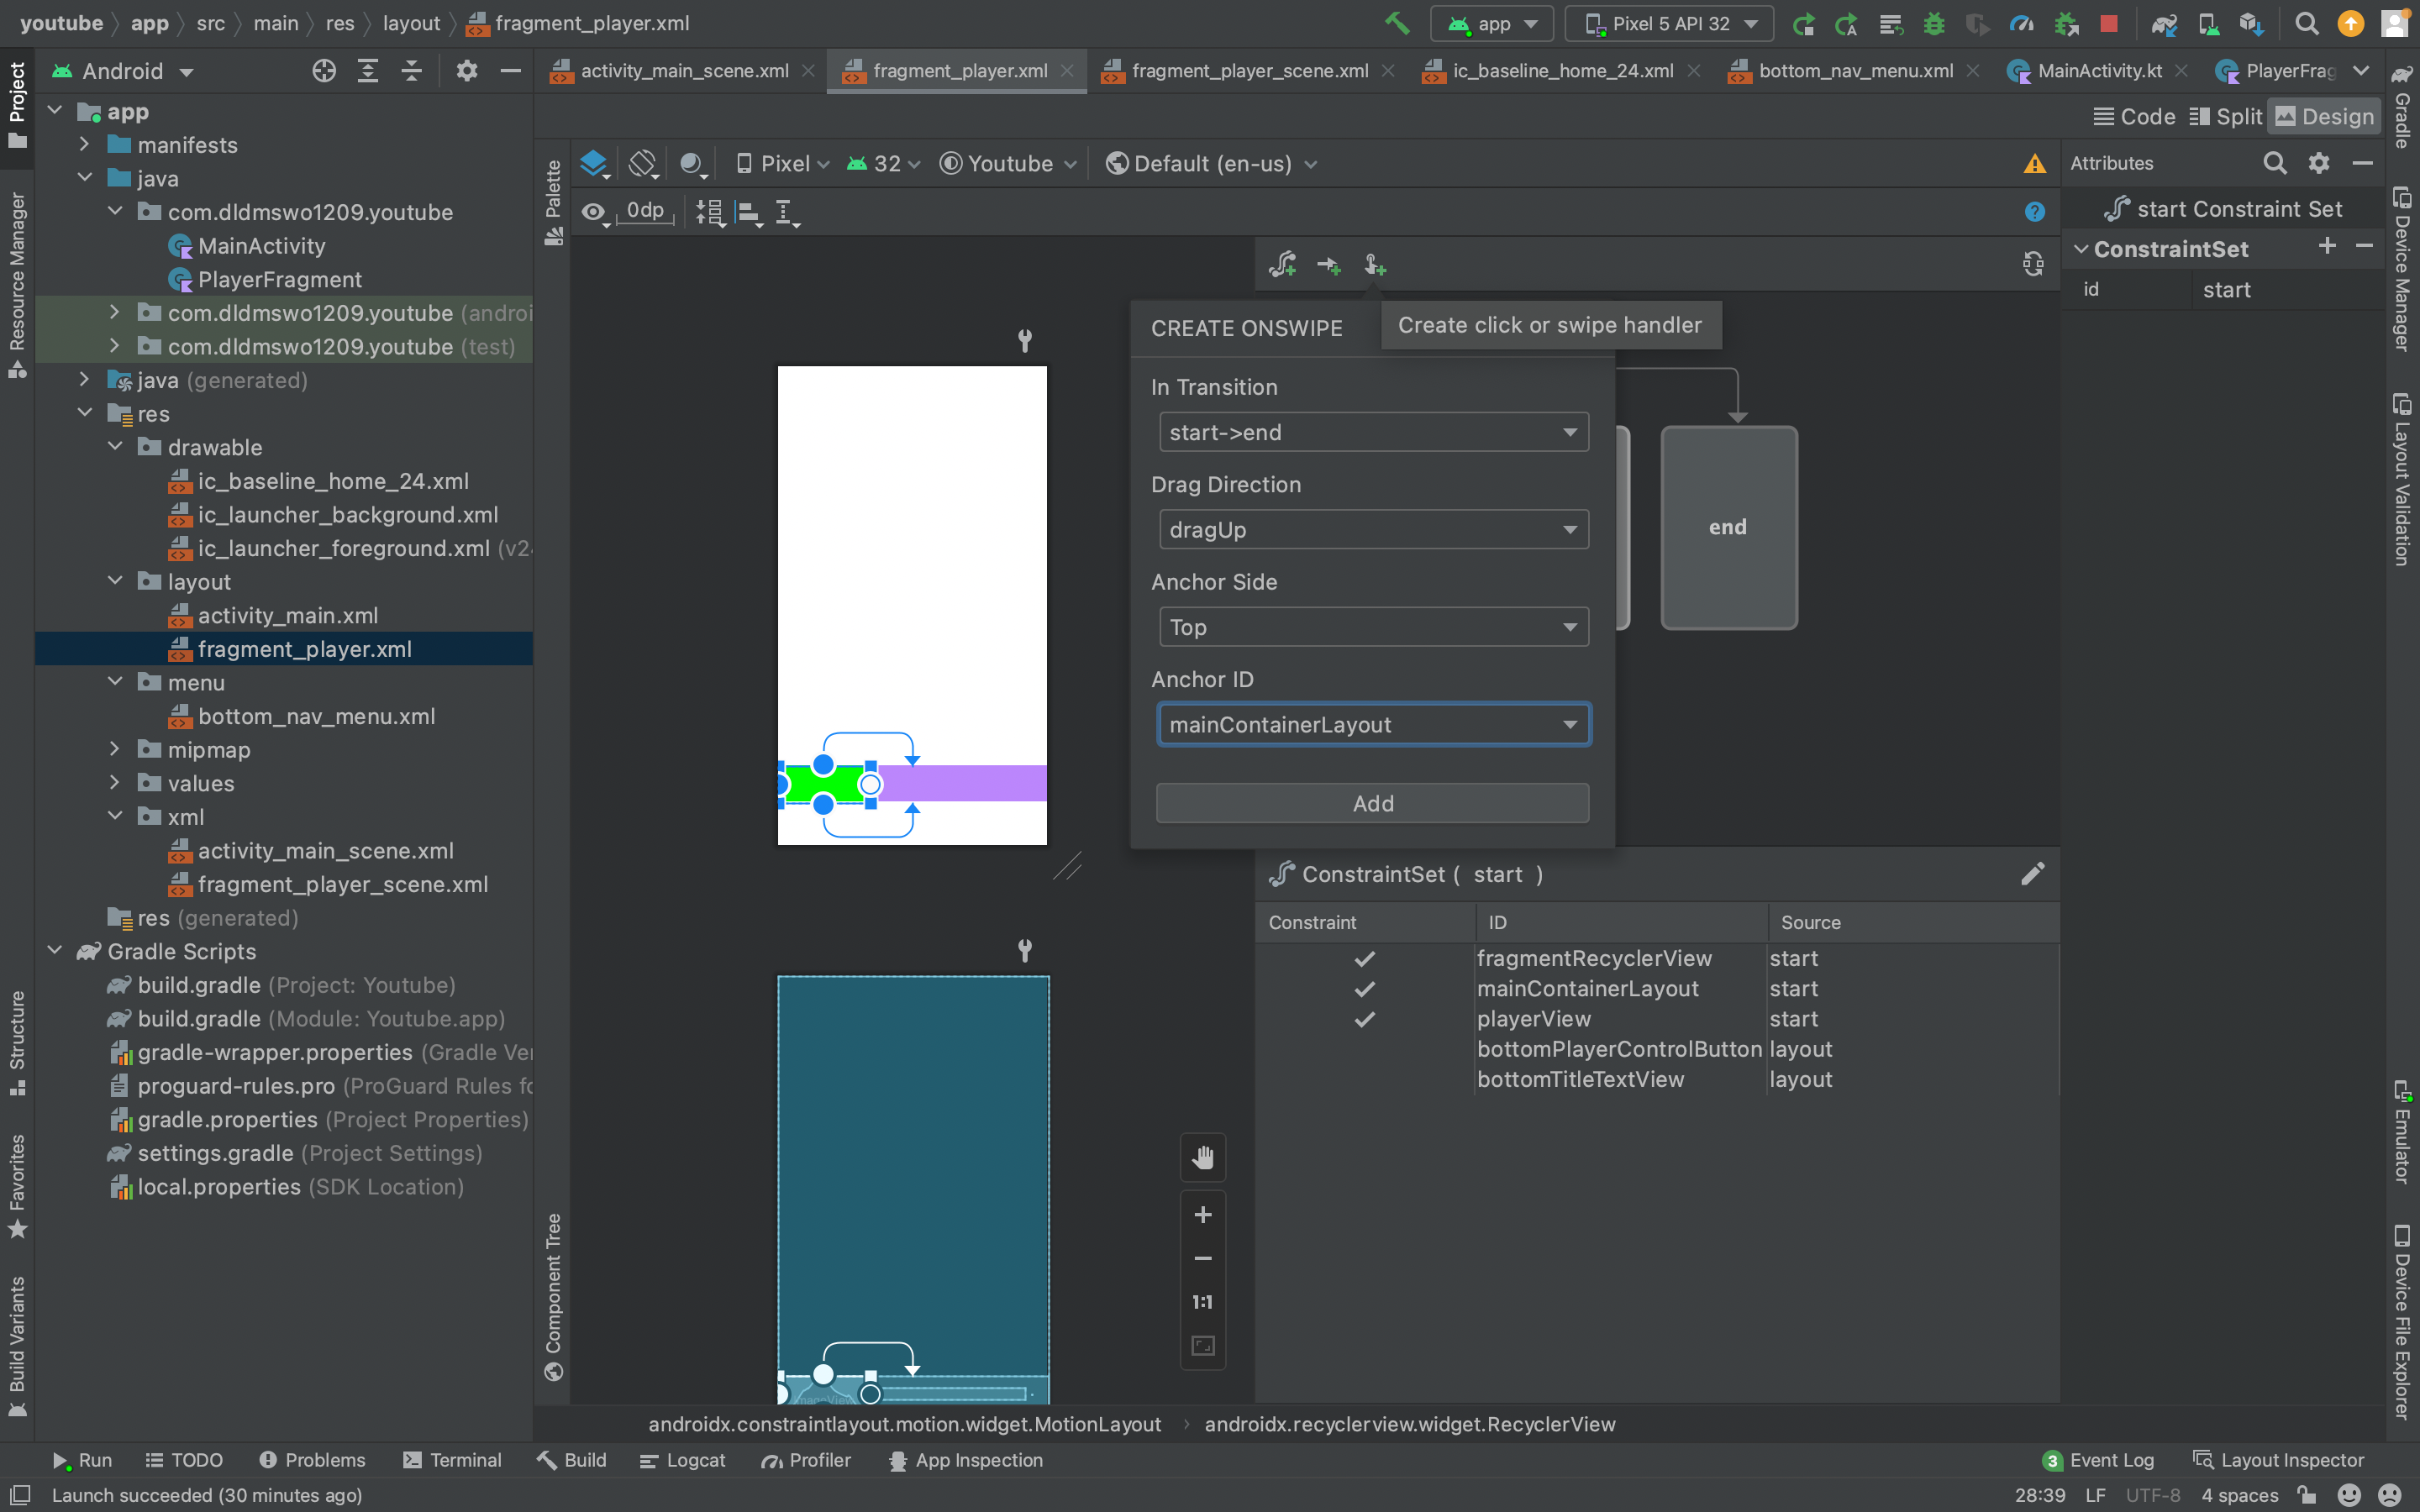 위와 같이 핸들러를 등록해야 스와이프 했을 때 우리가 설정한 모션대로 동작한다.
📌 activity_main_scene.xml
<?xml version="1.0" encoding="utf-8"?>
<MotionScene
    xmlns:android="http://schemas.android.com/apk/res/android"
    xmlns:motion="http://schemas.android.com/apk/res-auto">

    <Transition
        motion:constraintSetEnd="@+id/end"
        motion:constraintSetStart="@id/start"
        motion:duration="1000">
       <KeyFrameSet>
       </KeyFrameSet>
    </Transition>

    <ConstraintSet android:id="@+id/start">
        <Constraint
            android:id="@+id/mainBottomNavigationView"
            motion:layout_constraintEnd_toEndOf="parent"
            android:layout_width="0dp"
            android:layout_height="wrap_content"
            motion:layout_constraintBottom_toBottomOf="parent"
            motion:layout_constraintStart_toStartOf="parent" />
    </ConstraintSet>

    <ConstraintSet android:id="@+id/end">
        <Constraint
            android:id="@+id/mainBottomNavigationView"
            motion:layout_constraintEnd_toEndOf="parent"
            android:layout_width="0dp"
            android:layout_height="wrap_content"
            android:translationY="56dp"
            motion:layout_constraintBottom_toBottomOf="parent"
            motion:layout_constraintStart_toStartOf="parent" />
    </ConstraintSet>
</MotionScene>
위와 동일한 방식으로 메인화면 ConstrainSet 을 추가했다.
fragment 가 드래그 됨에 따라 BottomNavigation 을 밑으로 내리는 모션을 추가하기 위해서 ConstraintSet end 에 translationY="56dp"(56dp 만큼 밑으로 내려)를 설정했다.
여기서는 따로 핸들러를 등록하지 않고, fragment 가 드래그 됨에 따라 동작해야하므로 코드에서 구현한다.
📌 MainActivity.kt
import androidx.appcompat.app.AppCompatActivity
import android.os.Bundle
import com.dldmswo1209.youtube.databinding.ActivityMainBinding

class MainActivity : AppCompatActivity() {
    private lateinit var binding: ActivityMainBinding
    override fun onCreate(savedInstanceState: Bundle?) {
        super.onCreate(savedInstanceState)
        binding = ActivityMainBinding.inflate(layoutInflater)
        setContentView(binding.root)

        supportFragmentManager.beginTransaction()
            .replace(R.id.fragmentContainer, PlayerFragment())
            .commit()
    }
}
📌 PlayerFragment.kt
import android.os.Bundle
import android.view.View
import androidx.constraintlayout.motion.widget.MotionLayout
import androidx.fragment.app.Fragment
import com.dldmswo1209.youtube.databinding.FragmentPlayerBinding
import kotlin.math.abs

class PlayerFragment: Fragment(R.layout.fragment_player) {
    private lateinit var binding : FragmentPlayerBinding
    override fun onViewCreated(view: View, savedInstanceState: Bundle?) {
        super.onViewCreated(view, savedInstanceState)
        binding = FragmentPlayerBinding.bind(view)

        binding.playerMotionLayout.setTransitionListener(object : MotionLayout.TransitionListener{
            override fun onTransitionStarted(
                motionLayout: MotionLayout?,
                startId: Int,
                endId: Int
            ) {}

            override fun onTransitionChange(
                motionLayout: MotionLayout?,
                startId: Int,
                endId: Int,
                progress: Float
            ) {
                (activity as MainActivity).also { mainActivity ->
                    mainActivity.findViewById<MotionLayout>(R.id.mainMotionLayout).progress = abs(progress)
                }
            }

            override fun onTransitionCompleted(motionLayout: MotionLayout?, currentId: Int) {}

            override fun onTransitionTrigger(
                motionLayout: MotionLayout?,
                triggerId: Int,
                positive: Boolean,
                progress: Float
            ) {}
        })
    }
}
MotionLayout의 setTransitionLinstener 를 구현해서 MotionLayout이 움직이는 동안 할 작업(BottomNavigationView를 아래로 내려!)을 알려준다.

매일 조금씩이라도 성장하자