git status
git status gives information on the current status of a git repository and its contents.
git init
Use git init to create a new git repository.
This command creates an empty Git repository - basically a .git directory
git tracks a directory and all nested subdirectories.
The Basic Git Workflow
-
Work on stuff
Make new files, edit files, delete files, etc. -
Add changes
Group sepecific changes together, in preparation of commiting. -
Commit
Commit everythig that was previously added.
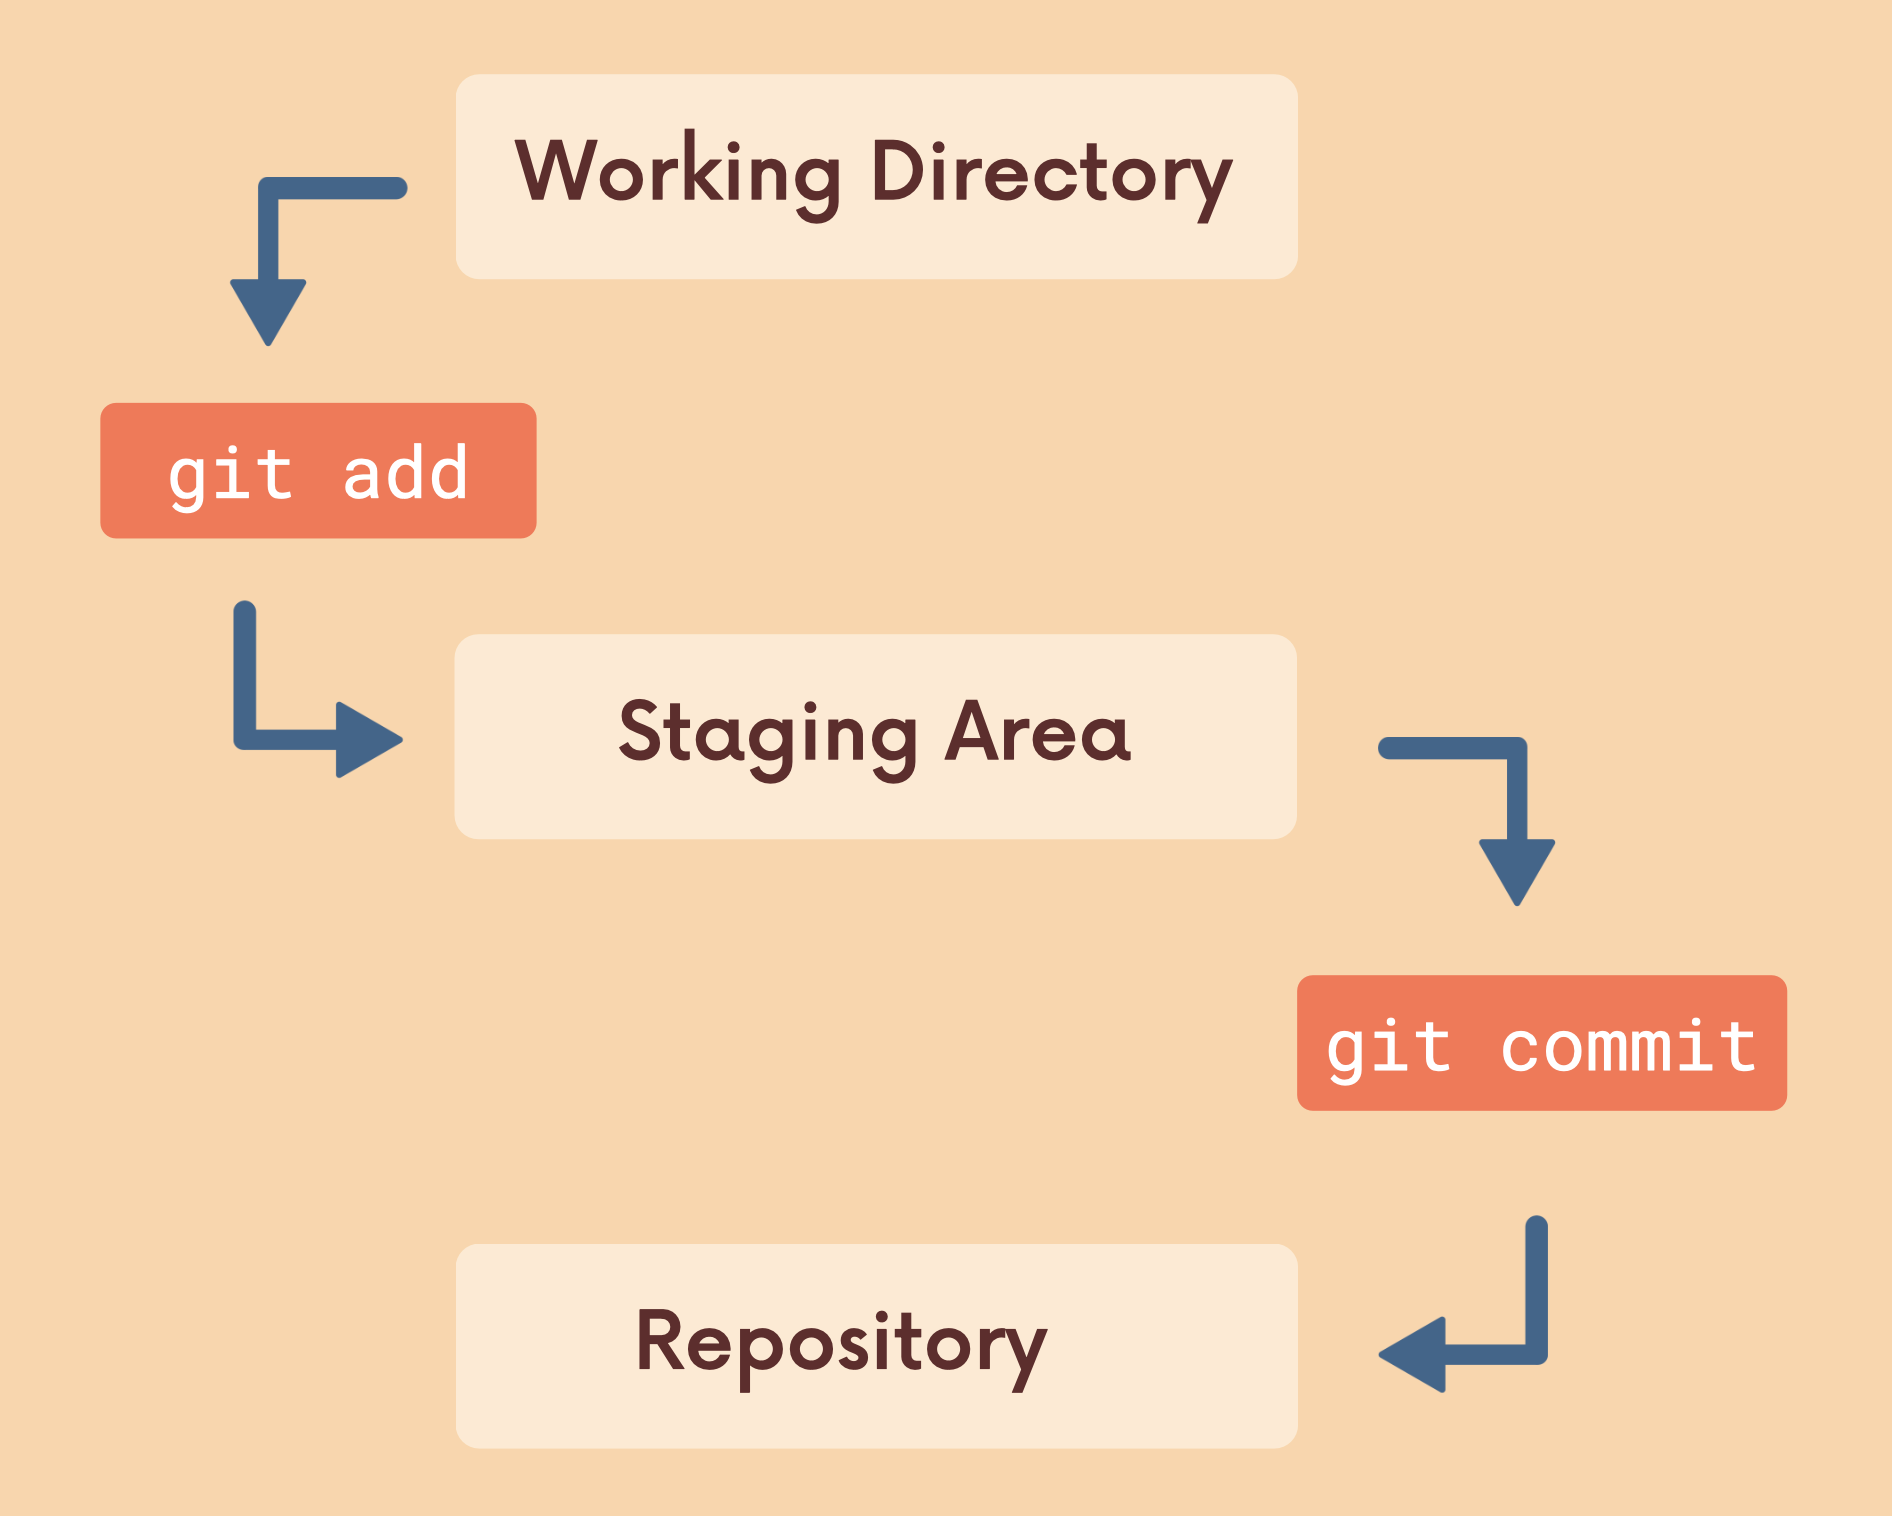
git add
Use git add to add specific files to the staging area. Separate files with spaces to add multiple at once.
git add file1 file2Use git add . to stage all changes at once.
git add .git commit
We use the git commit command to actually commit changes from the staging area.
git commit -m "my message"The -m flag allows us to pass in an inline commit message, rather than launching a text editor.
-am flag를 사용하면 add와 commit을 동시에 할 수 있다. 단, 추적중인 상태의 파일만 가능하다.
git commit -am "add and commit"git log
Show commit logs
git log--oneline is a shorthand for "--pretty=oneline --abbrev-commit" used together.
git log --onelineAtomic Commits
When possible, a commit should encompass a single feature, change, or fix. In other words, try to keep each commit focused on a single thing.
This makes it much easier to undo or rollback changes later on. It also makes your code or project easier to review.
Present-Tense Imperative Style?
Though the Git docs suggest using present-tense imperative messages, many developers prefer to use past-tense messages. All that matters is consistency, especially when working on a team with many people making commits.
Amending Commits
Suppose you just made a commit and then realized you forgot to include a file! Or, maybe you made a typo in the commit message that you want to correct.
Rather than making a brand new separate commit, you can "redo" the previous commit using the --amend option
git commit -m 'some commit'
git add forgotten_file
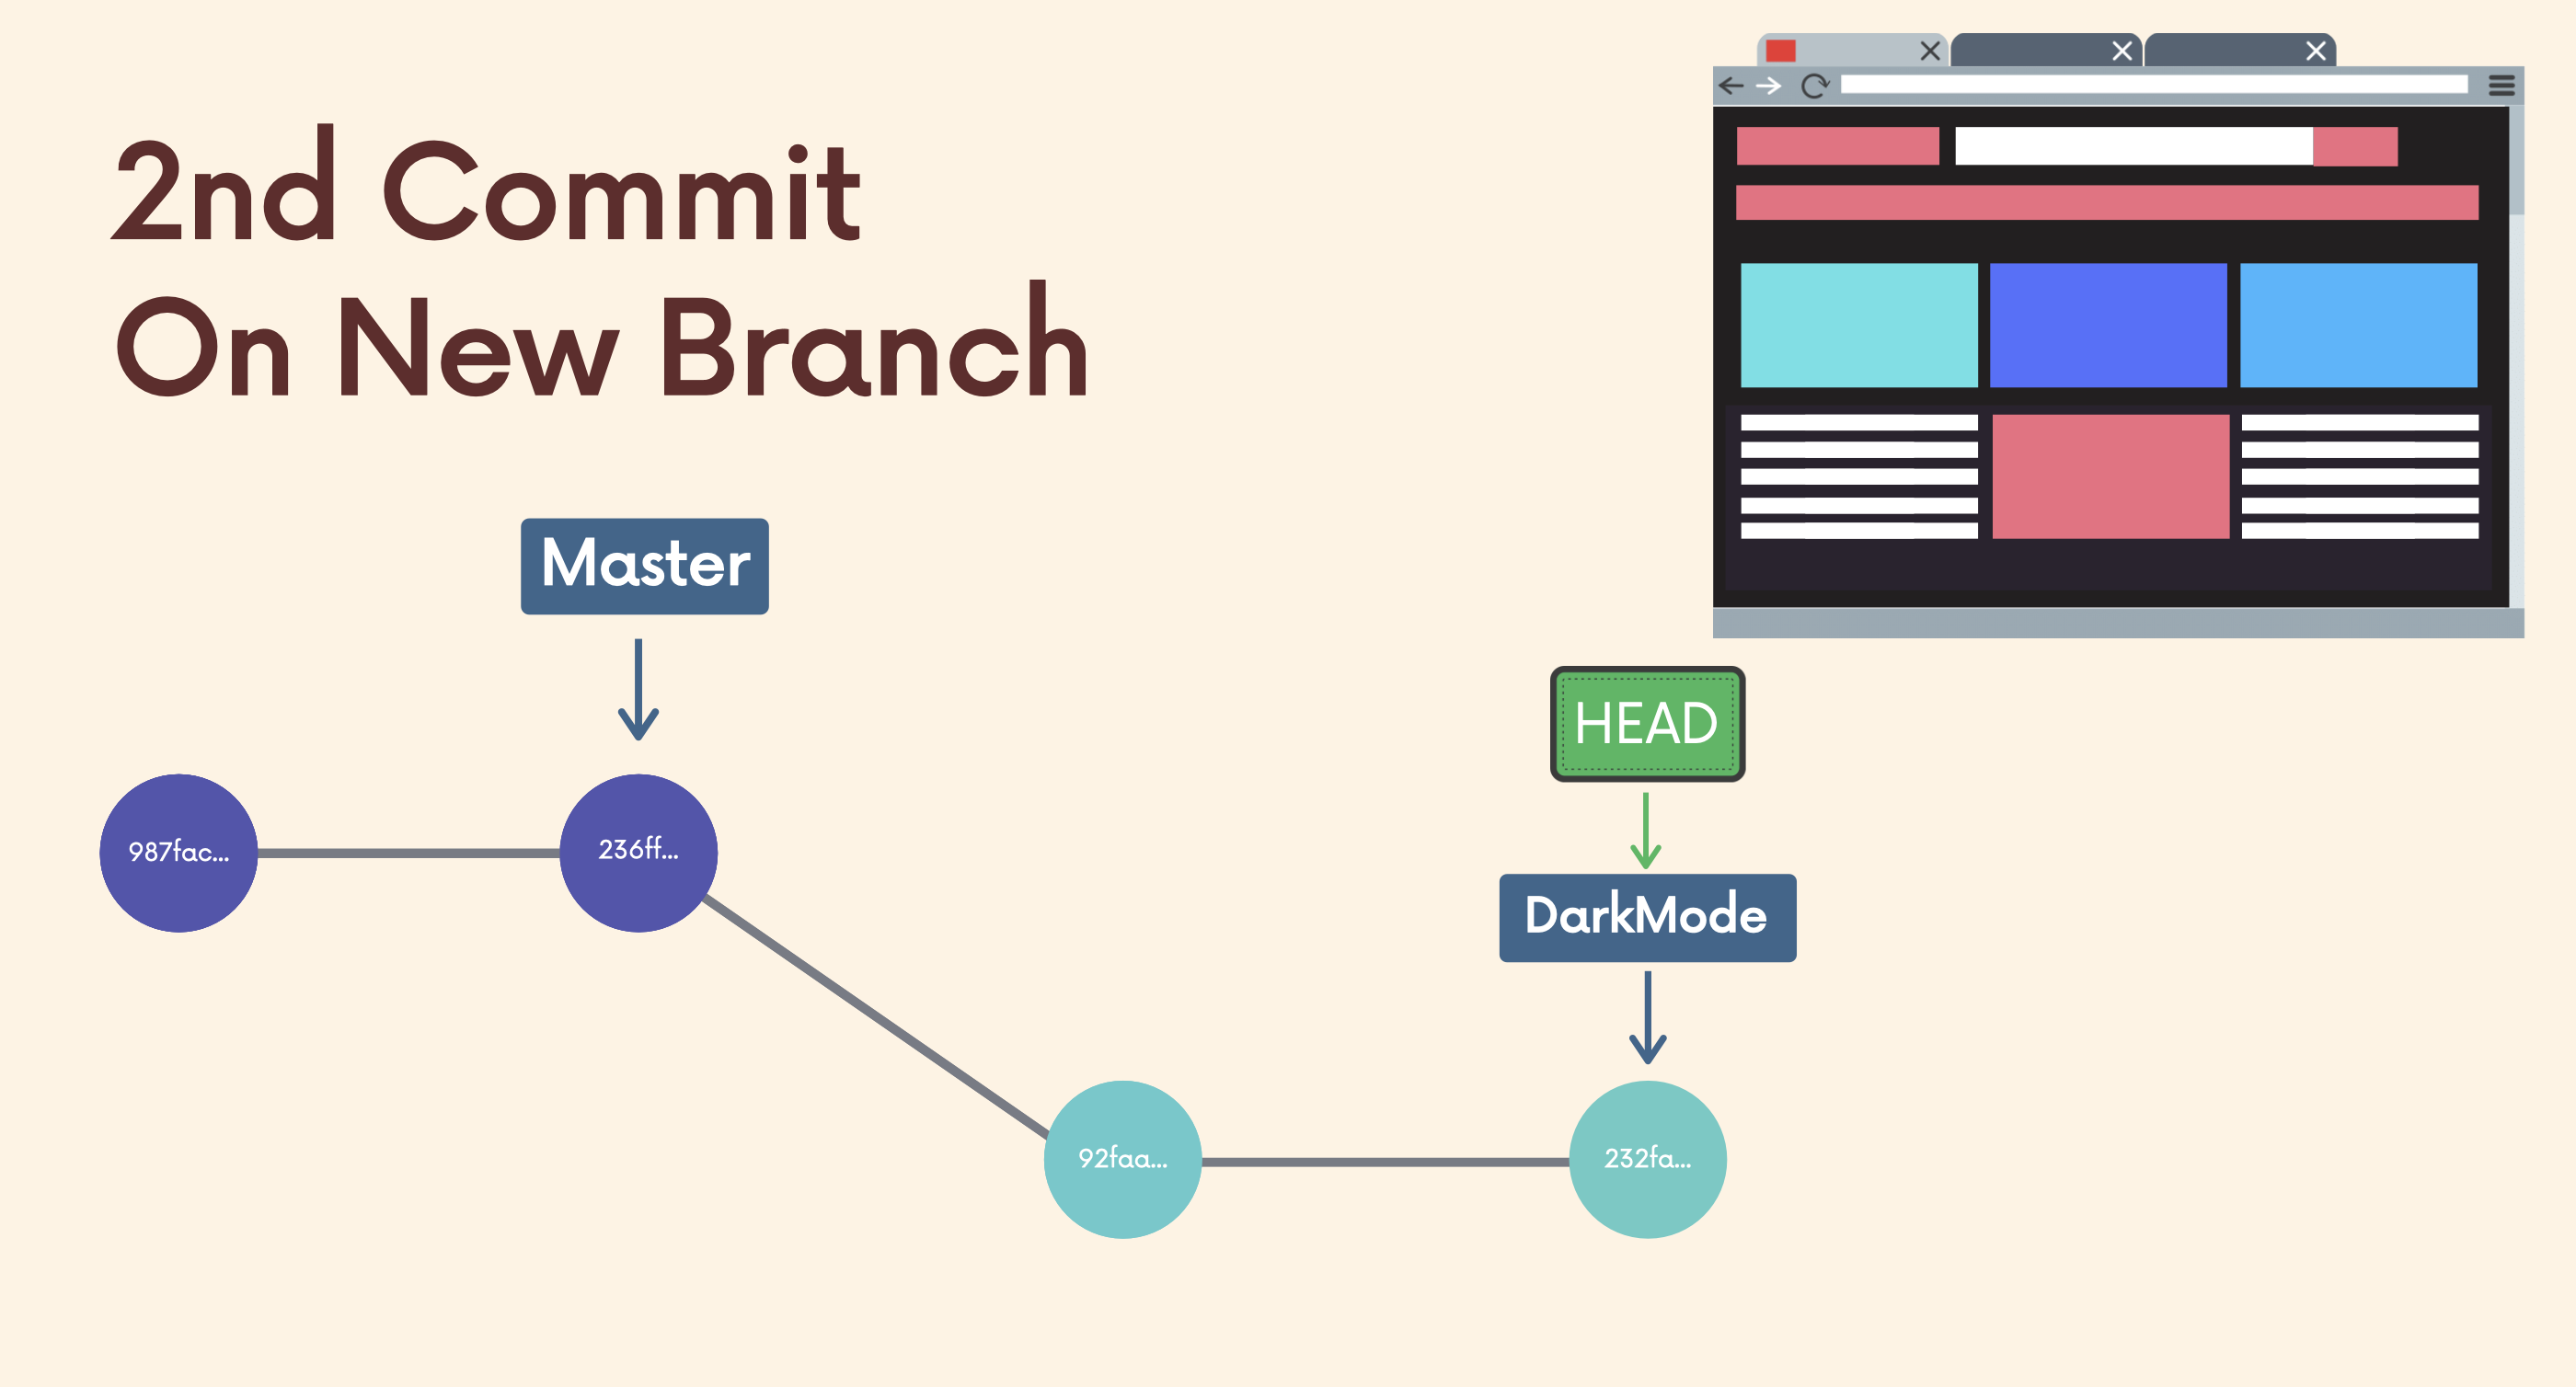
git commit --amendBranches
They enable us to create separate contexts where we can try new things, or even work on multiple ideas in parallel.
if we make changes on one branch, they do not impact the other branches (unless we merge the changes)

The Master(Main) Branch
In git, we are always working on a branch The default branch name is master(main).
It doesn't do anything special or have fancy powers. It's just like any other branch.
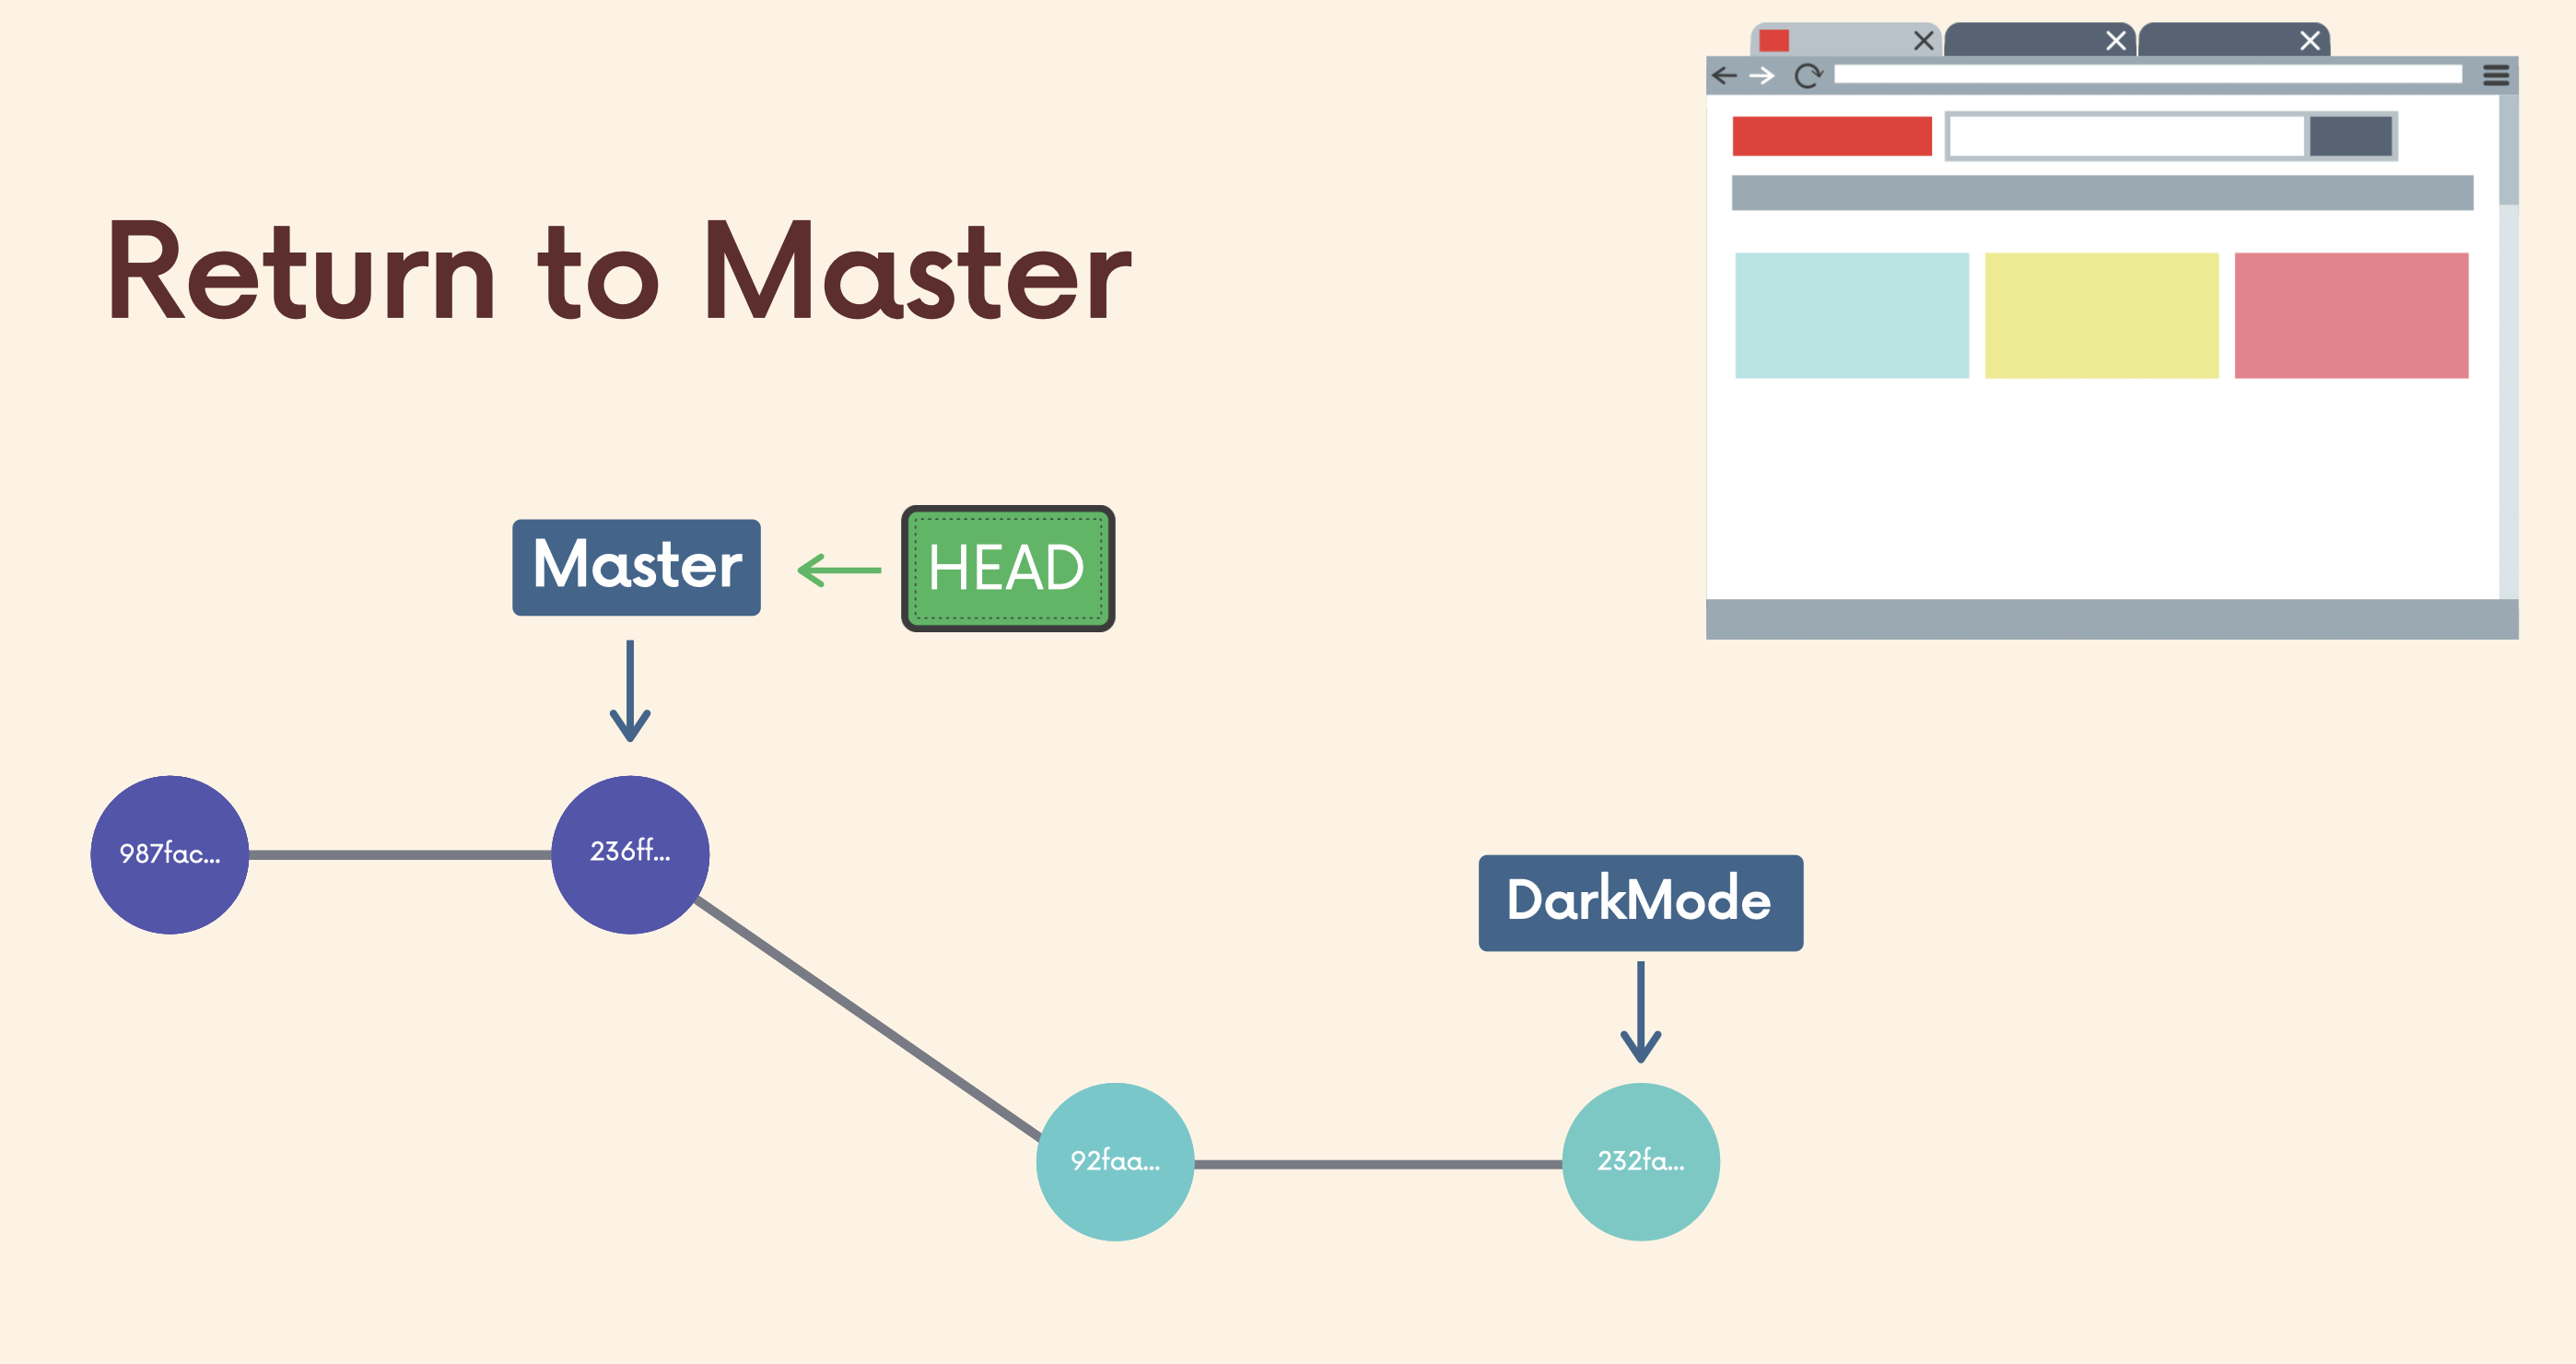
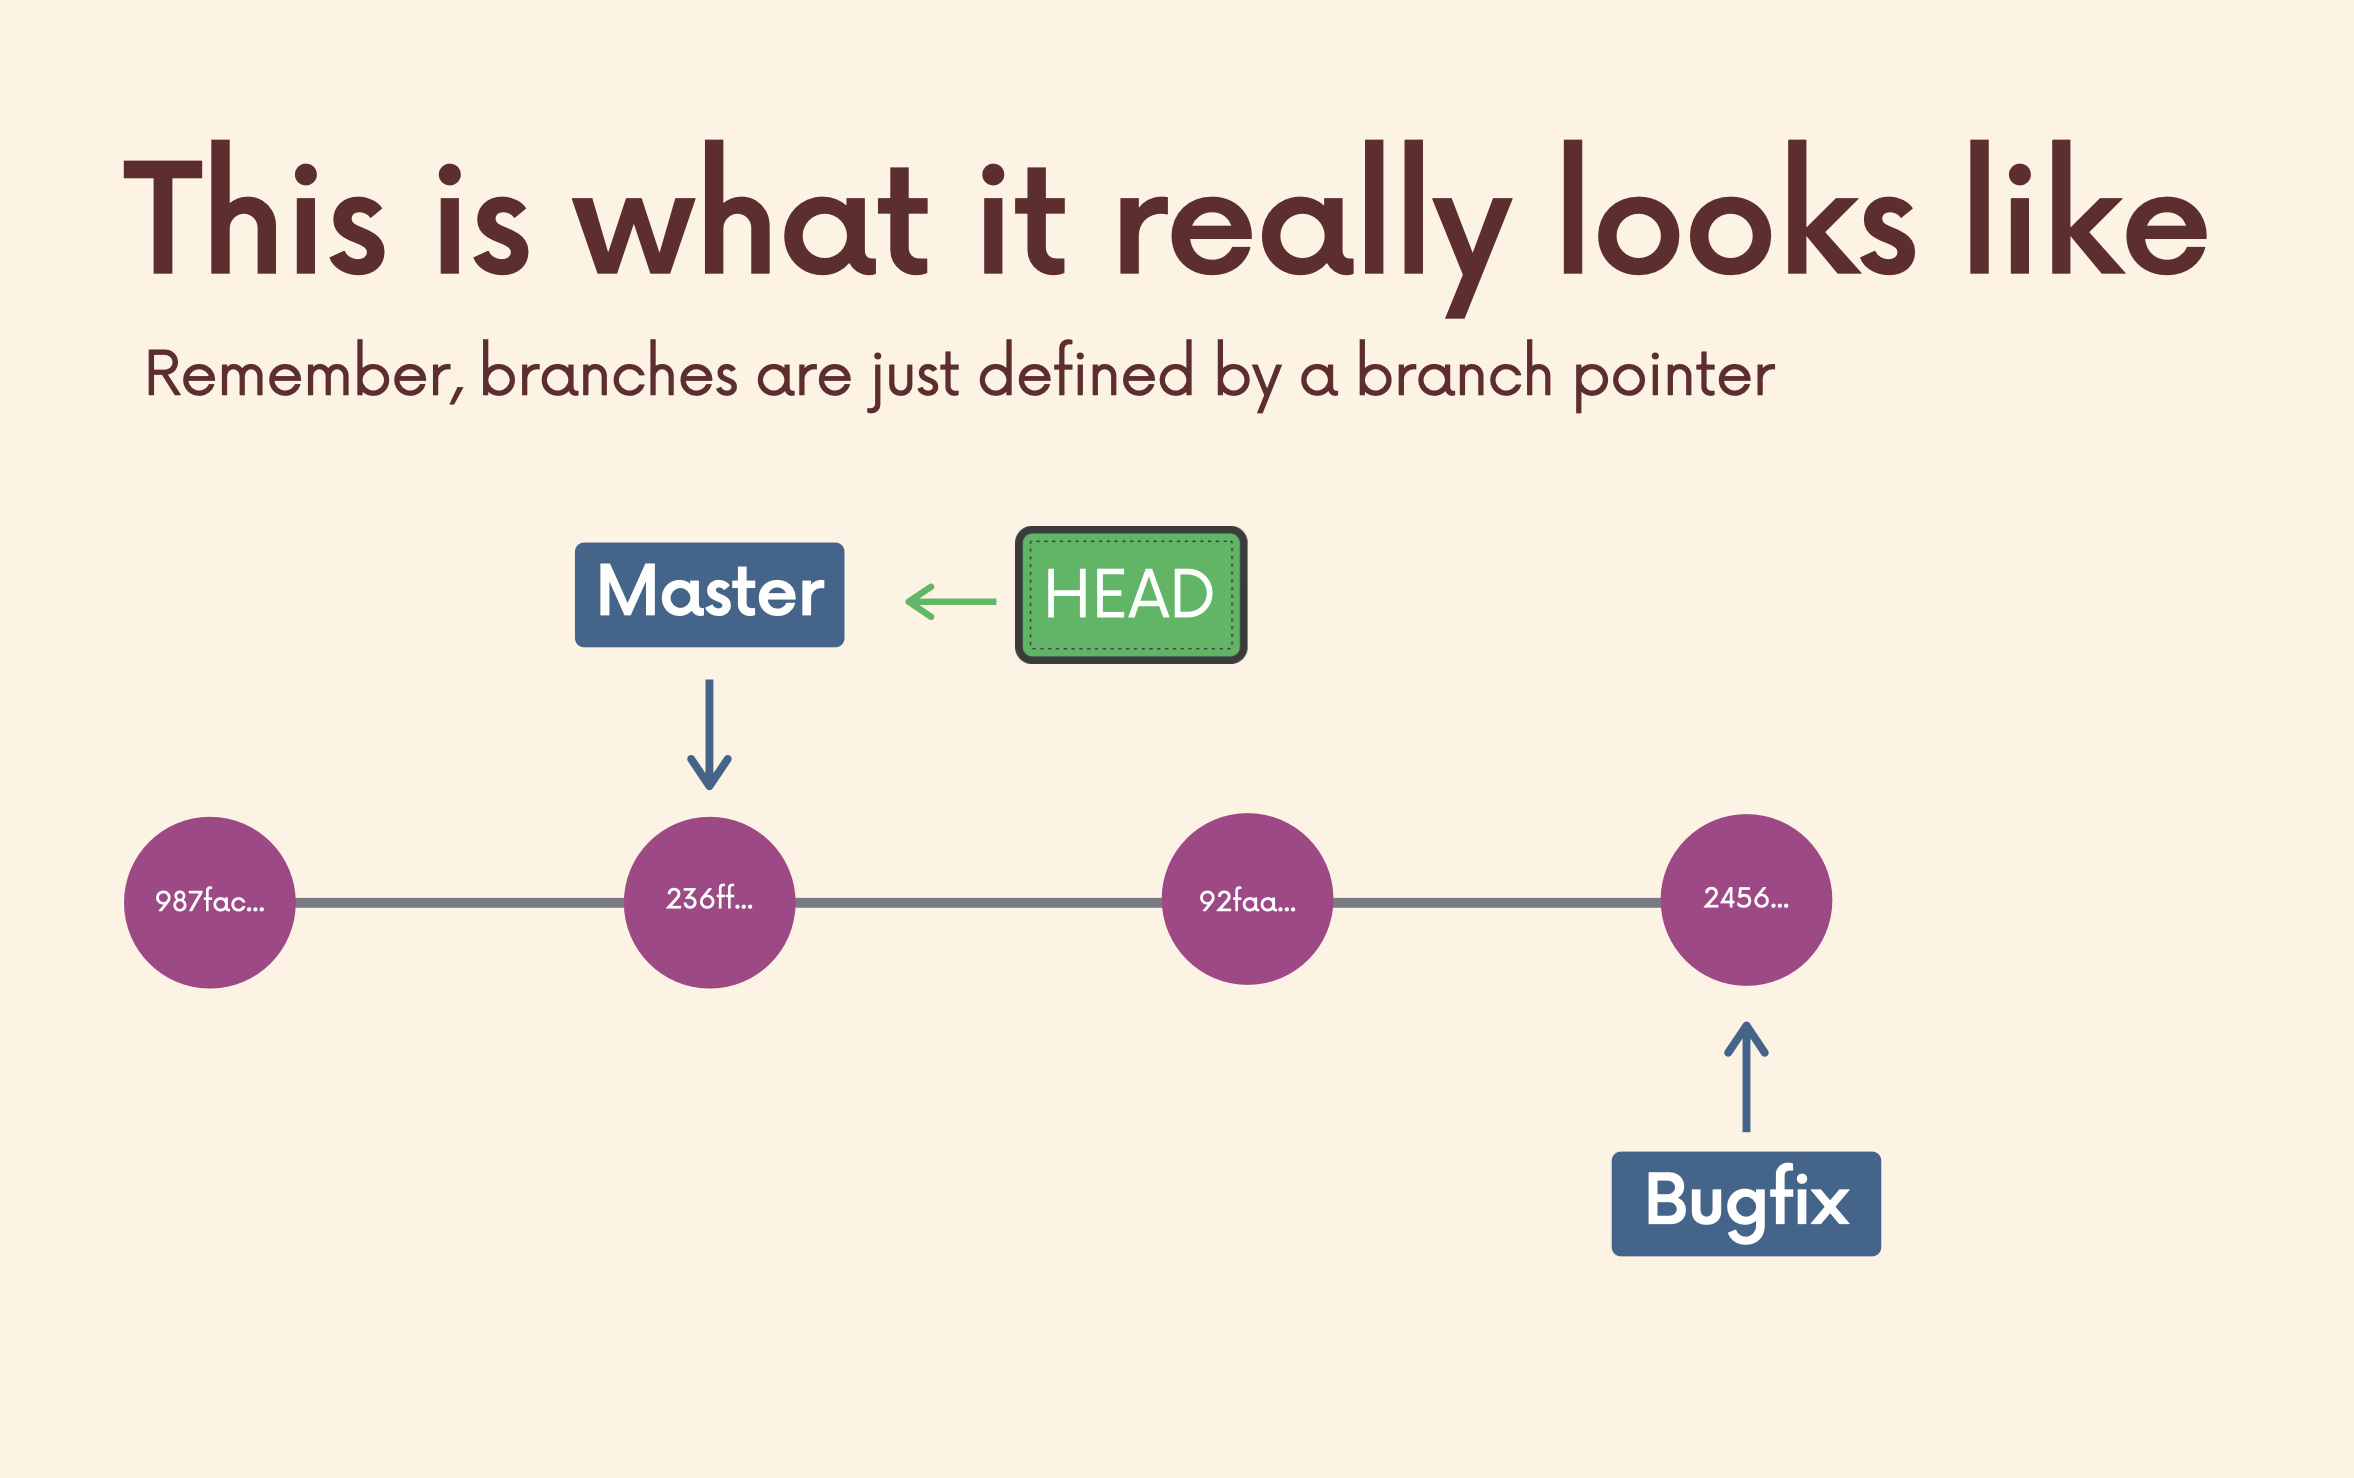
HEAD
HEAD is simply a pointer that refers to the current "location" in your repository. It points to a particular branch reference.
Viewing Branches
Use git branch to view your existing branches.
git branchCreating Branches
Use git branch <branch-name> to make a new branch based upon the current HEAD.
git branch <branch-name>Switching Branches
Once you have created a new branch, use git switch <branch-name> to switch to it.
git switch <branch-name>Creating & Switching
Use git switch with the -c flag to create a new branch and switch to it all in one go.
git switch -c <branch-name>Switching Branches With Unstaged Changes?
Untracked 상태의 파일은 바꾸려는 브랜치로 그대로 가져감.
하지만 Tracked 상태의 파일은 혹시 모를 충돌에 대비하여 commit 혹은 stash 이후 브랜치를 변경하라는 에러를 띄워줌.
Deleting & Renaming Branches
대문자는 강제의 의미가 들어감. (기본적으로 병합되지 않은 브랜치는 삭제할 수 없음)
git branch -d <branch-name>
git branch -D <branch-name>

git branch -m <branch-name>
git branch -M <branch-name>
Merging
To merge, follow these basic steps:
1. Switch to or checkout the branch you want to merge the changes into (the receiving branch)
2. Use the git merge command to merge changes from a specific branch into the current branch.
git switch master
git merge bugfix
Fast Forward Merge
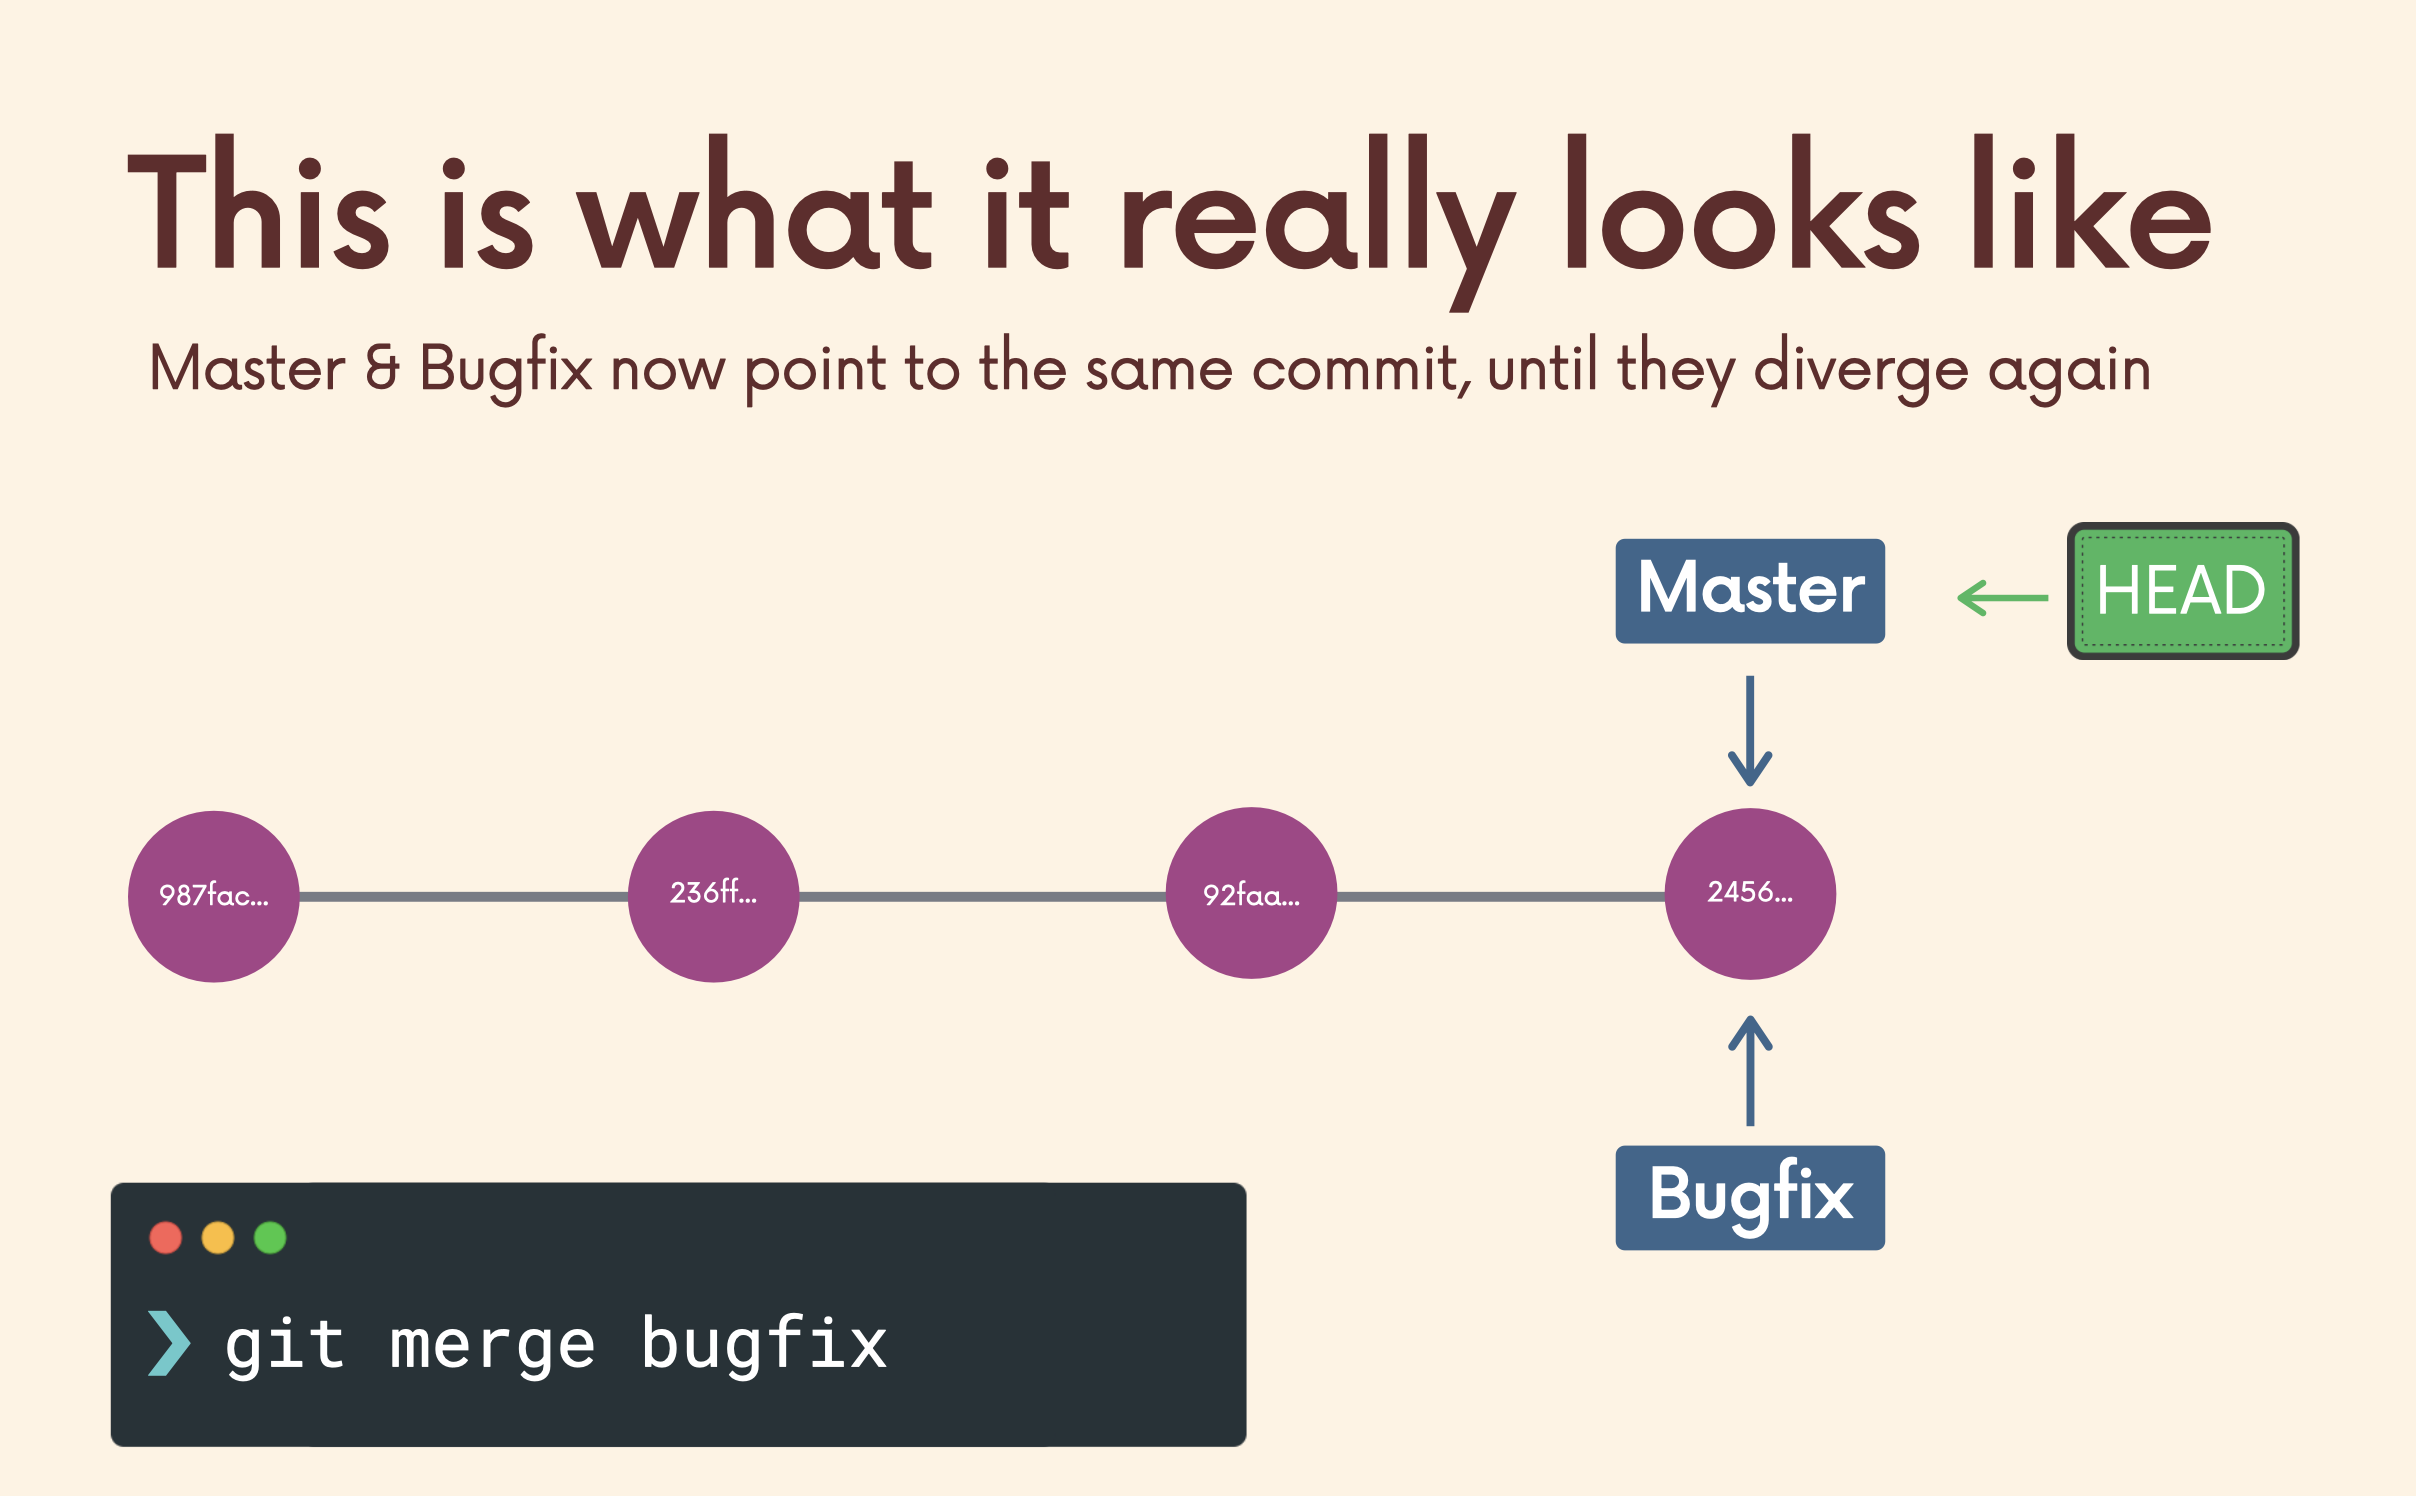
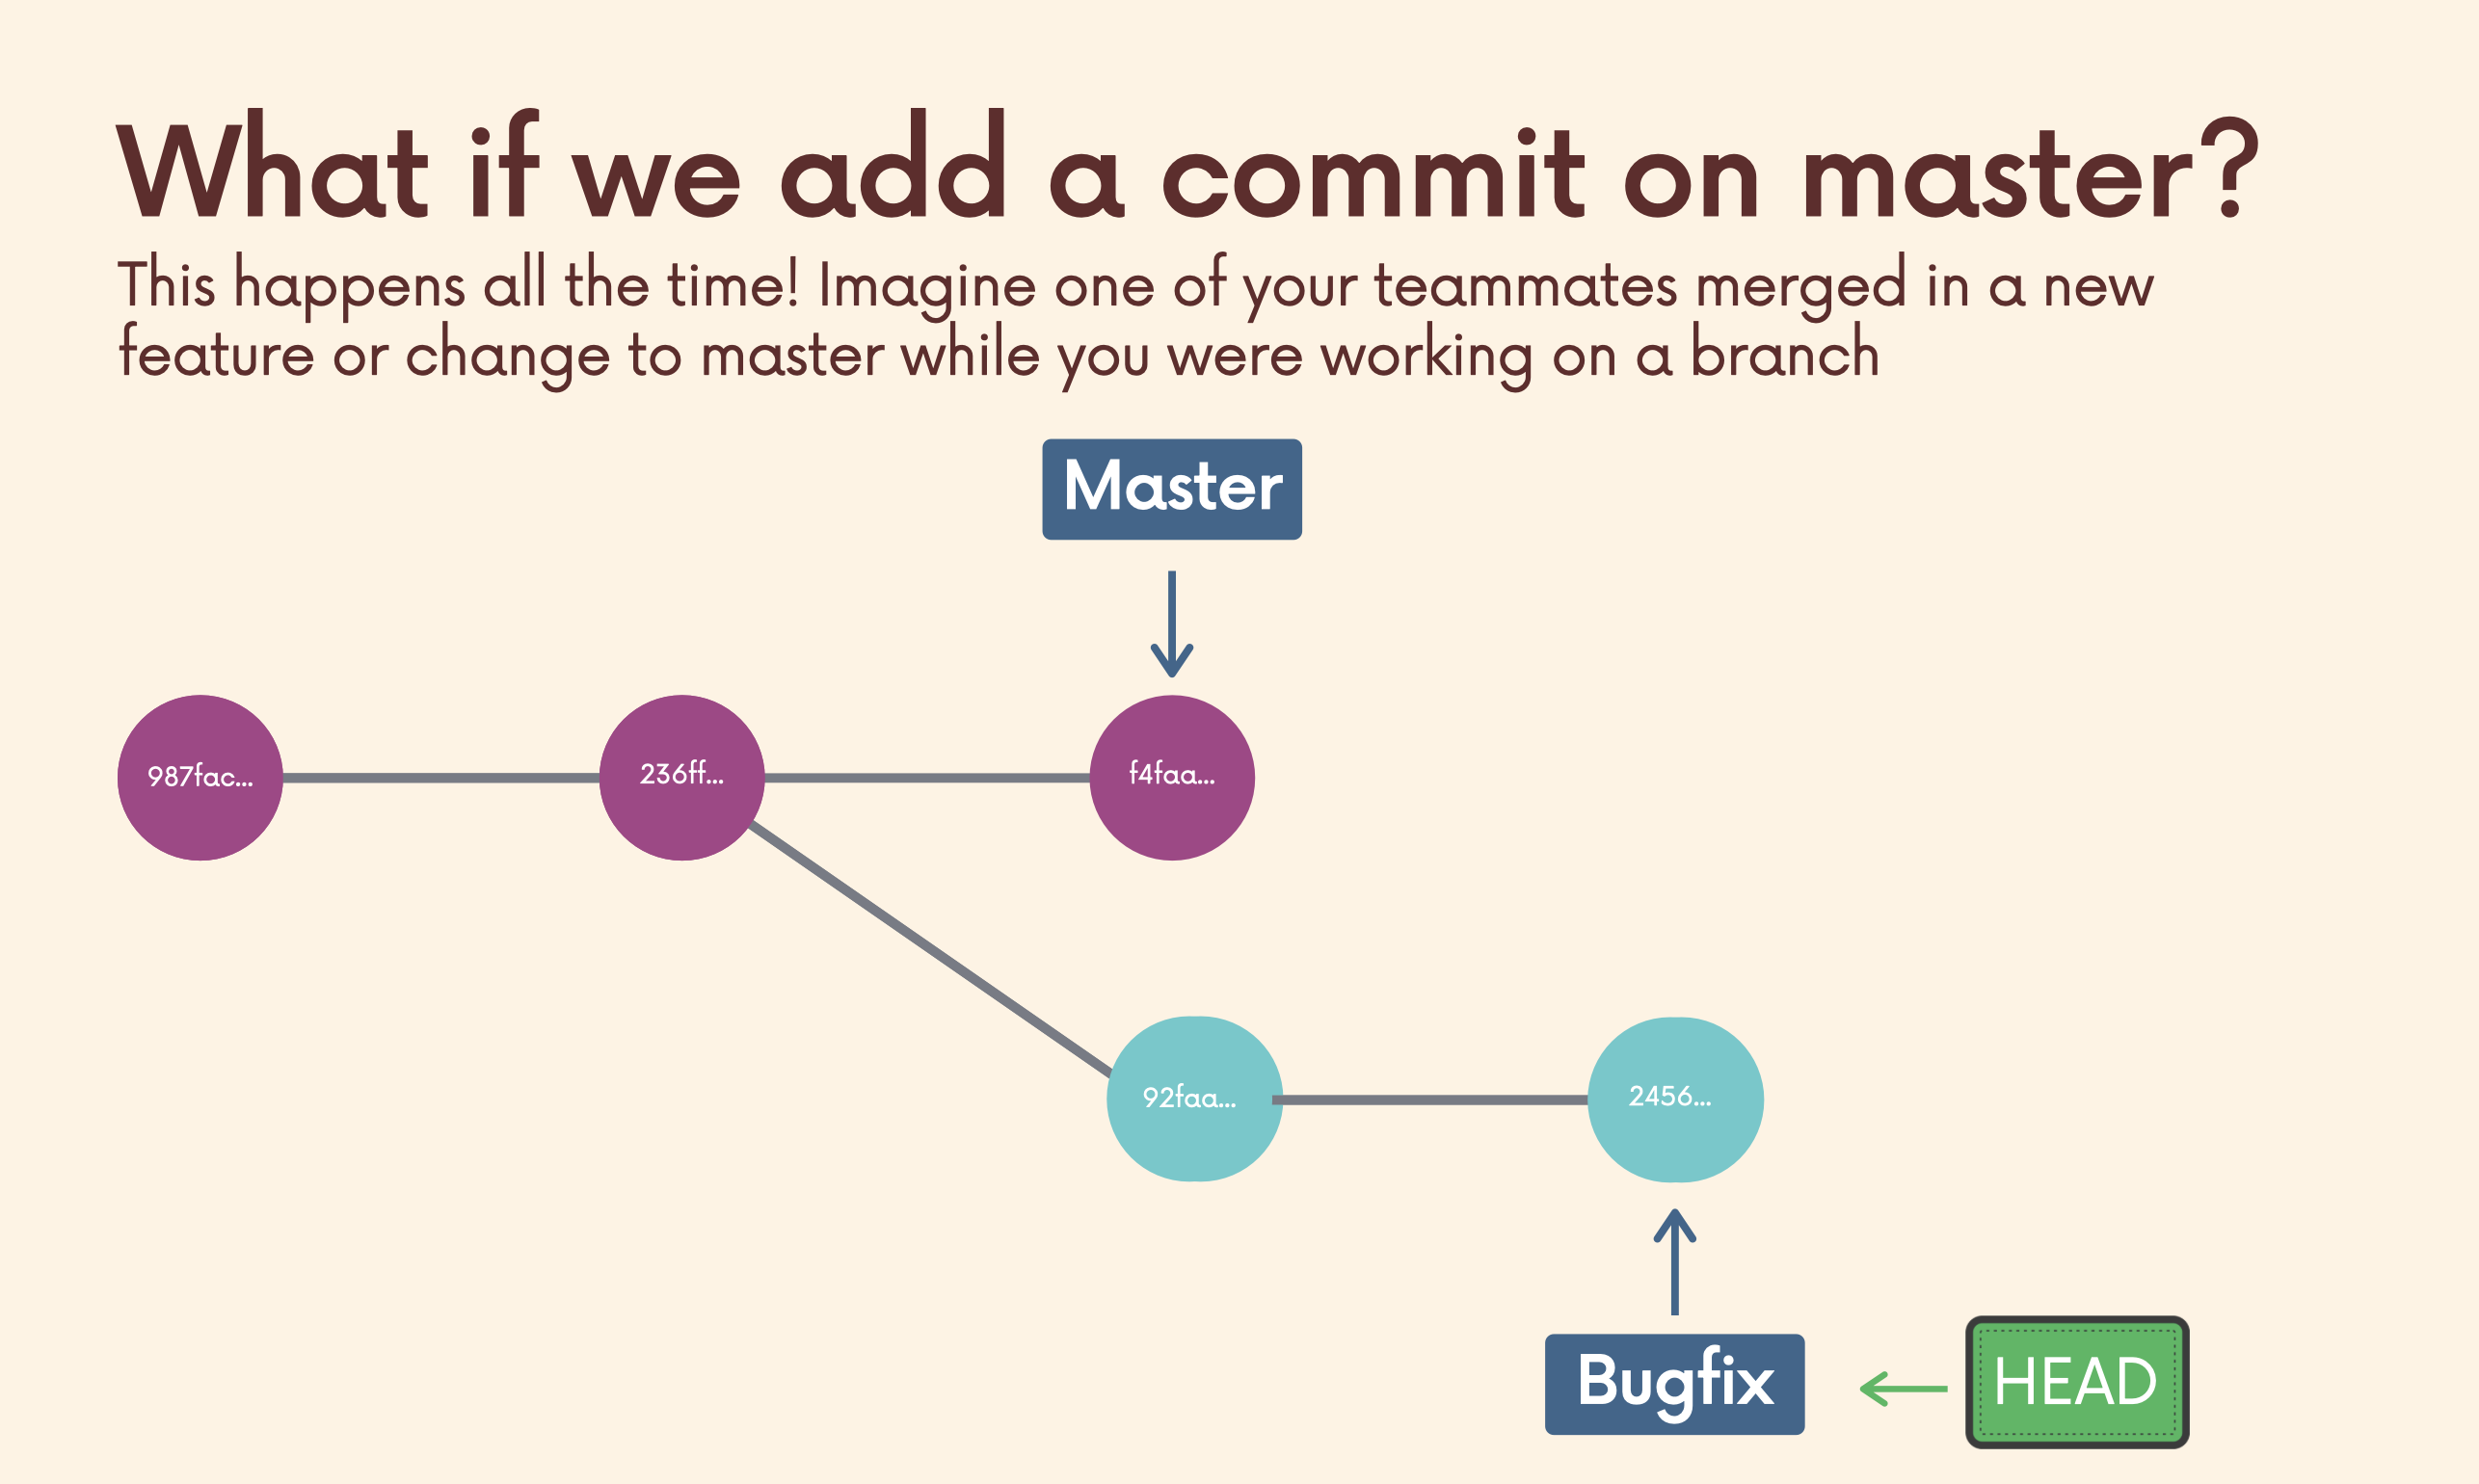
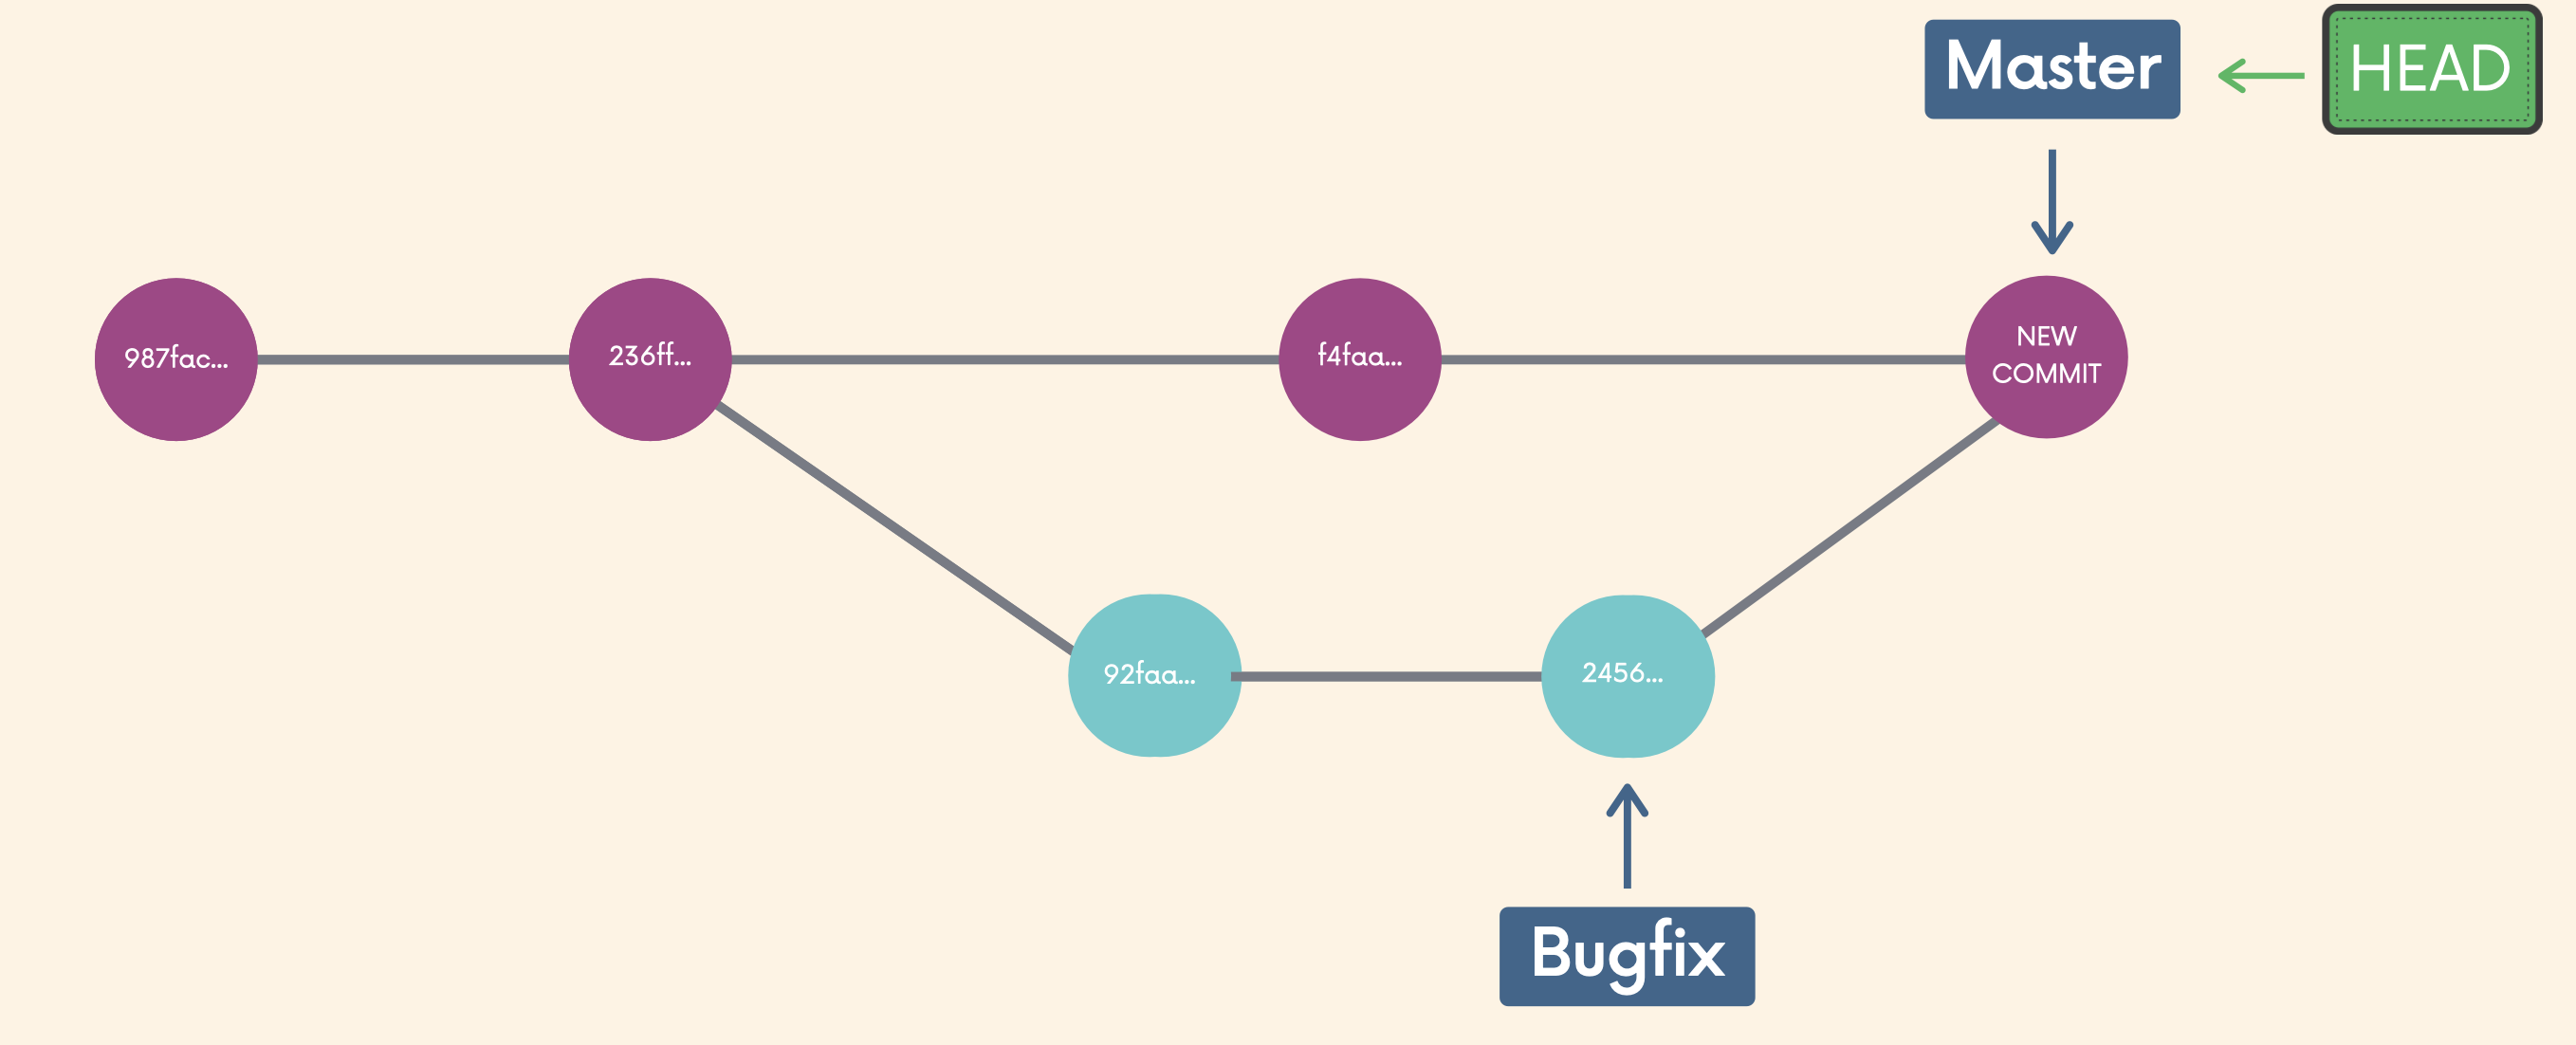
Generating Merge Commits
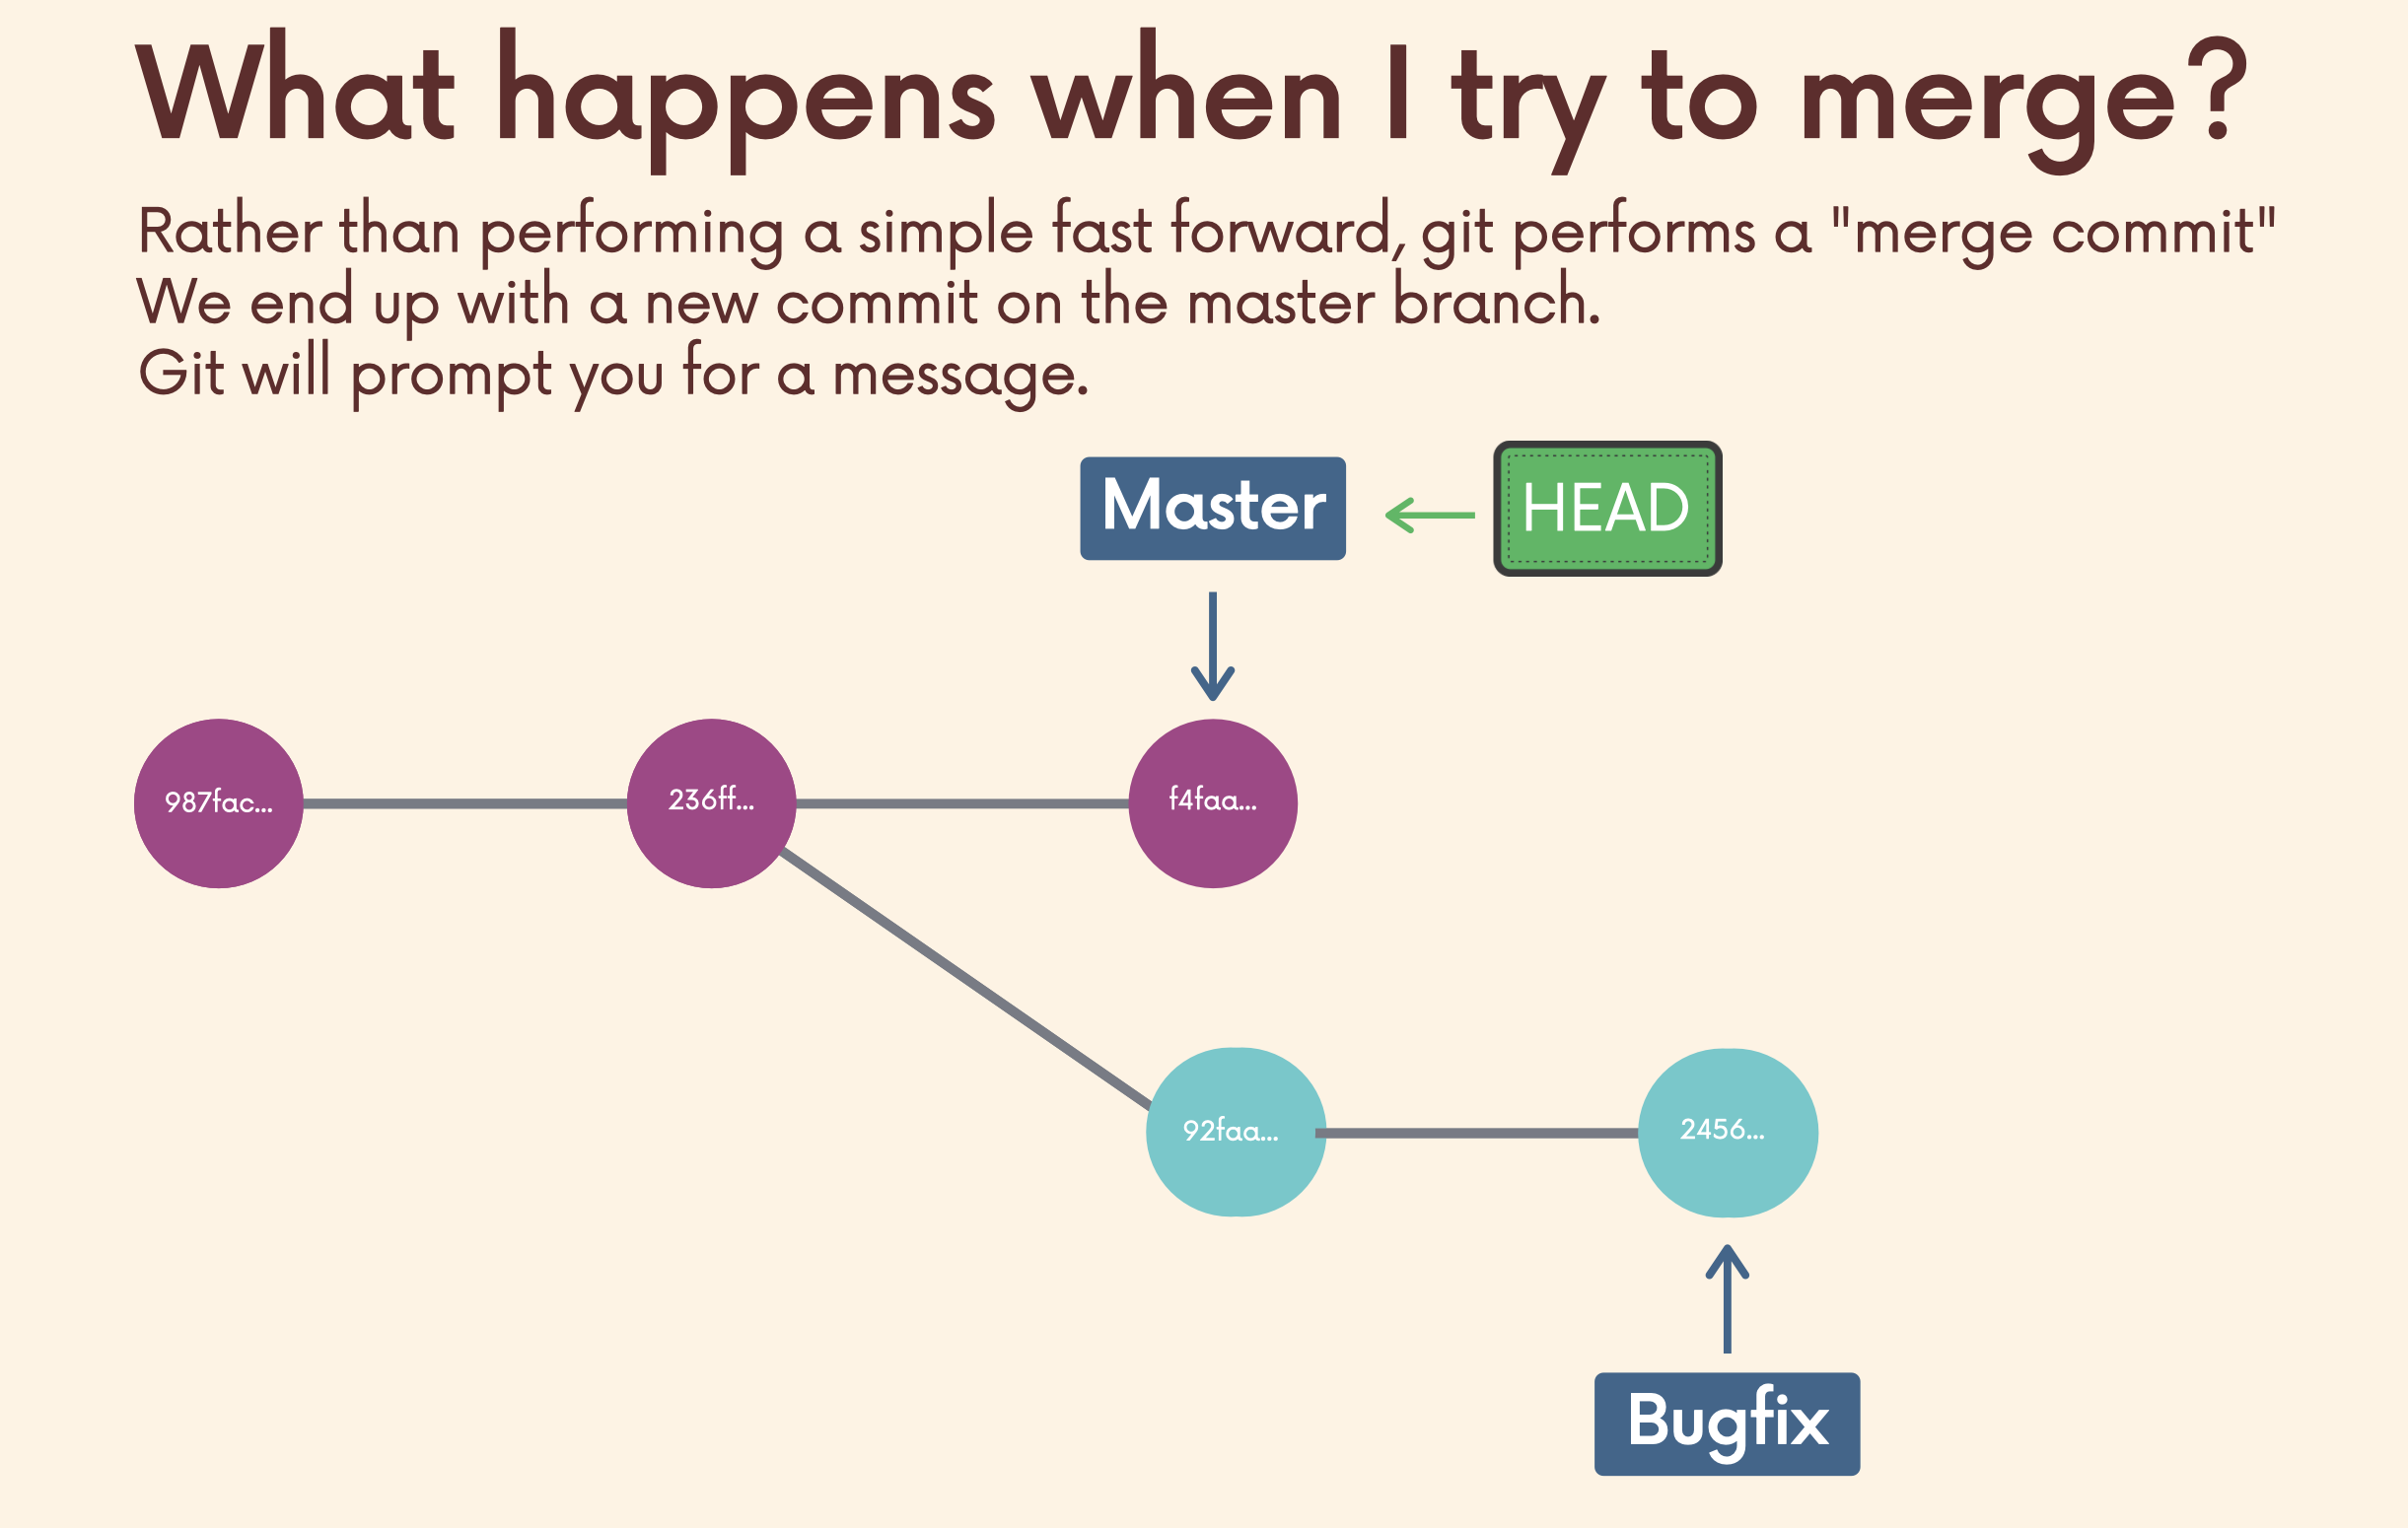
충돌이 없는 경우에는 commit message를 작성하면 merge가 된다.
Resolving Confilts
Whenever you encounter merge conflicts, follow these steps to resolve them:
1. Open up the file(s) with merge conflicts.
2. Edit the file(s) to remove the conflicts. Decide which branch's content you want to keep in each conflict. Or keep the content from both.
3. Remove the conflict "markers" in the document.
4. Add your changes and then make a commit!
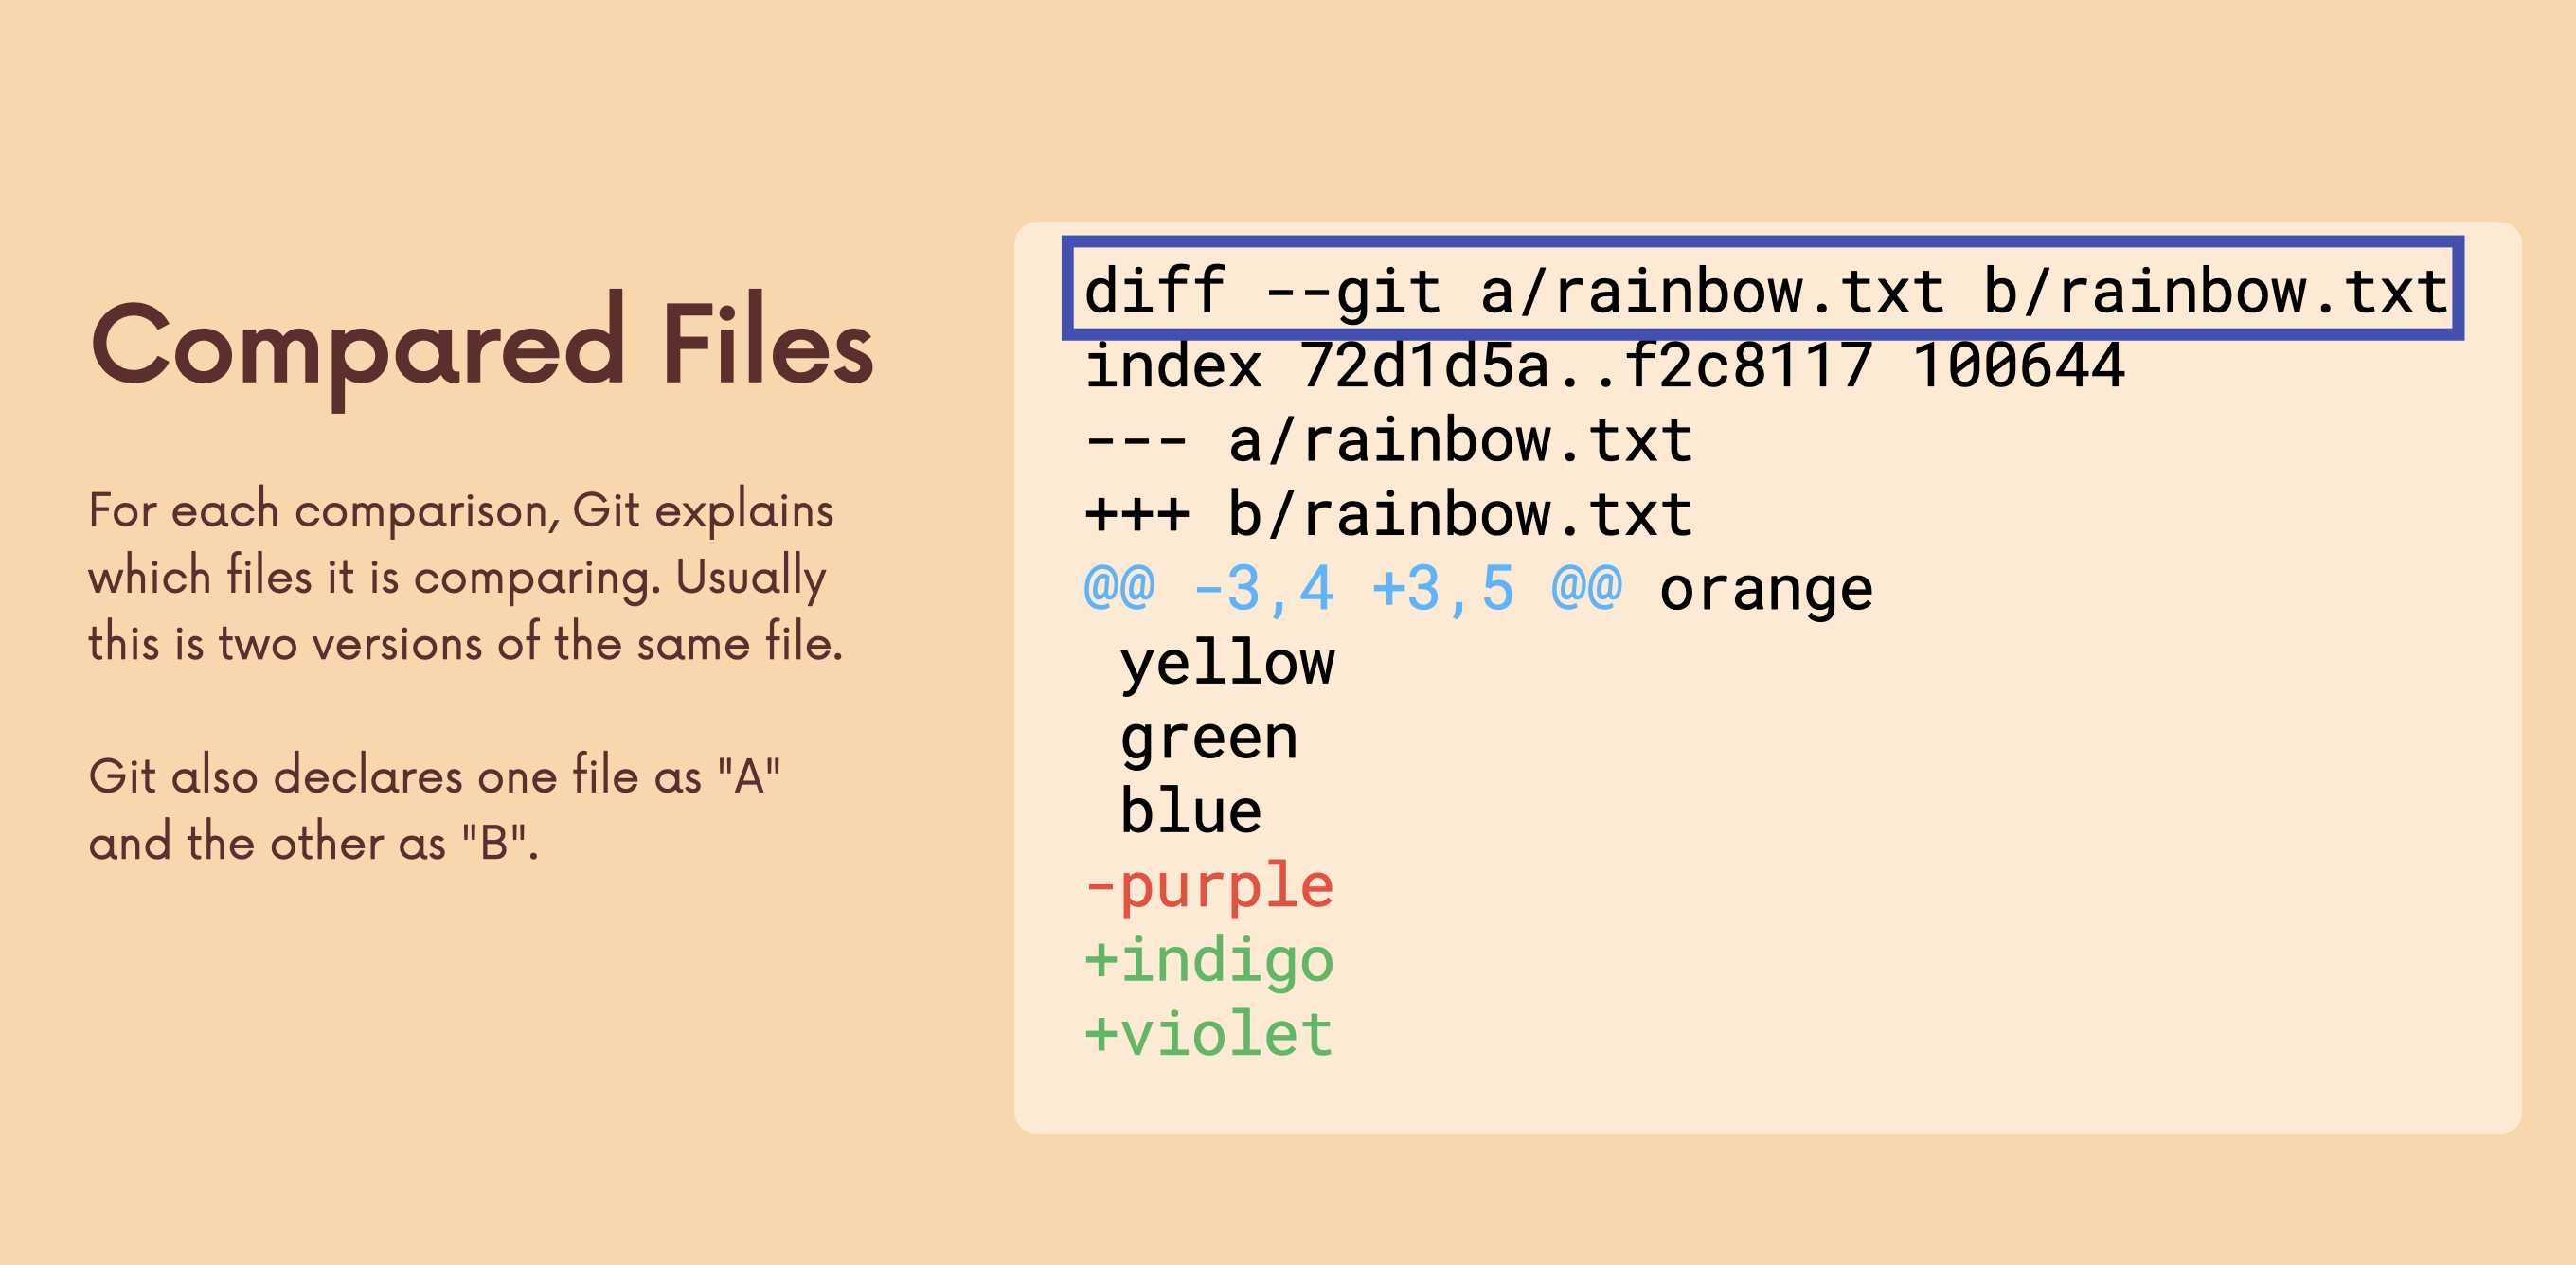
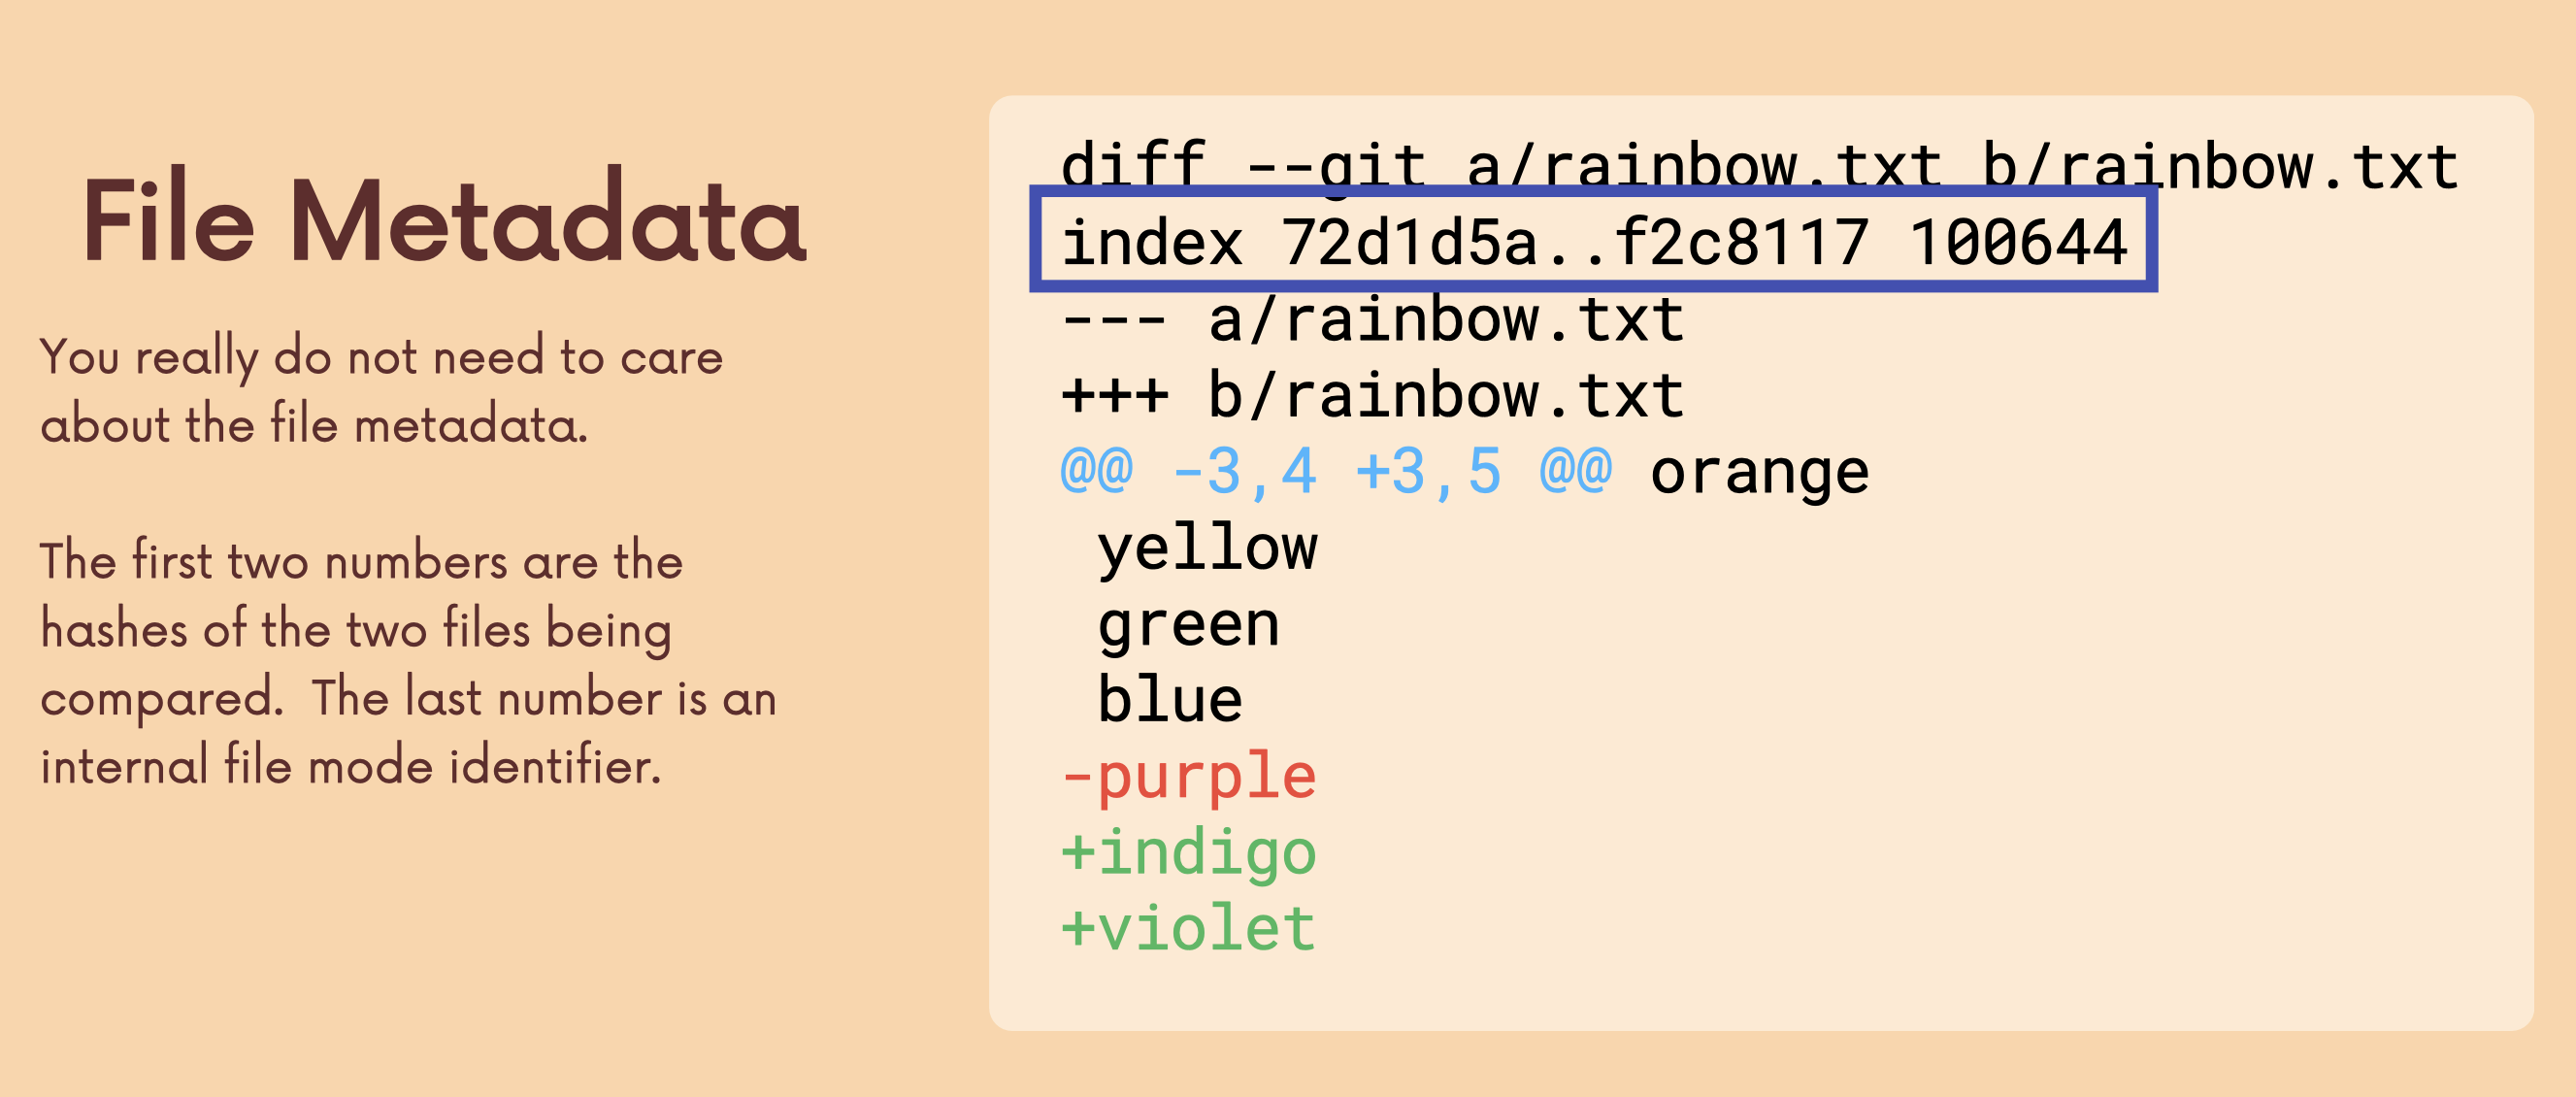
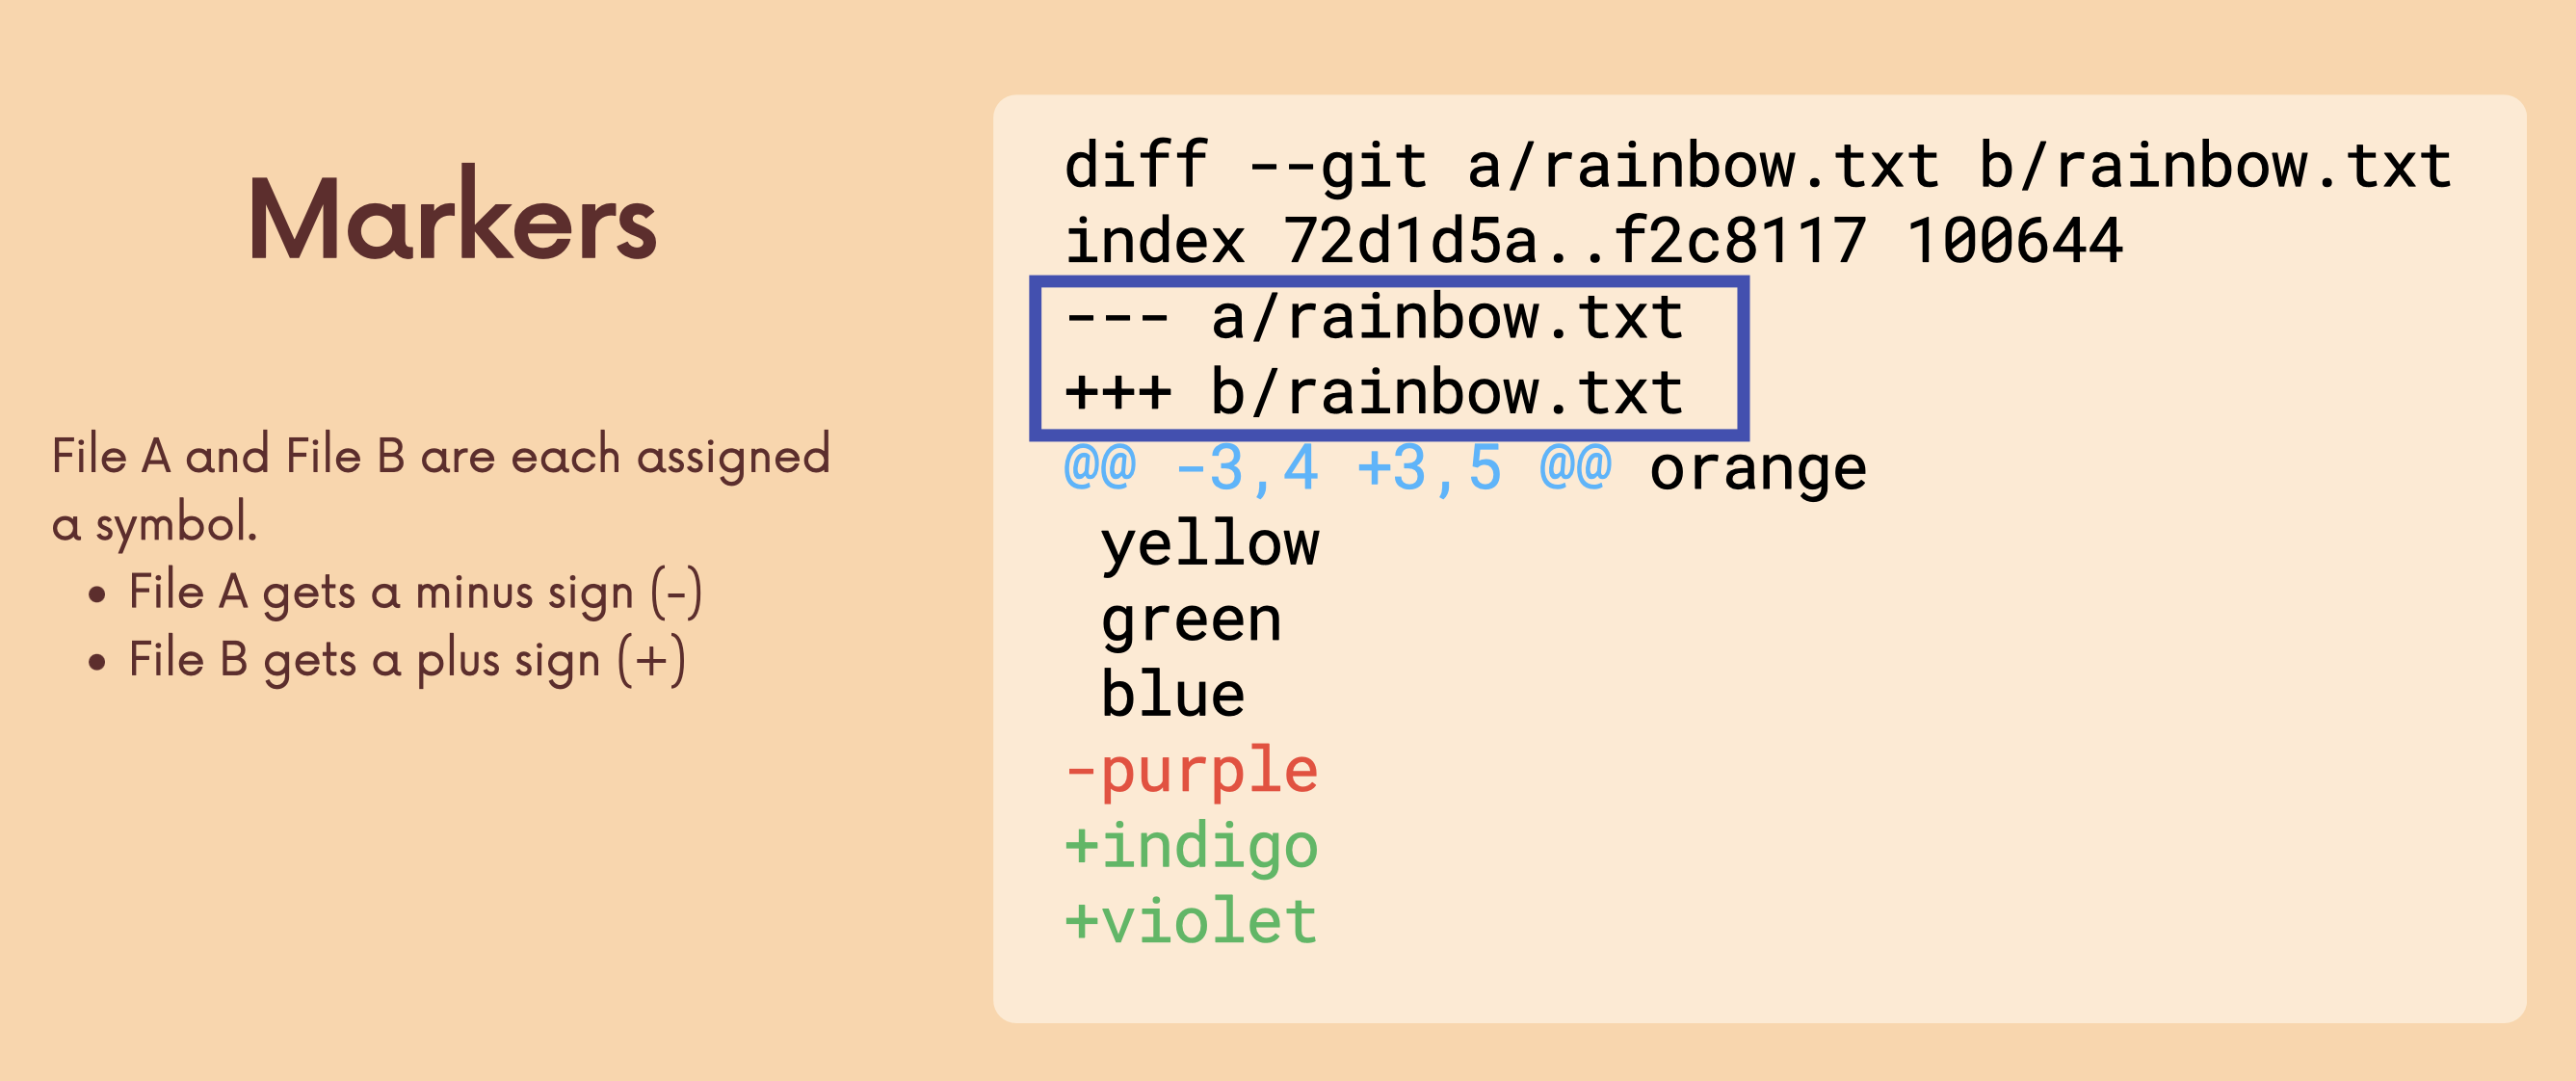
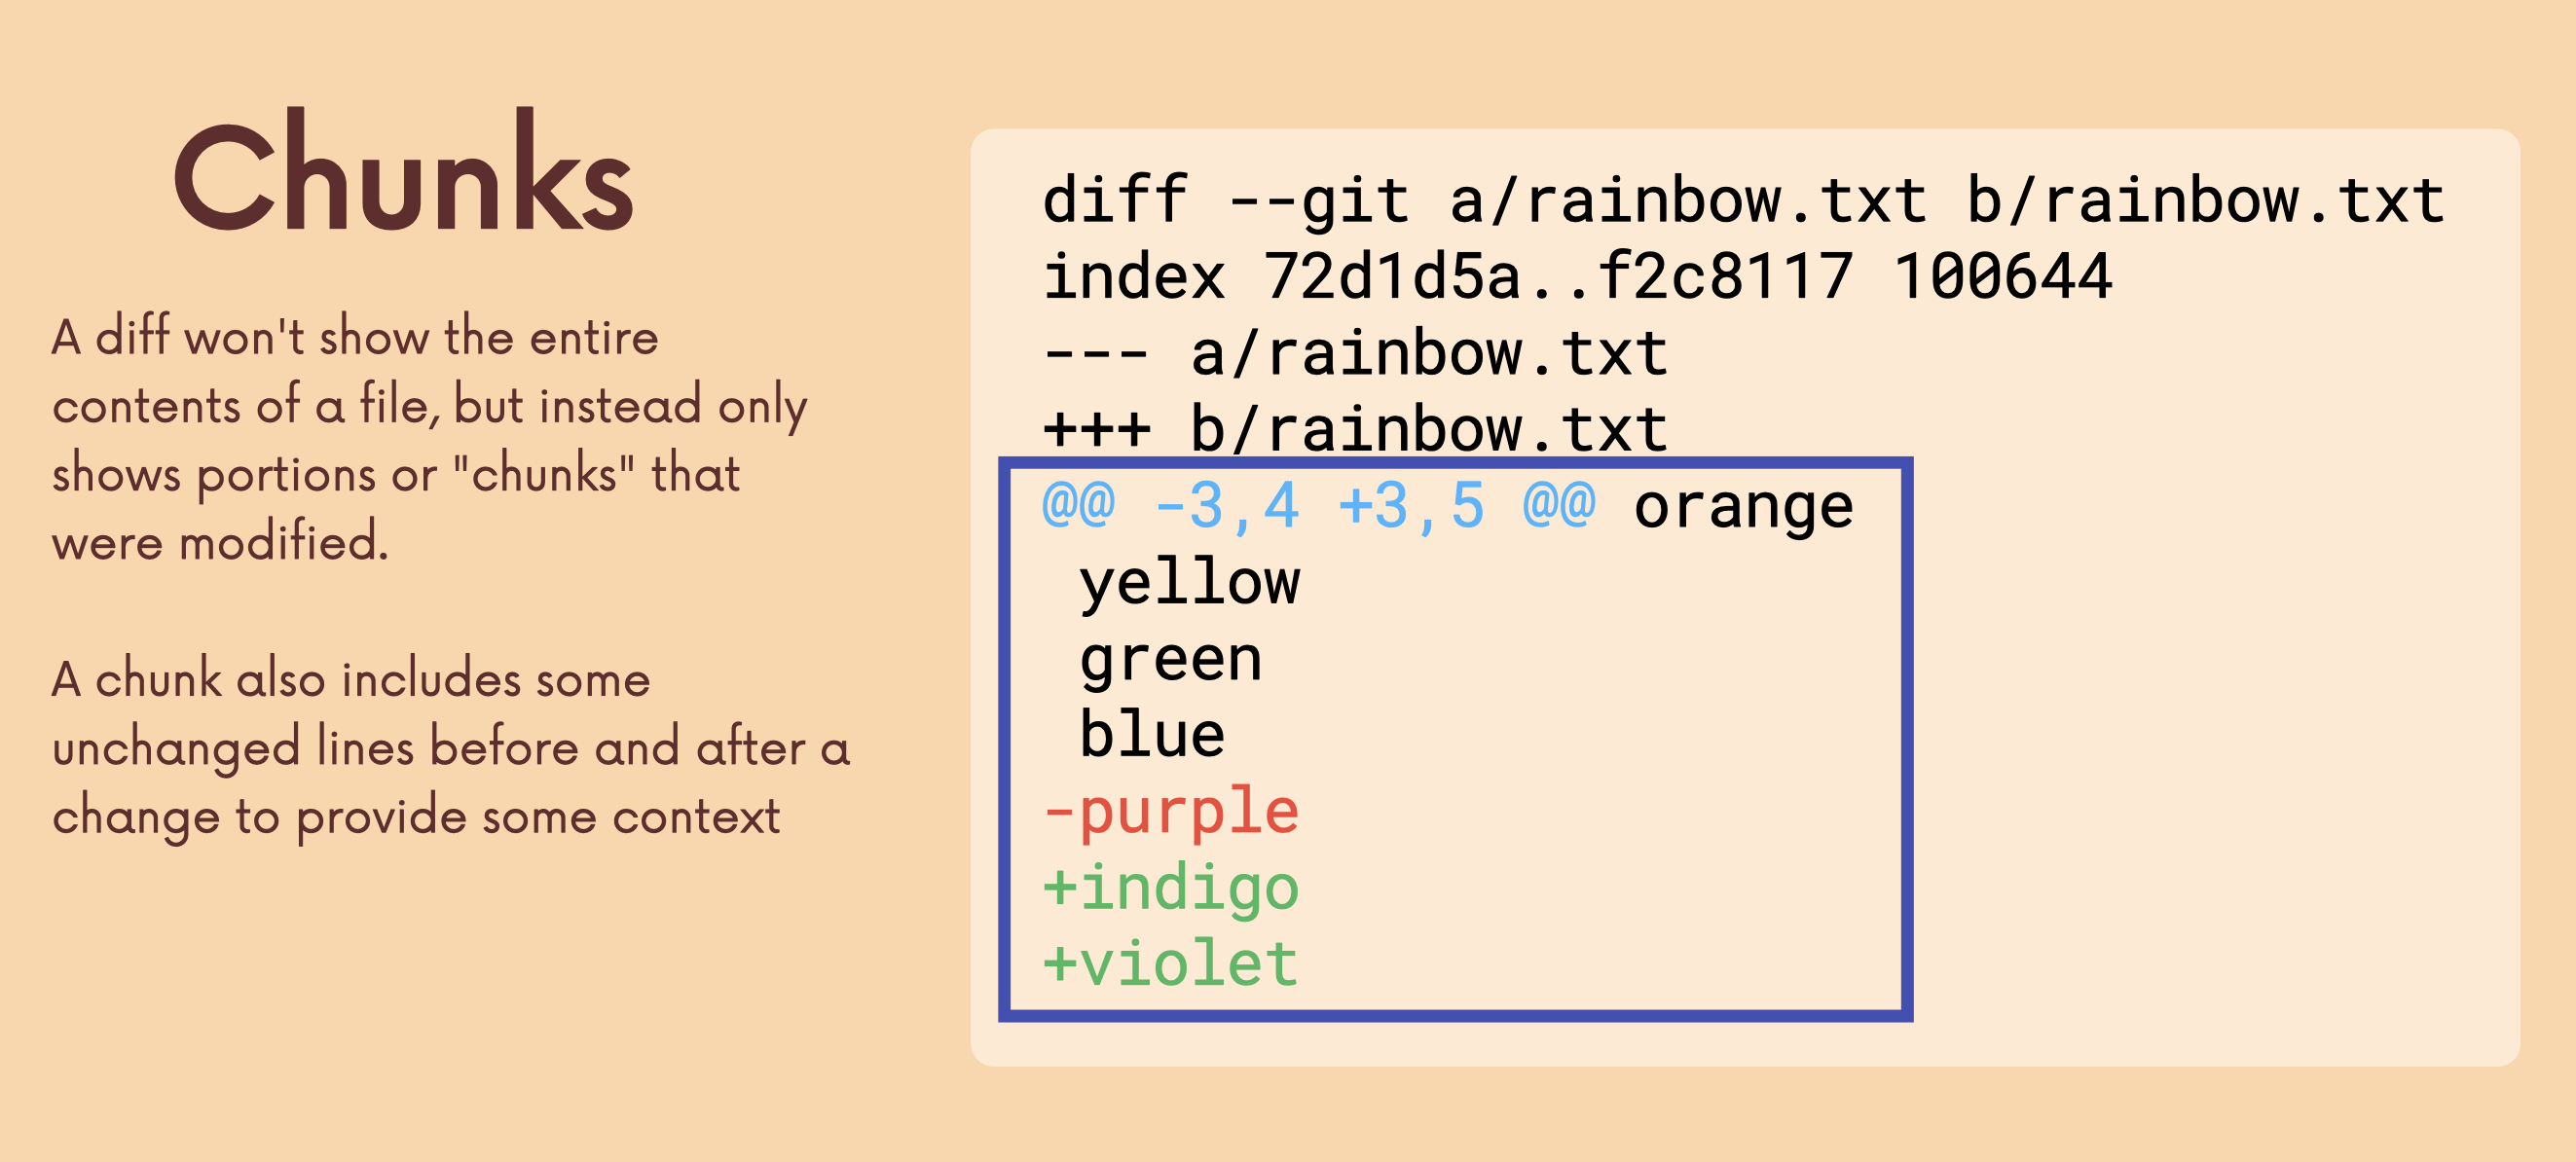
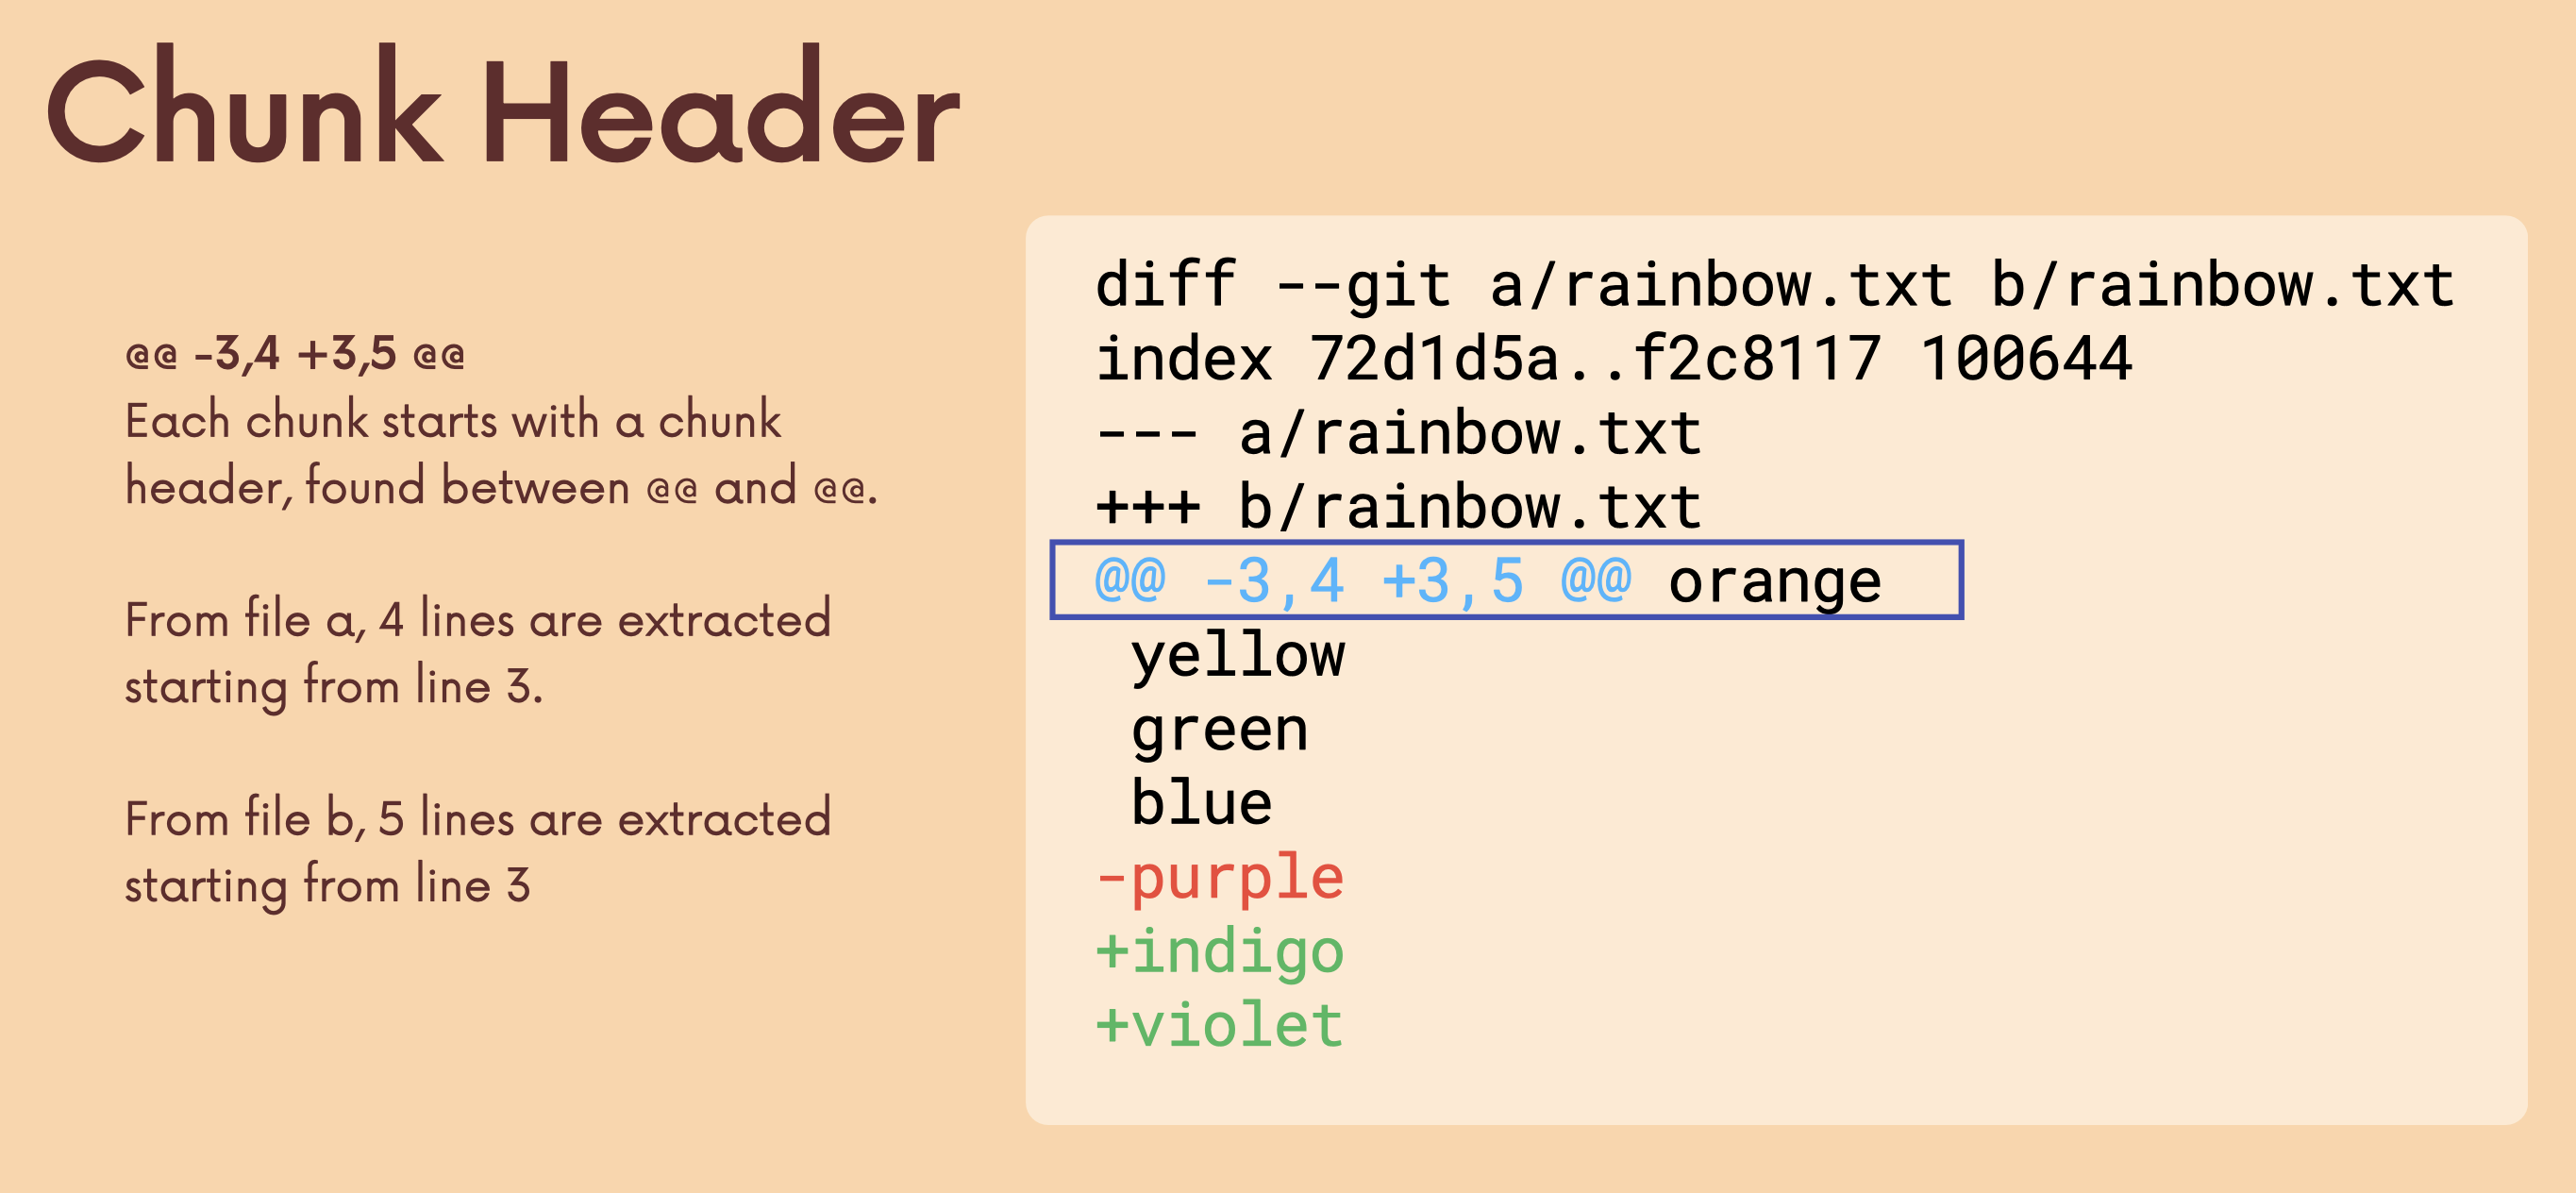
Git Diff
We can use the git diff command to view changes between commits, branches, files, our working directory, and more!
git diffWithout additional options, git diff lists all the changes in our working directory that are NOT staged for the next commit.
-> Compares Staging Area and Working Directory.


git diff HEAD lists all changes in the working tree since your last commit.
-> Compares Last Commit and Working Tree(working directory & staging area).
새로 만들어진 폴더나 파일은 staging area에 올라가야 알아봄.
git diff HEADgit diff --staged or --cached will list the changes between the staging area and our last commit.
git diff --staged
git diff --cached
We can view the changes withing a specific file by providing git diff with a filename.
git diff HEAD [filename]
git diff --staged [filename1] [filename2]
git diff branch..branch2 will list the changes between the tips of branch1 and branch2.
git diff branch1..branch2
git diff branch1 branch2
To compare two commits, provide git diff with the commit hashes of the commits in question.
git diff commit1..commit2
git diff commit1 commit2
Git Stash
git stash is super useful command that helps you save changes that you are not yet ready to commit. You can stash changes and then come back to them later.
git stashUse git stash pop to remove the most recently stashed changes in your stash and re-apply them to your working copy.
git stash popYou can use git stash apply to apply whatever is stashed away, without removing it from the stash. This can be useful if you want to apply stashed changes to multiple branches.
git stash applyYou can add multiple stashed onto the stack of stashes. They will all be stashed in the order you added them.
git stash
git stash
git stash
Run git stash list to view all stashes
git stash list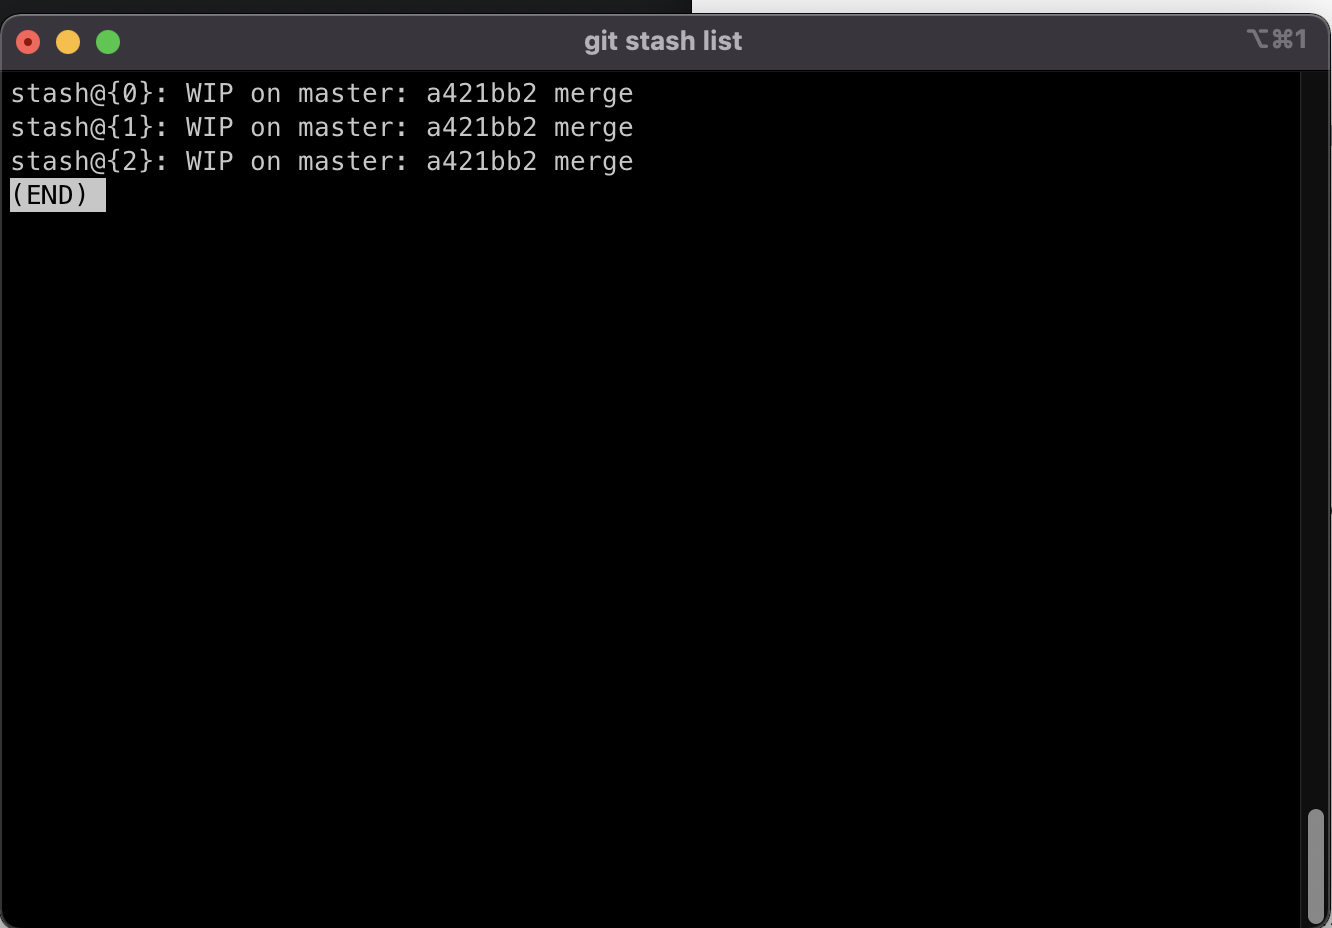
Applying Specific Stashes
git stash apply stash@{2}To delete a particular stash, you can use git stash drop <stash-id>
git stash drop stash@{2}To clear out all stashed, run git stash clear
git stash clearCheckout
We can use git checkout commit <commit-hash> to view a previous commit. We just need the first 7 digits of a commit hash.
git checkout d8194d6You have a couple options:
1. Stay in detached HEAD to examine the contents of the old commit. Poke around, view the files, etc.
2. Leave and go back to wherever you were before - reattach the HEAD.
3. Create a new branch and switch to it. You can now make and save changes, since HEAD is no longer detached.
git checkout supports a slightly odd syntax for referencing previous commits relative to a particular commit.
HEAD~1 refers to the commit before HEAD (parent)
HEAD~2 refers to 2 commits before HEAD (grandparent)
git checkout HEAD~1마지막으로 있던 브랜치로 돌아가기
git switch -Discarding Changes
git checkout HEAD <file1> <file2>
git checkout -- <file1> <file2>
Git Restore
To restore the file to the contents in the HEAD, use git restore <file-name>
git restore <file-name>git restore --source HEAD~1 index.html will restore the contents of index.html to its state from the commit prior to HEAD.
git restore --source HEAD~1 index.htmlIf you have accidentally added a file to your staging area with git add and you don't wish to include it in the next commit, you can use git restore to remove it from staging.
git restore --staged <file-name>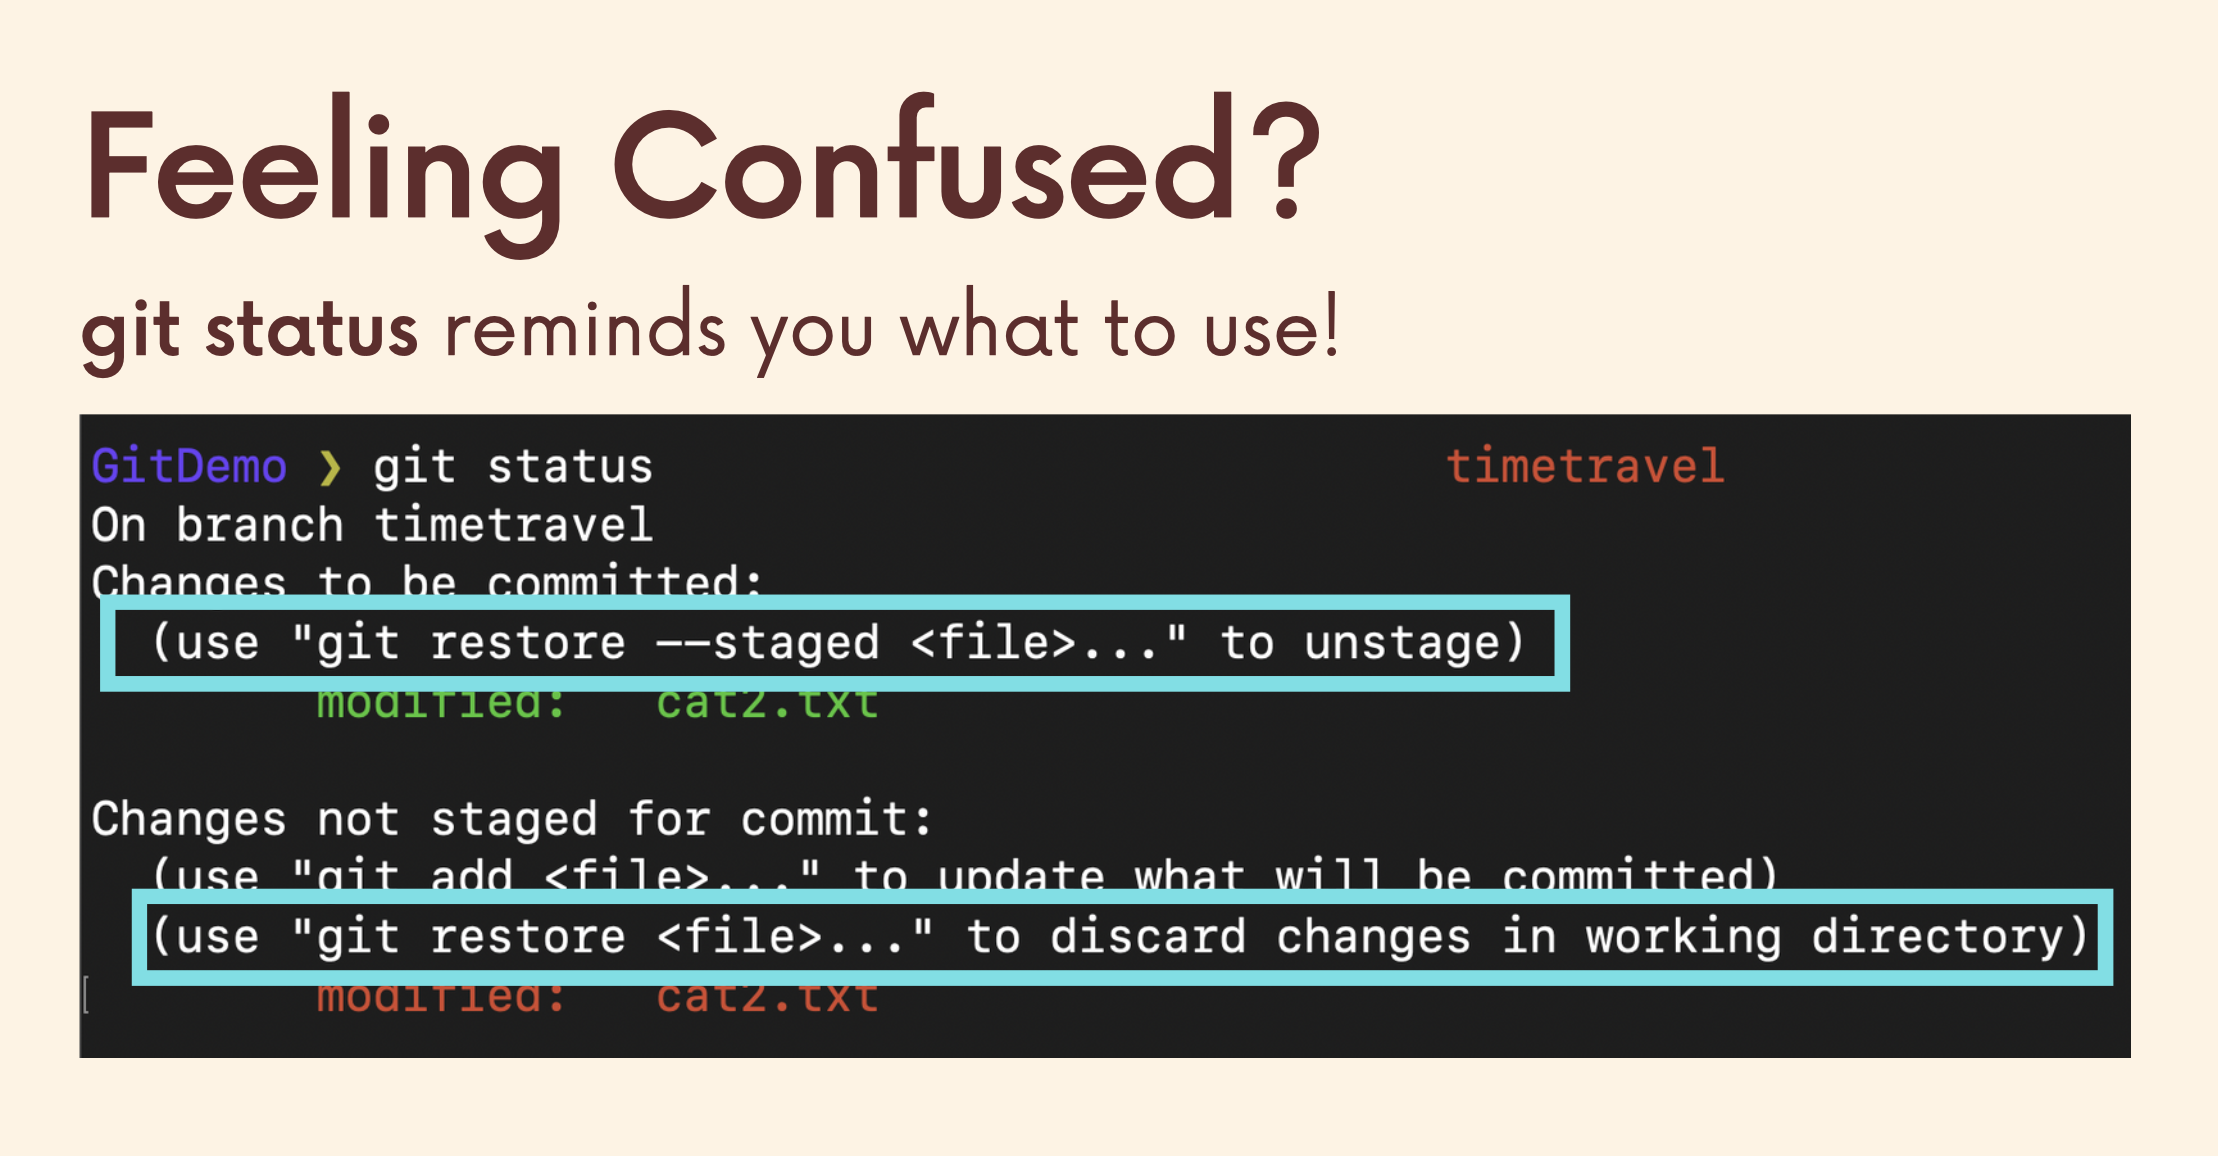
Git Reset
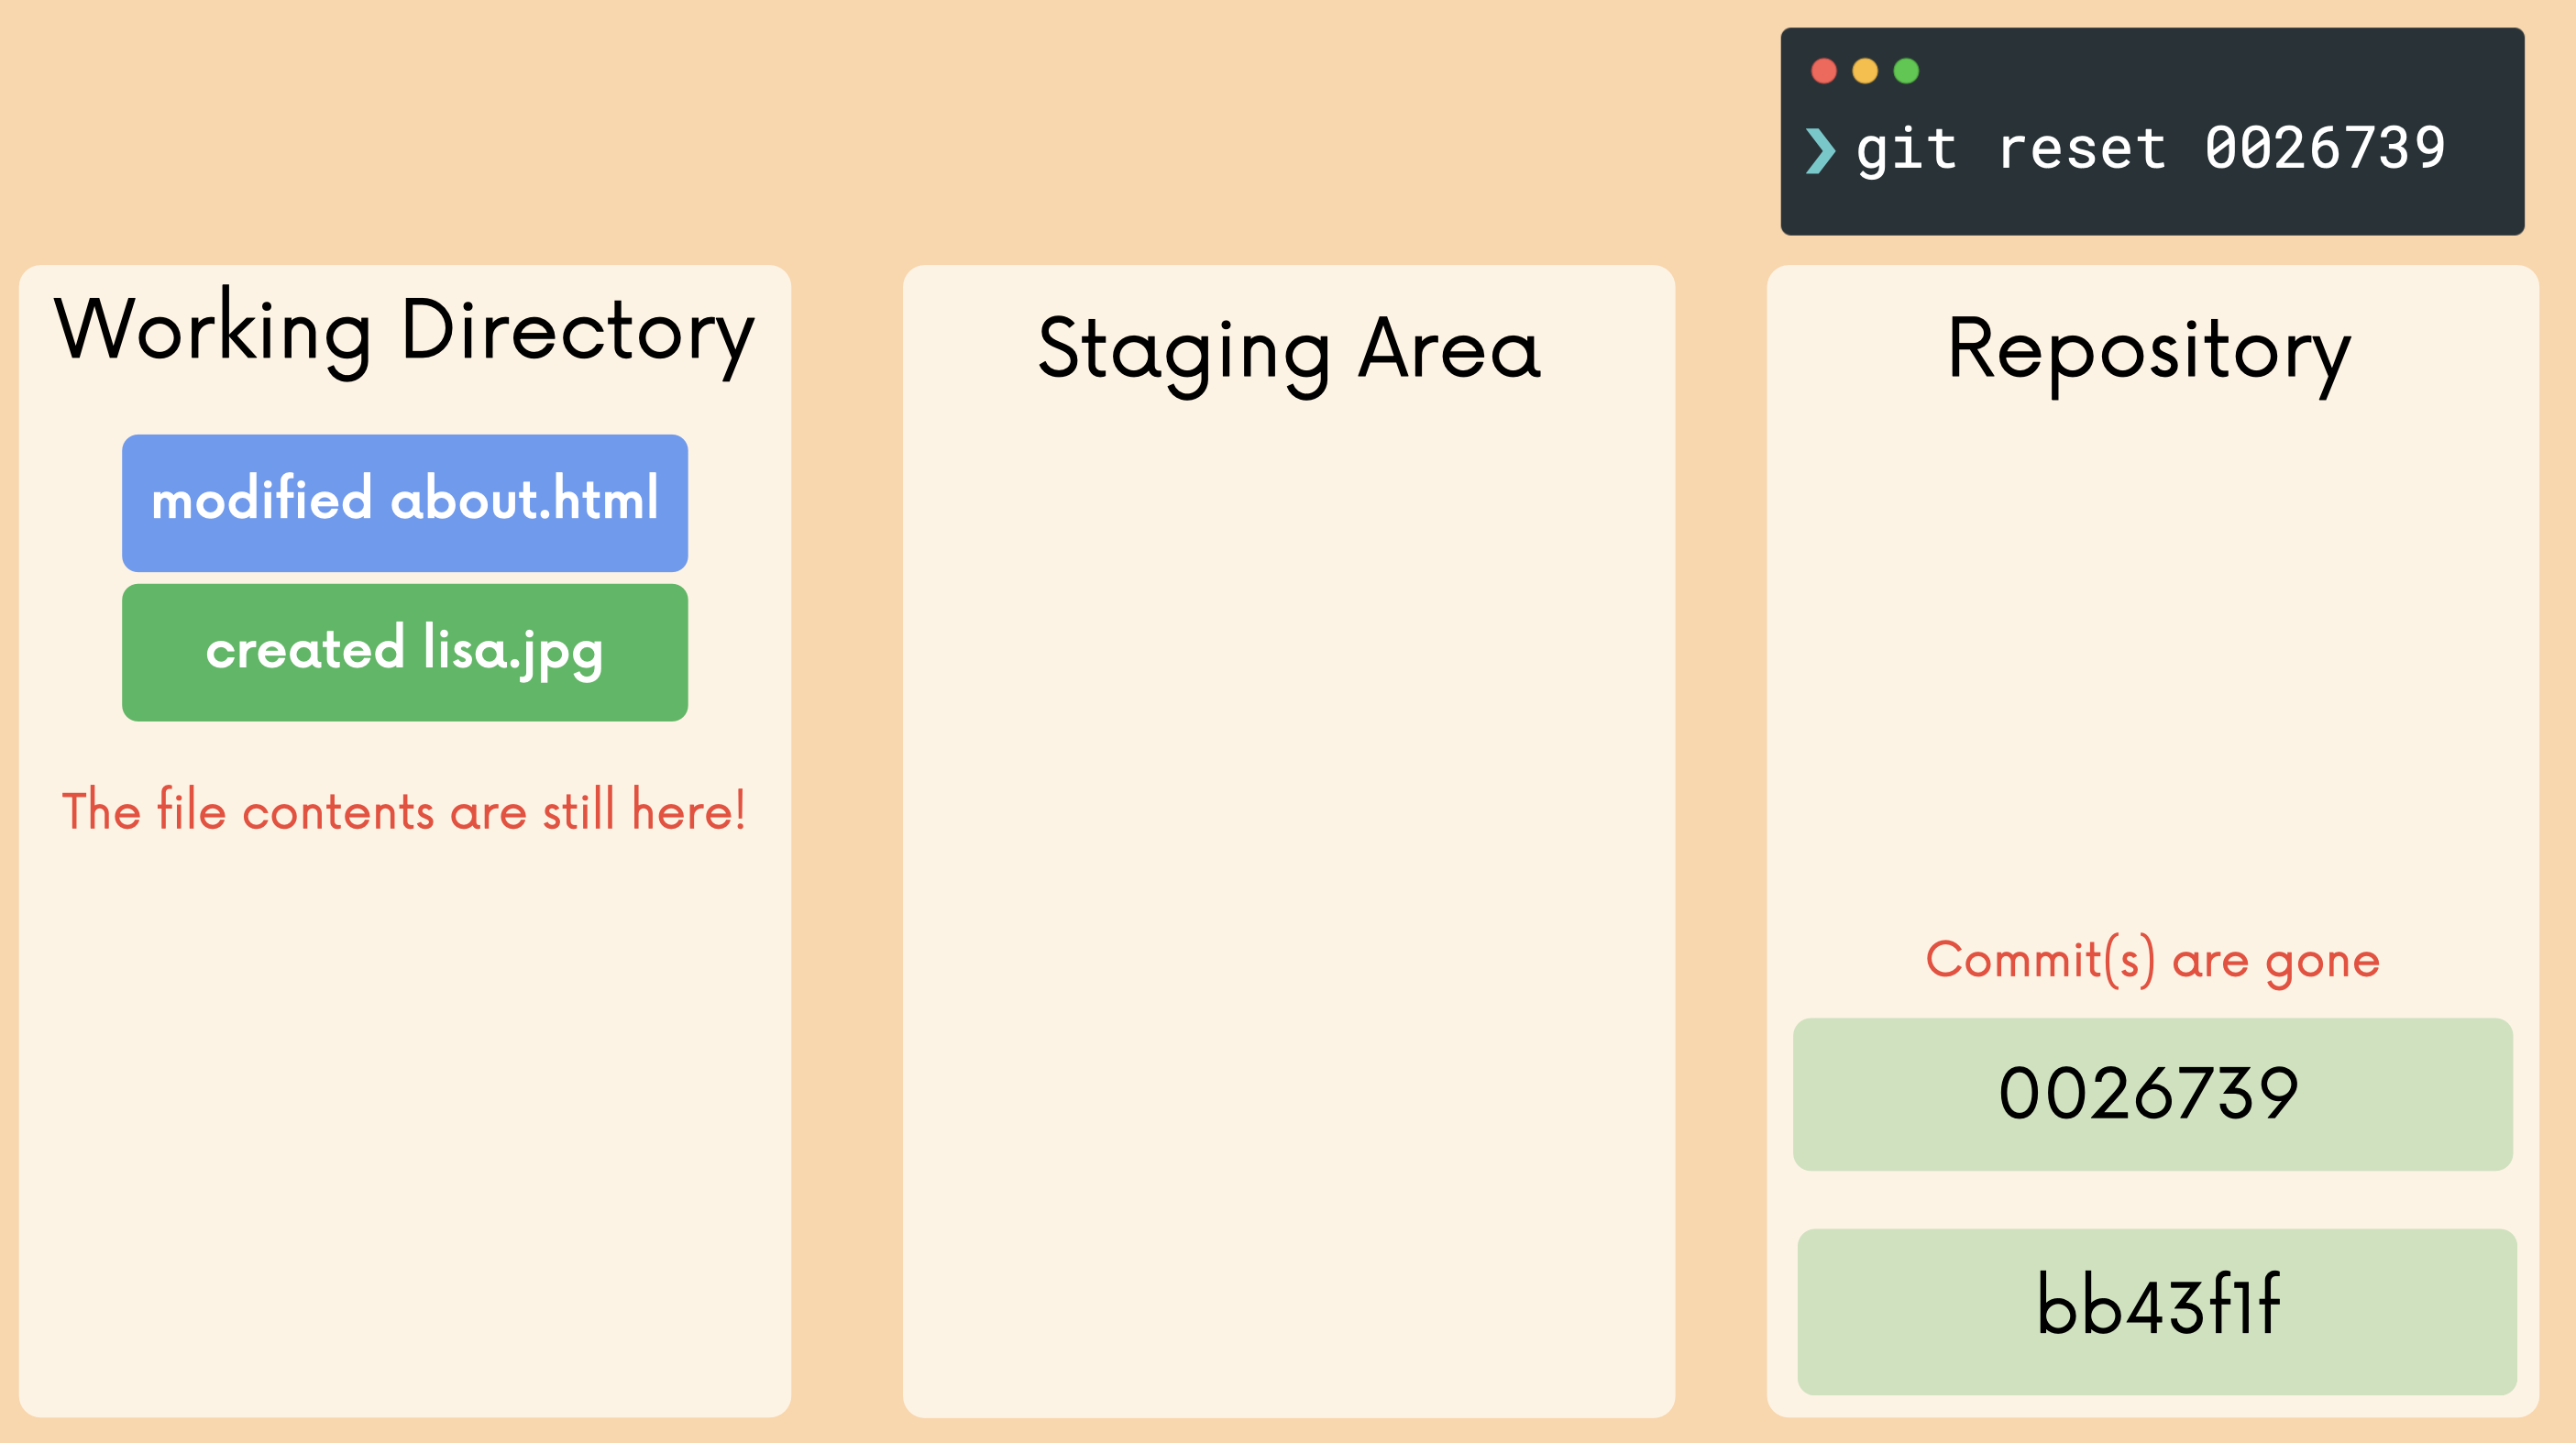
git reset <commit-hash> will reset the repo back to a specific commit. The commits are gone.
git reset <commit-hash>commit-hash 이후의 commit들이 사라짐.
하지만, commit만 사라지고 commit의 내용들은 working directory에 그대로 남아있다.
If you want to undo both the commits AND the actual changes in your files, you can use the --hard option.
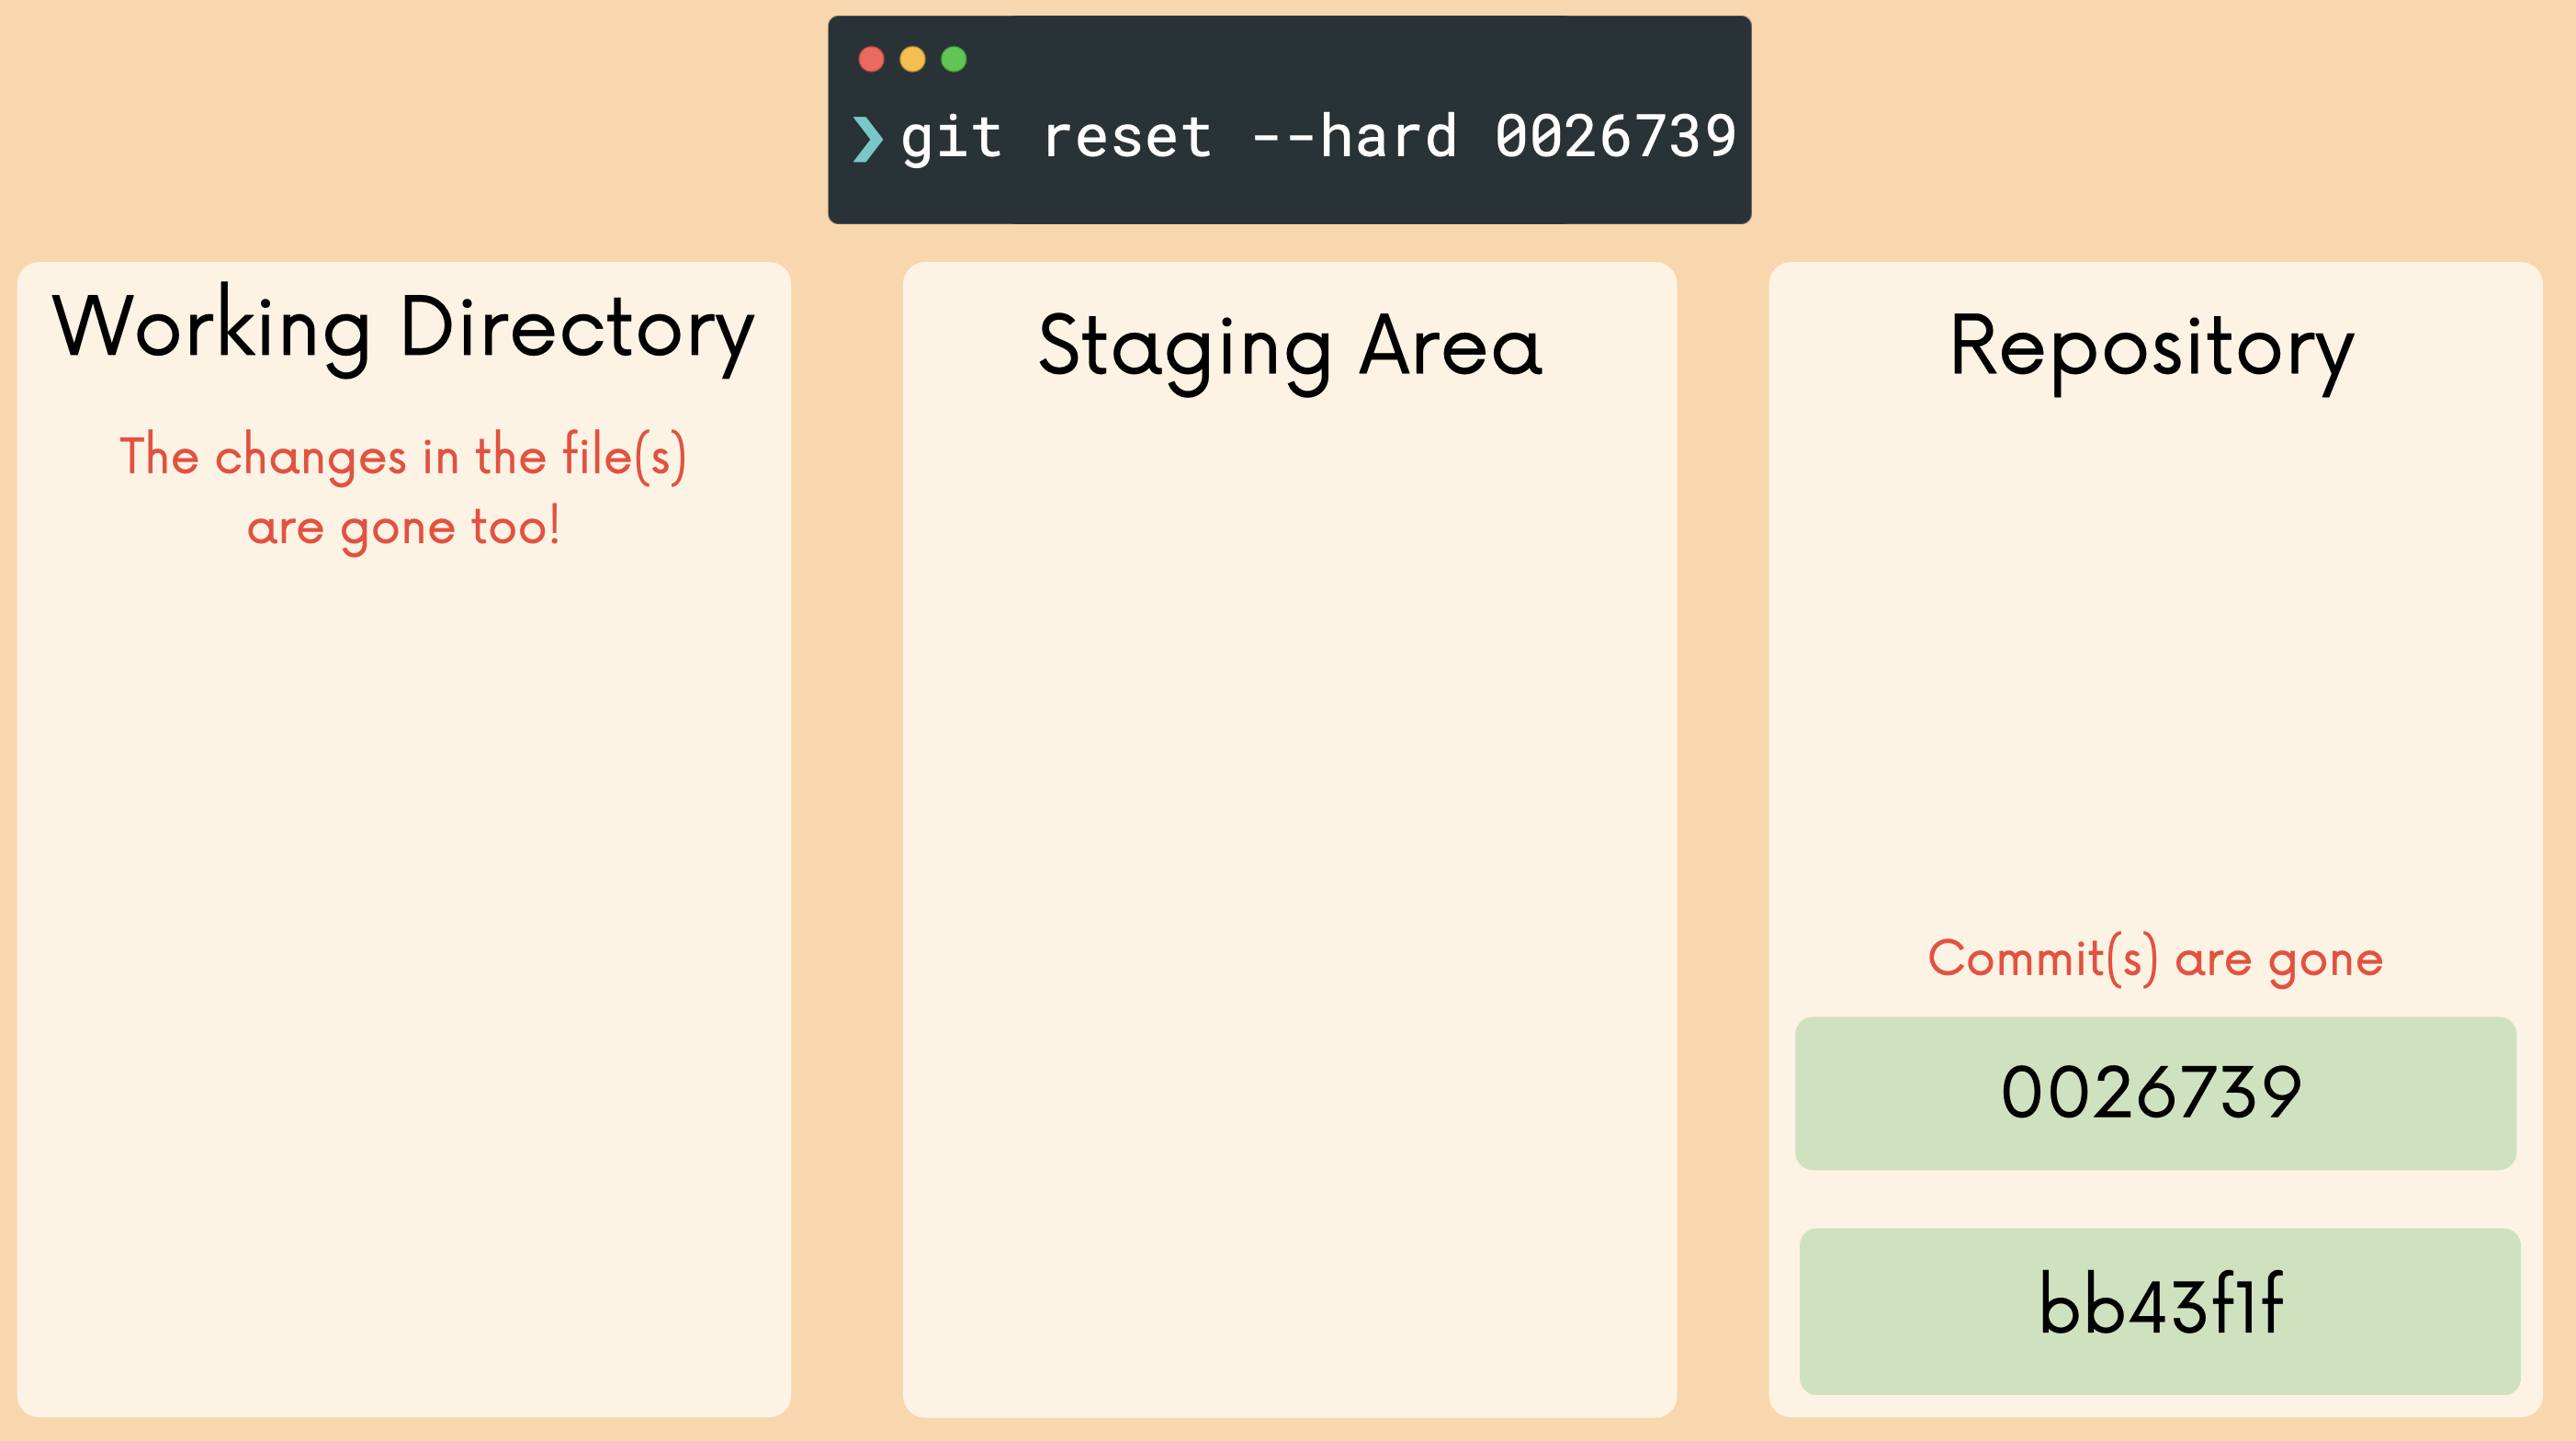
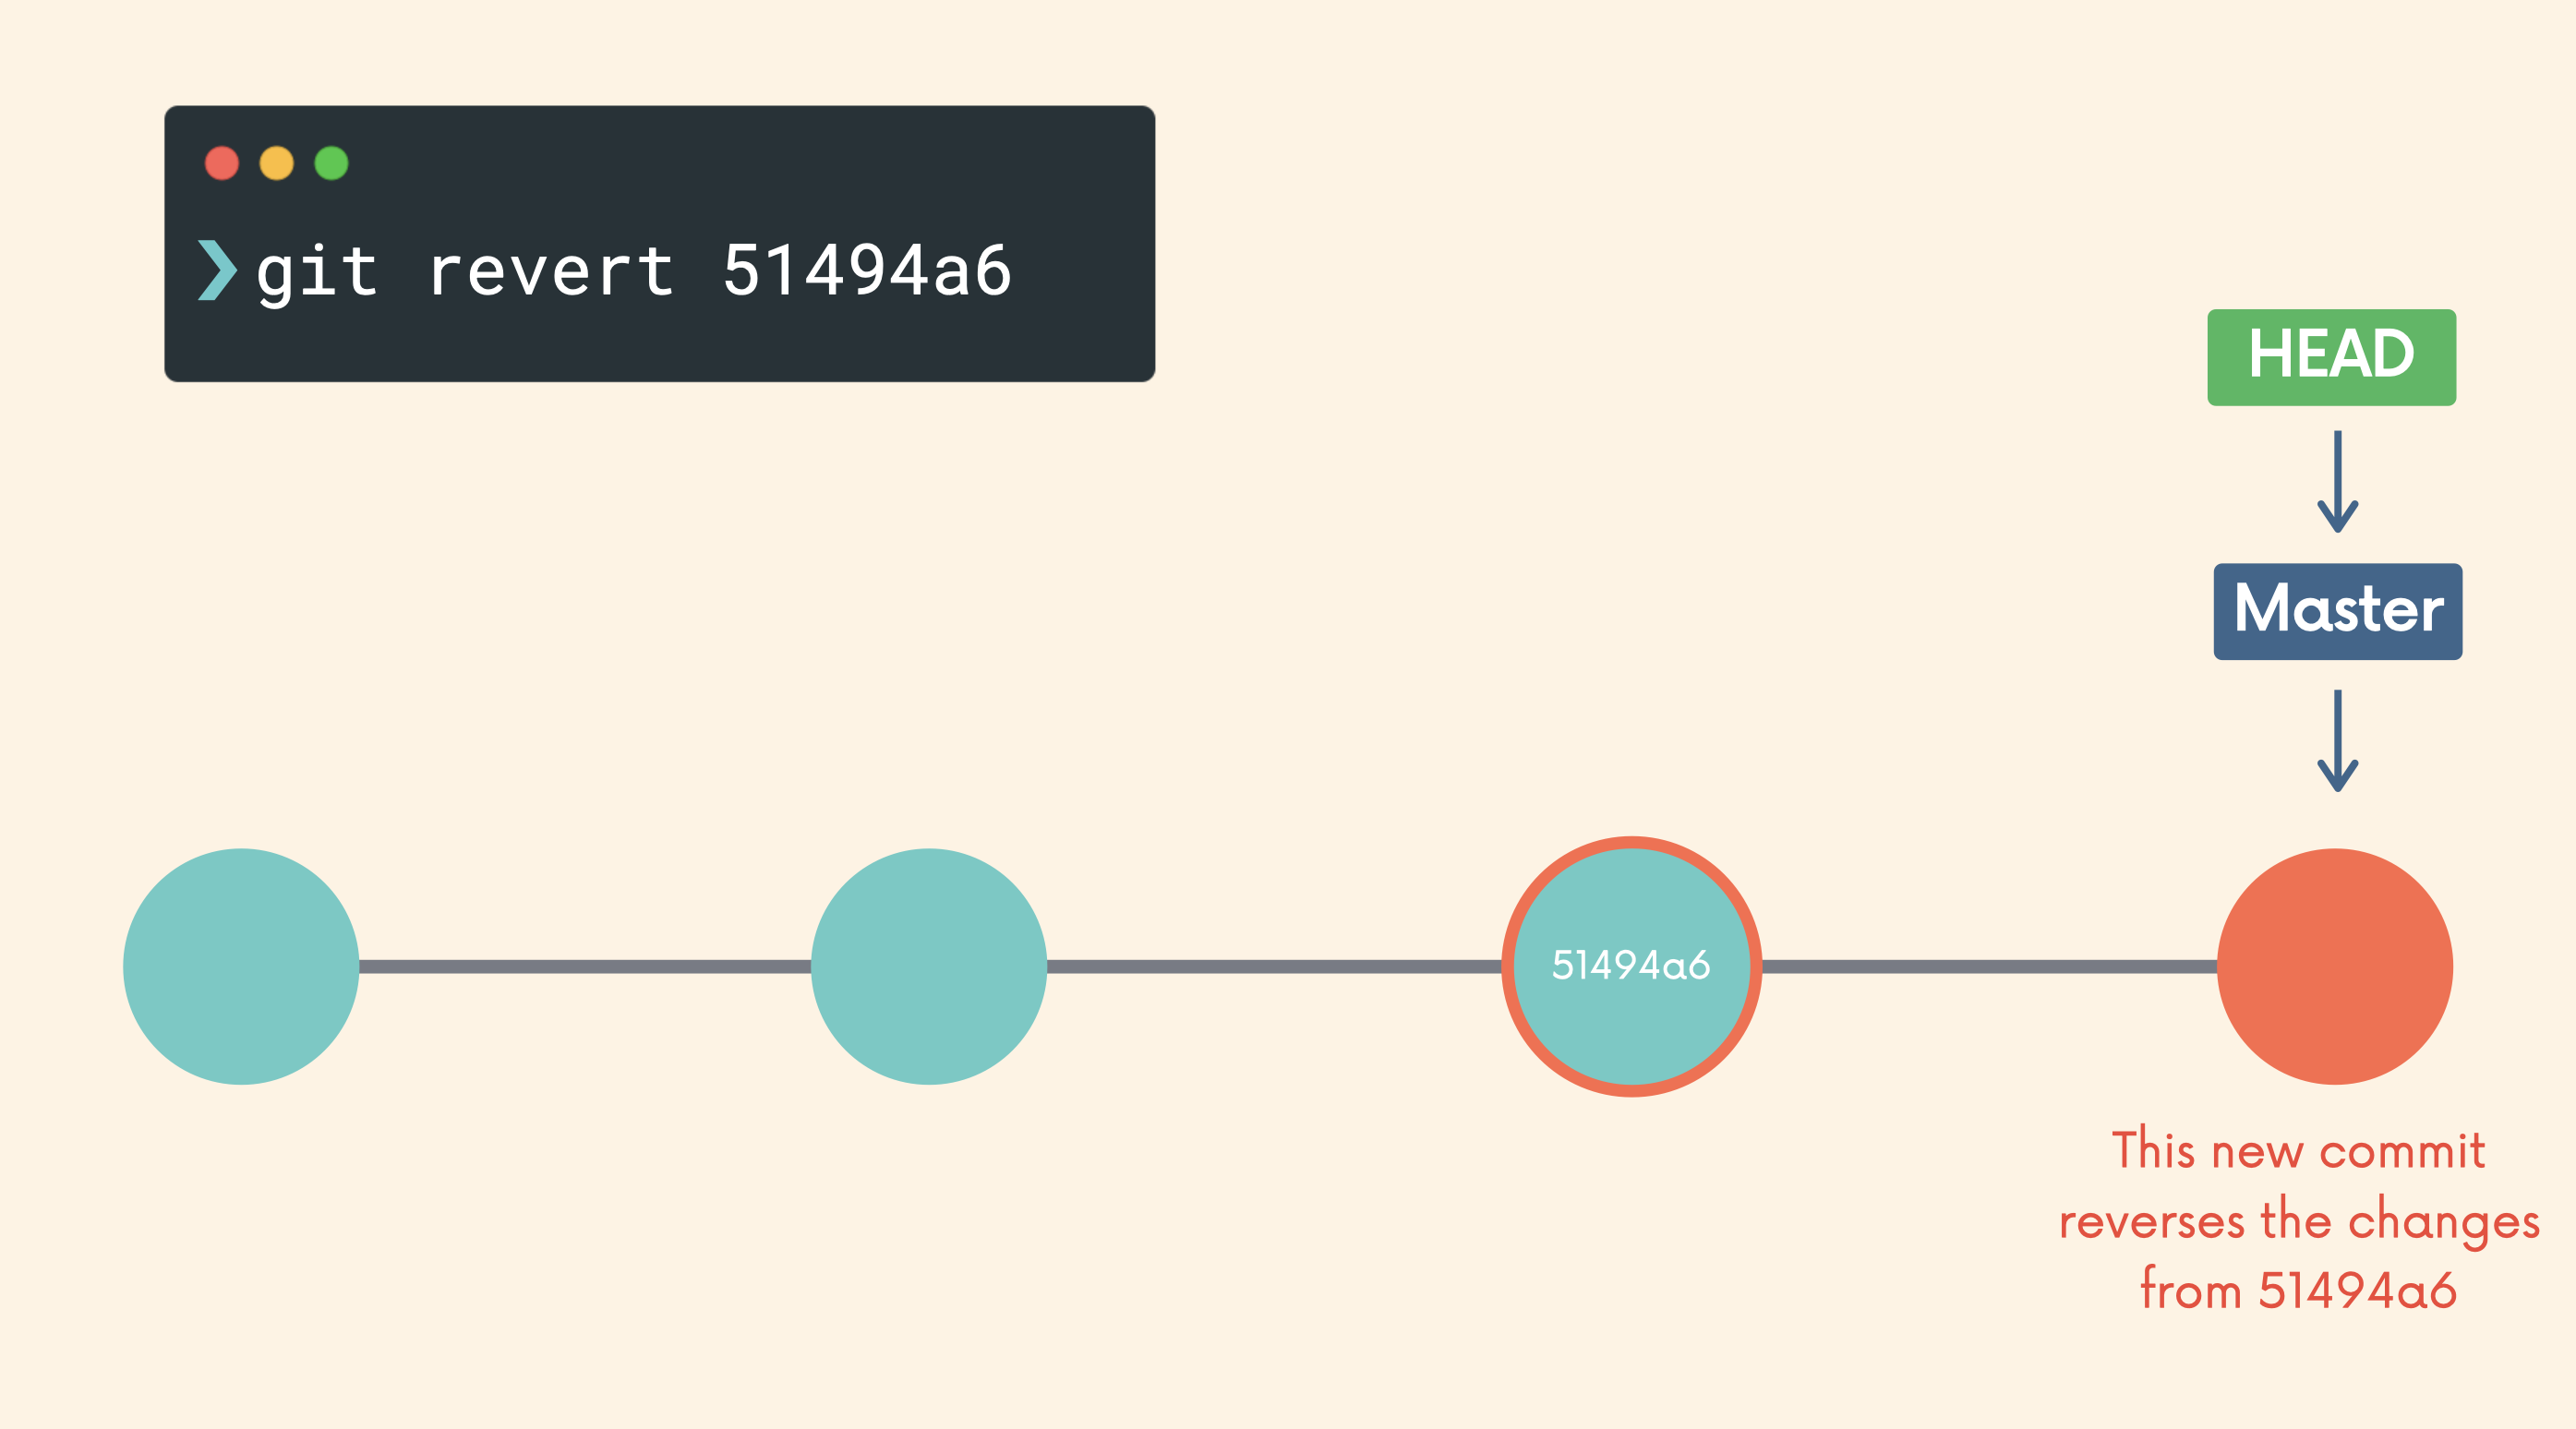
git reset --hard <commit-hash>Git Revert
git reset actually moves the branch pointer backwards, eliminating commits.
git revert instead creates a brand new commit which reverses/undos the changes from a commit. Because it results in a new commit, you will be prompted to enter a commit message.
git revert <commit-hash>commit-hash 직전의 commit 내용을 가지고 커밋을 새로 만듦
Both git reset and git revert help us reverse changes, but there is a significant difference when it comes to collaboration.
If you want to reverse some commits that other people already have on their machines, you should use revert.
If you want to reverse commits that you haven't shared with others, use reset and no one will ever know!
Remote Branches
Run git branch -r to view the remote branches our local repository knows about.
git branch -rBy default, my master branch is already tracking origin/master.
I didn't connect these myself!
I could checkout origin/puppies, but that puts me in detached HEAD.
Run git switch <remote-branch-name> to create a new local branch from the remote branch of the same name.
git switch <remote-branch-name>the new command git switch makes this super easy to do! It used to be slightly more complicated using git checkout
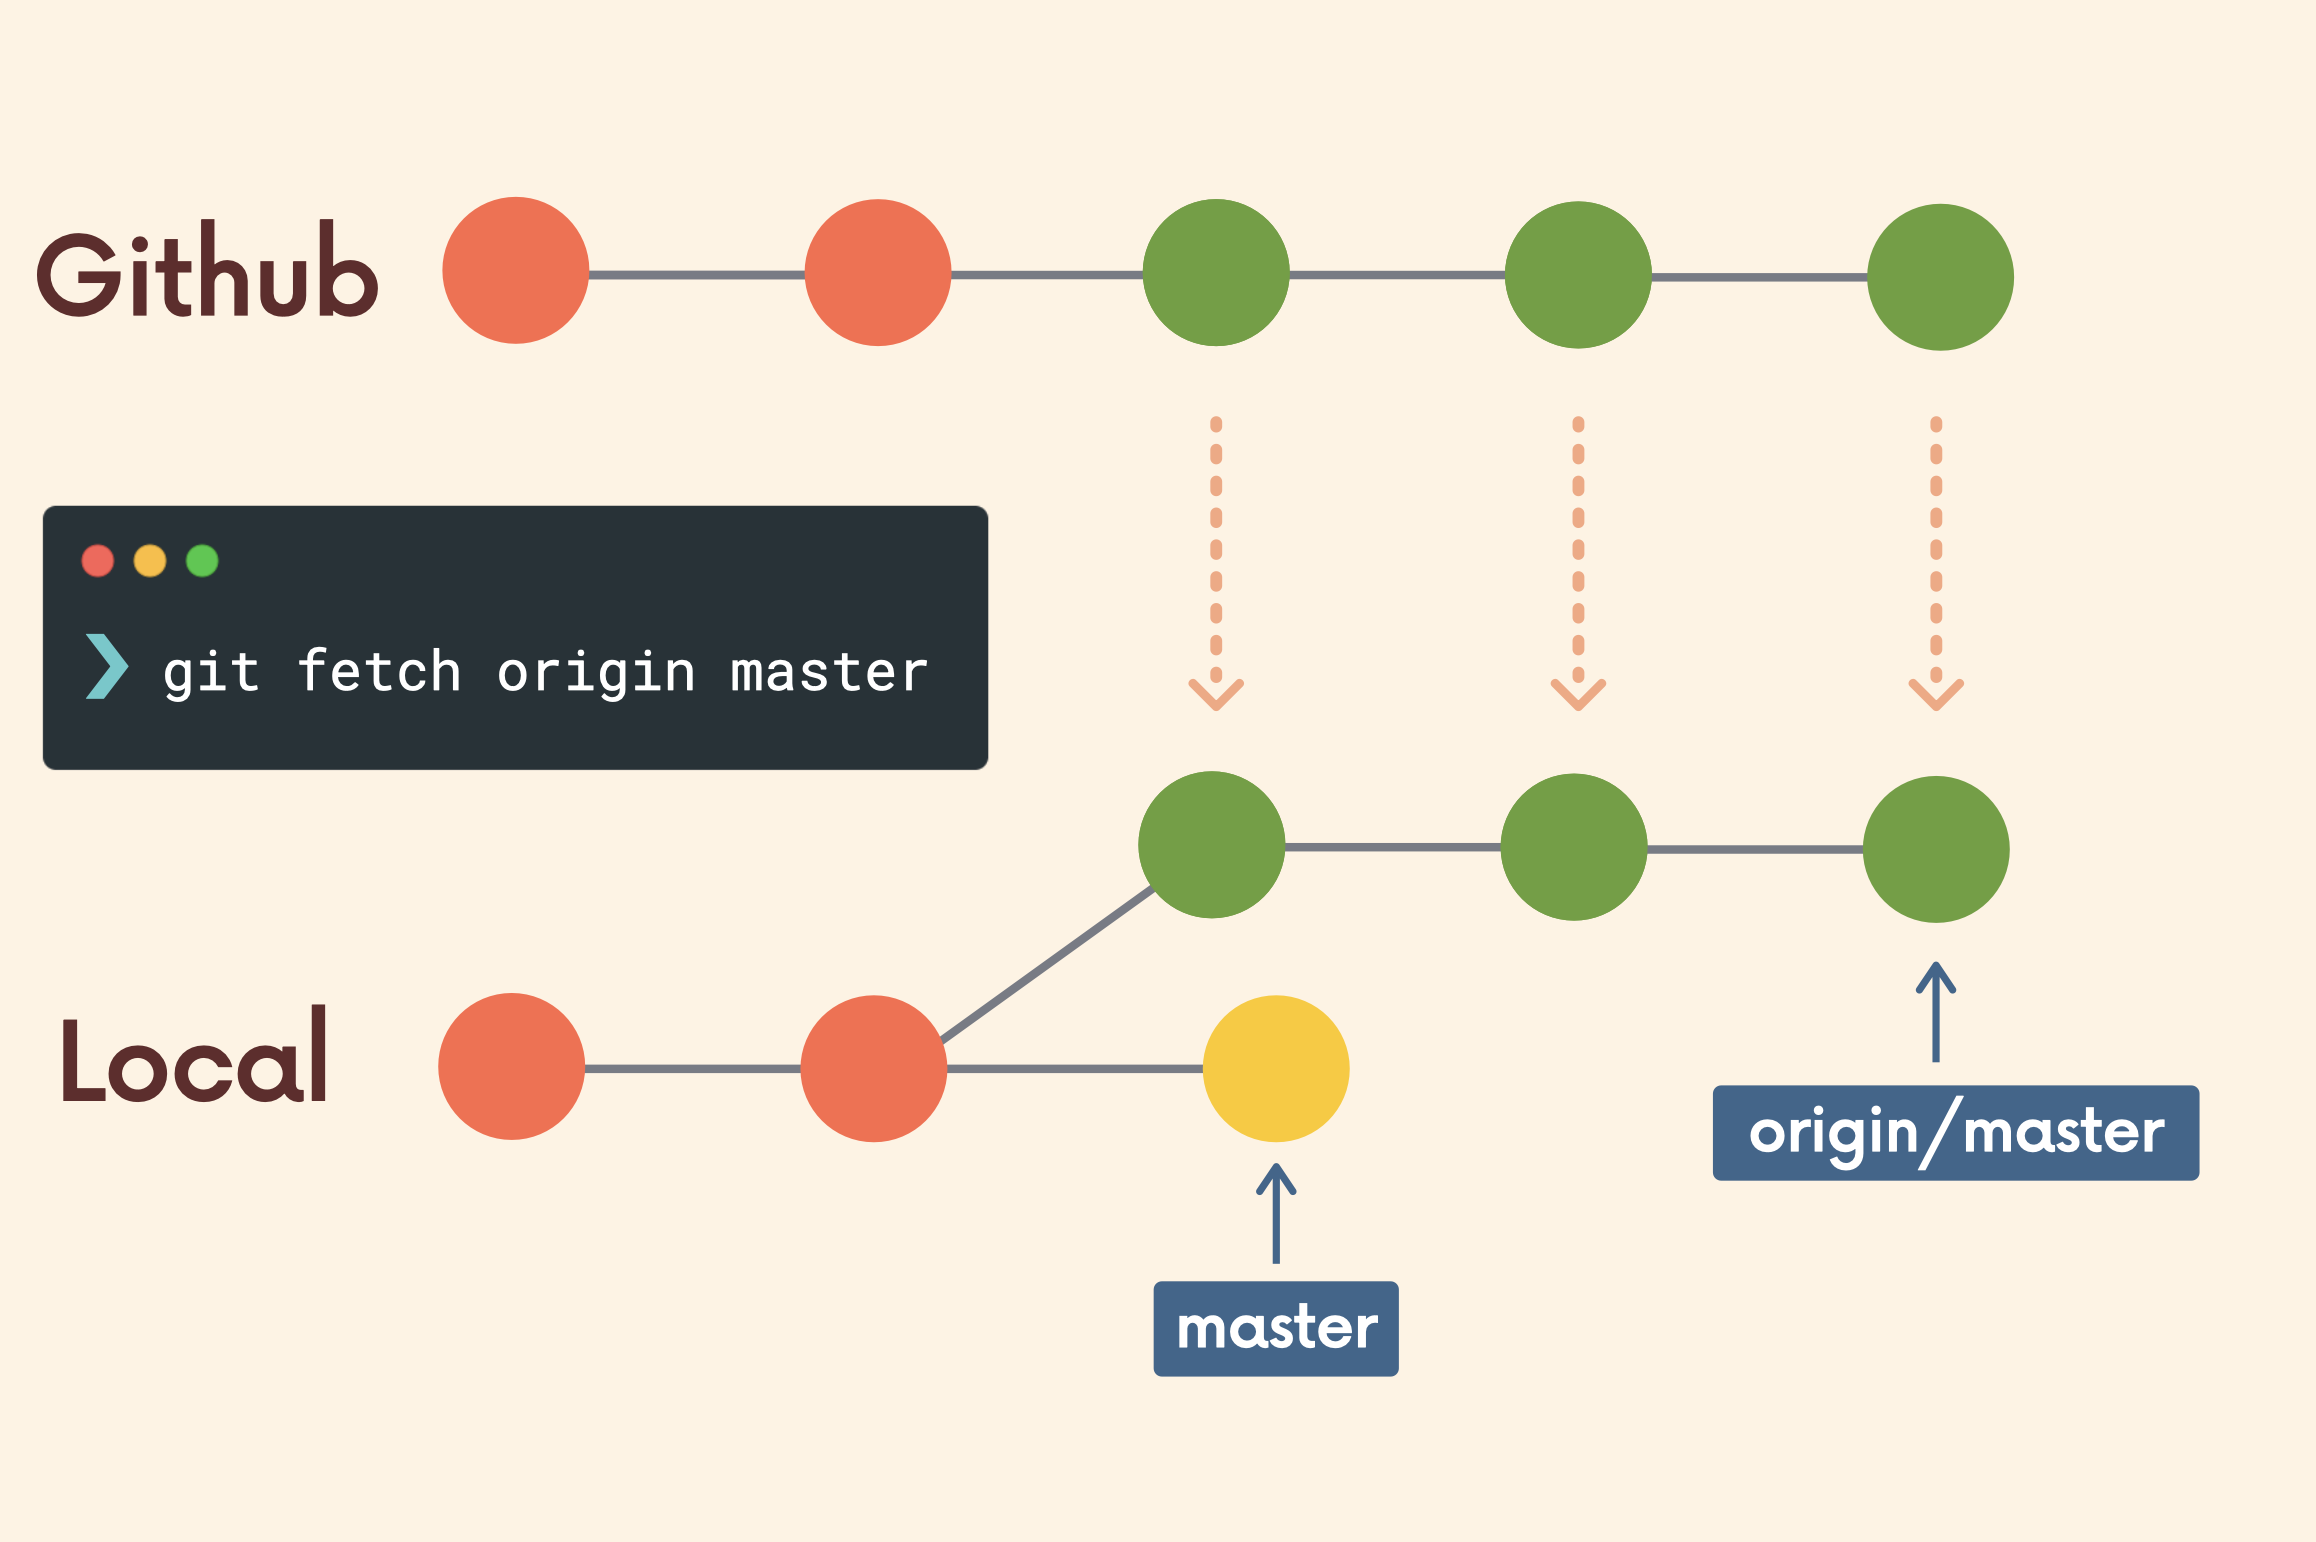
git checkout --track origin/puppiesGit Fetch
Fetching allows us to download changes from a remote repository, BUT those changes will not be automatically integrated into our working files.
Think of it as "please go and get the latest information from Github, but don't screw up my working directory."
git fetch <remote> would fetch all changes from the origin remote repository.
git fetch <remote>We can also fetch a specific branch from a remote using git fetch <remote> <branch>
git fetch <remote> <branch>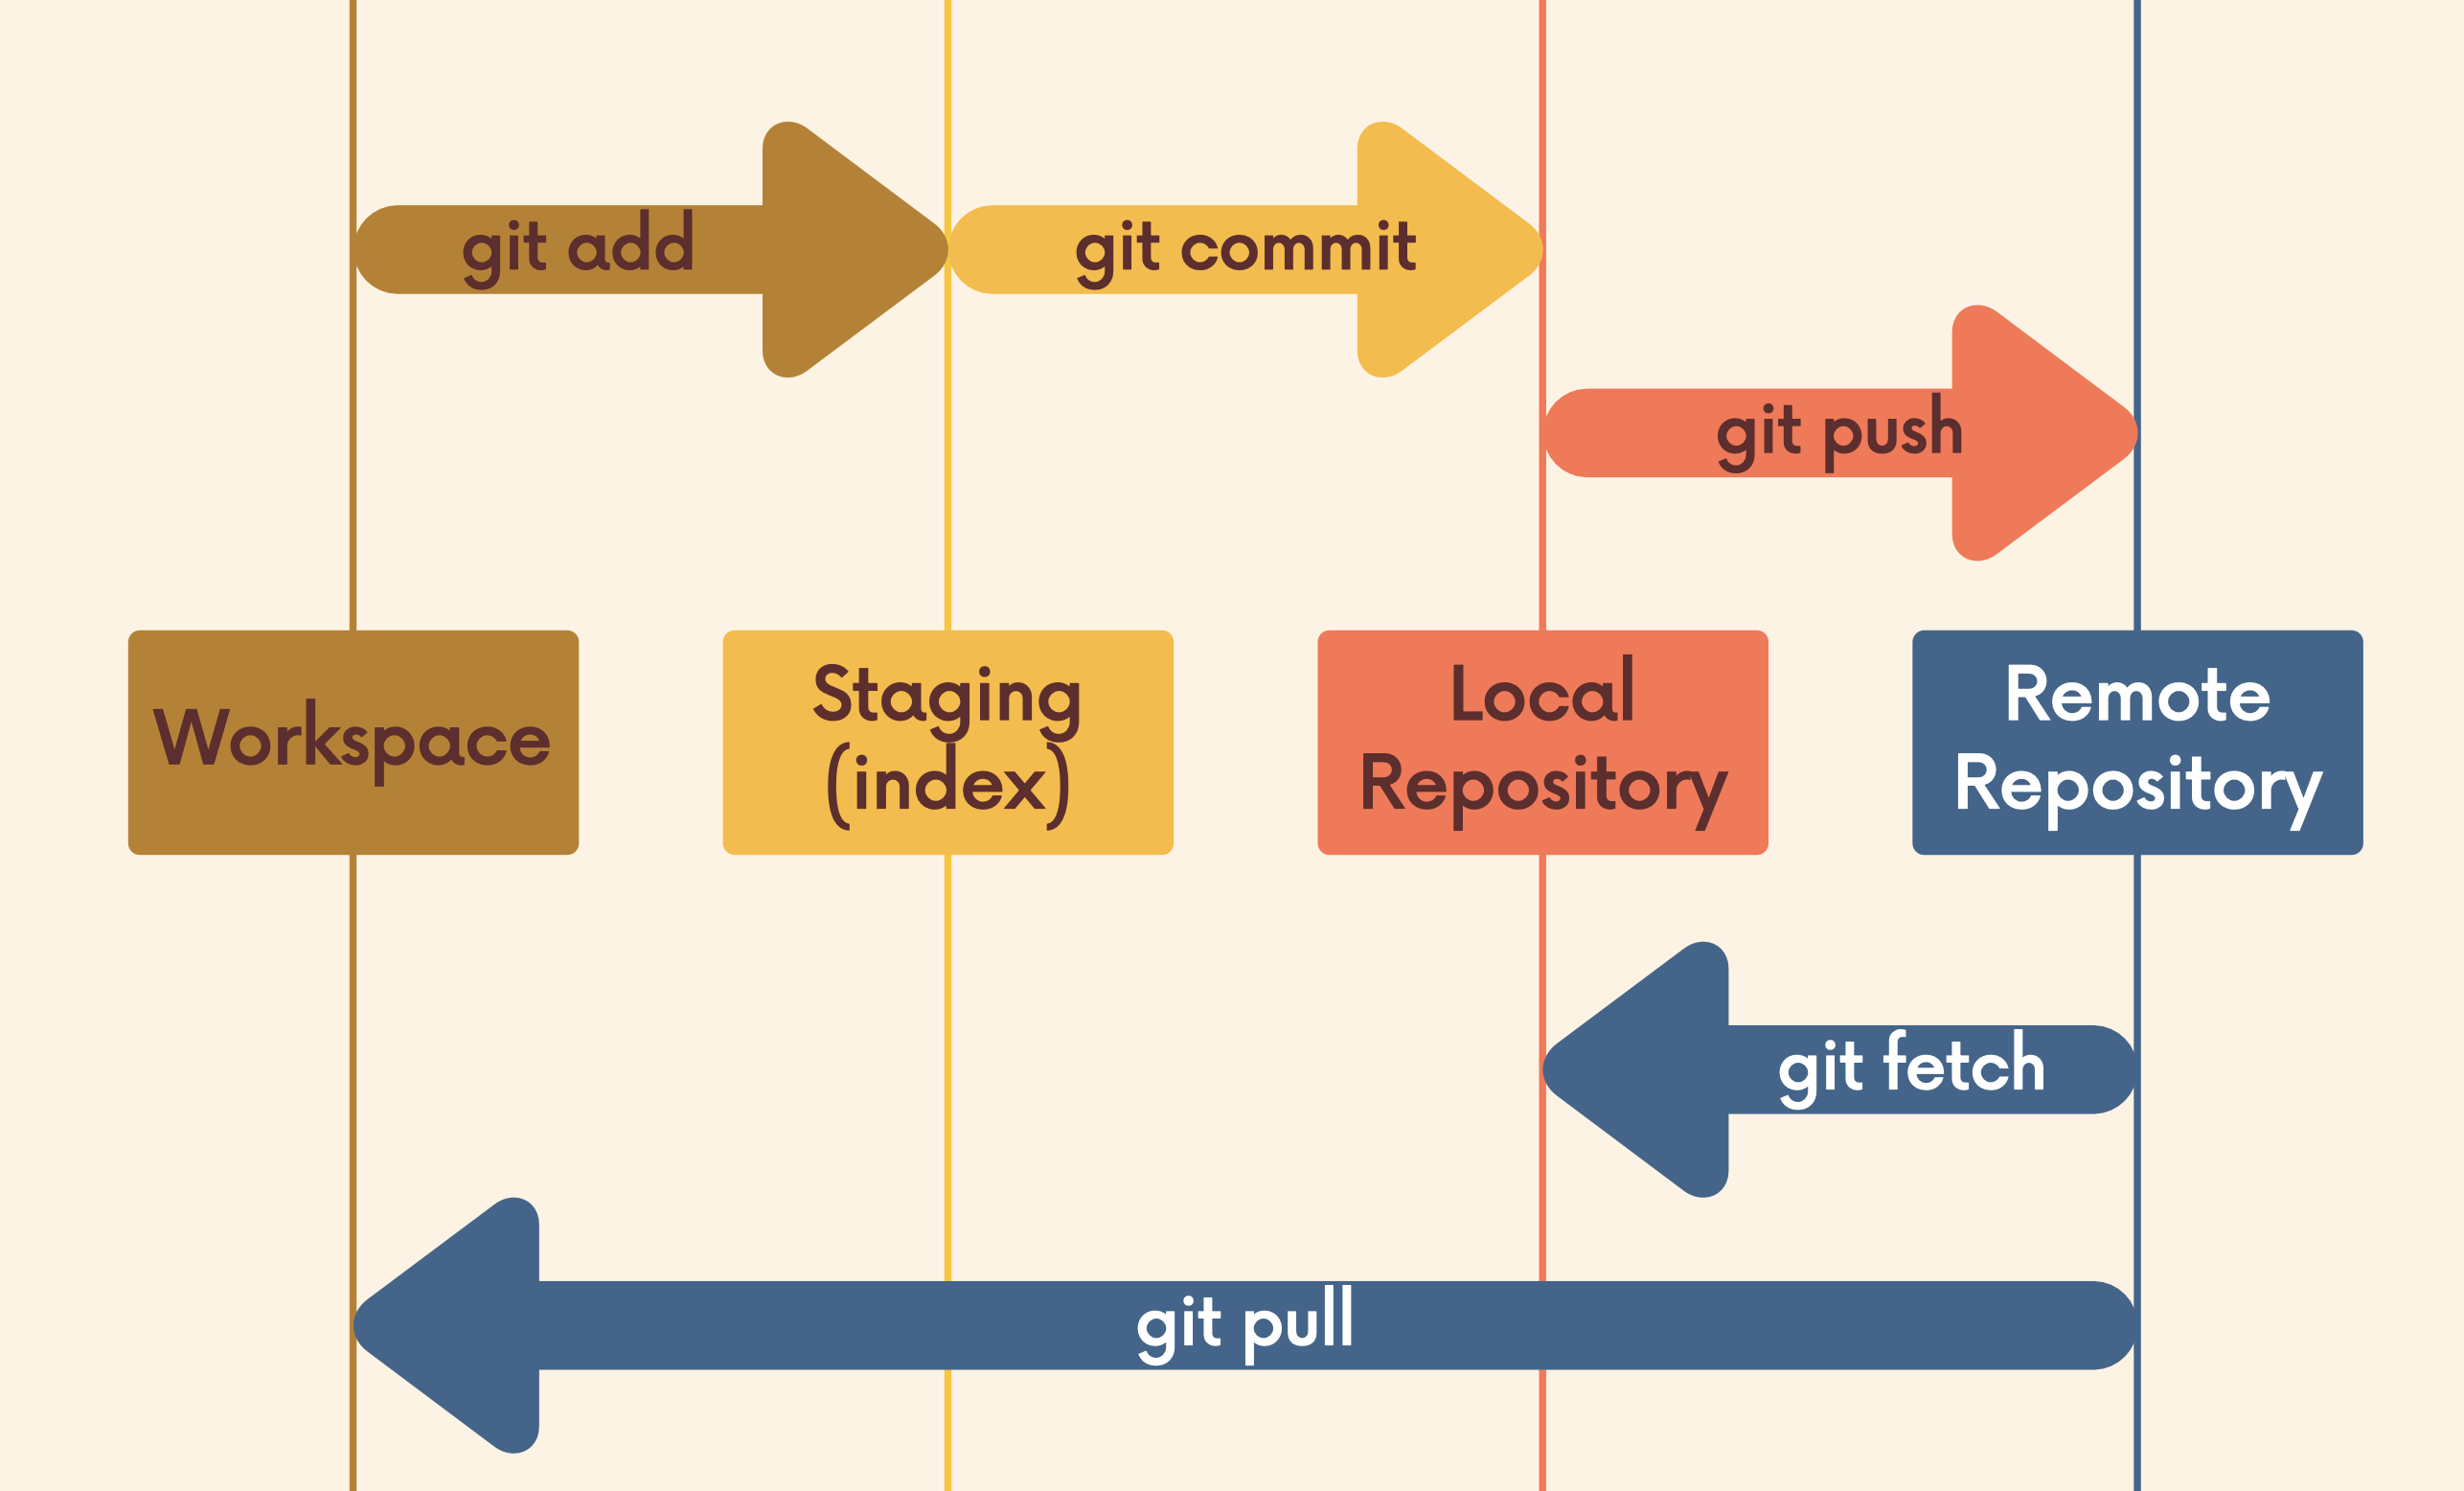
Git Pull
git pull = git fetch + git merge
Just like with git merge, it matters WHERE we run this command from. Whatever branch we run it from is where the changes will be merged into.
git pull <remote> <branch>If we run git pull without specifying a particular remote or branch to pull from, git assumes the following:
- remote will default to origin
- branch will default to whatever tracking connection is configured for your current branch.
git pull