참고 : https://docs.spring.io/spring-restdocs/docs/current/reference/html5/
https://lannstark.tistory.com/10?category=840828
https://hsik0225.github.io/spring/spring%20rest%20docs/2020/10/17/Spring-REST-Docs/
Spring Rest Docs
-
Restful 서비스를 정확하고 일기 편하게 문서화 하는 것을 도웁니다.
-
기본적으로 "Asciidoctor" 를 사용합니다.
-
Spring MVC의 TestFramework , Spring WebFlux WebTestClient또는 REST Assured 3 로 작성된 테스트에서 생성된 스니펫을 사용
-
테스트 기반 접근 방식은 서비스 문서의 정확성을 보장하는 데 도움이 됩니다
아래의 내용들은 Spring MVC 기반으로 설명합니다.
시작 하기
요구 사항
- Java8 이상
- 스프링 5.0.2 이상
빌드 구성
(gradle 기준)
plugins {
	id "org.asciidoctor.jvm.convert" version "3.3.2"
}
//asciidoc 파일을 html 파일로 processing 해주는 플러그인

configurations {
	asciidoctorExt
}

dependencies {
	asciidoctorExt 'org.springframework.restdocs:spring-restdocs-asciidoctor:{project-version}'
	testImplementation 'org.springframework.restdocs:spring-restdocs-mockmvc:{project-version}'
}

ext {
	snippetsDir = file('build/generated-snippets')

//ext는 전역변수를 설정해주는 것
//생성된 조각의 출력 위치를 정의

}


test {
	outputs.dir snippetsDir
}
// 결과물인 스니펫 디렉토리를 추가하는 `test` task를 설정

asciidoctor {
	inputs.dir snippetsDir
	configurations 'asciidoctorExt'

    dependsOn test
    //문서가 생성되기 전에 테스트가 실행되도록 작업이 테스트 작업에 종속되
}

bootJar {
	dependsOn asciidoctor
    // jar가 빌드 되기 전에 문서가 생성되도록 합니다

	from ("${asciidoctor.outputDir}/html5") {
		into 'static/docs'
	}
    // jar의 `static/docs` 디렉토리 안에 생성된 문서를 복사합니다
}
참고 위에 bootJar설정에서 static/docs경로에 index.html이 복사되어야 하는데, 되지 않는다면
아래 코드로 설정하면 됩니다.
bootJar {
	dependsOn asciidoctor

	copy {
		from asciidoctor.outputDir
		into "src/main/resources/static/docs"
	}
}
- compileJava -> test -> asciidoctor -> bootJar 순으로 실행
Setting Tests
- Junit와 Junit5를 지원합니다.
- 다른 TestFramework들도 지원은 하지만 , 더 많은 설정 작업들을 요구합니다.
Junit5기준으로 적겠습니다.
설정
1단계
@ExtendWith(RestDocumentationExtension.class)
public class RestDocsJunit5{
일반적은 스프링 어플리케이션을 테스트할 땐 SpringExtension 도 필요합니다.
@ExtendWith({RestDocumentationExtension.class, SpringExtension.class})
public class RestDocsJunit5{
RestDocumentaitionExtension 빌드 도구를 기반으로 출력 디렉토리가 생성되는데 , 경로는 아래와 같습니다.
-
Maven : target/generated-snippets
-
Gradle : build/generated-snippets
만일 , JUnit 5.1을 사용한다면 테스트 클래스에 필드로 @RegisterExtension을 선언하여 기본 설정을 Override할 수 있습니다.
@RegisterExtension은 생성할 때 결과 디렉토리를 변수로 받습니다.
public class JUnit5ExampleTests {

	@RegisterExtension
	final RestDocumentationExtension restDocumentation = new RestDocumentationExtension ("custom");

}
2단계
- @BeforeEach를 이용하여 MockMvc를 설정합니다.
private MockMvc mockMvc;

@BeforeEach
public void setUp(WebApplicationContext webApplicationContext,
        RestDocumentationContextProvider restDocumentation) {

	this.mockMvc = MockMvcBuilders.webAppContextSetup(webApplicationContext)
			.apply(documentationConfiguration(restDocumentation)) // 1
			.build();
}MockMvc인스턴스는 를 사용하여 구성 됩니다 MockMvcRestDocumentationConfigurer. documentationConfiguration()의 정적 메서드 에서 이 클래스의 인스턴스를 얻을 수 있습니
어노테이션 이용하기
@SpringBootTest를 사용할 경우
@SpringBootTest
@AutoConfigureMockMvc
@AutoConfigureRestDocs
public class JUnit5ExampleTests{
위 2개의 어노테이션을 이용하게 간단하게 설정할 수 있습니다.
@AutoConfigureMockMvc 의 경우 MockMvc 설정.
@AutoConfigureRestDocs의 경우 Spring REST Doc의 자동 설정
스니펫 생성하기
this.mockMvc.perform(get("/")
		.accept(MediaType.APPLICATION_JSON)
        )
		.andExpect(status().isOk())
		.andDo(document("index"));
1) "/" 를 get방식으로 호출합니다.
2) application/json 응답 데이터를 요구합니다.
3) index라는 디렉토리 안에 스니펫들을 생성합니다.
스니펫들은 RestDocumentationResultHandler 에 의해 작성됩니다.
정적 메소드인MockMvcRestDocumentation#document() 를 사용하여 이 클래스의 인스턴스를 얻을 수 있습니다.
결과적으로 해당 테스트를 실행하면 , gradle에 설정했던, 출력 디렉토리에 스니펫 조각이 생성됩니다.
기본적으로 6개의 스니펫이 작성됩니다.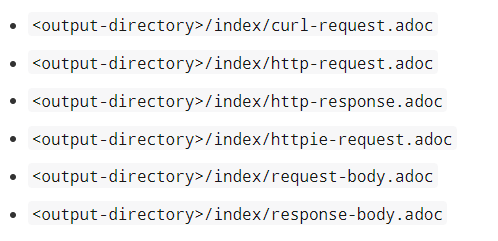
스니펫 사용하기
생성된 스니펫들을 사용하기 전에 .adoc 소스파일을 생성해야 합니다.
.adoc 접미사만 붙는다면 파일이름은 임의로 지정 가능합니다.
.adoc에 스니펫을 아래와 같이 사용할 수 있습니다.
- include::{snippets}/index/curl-request.adoc[]

정말 감사드립니다.
버전업이 되면서 적용 방법이 달라져서 해매고 있었는데, 덕분에 저도 적용에 완료했습니다.