
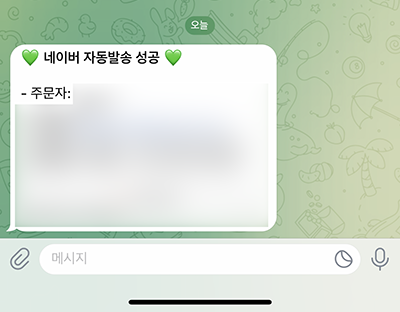
나는 nodemailer와 toad-scheduler로 이메일 자동 발송 기능을 만들어서 사용 중이다.
메일 발송 시 나한테 알리고 싶어서 bcc(숨은참조)와 카카오톡 api를 활용한 메시지 보내기 둘 다 구현해보고 bcc로 일단락하였다. (원래는 텔레그램도 고려했었음) 카카오톡 메시지를 사용하지 않은 이유는 내 채팅방에서 나한테 보낼 때 푸시 알림이 오지 않아서 내가 내 채팅방에 들어가지 않으면 확인할 수 없었기 때문이다.
그래서 bcc로 푸시알림을 받아왔었는데 숨은 참조로 자동 발송을 하면 똑같은 메일이 두 개씩 쌓여서 메일 확인 시 별로 좋지 않기도 하고,
첨부파일까지 붙어있는 메일이다보니 메일함 용량 문제도 있어서 텔레그램 봇을 활용한 메시지를 보내기로 결정하였다!
구현 방법은 어렵지 않아 보였다
- 텔레그램 계정 만들기
BotFather에게/newbot이라고 보내기- 채팅방에서 보여질 이름인
name과 봇 이름인username을 입력 (Bot,_bot으로 끝나야 함)- 봇 생성 완료 후 메시지 중간에 있는
HTTP API키 복사- node-telegram-bot-api npm 설치하기
bot.sendMessage()으로 메시지 보내기 기능 구현하기!
1~5는 어렵지 않아서 따로 포스팅 하지 않는다.
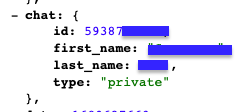
👩🏻💻 chat id값 구하기
처음에 텔레그램 API를 사용하기로 마음 먹고 찾아보면서 알게 된 https://api.telegram.org/bot토큰/getUpdates로 아이디 값을 받아왔다. 그런데 node-telegram-bot-api 라이브러리를 설치하면서 예제를 보니 msg.chat.id라는 값이 보였고 console로 찍어보니까 getUpdates에서 구한 chat id과 일치하였다.
1.
https://api.telegram.org/bot토큰/getUpdates로 구하기
응답메시지에 있는 chat id값을 복사하면 된다.
🚨 node.js 서버에서 함께 동작 중이면 아래와 같은 에러가 발생하니 꼭 끄고 요청하기
error: [polling_error] {"code":"ETELEGRAM","message":"ETELEGRAM: 409 Conflict: terminated by other getUpdates request; make sure that only one bot instance is running"}
2. node-telegram-bot-api 예제코드에서 구하기 👍🏻
onText() 혹은 on()에 console을 찍어보면 된다.
먼저 토큰을 입력하여 봇 정보를 생성해주는데 토큰값을 입력하면 키값이 노출되기 때문에
나는 환경변수에 선언하여 사용하였다
1. 봇 생성 (토큰값 설정)
- 예제 (token키 노출)
const TelegramBot = require('node-telegram-bot-api');

// replace the value below with the Telegram token you receive from @BotFather
const token = 'YOUR_TELEGRAM_BOT_TOKEN';

// Create a bot that uses 'polling' to fetch new updates
const bot = new TelegramBot(token, {polling: true});
- 환경변수로 선언 후 dotenv로 가져오는 방법
const bot = new TelegramBot(process.env.TELE_BOT_TOKEN, { polling: true });2. chat.id값 확인
토큰값 설정이 끝났으면 아래 예제를 통해 chat.id값을 구하면 된다.
봇에게 메시지를 보내면 메아리치는 예제다.
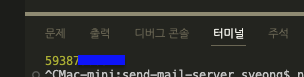
id값 확인은 ✅ 표시된 콘솔 둘 중 하나만 해보면 된다.
// Matches "/echo [whatever]"
bot.onText(/\/echo (.+)/, (msg, match) => {
  // 'msg' is the received Message from Telegram
  // 'match' is the result of executing the regexp above on the text content
  // of the message

  const chatId = msg.chat.id;
  console.log(msg.chat.id); ✅
  const resp = match[1]; // the captured "whatever"

  // send back the matched "whatever" to the chat
  bot.sendMessage(chatId, resp);
});

// Listen for any kind of message. There are different kinds of
// messages.
bot.on('message', msg => {
  const chatId = msg.chat.id;
  console.log(msg.chat.id); ✅
  // send a message to the chat acknowledging receipt of their message
  bot.sendMessage(chatId, 'Received your message');
});
3. 터미널 콘솔 결과 확인
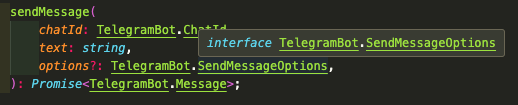
chat.id값만 구한 뒤 예제를 삭제하고 sendMessage()를 이용하여 발송 기능을 구현하였다.
💬 메시지 발송 기능 구현하기
const token = process.env.TELE_BOT_TOKEN;
const chatId = process.env.TELE_CHAT_ID;
const telebot = new TelegramBot(token); // chat.id도 구했고, 받아올 메세지가 없으므로 { polling: true } 옵션은 삭제함
const msg = 'message'
telebot.sendMessage(chatId, msg);
🎨 메시지에 스타일 입히기 (Markdown, MarkdownV2, HTML)
포스팅엔 msg 값을 간단히 message라고 적었지만 실제 전송되는 내용은 좀 길어서 스타일을 입히고 싶었다. 뭔가 그런 옵션이 있을 거 같기도 했고 BotFather에서 굵은 텍스트를 본 것 같기도 해서 sendMassage에 마우스를 올려보니 options이 있는 것이다..! 😲

그래서 타고타고 어떤 옵션값이 있나 확인하러 들어가봤다

HTML, Markdown, MarkdownV2 세 가지 속성값이 있는 걸 확인 후 나는 html 속성으로 지정하였다
telebot.sendMessage(chatId, msg, { parse_mode: 'HTML' });
모든 HTML, 마크다운 문법이 적용되는 것이 아니기 때문에
https://core.telegram.org/bots/api#html-style 사이트를 참고해서 사용하면 된다.
💡 TIP
html 옵션 사용 시 줄바꿈 <br> 태그는 오류가 발생하므로 \n으로 작성하면 된다.

훌륭한 글이네요. 감사합니다.