API Routes
How?
pages내에 api 폴더를 만들어줍니다. (pages/api/)
Nextjs내에서 api endpoint를 만들 수 있습니다.
어디서 실행되나?
server side code를 쓰는 것임, client상에서는 실행되는 것이 아닙니다.
api routes를 쓰는건 extra feature으로,
server-side code에서(getStaticProps, getStaticPaths) own api에 fetch를 사용하지 않아야 합니다. (firebase와 같은 external api에 fetch를 사용하는 것은 상관없음)
pages/my-page.js의 getStaticProps, getStaticPaths, getServerSideProps에서 pages/api/newsletters.js에 fetch 요청을 하는 대신에, node로 fs에 접근해서 가져오는 방식을 사용합니다.
( await fetch('/api/newsletters')와 같은 코드를 getStaticProps, getStaticPaths, getServerSideProps에서는 사용하지 않아야한다는 의미입니다.)
브라우저상에서 api 폴더의 서버코드들은 어떻게 되는가?
client side에서 사용하지 않은 코드들은 client-side bundle에 포함되지 않습니다.
(예를들어, pages에서 import된 function들 중에서 getStaticProps에서만 사용된다면, client-side bundle에 포함되지 않습니다.)
// pages/api/hello.js
function handler(req, res) {

}
export default handler;
여기서 쓰는 req, res는 node에서 일반적으로 사용하는 req, res와 거의 같습니다.
// pages/api/[eventId].js
function handler(req, res) {
  const eventId = req.query.eventId;
}
export default handler;
req.query에서 dynamic router path를 property로 갖고 있습니다.
Example
json data
// data/feedback.json
[]
Example1. POST 요청처리
새로운 feedback data에 대한 POST요청을 처리합니다.
- json에 데이터 추가
- response로 json 데이터 보냄
// pages/api/feedback.js
import fs from 'fs';
import path from 'path';

export function feedbackPath() {
  return path.join(process.cwd(), 'data', 'feedback.json');
}

export function extractFeedback(filePath) {
  const fileData = fs.readFileSync(filePath);
  return JSON.parse(fileData);
}

function handler(req, res) { // /api/feedback으로 POST 요청
  if (req.method === 'POST') {
    const email = req.body.email;
    const feedbackText = req.body.text;


    const newFeedback = { // 새로운 데이터 형태
      id: new Date().toISOString(),
      email: email,
      text: feedbackText
    }

    const filePath = feedbackPath(); // file 경로 가져옴
    const data = extractFeedback(filePath); // file data를 읽어옴
    data.push(newFeedback); // 새로운 데이터 추가
    fs.writeFileSync(filePath, JSON.stringify(data)); // data에 쓰기

    res.status(201).json({ message: 'Success!', feedback: newFeedback }); // 성공 메시지
  } else {
    const filePath = feedbackPath();
    const data = extractFeedback(filePath);
    res.status(200).json(data);
  }
}

export default handler;
// pages/index.js
import { useRef, useState } from 'react';
function HomePage() {
const [feedbackItems, setFeedbackItems] = useState([]);
const emailInputRef = useRef();
const feedbackInputRef = useRef();
function submitFormHandler(e) {
e.preventDefault();
const enteredEmail = emailInputRef.current.value;
const enteredFeedback = feedbackInputRef.current.value;
const reqBody = {
email: enteredEmail,
text: enteredFeedback,
}
fetch('/api/feedback', {
method: 'POST',
body: JSON.stringify(reqBody),
headers: {
'Content-type': 'application/json'
}
}).then(res => res.json())
.then(data => console.log(data));
}
function loadFeedbackHandler() {
fetch('/api/feedback')
.then(res => res.json())
.then(data => {
setFeedbackItems(data);
});
}
return (
<div>
<h1>The Home Page</h1>
<form onSubmit={submitFormHandler}>
<div>
<label htmlFor="email">Your Email</label>
<input type="email" id='email' ref={emailInputRef} />
</div>
<div>
<label htmlFor="feedback">Your Feedback</label>
<textarea id='feedback' row='5' ref={feedbackInputRef} />
</div>
<button type="submit">Send Feedback</button>
</form>
<hr />
<button onClick={loadFeedbackHandler}>Load Feedback</button>
<ul>
{feedbackItems.map(item => <li key={item.id}>{item.text}</li>)}
</ul>
</div>
);
}
export default HomePage;Example2. GET 요청처리(dynamic api route)
특정 id Page에 진입시 id에 해당하는 데이터(json에서 find)를 가져옵니다.
// pages/api/feedback/[feedbackId].js
import { feedbackPath, extractFeedback } from './';

function handler(req, res) {
  const feedbackId = req.query.feedbackId;
  const filePath = feedbackPath();
  const feedbackData = extractFeedback(filePath);
  const selected = feedbackData.find(
    feedback => feedback.id = feedbackId
  )
  res.status(200).json({ feedback: selected });
}

export default handler;
// pages/feedback/index.js
import { useState } from 'react';
import { feedbackPath, extractFeedback } from '../api/feedback/';
function FeedbackPage(props) {
const [feedbackData, setFeedbackData] = useState();
function handler(id) {
fetch(`/api/feedback/${id}`).then(r => r.json()).then(data => {
setFeedbackData(data.feedback);
});
}
return (
<>
{feedbackData && <p>{feedbackData.email}</p>}
<div>
{props.feedbackItems.map(item =>
<li key={item.id}>
{item.text}<button onClick={handler.bind(null, item.id)}>Show Details</button>
</li>)}
</div>
</>
)
}
export async function getStaticProps() {
const filePath = feedbackPath();
const data = extractFeedback(filePath);
return {
props: {
feedbackItems: data
}
}
}
export default FeedbackPageMongoDB 연결하기
mongodb를 연결하여 db에 POST, GET을 해보겠습니다.
mongodb 설치
npm install mongodbmongodb cluster 생성하기 (이미지 설명)
이미지 바로 아래에 설명을 추가하였습니다.
mongodb에서 Free tier 클러스터를 생성합니다.
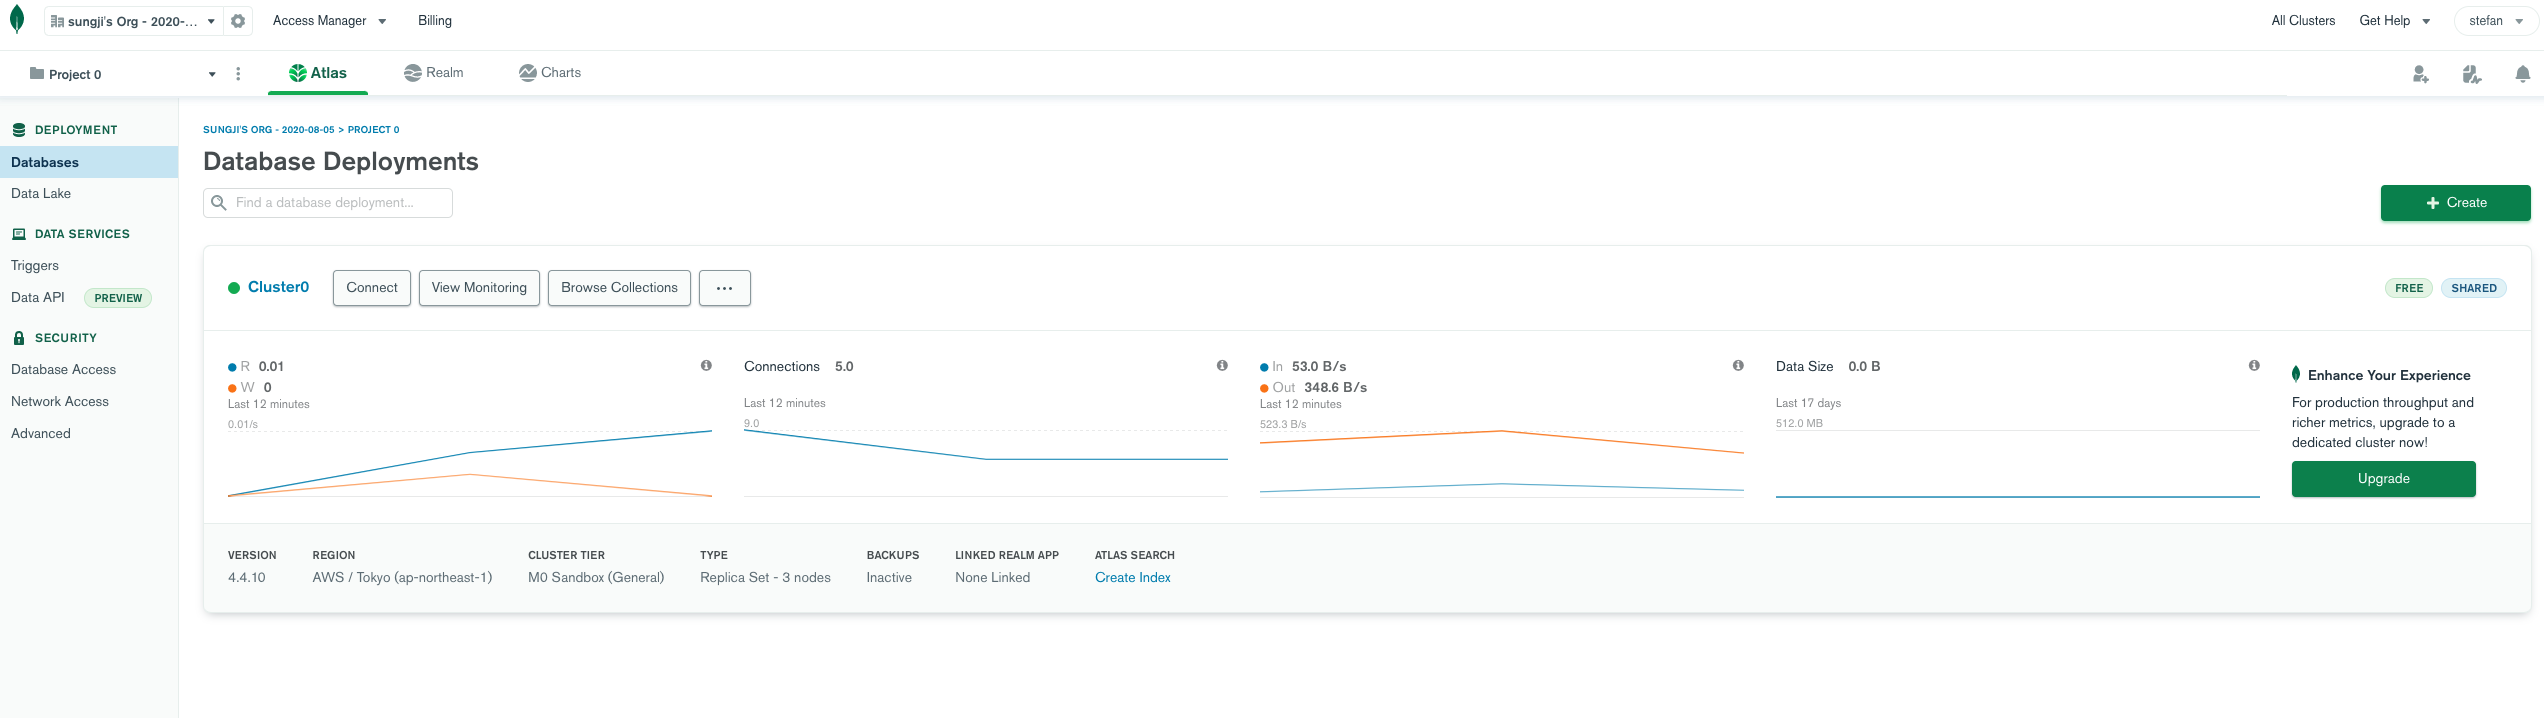
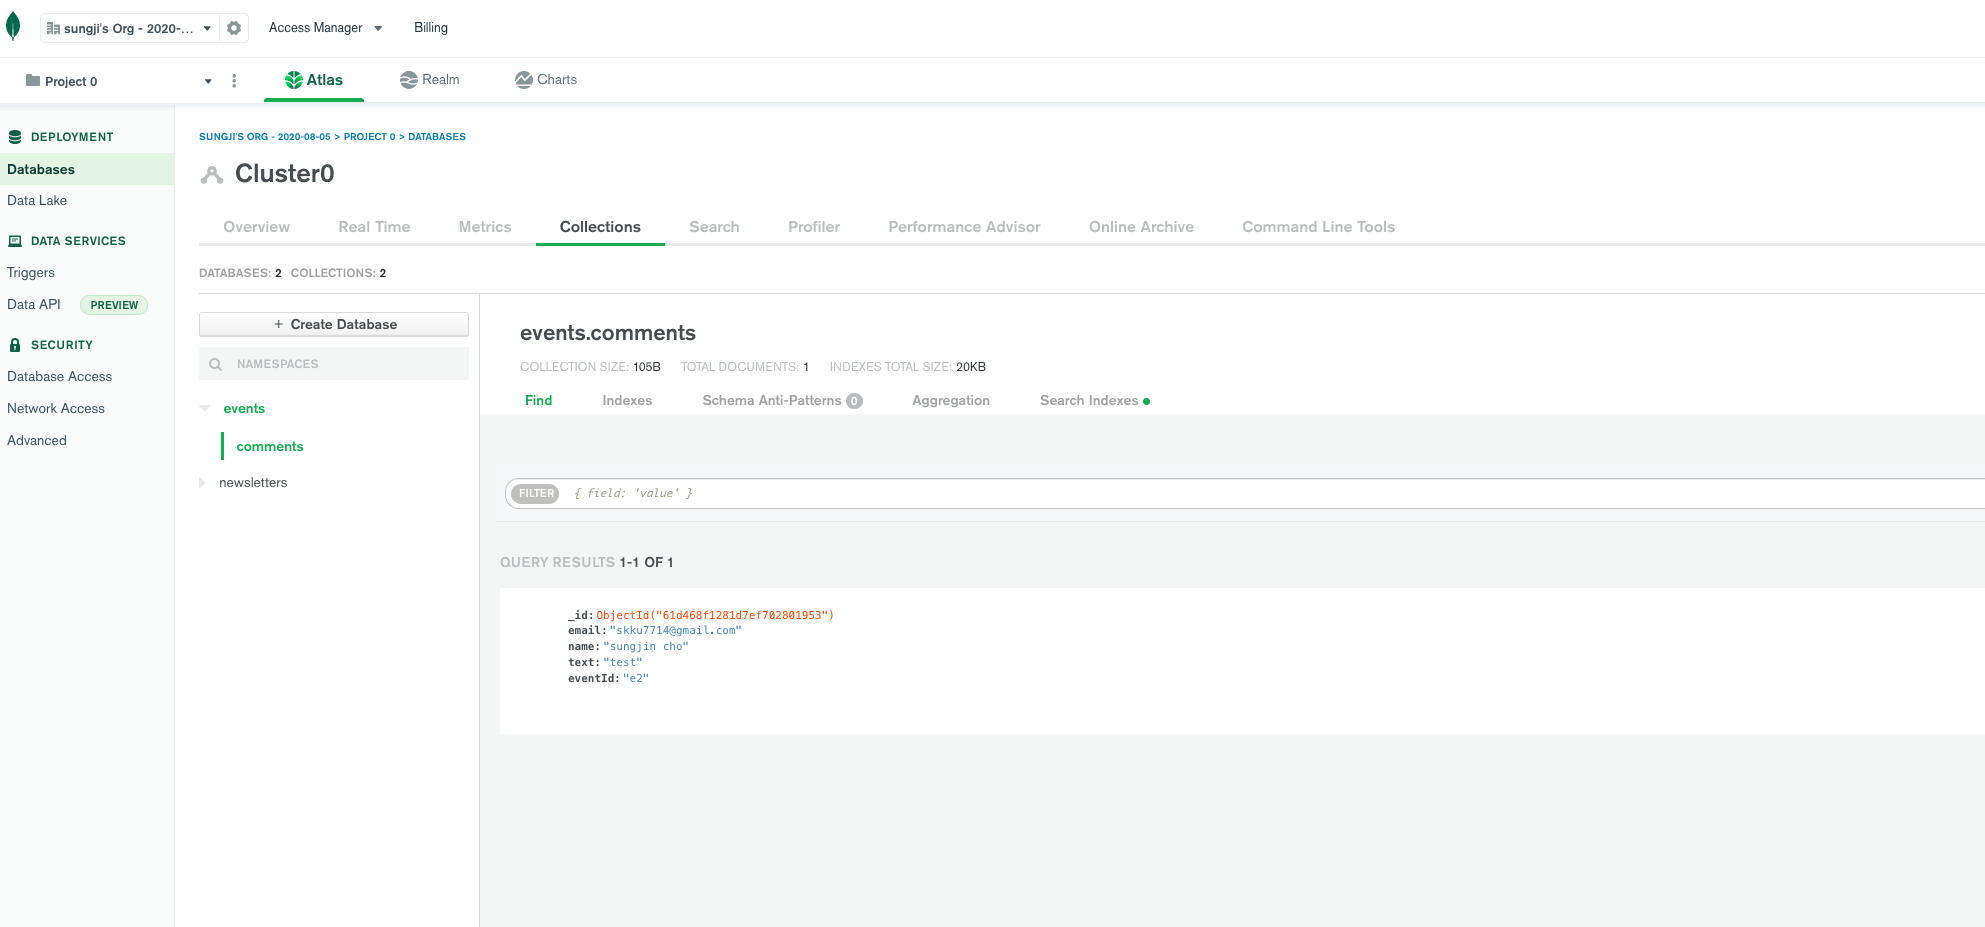
Databases 메뉴에서 database collection을 확인할 수 있습니다. (위 image에서 Browse Collections 버튼)
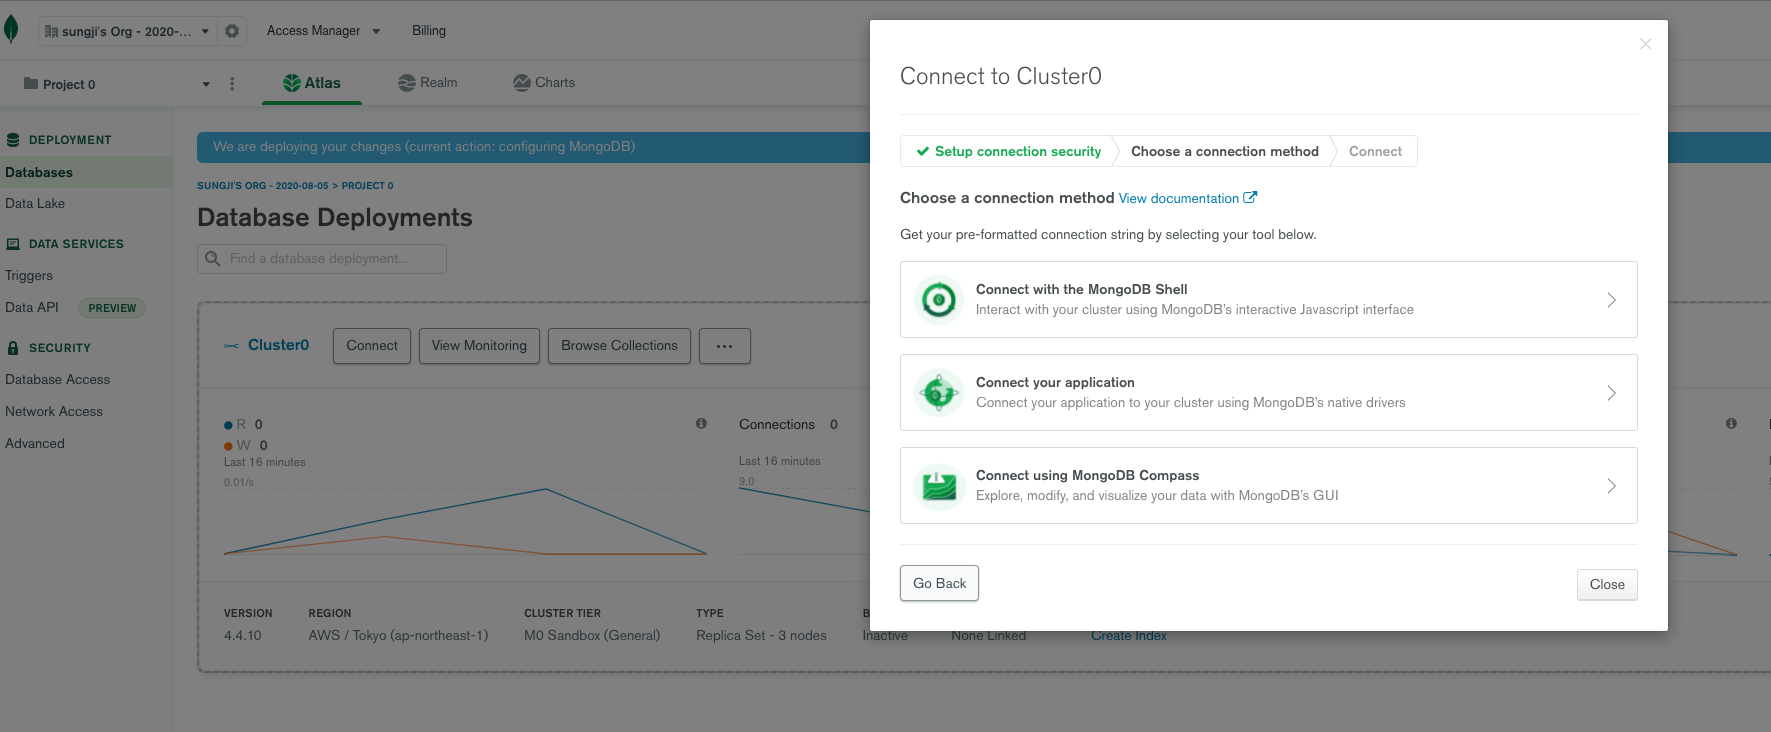

Databases 메뉴에서 Connect > Connect you application을 선택합니다. application code가 나오는데 해당 코드를 프로젝트에서 사용하게 됩니다.
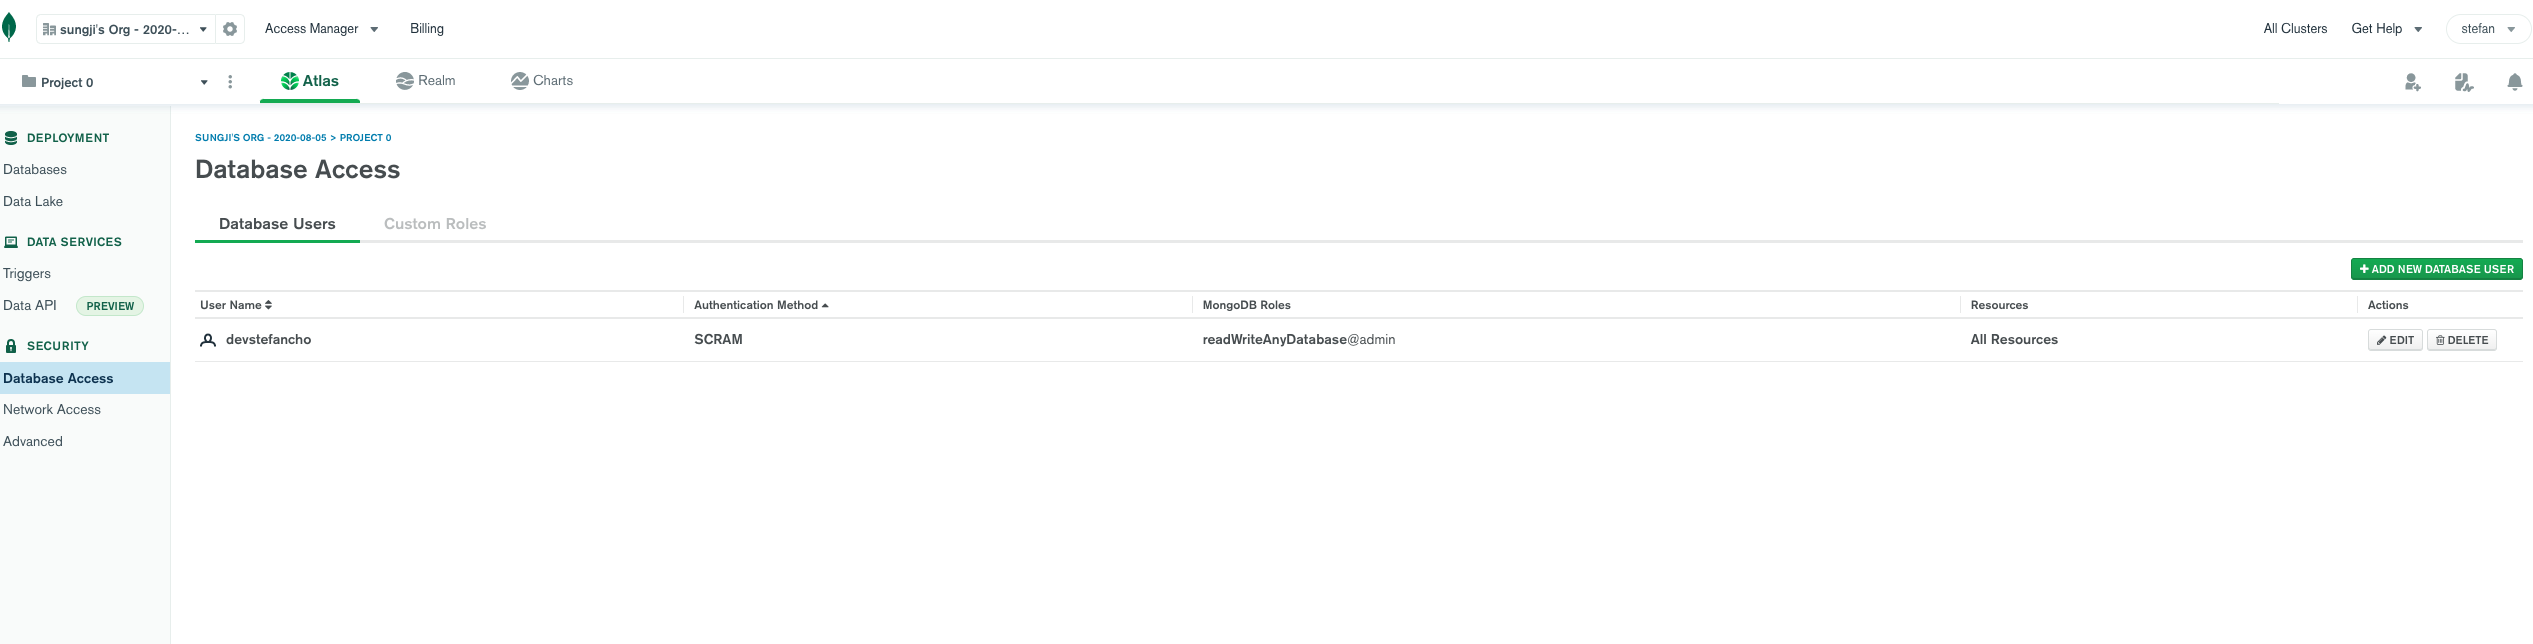
Database Access에서 db접근 계정을 설정할 수 있습니다. 여기서 설정한 계정과 비밀번호를 코드에 넣어주어 연결하게 됩니다.
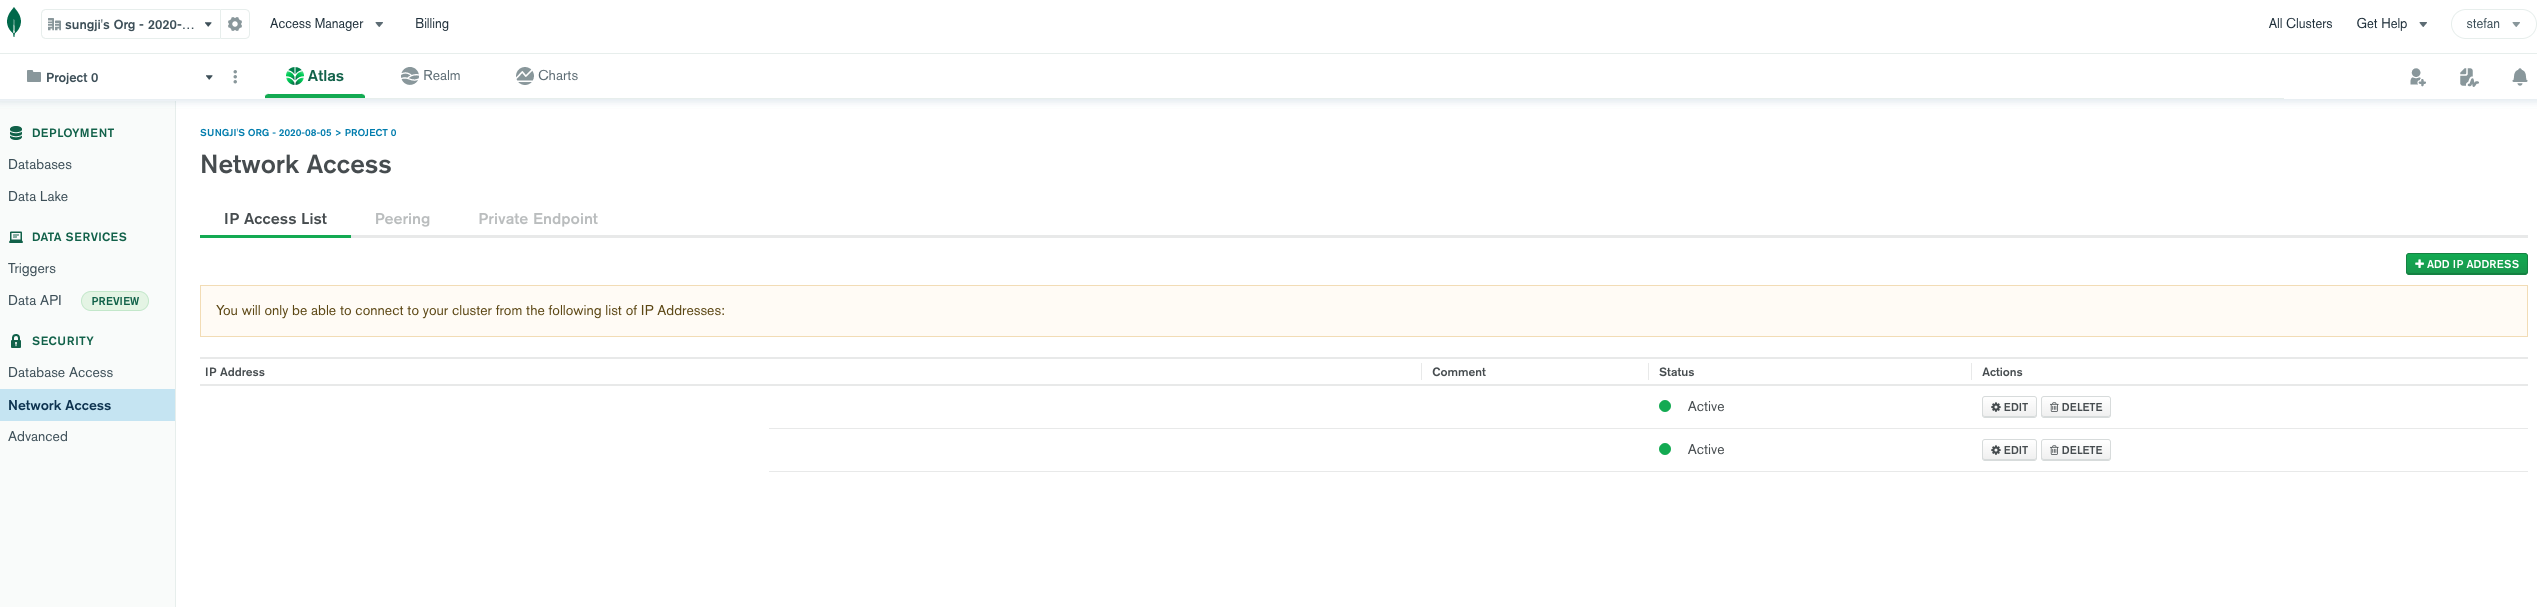
Network Access에서 접근허용할 IP주소를 설정합니다. Add IP ADDRESS 버튼을 클릭합니다.
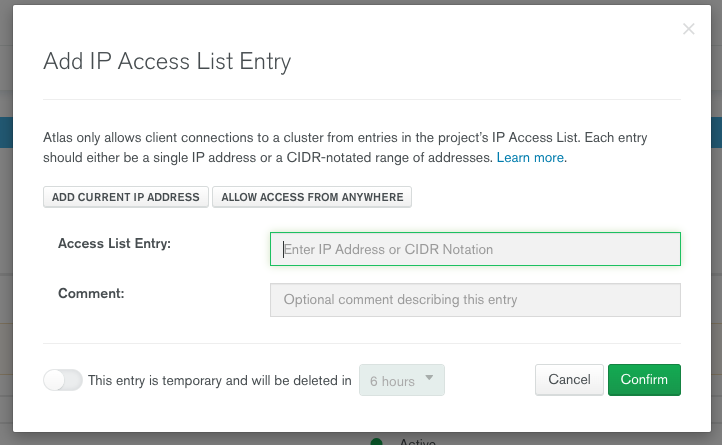
ADD CURRENT IP ADDRESS를 클릭하여 현재 IP 주소를 추가합니다.
Mongodb 연결하여 db에 데이터 저장하기
import { MongoClient } from 'mongodb';
async function handler(req, res) {
  if (req.method === 'POST') {
    const userEmail = req.body.email;

    if (!userEmail || !userEmail.includes('@')) {
      res.status(422).json({ message: 'Invalid email address.' });
      return;
    }

    const client = await MongoClient.connect('mongodb+srv://본인계정이름:비밀번호부분@cluster0.tjcec.mongodb.net/데이터베이스이름?retryWrites=true&w=majority') // 데이터베이스와 연결합니다.
    const db = client.db(); // db를 가져옵니다.

    await db.collection('Collection이름').insertOne({ email: userEmail }); // db collection에 데이터 하나를 저장합니다.

    client.close(); // 연결을 종료합니다.

    console.log(userEmail);
    res.status(201).json({ message: 'Signed Up!' });
  }
}

export default handler
MongoClient를 연결합니다. connect안의 코드는 위 내용중에서 "Databases 메뉴에서 Connect > Connect you application" 스크린샷 부분을 참고하세요.
Mongodb 연결하여 데이터 가져오기
import { MongoClient } from 'mongodb';
async function handler(req, res) {
  const eventId = req.query.eventId;

  const client = await MongoClient.connect('mongodb+srv://본인계정이름:비밀번호부분@cluster0.tjcec.mongodb.net/데이터베이스이름?retryWrites=true&w=majority') // 데이터베이스와 연결합니다.

  if (req.method === 'POST') {
    const { email, name, text } = req.body;

    if (!name || !text || name.trim() === '' || text.trim() === '') {
      res.status(422).json({ message: 'Invalid input.' });
      return;
    }

    const newComment = {
      email,
      name,
      text,
      eventId
    }
    const db = client.db(); // db를 가져옵니다.
    const result = await db.collection('Collection이름').insertOne(newComment); // collection에 데이터 하나를 추가합니다.
    res.status(201).json({ message: 'Added comment. ', comment: newComment });
  }
  if (req.method === 'GET') {
    const db = client.db(); // db를 가져옵니다.
    const documents = await db.collection('comments').find().sort({ _id: -1 }).toArray(); // comments collection을 _id로 정렬하여 Array로 만듭니다.
    const dummyList = [
      { id: 'c1', name: 'cho', text: 'A first comment' },
      { id: 'c2', name: 'cho', text: 'A second comment' },
    ]

    res.status(200).json({ comments: documents }); // HTTP 응답에 db 데이터를 보냅니다.
  }
  client.close(); // 연결을 종료합니다.
}

export default handler;
데이터를 가져오는 것 또한 저장하는것과 거의 같습니다.
우선 connect로 db와 연결하여, db에 데이터를 저장하거나, 가져오고 마지막에 연결을 close해주면 됩니다.
데이터 확인
해당 데이터들은 Databases > Browse Collections에서 확인할 수 있습니다.