7-1-1 요청 파라미터란?
서버에 전송되는 값을 요청 파라미터(request parameter)라고 한다.
| 요청 파라미터 | 내용 |
|---|---|
| 요청 쿼리 스트링(query string)으로 보내지는 값 HTTP 메서드: GET으로 서버로 데이터 전송 | |
| 요청 본문(body)에 저장되어 보내지는 값 HTTP 메서드: POST로 서버로 데이터 전송 | 뷰에서 입력값 및 선택한 값이나 숨김 파라미터(hidden parameter) 등에서 미리 뷰에 입력해둔 값 등 |
| 뷰에서 클릭한 버튼의 name 속성값 | 하나의 뷰에 버튼이 여러 개 있을 때 어느 버튼인지 판별할 수 있는 값 |
| URL 경로(path)의 일부로 보내지는 값 | 링크 등으로 URL의 일부로 보내지는 값 |
7-1-2 요청 파라미터의 취득 방법
| 방법 | 내용 |
|---|---|
| @RequestParam 사용 | @RequestParam 어노테이션을 이용해 파라미터를 하나씩 취득 |
| Form 클래스 사용 (Form 클래스는 따로 만들어야 함) | 스프링 MVC가 Form 클래스 내의 필드에 대해 값을 저장합니다. 요청 파라미터를 모아서 하나의 객체로 받아들이기 때문에 자주 사용되는 방법이다. 받을 때는 '형변환'이나 '포맷 지정'이 가능하다. |
7-2-1 프로젝트 생성
생략
7-2-2 컨트롤러와 뷰 생성
1. 컨트롤러 생성
package com.example.ch7.controller;

import org.springframework.format.annotation.DateTimeFormat;
import org.springframework.stereotype.Controller;
import org.springframework.ui.Model;
import org.springframework.web.bind.annotation.GetMapping;
import org.springframework.web.bind.annotation.PostMapping;
import org.springframework.web.bind.annotation.RequestParam;

import java.time.LocalDate;

@Controller
public class RequestParamController {
//    입력 화면을 표시
    @GetMapping("/show")
    public String showView(){
        // 반환값으로 뷰 이름을 돌려줌
        return "entry";
    }
}
2. 뷰 생성(입력 화면)
showView 메서드의 반환값인 entry에 대응하는 entry.html을 resources/templates 폴더 아래에 생성
<!DOCTYPE html>
<html lang="ko" xmlns:th="http://www.thymeleaf.org">
<head>
    <meta charset="UTF-8">
    <title>입력 화면</title>
</head>
<body>
<form th:action="@{/confirm}" method="post">
    <div>
        <label for="name">이름</label>
        <input type="text" name="name">
    </div>
    <div>
        <label for="age">나이</label>
        <input type="number" name="age" min="1" max="100">
    </div>
    <div>
        <label for="birth">생년월일:</label>
        <input type="date" name="birth">
    </div>
    <input type="submit" value="전송">
</form>
</body>
</html>
form 태그의 @{/confirm}는 /confirm URL로 보낸다는 뜻
위 코드 책 보고 따라친건데 빨간줄 뜬다. label태그 for 속성이 input 태그 name 속성이 아니라 id 속성값과 같아야하는데 책에서는 name속성으로 되어있다.
<!DOCTYPE html>
<html lang="ko" xmlns:th="http://www.thymeleaf.org">
<head>
    <meta charset="UTF-8">
    <title>입력 화면</title>
</head>
<body>
<form th:action="@{/confirm}" method="post">
    <div>
        <label for="name">이름</label>
        <input type="text" id="name">
    </div>
    <div>
        <label for="age">나이</label>
        <input type="number" id="age" min="1" max="100">
    </div>
    <div>
        <label for="birth">생년월일:</label>
        <input type="date" id="birth">
    </div>
    <input type="submit" value="전송">
</form>
</body>
</html>
이렇게 고쳐주면 빨간줄이 안뜬다.
하지만 but name 속성을 빼면 confirm으로 넘어가 오류 화면이 나온다.
다시 써줬다...
<!DOCTYPE html>
<html lang="ko" xmlns:th="http://www.thymeleaf.org">
<head>
    <meta charset="UTF-8">
    <title>입력 화면</title>
</head>
<body>
<form th:action="@{/confirm}" method="post">
    <div>
        <label for="name">이름</label>
        <input type="text" id="name" name="name">
    </div>
    <div>
        <label for="age">나이</label>
        <input type="number" id="age" name="age" min="1" max="100">
    </div>
    <div>
        <label for="birth">생년월일:</label>
        <input type="date" id="birth" name="birth">
    </div>
    <input type="submit" value="전송">
</form>
</body>
</html>
이렇게 고쳐주면 빨간줄도 안뜨고 confirm으로 잘 넘어간다
HTML의 태그는 웹 폼 요소와 그에 대한 설명을 연결하는데 사용됩니다. 태그는 웹 접근성을 향상시키는데 중요한 역할을 합니다. 태그는 다음과 같은 특징이 있습니다:
연결성: 태그는 for 속성을 통해 특정 form 요소와 연결됩니다. for 속성의 값은 연결된 요소의 id 속성 값과 같아야 합니다.
<label for="name">Name:</label>
<input type="text" id="name" name="name">
이런 식으로 <label>을 사용하면, 사용자가 레이블을 클릭하면 해당하는 입력 필드에 포커스가 맞춰집니다.
웹 접근성 향상: <label> 태그는 웹 접근성에 큰 도움이 됩니다. 시각 장애가 있는 사용자들이 스크린 리더를 사용할 때, <label> 태그는 연결된 폼 요소에 대한 정보를 제공합니다.
유저 인터페이스 개선: 레이블은 폼 요소의 클릭 가능 영역을 확장합니다. 즉, 사용자가 레이블을 클릭하면 연결된 폼 요소가 선택되거나 포커스가 맞춰지게 됩니다. 이는 체크박스나 라디오 버튼 등 작은 폼 요소의 사용성을 향상시킵니다.
포커스가 맞춰진다?
-> 
3. 컨트롤러에 추가
package com.example.ch7.controller;

import org.springframework.format.annotation.DateTimeFormat;
import org.springframework.stereotype.Controller;
import org.springframework.ui.Model;
import org.springframework.web.bind.annotation.GetMapping;
import org.springframework.web.bind.annotation.PostMapping;
import org.springframework.web.bind.annotation.RequestParam;

import java.time.LocalDate;

@Controller
public class RequestParamController {

    @PostMapping("confirm")
    public String confirmView(
            Model model, @RequestParam String name, @RequestParam Integer age,
            @DateTimeFormat(iso = DateTimeFormat.ISO.DATE) @RequestParam LocalDate birth
    ){
        // Model에 저장
        model.addAttribute("name", name);
        model.addAttribute("age", age);
        model.addAttribute("birth", birth);

        // 반환값으로 뷰 이름을 돌려줌
        return "confirm";
    }
}
Model 객체: 이 객체는 컨트롤러(Controller)와 뷰(View) 사이의 데이터를 전달하는 역할을 합니다. Model 객체에 데이터를 추가하는 것은 뷰에서 이 데이터를 사용할 수 있게 하는 것과 같습니다. 컨트롤러는 이 Model 객체에 데이터를 추가하고, 뷰는 이 Model 객체에서 데이터를 가져와 사용자에게 보여주는 HTML 문서를 생성합니다.
뷰(View, 예: confirm.html): 이는 실제 사용자에게 보여지는 부분입니다. Spring MVC에서는 HTML 파일을 뷰로 사용할 수 있습니다. 템플릿 엔진(예: Thymeleaf, FreeMarker 등)은 이 HTML 파일과 Model 객체를 사용하여 최종적인 HTML 문서를 생성합니다. 이 HTML 문서는 HTTP 응답의 본문에 포함되어 클라이언트에게 전송됩니다.
따라서, Model 객체는 데이터를 전달하는 역할을 하며, 뷰(View)는 이 데이터를 사용하여 사용자에게 보여주는 역할을 합니다. 이 두 가지 요소는 사용자에게 정보를 표시하는 과정에서 서로 다른 역할을 합니다.
참고 뷰 리졸버란(view resolver)
뷰 리졸버(View Resolver)는 Spring MVC 프레임워크에서 컨트롤러(Controller)가 반환하는 뷰 이름(String)을 실제 뷰(View) 객체로 변환하는 역할을 합니다.
4. 뷰 생성(확인 화면)
<!DOCTYPE html>
<html lang="ko" xmlns:th="http://www.thymeleaf.org">
<head>
    <meta charset="UTF-8">
    <title>확인 화면</title>
</head>
<body>
    <ul>
        <li>이름: [[${name}]]</li>
        <li>나이: [[${age}]]</li>
        <li>생년월일: [[${birth}]]</li>
    </ul>
</body>
</html>
7-3-1 Form 클래스 생성
package com.example.ch7.form;

import lombok.Data;
import org.springframework.format.annotation.DateTimeFormat;

import java.time.LocalDate;

@Data
public class Form {
    private String name;

    private Integer age;

    @DateTimeFormat(iso = DateTimeFormat.ISO.DATE)
    private LocalDate birth;
}
@Data 어노테이션으로 자동으로 getter/setter 생성
@DateTimeFormat으로 iso = DateTimeFormat.ISO.DATE를 지정해 날짜 형식을 'yyyy-mm-dd'로 받아들이도록 지정
1. 컨트롤러 수정 및 추가
package com.example.ch7.controller;

import com.example.ch7.form.Form;
import org.springframework.format.annotation.DateTimeFormat;
import org.springframework.stereotype.Controller;
import org.springframework.ui.Model;
import org.springframework.web.bind.annotation.GetMapping;
import org.springframework.web.bind.annotation.PostMapping;
import org.springframework.web.bind.annotation.RequestParam;

import java.time.LocalDate;

@Controller
public class RequestParamController {
//    입력 화면을 표시
    @GetMapping("/show")
    public String showView(){
        // 반환값으로 뷰 이름을 돌려줌
        return "entry";
    }

//    @PostMapping("confirm")
//    public String confirmView(
//            Model model, @RequestParam String name, @RequestParam Integer age,
//            @DateTimeFormat(iso = DateTimeFormat.ISO.DATE) @RequestParam LocalDate birth
//    ){
//        // Model에 저장
//        model.addAttribute("name", name);
//        model.addAttribute("age", age);
//        model.addAttribute("birth", birth);
//
//        // 반환값으로 뷰 이름을 돌려줌
//        return "confirm";
//    }

    @PostMapping("confirm")
    public String confirmView(Form form){

        // 반환값으로 뷰 이름을 돌려줌
        return "confirm2";
    }

}
2. 뷰 생성(확인 화면: Form 클래스 사용)
confirmView 메서드의 반환값에 대응하는 confirm2.html을 resources/templates에 생성
<!DOCTYPE html>
<html lang="ko" xmlns:th="http://www.thymeleaf.org">
<head>
    <meta charset="UTF-8">
    <title>확인 화면:Form 클래스 사용</title>
</head>
<body>
 <ul>
     <li>이름: [[${form.name}]]</li>
     <li>나이: [[${form.age}]]</li>
     <li>생년월일: [[${form.birth}]]</li>
 </ul>
</body>
</html>
7-4-1 프로젝트 생성
생략
7-4-2 컨트롤러와 뷰 생성
1. 컨트롤러 생성
package com.example.ch74.controller;

import org.springframework.stereotype.Controller;
import org.springframework.web.bind.annotation.GetMapping;

@Controller
public class PathVariableController {

    @GetMapping("show")
    public String showView(){
        // 반환값으로 뷰 이름을 돌려줌
        return "show";
    }
}
2. 뷰 생성(입력 화면)
<!DOCTYPE html>
<html lang="ko" xmlns:th="http://www.thymeleaf.org">
<head>
    <meta charset="UTF-8">
    <title>URL 경로에 포함된 값과 클릭된 버튼 식별</title>
</head>
<body>
<!--URL에 값 넣기-->
<h3><a href="@{/function/1}">기능-1</a></h3>
<h3><a href="@{/function/2}">기능-2</a></h3>
<h3><a href="@{/function/3}">기능-3</a></h3>
<!--같은 form 태그 안에 포함된 여러 개의 버튼-->
<form th:action="@{/send}" method="post">
    <input type="submit" value="버튼A" name="a">
    <input type="submit" value="버튼B" name="b">
    <input type="submit" value="버튼C" name="c">
</form>
<h3></h3>
<h3></h3>
</body>
</html>
폼 태그 <form th:action="@{/send}" method="post"> 에서 /send를 받는 코드는 controller에 나중에 작성
위에 잘 보면 URL에 값 넣기 a태그에서 href속성 앞에 th:가 빠져있다. 이 상태로 실행해 기능-1을 눌러보면
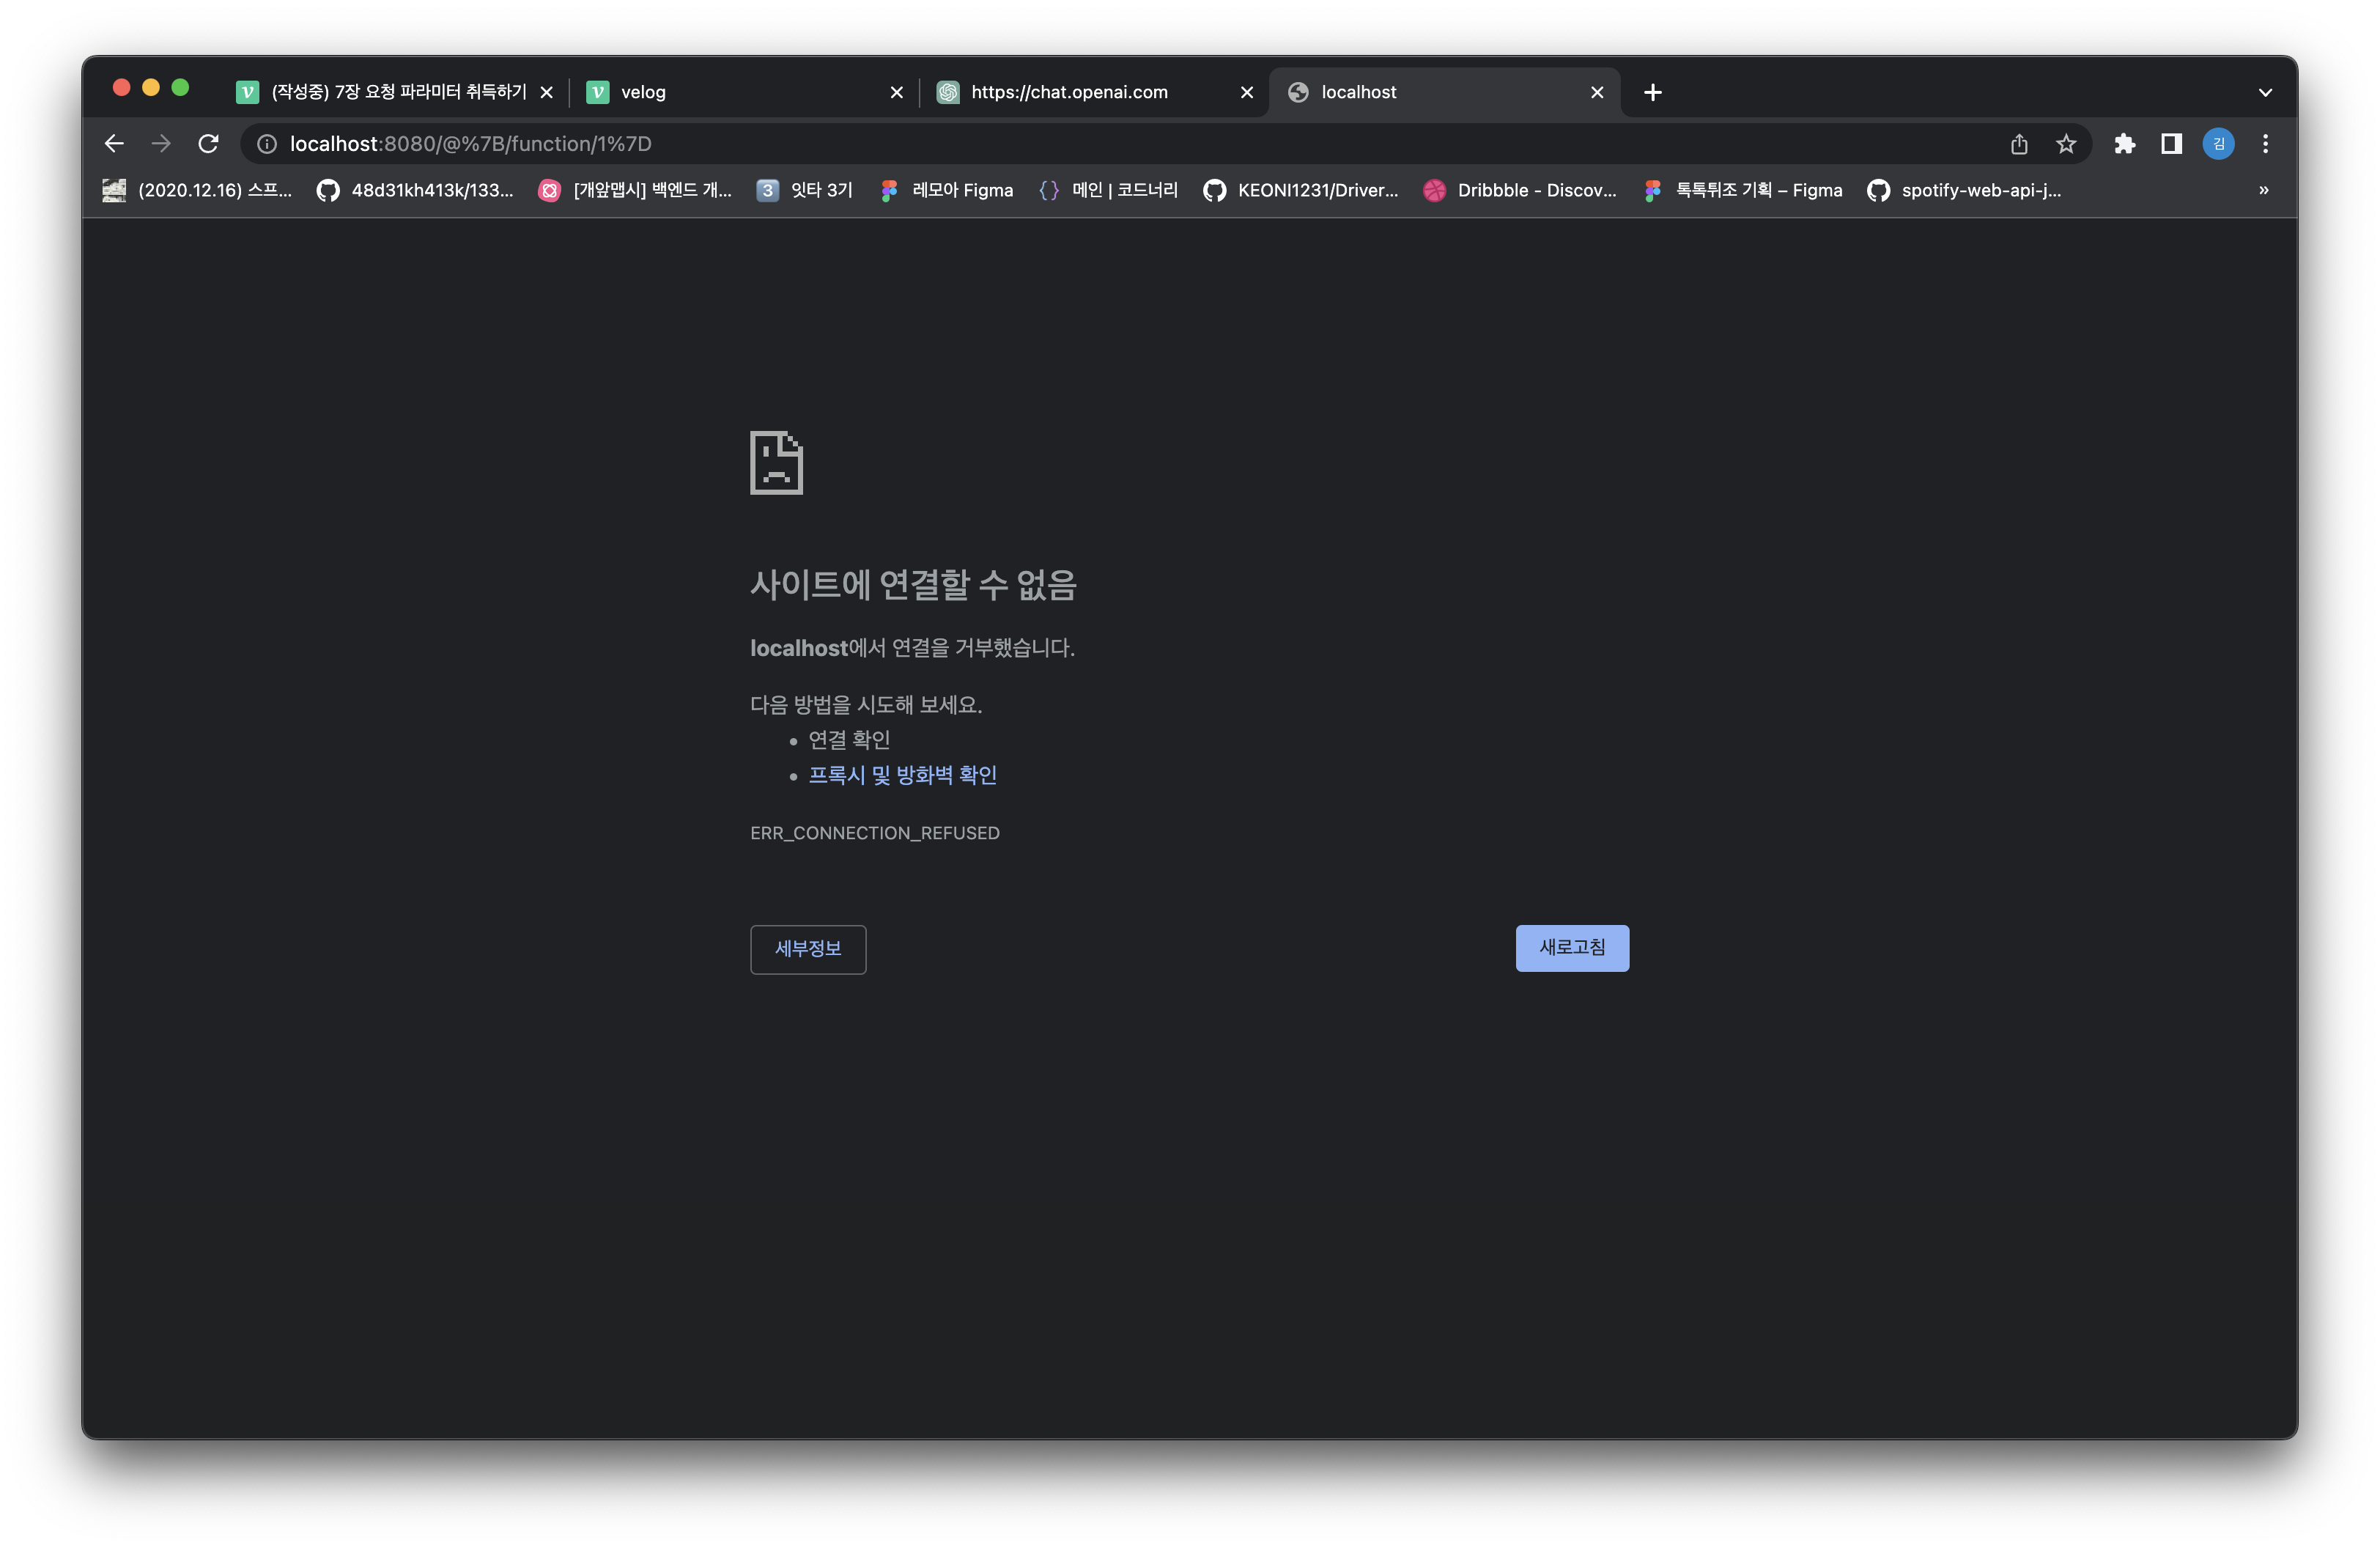
이렇게 나온다.
<!DOCTYPE html>
<html lang="ko" xmlns:th="http://www.thymeleaf.org">
<head>
    <meta charset="UTF-8">
    <title>URL 경로에 포함된 값과 클릭된 버튼 식별</title>
</head>
<body>
<!--URL에 값 넣기-->
<h3><a th:href="@{/function/1}">기능-1</a></h3>
<h3><a th:href="@{/function/2}">기능-2</a></h3>
<h3><a th:href="@{/function/3}">기능-3</a></h3>
<!--같은 form 태그 안에 포함된 여러 개의 버튼-->
<form th:action="@{/send}" method="post">
    <input type="submit" value="버튼A" name="a">
    <input type="submit" value="버튼B" name="b">
    <input type="submit" value="버튼C" name="c">
</form>
<h3></h3>
<h3></h3>
</body>
</html>
이렇게 href앞에 th:를 붙여줘야 잘 동작한다.
package com.example.ch74.controller;

import org.springframework.stereotype.Controller;
import org.springframework.web.bind.annotation.GetMapping;
import org.springframework.web.bind.annotation.PathVariable;

@Controller
public class PathVariableController {

    @GetMapping("show")
    public String showView(){
        // 반환값으로 뷰 이름을 돌려줌
        return "show";
    }

    @GetMapping("/function/{no}")
    public String selectFunction(@PathVariable Integer no) {
        // 뷰 이름을 초기화
        String view = null;
        switch (no) {
            case 1:
                view = "pathvariable/function1";
                break;
            case 2:
                view = "pathvariable/function2";
                break;
            case 3:
                view = "pathvariable/function3";
                break;
        }

        // 반환값으로 뷰 이름을 돌려줌
        return view;
    }
}
PathVariableController에 GetMapping 추가
3. 뷰 생성(기능 화면)
<!DOCTYPE html>
<html lang="en">
<head>
    <meta charset="UTF-8">
    <title>기능 1</title>
</head>
<body>
    <h1>기능 1 화면</h1>
</body>
</html>
<!DOCTYPE html>
<html lang="en">
<head>
<meta charset="UTF-8">
<title>기능 2</title>
</head>
<body>
<h1>기능 2 화면</h1>
</body>
</html><!DOCTYPE html>
<html lang="en">
<head>
<meta charset="UTF-8">
<title>기능 3</title>
</head>
<body>
<h1>기능 3 화면</h1>
</body>
</html>4. 뷰 생성(버튼 클릭 확인 화면)
<!DOCTYPE html>
<html lang="en">
<head>
    <meta charset="UTF-8">
    <title>a</title>
</head>
<body>
    <h1>버튼 A클릭 화면</h1>
</body>
</html>
title이랑 h1태그 알파벳만 바꿔 복붙