
계속 미루고 미루다 드디어 Vanila JS로 SPA 구현하기를 시도해봤다.
백지에서 하기에는 감이 안잡혀서 구글에서 예시를 찾다가
유튜브에 도움 요청....☆
강의도 몇 개 없어서 해외 강의를 참고했다.
우선 폴더 구조는 이런 형태이고, html파일은 index.html 하나로 구성되어 있다.

1. 프로젝트 생성 및 express 패키지 설치
먼저 프로젝트 디렉터리를 생성한다.
그리고 프로젝트 루트 폴더에서 아래와 같은 커멘드를 실행하여 package.json파일을 생성하고, express 패키지를 설치한다.
npm init -y //package.json 파일 생성
npm i express //express 패키지 설치
Node와 Express
- Node(Node.js): 오픈소스, 크로스 플랫폼이며, 개발자가 모든 종류의 서버 사이드 도구들과 어플리케이션을 javascript로 만들 수 있도록 해주는 런타임 환경이다.
- Express: 웹 및 모바일 애플리케이션을 위한 일련의 강력한 기능을 제공하는 간결하고 유연한 Node.js 웹 애플리케이션 프레임워크이다. 즉, Node.js의 원칙과 방법을 이용해 웹 애플리케이션을 만들기 위한 프레임워크이다.
- 각종 라이브러리와 미들웨어 등이 내장되어 있어 개발하기 편하고, 개발 규칙을 강제하여 코드 및 구조의 통일성을 향상시킬 수 있다는 장점.
2. server.js 파일 작성
/js-spa/server.js
루트 폴더 아래 server.js 파일을 만들어 아래와 같이 작성한다.
const express = require("express");
const path = require("path");
const port = process.env.PORT || 80;

const app = express();

app.use("/static", express.static(path.resolve(__dirname, "frontend", "static")))
app.get("/*", (req, res) => {
    res.sendFile(path.resolve(__dirname, "frontend", "index.html"));
});

app.listen(port, () => console.log("Server running..."));
express 프레임워크도... express로 서버 구현도 처음인 나는.... 이게 다 무슨 소리인가 싶었으니... 한 줄씩 뜯어보자

const express = require("express"); const path = require("path");require: nodeJS에서 다른 패키지를 불러올 때 사용되는 키워드
즉, node_modules에서 express, path라는 모듈을 활용하겠다 !const port = process.env.PORT || 80;process.env: nodeJS에서 환경 변수를 가져올 때 사용된다.
즉, 환경 변수가 입력되지 않을 시 port에 80을 지정 !
** 강의에서는 80대신 5060 port 번호를 사용했는데, 처음엔 똑같이 했다가 localhost:5060으로 했을 때 계속 웹 페이지를 찾을 수 없다고 나오길래 포트 번호를 바꿔줬더니 정상 실행됐다.
app.use("/static", express.static(path.resolve(__dirname, "frontend", "static")))path.resolve([...paths])
- 여러 인자들을 넣으면 경로를 묶어 root 경로를 고려한 새로운 경로를 반환한다.
- 오른쪽 인자부터 읽다가 /folder_name 형태의 경로가 등장하면 절대경로로 인식해 그 경로를 바로 반환한다.
(즉, 절대경로가 아닌 경우는 상대경로 표시(./folder_name)를 확실히 해야함)- ex) path.resolve('/a', '/b', 'c'); // /b가 절대경로라고 가정,
return: /b/c
__dirname- 현재 실행 중인 파일의 절대경로(파일명을 제외한)
express.static("디렉터리 이름")- 정적 파일(직접 값에 변화를 주지 않는 이상 변하지 않는 파일들, image, css, js 파일...) 제공하기
- 해당 디렉터리 밑에 있는 데이터들은 웹 브라우저의 요청에 따라 서비스를 제공할 수 있음
- ex) app.use(express.static('public'));
사용자가 127.0.0.1:80/images/puppy.png로 접근하면, 해당 파일을 public/images/puppy.png에 존재하는지 검색- node 프로세스가 실행되는 디렉터리에 상대적이므로 절대경로를 사용하는 것이 안전
app.use()- 응용프로그램 수준의 미들웨어를 app객체의 인스턴스에 바인딩
- 가상 경로 지정 가능
- ex) app.use('/static', express.static('public'));인 경우
사용자가 public 디렉터리에 있는 파일들에 접근하려면 /static/images/puppy.png로 접근해야 함
app.get("/*", (req, res) => {
    res.sendFile(path.resolve(__dirname, "frontend", "index.html"));
});
app.get("url 정의", 해당 url에서 수행할 작업 및 응답)
- REST API의 GET 리퀘스트를 정의하는 부분
- 두 번째 파라미터 함수에는 request, response 두 개의 파라미터를 받음
- 응답할 때, res 파라미터를 사용해 응답 정보를 송신
res.sendFile()- response에 해당 파일을 전송, 클라이언트(FrontEnd단)로 데이터 전송
즉, 해당 서버에서 어떤 경로로 요청이 들어오든 frontend 디렉터리에 있는 index.html을 응답
app.listen(port, () => console.log("Server running..."));app.listen()
- express 서버를 실행할 때 필요한 포트 정의 및 실행 시 callback 함수를 받음
즉, express를 80번 포트에 실행하고, express 서버 구축 성공 시 Server running...이라는 로그를 실행해라.
3. index.html 작성
/js-spa/frontend/index.html
<!DOCTYPE html>
<html lang="en">
<head>
<meta charset="UTF-8">
<meta name="viewport" content="width=device-width, initial-scale=1.0">
<title>Single Page App</title>
<link rel="stylesheet" href="./static/css/index.css">
</head>
<body>
<nav class="nav">
<a href="/" class="nav__link" data-link>Dashboard</a>
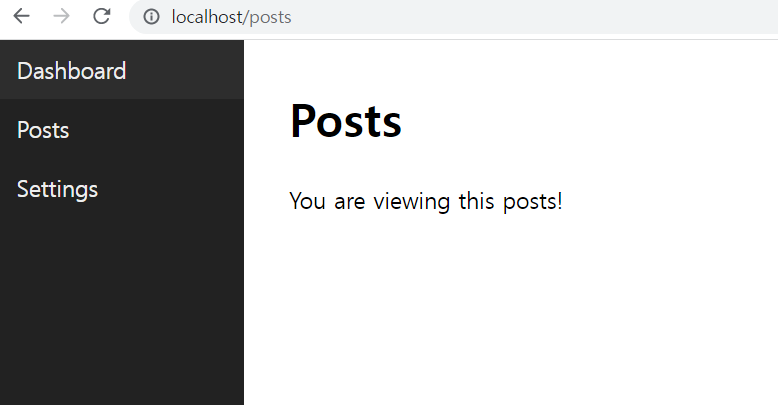
<a href="/posts" class="nav__link" data-link>Posts</a>
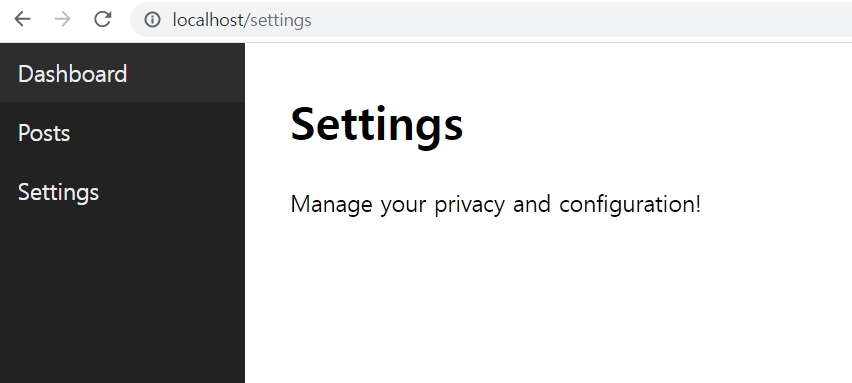
<a href="/settings" class="nav__link" data-link>Settings</a>
</nav>
<script type="module" src="/static/js/index.js"></script>
</body>
</html>각각의 메뉴들은 data-link 속성을 가지고 있다.
(a 요소 탐색에 사용됨)
4. 라우터 구현
/js-spa/frontend/static/js/index.js
const navigateTo = url => {
    history.pushState(null, null, url);
    router();
}

const router = async () => {
	//path: 웹 애플리케이션에서 처리할 수 있는 모든 url 정보를 담음
    //view: 렌더링할 페이지
    const routes = [
        { path: "/", view: Dashboard },
        { path: "/posts", view: Posts },
        { path: "/settings", view: Settings },
    ];

    //route: path, view 정보
    //isMatch: 현재 url과 path가 일치하는지에 대한 boolean 값
    const potentialMatches = routes.map(route => {
        return {
            route: route,
            isMatch: location.pathname === route.path
        }
    });

	//isMatch === true인 즉, 현재 url과 path가 일치하는 route 객체 저장
    let match = potentialMatches.find(potentialMatche => potentialMatche.isMatch);

	//match가 없으면 즉, 요청 들어온 url이 path 목록에 없으면
    //default page 연결
    if(!match) {
        match = {
            route: routes[0],
            isMatch: true
        };
    }
};

//popstate 메소드 연결
window.addEventListener("popstate", router);

//브라우저가 HTML을 전부 읽고, DOM 트리를 완성했을 때 router 함수 실행
document.addEventListener("DOMContentLoaded", () => {
	//클릭한 대상이 data-link 속성을 가진 a태그일 때,
    //navigateTo 메소드로 링크 전달
    document.body.addEventListener("click", e => {
        if(e.target.matches("[data-link]")) {
            e.preventDefault();
            navigateTo(e.target.href);
        }
    })
    router();
})history.pushState(null, null, url);history.pushState(state, title, url)
- state: 브라우저 이동 시 넘겨줄 데이터
- title: 변경할 브라우저 제목 (없으면 null)
- url: 변경할 주소
popstate()- 사용자의 세션 기록 탐색으로 인해 현재 활성화된 기록 항목이 바뀔 때 발생
- 브라우저의 back 버튼이나, history.back() 호출 등을 통해서만 발생
(history.pushState(), history.replaceState()로는 발생 X)
5. View 생성
5-1. 우선, View 기본 구조를 작성한다.
/js-spa/frontend/static/js/views/AbstractView.js
export default class {
    constructor() {}

    setTitle(title) {
        document.title = title;
    }

    async getHtml() {
        return "";
    }
}
5-2. View 생성
/js-spa/frontend/static/js/views/Dashboard.js
- AbstractView를 상속 받아 View 생성
import AbstractView from "./AbstractView.js";

export default class extends AbstractView {
    constructor() {
        super();
        this.setTitle("Dashboard");
    }

    async getHtml() {
		return `
            <h1>Welcome back, Dom</h1>
            <p>Dashboard Page</p>
            <p><a href="/posts" data-link>View recent posts</a></p>
        `;
    }
}
5-3. View 렌더링
/js-spa/frontend/index.html
<body>
    <nav class="nav">
        <a href="/" class="nav__link" data-link>Dashboard</a>
        <a href="/posts" class="nav__link" data-link>Posts</a>
        <a href="/settings" class="nav__link" data-link>Settings</a>
    </nav>
  	<!-- View가 렌더링 될 영역 지정 -->
    <div id="app"></div>
    <script type="module" src="/static/js/index.js"></script>
</body>
/js-spa/frontend/static/js/index.js
//각각의 View를 import 시킴
import Dashboard from "./views/Dashboard.js";
import Posts from "./views/Posts.js";
import Settings from "./views/Settings.js";

const router = async () => {
    	...
    ~위와 동일~
    	...
    let match = potentialMatches.find(potentialMatche => potentialMatche.isMatch);

  	//match안 route.view에는 렌더링할 페이지기 클래스 형태로 담겨있으므로 new를 통해 객체 생성
    const view = new match.route.view();

  	//View 객체의 getHtml 메소드를 통해 동적으로 생성된 태그들을
	//index.html에 지정한 위치에(<div id="app"></div>) innerHTML로 렌더링
    document.querySelector("#app").innerHTML = await view.getHtml();
};
6. 서버 실행
node server.js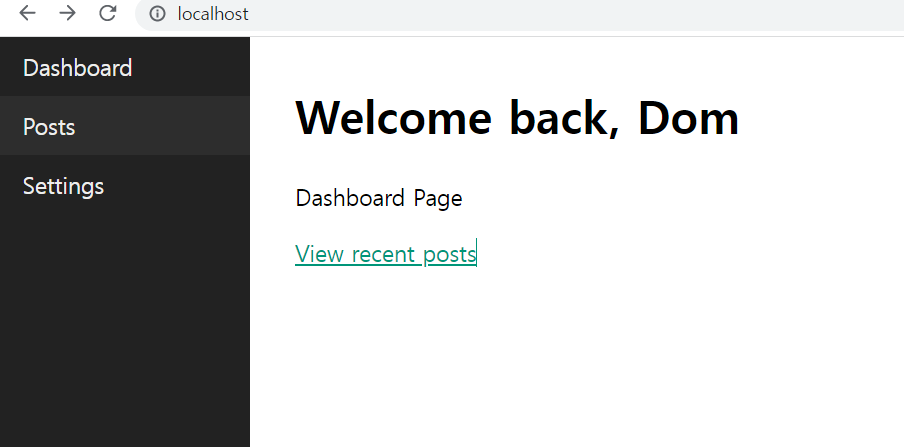
Nuxt 환경의 프로젝트에서는 폴더, 파일 기반으로 라우터를 자동으로 생성해줘서 라우팅 구현이 이렇게 복잡할지 몰랐다.....
그래도 따라해보니까 라우팅 원리에 대해 좀 더 이해가 된 것 같긴 한데...
너무 어렵다...😇
다음은 url parameter값을 다루는 부분인데...

다음 편에 계속....
강의: https://youtu.be/6BozpmSjk-Y
express 참고: https://blog.codefactory.ai/nodejs/creating-server-with-express/express-intro/