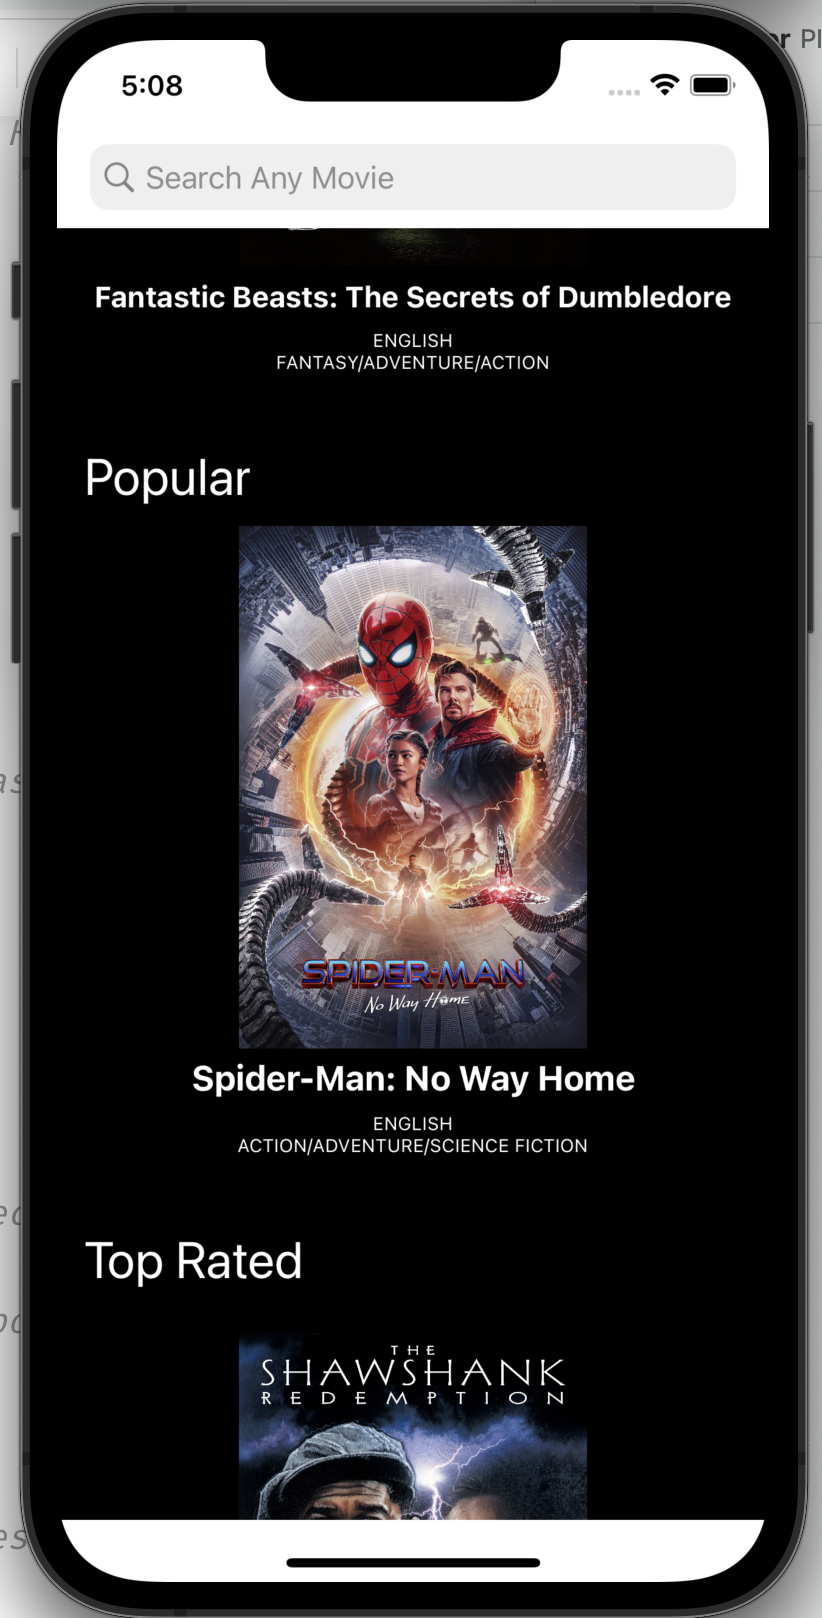
UICollectionViewDiffableDataSource와 UICollectionViewCompositionalLayout을 사용하여 아래와 같은 뷰를 그려보았다.
한 CollectionView가 여러 Section으로 나눠져 있고, 각 Section마다 Item들이 가로로 스크롤이 되는 형식으로 구현하였다.
이번 포스팅에서는 UICollectionViewDiffableDataSource에 대해 소개해보겠다.
처음 적용해보는 section이라는 개념 때문에 꽤 애를 먹어서... 정리해보려고 한다.
그럼 시작~!
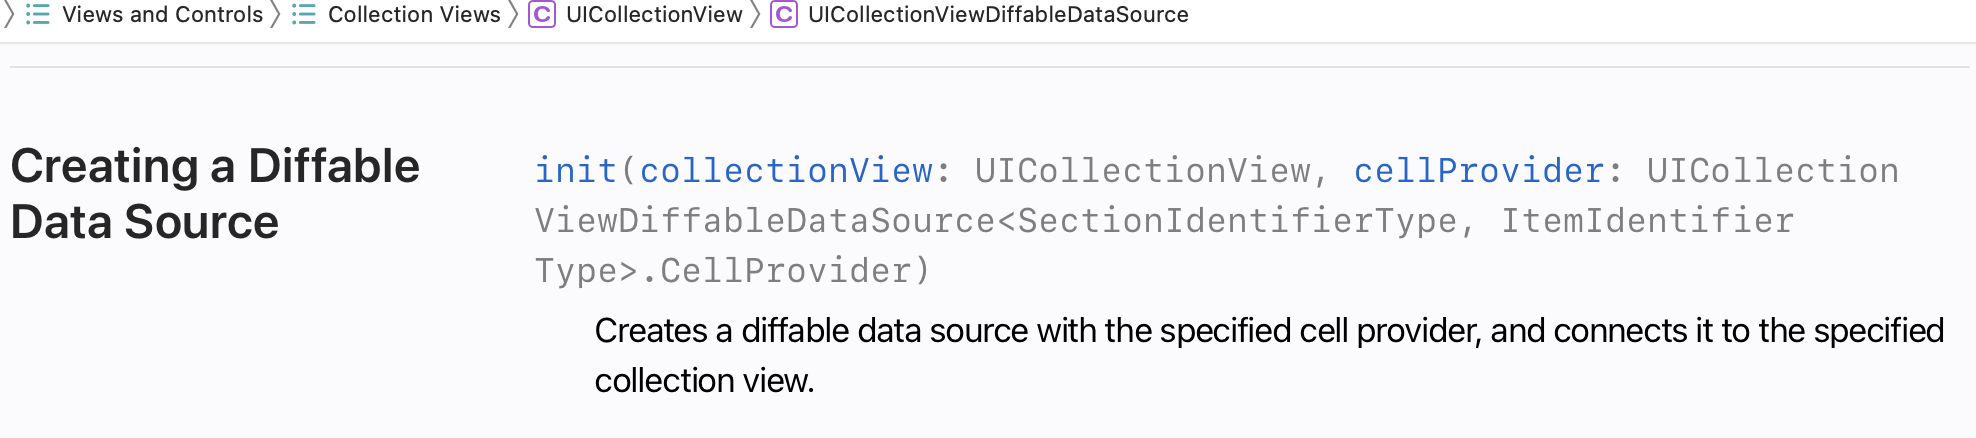
iOS 13부터 UICollectionViewDataSource를 대체할 수 있는 UICollectionViewDiffableDataSource를 사용할 수 있다.
UICollectionViewDataSource와의 차이점
기존 UICollectionViewDataSource에서는 컬렉션뷰에 몇개의 아이템을 보여줘야하는지.. 등에 대해서도 알려줘야 했다면
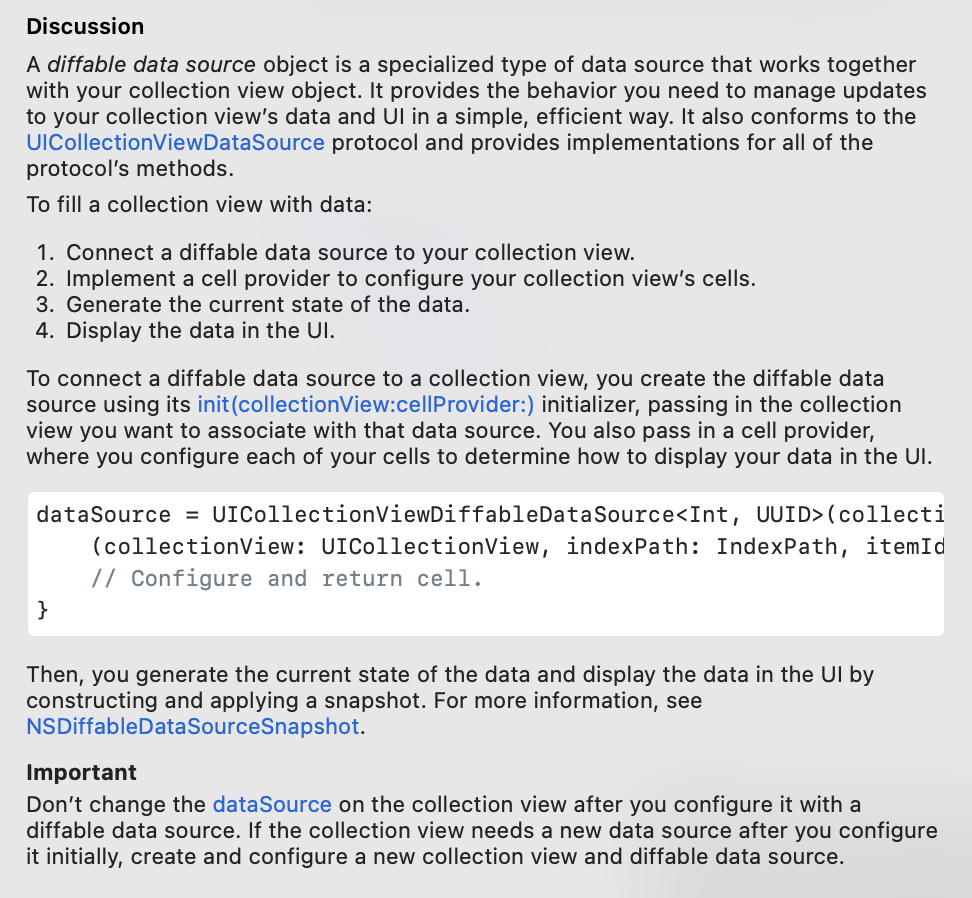
이 새로나온 diffable datasource는 말 그대로 diff 차이를 스스로 계산해서 업데이트 된 뷰의 데이터를 전달한다면 기존과 달라진 부분을 스스로 계산하여 달라진 부분만 업데이트가 가능하다.
이러한 성질때문에 각 요소들이 같은지 다른지 확인하기 위해서 UICollectionViewDiffableDataSource의 데이터는 모두 Hashable해야한다.
기존 UICollectionViewDataSource에서는 컬렉션뷰가 이미 업데이트 된 상황에서, 새로운 데이터로 업데이트해야할 때 reloadData()를 사용했다.
하지만...뷰의 요소를 수정, 삭제, 추가할때... animation이 적용이 안된다는 점이 한계였다.
UICollectionViewDiffableDataSource는 이러한 한계를 극복해버렸다.
- 뷰 업데이트시 자동으로 애니메이션이 적용되고
- CollectionView와 DataSource 간에 데이터 자동으로 동기화되어
사용하기 아주 편리하다!
그럼 이제 UICollectionViewDiffableDataSource의 기본적인 사용 방법에 대해 알아보자
UICollectionViewDiffableDataSource 구현 순서
대략적으로 큰 틀은,
- CollectionView에 사용될 셀을 등록하고,
- dataSource 역할을 하는 UICollectionViewDiffableDataSource에서 cell에 데이터를 어떻게 채워줄지 설정해준 후,
- 실제 데이터가 넘어오면 Snapshot에 추가하여 앞서 설정해준 dataSource에 적용하는 흐름이다.
코드와 함께 Araboza
1. 뷰컨에 스토리보드로 추가한 collectionView 준비
final class MovieListViewController: UIViewController {
    @IBOutlet weak var collectionView: UICollectionView!
}
2. UICollectionViewCell 상속한 커스텀 셀 생성
class MovieListCollectionViewCell: UICollectionViewCell {
    @IBOutlet weak var posterImageView: DownloadableUIImageView!
    @IBOutlet weak var titleLabel: UILabel!
    @IBOutlet weak var originalLanguageLabel: UILabel!
    @IBOutlet weak var genresLabel: UILabel!

    private var viewModel: MovieListItemViewModel!

    override func awakeFromNib() {
        super.awakeFromNib()
    }

    override func prepareForReuse() {
        posterImageView.cancleLoadingImage()
    }

    func configure(with viewModel: MovieListItemViewModel) {
        self.viewModel = viewModel

        guard let posterPath = viewModel.posterPath,
              let url = MovieURL.image(posterPath: posterPath).url,
              let title = viewModel.title else {
            return
        }
        self.posterImageView.kf.setImage(with: url)
        self.titleLabel.text = title
        self.originalLanguageLabel.text = viewModel.originalLanguage
        self.genresLabel.text = viewModel.genres
    }

}
3. collectionview에 앞서 생성한 커스텀 셀 register
     self.collectionView.register(
        UINib(nibName: "MovieListCollectionViewCell", bundle: nil),
        forCellWithReuseIdentifier: "MovieListCollectionViewCell")
4. UICollectionViewDiffableDataSource 설정
- SectionIdentifierType, ItemIdentifierType을 정해줌
여기서 SectionIdentifierType로 등록해줄 Section 타입은, 앞서 말한 것처럼 Hashable 해야한다.
한 section이 movies 배열을 가지고 있는 구조이고,
unique하게 identify되게 하기 위해서 id 프로퍼티를 생성해주었다.
final class Section: Hashable {
    var id = UUID()
    var title: String
    var movies: [MovieListItemViewModel]

    init(title: String, movies: [MovieListItemViewModel]) {
        self.title = title
        self.movies = movies
    }

    func hash(into hasher: inout Hasher) {
        hasher.combine(id)
    }

    static func == (lhs: Section, rhs: Section) -> Bool {
        lhs.id == rhs.id
    }
}
ItemIdentifierType은 MovieListItemViewModel 타입으로 생성하였는데, 아래 아래 코드에서 collectionView.dequeueReusableCell을 통해 셀을 configure할 때 사용하는 데이터이다.
struct MovieListItemViewModel: Hashable {
    let id: Int
    let posterPath: String?
    let title: String?
    let originalLanguage: String
    let genres: String
    let section: MovieListURL

    init(movie: MovieListItem, section: MovieListURL) {
        self.id = movie.id
        self.posterPath = movie.posterPath
        self.title = movie.title
        self.originalLanguage = movie.originalLanguage.formatted
        self.genres = movie.genres.map {$0.name.uppercased()}
                                    .joined(separator: "/")
        self.section = section
    }
}- UICollectionViewDiffableDataSource의
인스턴스를 생성하여 뷰에 데이터를 어떻게 뿌려줄지 설정
이니셜라이저의 후행 클로저로 collectionView, indexPath, itemIdentifier 가 넘어오면,
dequeueReuseableCell로 앞서 등록해준 셀에 대한 configuration을 해준다
    private var movieListDataSource: DataSource!
    private typealias DataSource = UICollectionViewDiffableDataSource<Section, MovieListItemViewModel>

    self.movieListDataSource = DataSource(collectionView: self.collectionView) { collectionView, indexPath, itemIdentifier in
       guard let cell = collectionView.dequeueReusableCell(
          withReuseIdentifier: "MovieListCollectionViewCell",
          for: indexPath) as? MovieListCollectionViewCell else {
            return UICollectionViewCell()
    }
       cell.configure(with: itemIdentifier)
            return cell
    }
5. NSDiffableDataSourceSnapshot 설정
- (DiffableDataSource와 동일한) SectionIdentifierType, ItemIdentifierType을 정해줌
- 넘어온 데이터(Section, Item)를 snapshot에 append하고, snapshot을 dataSource에 apply해줌
	private typealias Snapshot = NSDiffableDataSourceSnapshot<Section, MovieListItemViewModel>

    var snapshot = Snapshot()
    snapshot.appendSections(sections)
    sections.forEach { section in
        snapshot.appendItems(section.movies, toSection: section)
    }
    self.movieListDataSource?.apply(snapshot)
수정사항이 있을때마다 snapshot에만 apply해주면 간편하게 데이터를 업데이트 가능하다.
6. Layout 설정: UICollectionViewCompositionalLayout
private func createLayout() -> UICollectionViewLayout {
    let itemSize = NSCollectionLayoutSize(
        widthDimension: .fractionalWidth(1.0),
        heightDimension: .fractionalHeight(1.0))
    let item = NSCollectionLayoutItem(layoutSize: itemSize)
    item.contentInsets = NSDirectionalEdgeInsets(
        top: 20,
        leading: 20,
        bottom: 20,
        trailing: 20)

    let groupSize = NSCollectionLayoutSize(
        widthDimension: .fractionalWidth(1.0),
        heightDimension: .fractionalWidth(1.0))
    let group = NSCollectionLayoutGroup.horizontal(
        layoutSize: groupSize,
        subitems: [item])

    let section = NSCollectionLayoutSection(group: group)
    section.orthogonalScrollingBehavior = .paging
    section.interGroupSpacing = 0

    let layout = UICollectionViewCompositionalLayout(section: section)
    return layout
}
레이아웃 설정이 완료되었다면, 레이아웃을 리턴하여 viewDidLoad에서 collectionViewLayout을 세팅해준다.
collectionView.setCollectionViewLayout(createLayout(), animated: true)전체코드
final class MovieListViewController: UIViewController, UICollectionViewDelegate {
    @IBOutlet weak var searchBar: UISearchBar!
    @IBOutlet weak var collectionView: UICollectionView!

    let viewModel: MovieListViewModel
    private let disposeBag = DisposeBag()
    private var movieListDataSource: DataSource!

    private typealias DataSource = UICollectionViewDiffableDataSource<Section, MovieListItemViewModel>
    private typealias Snapshot = NSDiffableDataSourceSnapshot<Section, MovieListItemViewModel>

    override func viewDidLoad() {
        super.viewDidLoad()
        registerCollectionViewItems()
        configureDataSource()
        configureBind()
        collectionView.setCollectionViewLayout(createLayout(), animated: true)
        self.collectionView.backgroundColor = .black
    }

    init?(viewModel: MovieListViewModel, coder: NSCoder) {
        self.viewModel = viewModel
        super.init(coder: coder)
    }

    required init?(coder: NSCoder) {
        fatalError("init(coder:) has not been implemented")
    }

    private func registerCollectionViewItems() {
        self.collectionView.register(
            UINib(nibName: "MovieListCollectionViewCell", bundle: nil),
            forCellWithReuseIdentifier: "MovieListCollectionViewCell")
    }

    private func configureDataSource() {
        self.movieListDataSource = DataSource(collectionView: self.collectionView) { collectionView, indexPath, itemIdentifier in
            guard let cell = collectionView.dequeueReusableCell(
                withReuseIdentifier: "MovieListCollectionViewCell",
                for: indexPath) as? MovieListCollectionViewCell else {
                return UICollectionViewCell()
            }
            cell.configure(with: itemIdentifier)
            return cell
        }

    private func populate(with sections: [Section]) {
        var snapshot = Snapshot()
        snapshot.appendSections(sections)
        sections.forEach { section in
            snapshot.appendItems(section.movies, toSection: section)
        }
        self.movieListDataSource?.apply(snapshot)
    }

    private func configureBind() {
        let input = MovieListViewModel.Input(viewWillAppear: self.rx.viewWillAppear.asObservable())
        let output = viewModel.transform(input)

        output.sectionObservable
            .withUnretained(self)
            .subscribe(onNext: { (self, sections) in
                self.populate(with: sections)
                print("성공")
            }).disposed(by: disposeBag)
    }

    private func createLayout() -> UICollectionViewLayout {
        let itemSize = NSCollectionLayoutSize(
            widthDimension: .fractionalWidth(1.0),
            heightDimension: .fractionalHeight(1.0))
        let item = NSCollectionLayoutItem(layoutSize: itemSize)
        item.contentInsets = NSDirectionalEdgeInsets(
            top: 20,
            leading: 20,
            bottom: 20,
            trailing: 20)

        let groupSize = NSCollectionLayoutSize(
            widthDimension: .fractionalWidth(1.0),
            heightDimension: .fractionalWidth(1.0))
        let group = NSCollectionLayoutGroup.horizontal(
            layoutSize: groupSize,
            subitems: [item])

        let section = NSCollectionLayoutSection(group: group)
        section.orthogonalScrollingBehavior = .paging
        section.interGroupSpacing = 0

        let layout = UICollectionViewCompositionalLayout(section: section)
        return layout
    }

}
Section마다 타이틀을 다르게 구현한 부분은 다음 포스팅에서 이어서 설명하겠다.
Reference