
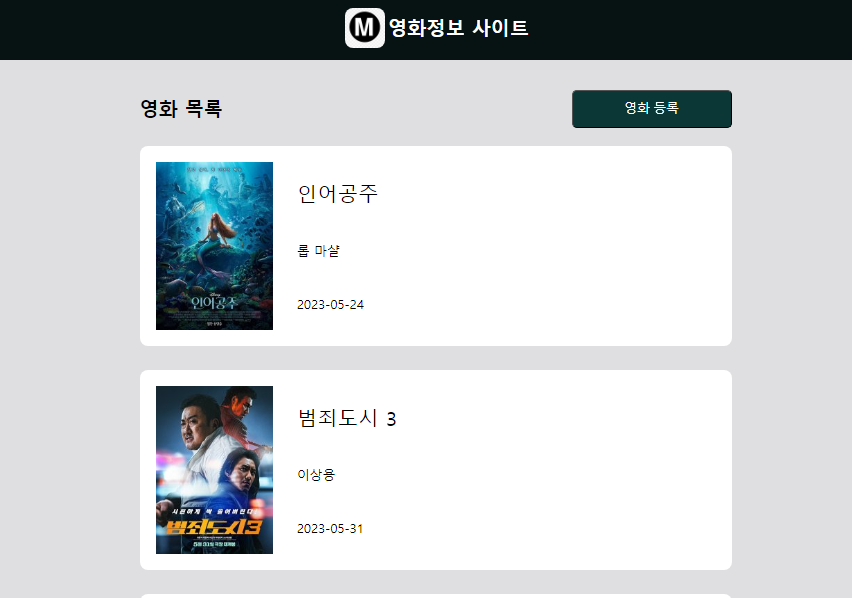
영화 정보를 등록하고 확인할 수 있는 페이지를 스프링과 타임리프를 이용해서 만들어본다.
타임리프는 스프링 부트에서 공식적으로 지원하는 View 템플릿으로
JSP와 달리 html 확장자를 갖고 있어 JSP처럼 Servlet이 문서를 표현하는 방식이 아니기 때문에 서버 없이도 동작 가능하다.
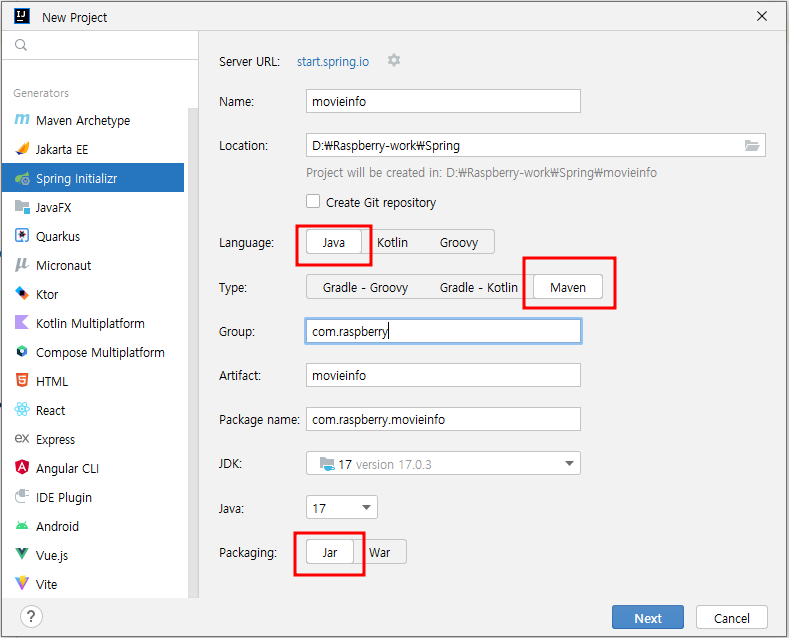
🌱 인텔리제이 세팅하기
프로젝트 생성 후 Java, Maven, Jar 선택
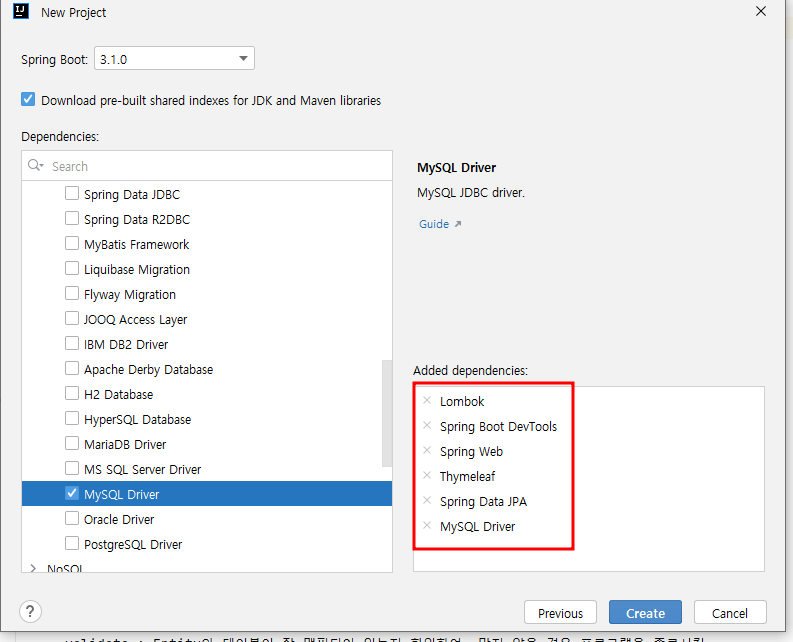
필요 dependencies
- Spring Boot DevTools, Lombok, Spring Web, Thymeleaf, Spring Data Jpa, MySQL Driver
application.properties에서 필요한 속성들을 설정한다.
# static resource
spring.web.resources.static-locations=classpath:static/

# datasource(DB)
spring.datasource.driver-class-name=com.mysql.cj.jdbc.Driver
spring.datasource.url=jdbc:mysql://127.0.0.1:3306/berrydb?serverTimezone=Asia/Seoul
spring.datasource.username=buser
spring.datasource.password=12341234

# port number
server.port = 80

# jpa setting
spring.jpa.database=mysql
spring.jpa.database-platform=org.hibernate.dialect.MySQL8Dialect
spring.jpa.generate-ddl=false
spring.jpa.hibernate.ddl-auto=update

# JPA log setting
spring.jpa.properties.hibernate.show_sql=true
spring.jpa.properties.hibernate.format_sql=true
spring.jpa.properties.hibernate.use_sql_comments=true
logging.level.org.hibernate.type.descriptor.sql=trace

# thymeleaf setting
spring.thymeleaf.cache=false
spring.devtools.restart.enabled=true

# multi-part file upload setting
spring.servlet.multipart.max-file-size=4MB
spring.servlet.multipart.max-request-size=8MB

# error page setting
server.error.whitelabel.enabled=false
server.error.path=/error/
server.error.include-stacktrace=always
server.error.include-message=always
server.error.include-exception=true
🌱 메인페이지 만들기(껍데기)
스프링과 타임리프를 활용한 웹 페이지 구현에 집중해야 하므로 css 기록은 생략!
💻 header 소스
<div class="top-bar">
  <img th:src="@{images/mlogo.png}" alt="로고" class="logo" th:onclick="|location.href='@{/}'|">
  <h2>영화정보 사이트</h2>
</div>
header 부분의 로고를 클릭하면 메인 페이지로 돌아올 수 있게 onclick 이벤트를 걸어준다.
💻 footer 소스
<div class="footer-bar">
<img th:src="@{images/mlogo.png}" class="footer-logo">
<span>©ICIA IoT 2023</span>
</div>💻 contents 소스
<div class="wrap">
    <th:block th:insert="~{header.html}"></th:block>
    <div class="content">
        <div class="board-form">
            <div class="list-title">
                <h2 class="form-header">영화 목록</h2>
                <button class="wr-btn" th:onclick="|location.href='@{writeForm}'|">영화 등록</button>
            </div>
            <div class="data-area">
                <th:block th:if="${#lists.isEmpty(mList)}">
                    <div class="movie-item" style="height: 100px;">등록된 영화가 없습니다.</div>
                </th:block>
                <th:block th:unless="${#lists.isEmpty(mList)}">
                    <th:block th:each="mitem:${mList}">
                        <div class="movie-item">
                            <th:block th:if="${mitem.msysname} == null">
                                <img class=poster-pre th:src="@{images/no_image.jpg}">
                            </th:block>
                            <th:block th:unless="${mitem.msysname} == null">
                                <img class="poster-pre" th:src="@{upload/}+${mitem.msysname}">
                            </th:block>
                            <div class="info-pre">
                                <div class="title-pre">
                                    <a th:href="@{detail(mcode=${mitem.mcode})}" th:text="${mitem.mname}"></a>
                                </div>
                            <div th:text="${mitem.mdirector}"></div>
                            <div th:text="${mitem.mopen}"></div>
                            </div>
                        </div>
                    </th:block>
                </th:block>
            </div><!--data-area-->
            <div class="paging-area">
                <div class="paging" th:utext="${paging}"></div>
            </div><!--paging-area-->
        </div>
    </div>
    <th:block th:insert="~{footer.html}"></th:block>
</div><!--wrap-->- 영화등록 버튼을 누르면
writeForm페이지로 이동하게끔 이벤트를 걸어준다. - 등록된 영화 정보가 없을 때는 등록된 영화가 없다는 문구가 출력된다.
💻 javascript 소스
<script th:inline="javascript">
    $(function () {
        let m = [[${msg}]];//msg가 없으면 null.
        if (m != null) {
            alert(m);
        }
    });
</script>
alert 로 메세지를 띄워주는 스크립트를 작성한다.
🌱 메인페이지 만들기(알맹이)
💻 Controller 소스
@GetMapping("/")
public ModelAndView home(Integer pageNum, HttpSession session){
    log.info("home()");

    //서비스 만들면 수정할 것
    //mv = new ModelAndView();
    mv = mServ.getMovieList(pageNum, session);
    mv.setViewName("home");

    return mv;
}
페이징 처리를 위해 페이지번호와 세션을 가져와서 서비스에 넘긴다.
💻 Service 소스
 @Autowired
//리포지토리 가져오기
private MovieRepository mRepo;

public ModelAndView getMovieList(Integer pageNum, HttpSession session){
    log.info("getMovieList()");

    if(pageNum == null){
        pageNum = 1;
    }
    int listCnt = 5; //한페이지 당 5개씩 목록 출력

    //페이징 조건 생성(Pageable)
    Pageable pb = PageRequest.of((pageNum -1), listCnt, Sort.Direction.DESC, "mcode");
    //of(시작번호, 목록개수, 정렬방식, 키필드명)

    Page<Movie> result = mRepo.findByMcodeGreaterThan(0L, pb); //Long 타입이라 0L입력

    //페이지 형태의 결과를 목록형태로 변환
    List<Movie> mList = result.getContent();

    //전체 페이지
    int totalPage = result.getTotalPages();

    //페이징용 html 작성
    String paging = getPaging(pageNum, totalPage);

    //세션에 페이지 번호 저장
    session.setAttribute("pageNum", pageNum);

    mv = new ModelAndView();
    mv.addObject("mList", mList);

    //페이징용 html 추가
    mv.addObject("paging", paging);

    //뷰네임 지정
    mv.setViewName("home");

    return mv;
}
GreaterThan : Repository 메소드 중 범위에 따라 데이터를 가져오도록 처리하는 메소드 작명법
이 영화 정보가 저장된 리스트를 가져오는 getMovieList 서비스는 다음 항목을 처리한다.
- 페이징 처리 (데이터 개수가 많으면 5개씩 쪼개서 페이지를 분할 처리)
- 페이징에 필요한 html 요소 메소드를 가져온다.
- 페이징 유틸 - 저장된 영화 정보 데이터를
mList로 반환한다.
이러한 것들을 처리하기 위해서는 ...또 필요한 것이 있다.
테이블을 생성하는 엔티티와 DB CRUD(insert, update, delete, select 용 인터페이스)에 필요한 리포지토리...!
그것은 다음 포스팅ㅇㅔ....

📅 DATE
2023.06.05 작성

사람의 마음에 차 있는 너르고 크고 올바른 기운