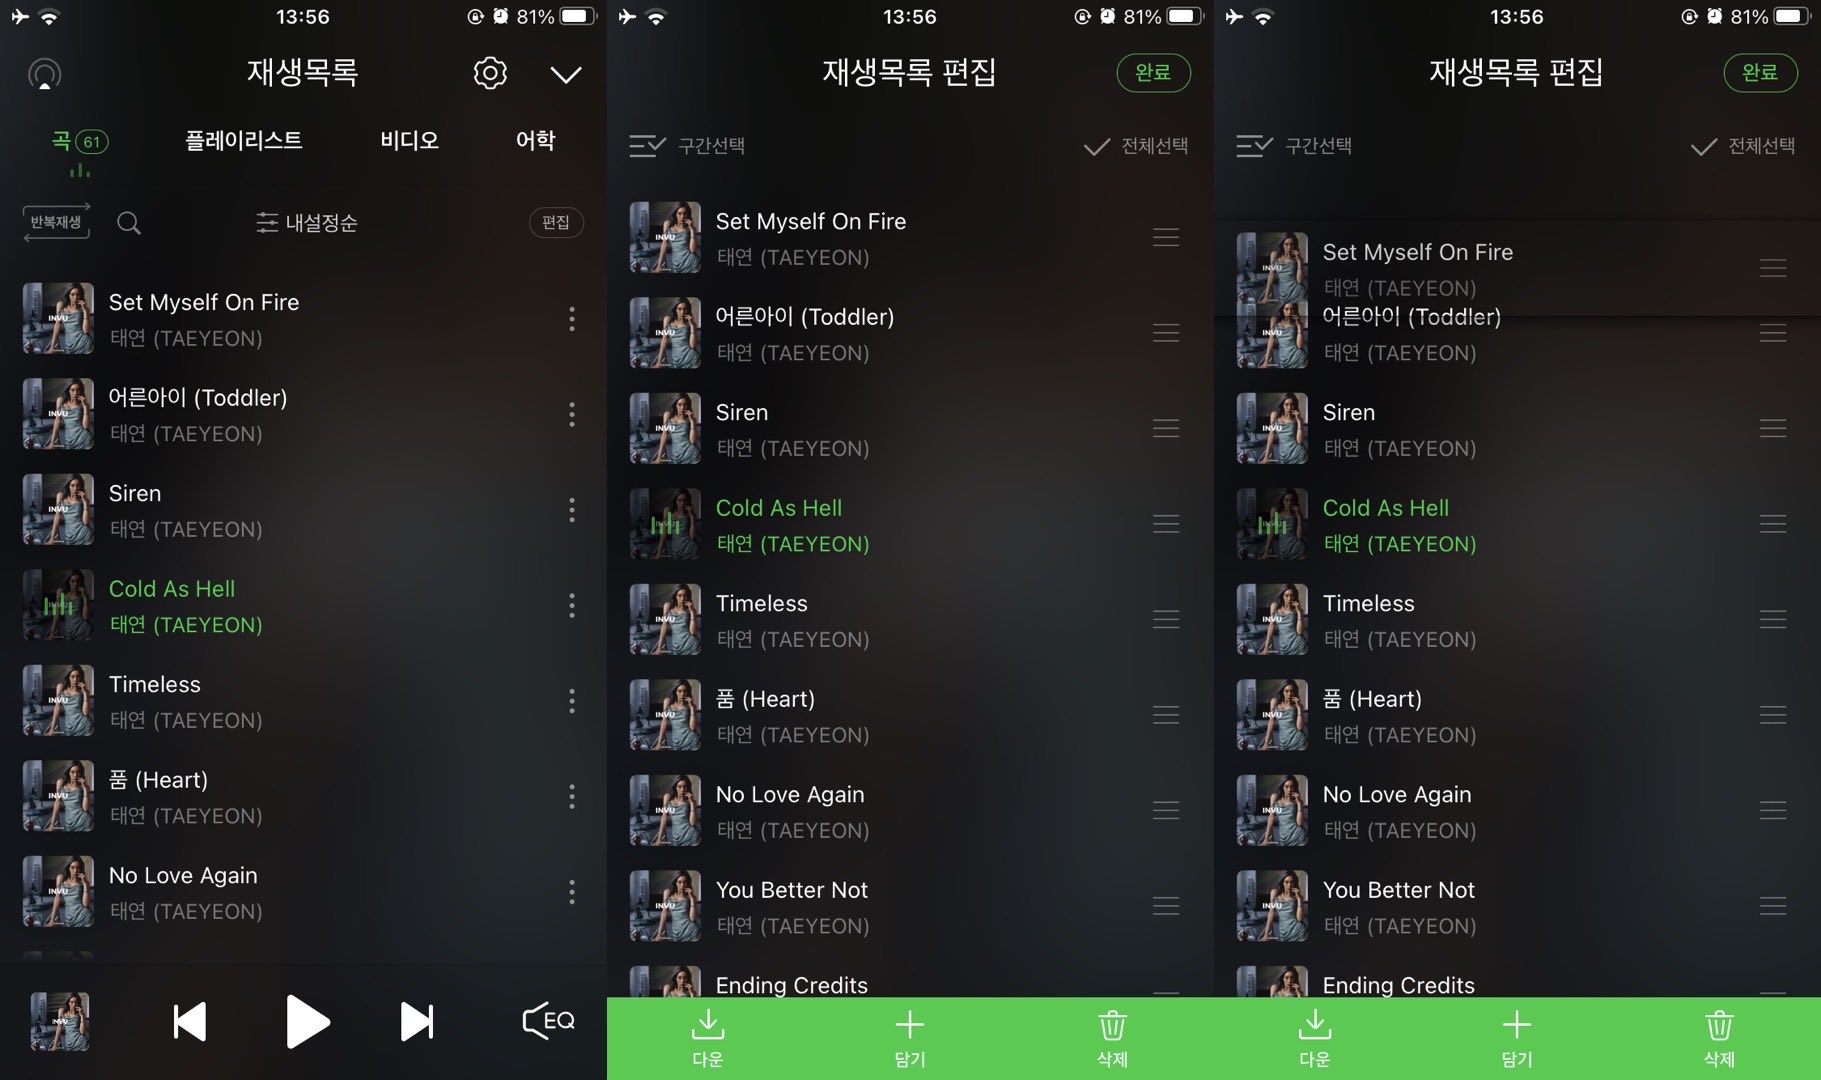
발단

위와 같은 디자인의 순서를 변경하는 UI를 만들어야 했다.
일단 대략적인 방법은 머릿속에 잡혔는데,
첫번째 방법
멜론, 유투브 뮤직 같은 음악 앱이나 다른 여러가지 어플리케이션에서 사용하는 순서 변경 방법. 편집 버튼이 따로 있어서 일반적으로 보는 모드와 편집 모드를 따로 사용하는 경우에 더 많이 사용한다.
- tableView 로 만들고
- tableView.editing = true
- 왼쪽 버튼을 없애고
- 오른쪽에 나타나는 이동용 햄버거 버튼을 커스텀!
4번이 힘들었다. 내가 검색을 잘 못하는건지 영어를 못하는건지 검색 키워드를 못 찾아서 레퍼런스 찾기 쉽지 않았다. 검색하다 발견한 것은 UITableViewReorderControl 이 가장 정확한 키워드였다.
두번째 방법
길게 클릭한 후 드래그해서 옮기는 방법
- LongPress gesture 를 등록하고
- 해당 cell 을 옮기는 코드 작성
선택!
원래 기획 의도가 cell 전체 영역을 살짝 터치해도 이동이 가능하게 하는 것이었고, 첫번째 방법이 사용성도 좋다고 생각해서 첫번째 방법으로 결정했다. 사실 cell 전체 영역으로 만드는 것도 불가능 하진 않았겠지만 일반적으로 많이 쓰는 방법도 아닌 것 같고 너무 레퍼런스가 없어서 해서 잠시 미뤄두었다.
미뤄뒀던 중에 reorder control 이미지 커스텀 하려고 구글링 하다가 해당 구현법을 발견하긴 했다. 그러나... 실 기기에서 테스트해보니 스크롤 하고 싶은데 셀이 옮겨지고 셀을 옮기고 싶은데 스크롤 되는 경우가 있어서 답답해서 사용하지 않기로 결정했다. 이 방법도 아래에 같이 정리할 예정이다.
전개 : reorder control image custom
일단 큰 구조는 app bar, tableView, 아래에 붙어있는 Button View (안에 2개) 였기 때문에, 버튼 view 가 노치 영역에 맞춰서 늘어나는 것을 쉽게 하고 싶어서
- 전체 구조는 코드 베이스로 SnapKit 을 이용해서 잡고,
- tableView Cell, Button View 는 xib 를 이용해서 만들고 가져다 썼다.
방법 1. editing = true / moveRowAt 세팅
class ViewController: UIViewController {
    private var snsd = [
        ["태연", "890309"],
        ["써니", "890515"],
        ["티파니", "890801"],
        ["효연", "890922"],
        ["유리", "891205"],
        ["수영", "900210"],
        ["윤아", "900530"],
        ["서현", "910628"],
    ]

    // 이 안에 있는 설정은 대체로 viewDidLoad 에서 하지만 개인적으로 closure 를 이용해서 생성하는걸 더 좋아해서 이렇게 했다!
    private lazy var tableView: UITableView = {
        let v = UITableView()

        let snsdCell = UINib(nibName: "SnsdTableViewCell", bundle: nil)
        v.register(snsdCell, forCellReuseIdentifier: "SnsdCell")

        v.isEditing = true // isEditing 설정!!!

        v.dataSource = self
        v.delegate = self

        return v
    }()

    private let btn: UIButton = {
        let btn = UIButton()
        btn.setTitle("적용하기", for: .normal)
        btn.backgroundColor = .orange
        btn.addTarget(self, action: #selector(btnPressed), for: .touchUpInside)
        btn.contentEdgeInsets = UIEdgeInsets(top: -20, left: 0, bottom: 0, right: 0)
        return btn
    }()

    override func viewDidLoad() {
        super.viewDidLoad()

        view.backgroundColor = .white
        view.addSubview(tableView)
        view.addSubview(btn)

        tableView.snp.makeConstraints { make in
            make.top.equalTo(view.safeAreaLayoutGuide.snp.top)
            make.left.right.equalToSuperview()
            make.bottom.equalTo(view.safeAreaLayoutGuide.snp.bottom).offset(-50)
        }

        btn.snp.makeConstraints { make in
            make.top.equalTo(view.safeAreaLayoutGuide.snp.bottom).offset(-50)
            make.left.right.bottom.equalToSuperview()
        }
    }

}

extension ViewController: UITableViewDataSource, UITableViewDelegate {
    func tableView(_ tableView: UITableView, numberOfRowsInSection section: Int) -> Int {
        return snsd.count
    }

    func tableView(_ tableView: UITableView, cellForRowAt indexPath: IndexPath) -> UITableViewCell {
        let cell = tableView.dequeueReusableCell(withIdentifier: "SnsdCell", for: indexPath) as! SnsdTableViewCell

        cell.nameLabel.text = snsd[indexPath.row][0]
        cell.birthLabel.text = snsd[indexPath.row][1]

        return cell
    }

    // 왼쪽 버튼 없애기
    func tableView(_ tableView: UITableView, editingStyleForRowAt indexPath: IndexPath) -> UITableViewCell.EditingStyle {
        return .none
    }

    // editing = true 일 때 왼쪽 버튼이 나오기 위해 들어오는 indent 없애기
    func tableView(_ tableView: UITableView, shouldIndentWhileEditingRowAt indexPath: IndexPath) -> Bool {
        return false
    }

    // 오른쪽 reorder control 이 나오면서 셀을 이동할 수 있게 됨.
    func tableView(_ tableView: UITableView, moveRowAt sourceIndexPath: IndexPath, to destinationIndexPath: IndexPath) {
        let removed = snsd.remove(at: sourceIndexPath.row)
        snsd.insert(removed, at: destinationIndexPath.row)
    }
}
결과

그냥.. 옆으로 나와버린다. 원래 디자인을 살리는 방법이 있었겠지만, 어떤 방법을 이용해도 오른쪽에서 reorder control 을 위한 view 가 나오는건 동일하기도 하고, 다른 대기업 앱들도 테두리를 쓰는 디자인은 거의 없길래 테두리를 없애버렸다. 야호!
방법 2. editingAccessoryView 아닌가..?
결론부터 말하자면 아님..
// ViewController > cellForRowAt
// customCell 클래스의 awakeFromNib 이나 init 에서 해줘도 같다.
    func tableView(_ tableView: UITableView, cellForRowAt indexPath: IndexPath) -> UITableViewCell {
        let cell = tableView.dequeueReusableCell(withIdentifier: "SnsdCell", for: indexPath) as! SnsdTableViewCell

        cell.nameLabel.text = snsd[indexPath.row][0]
        cell.birthLabel.text = snsd[indexPath.row][1]
        cell.editingAccessoryView = UIImageView(image: UIImage(named: "reorder"))

        return cell
    }
결과

아님... 그냥 reorder control 옆에 Accessory View 가 생겨버림... 일단 그래서 cell 안에 들어가있는 햄버거버튼 view 는 없애야겠다는 생각을 하게 되었다.
방법 3. willDisplay (혹은 cell 의 setEditing) 에서 UITableViewCellReorderControl 내의 이미지뷰를 변경
출처 - https://pilvi.tistory.com/2?category=868530
func tableView(_ tableView: UITableView, willDisplay cell: UITableViewCell, forRowAt indexPath: IndexPath) {
    // cell 의 subview 에서 UITableViewReorderControl 안의
    // imageView 를 찾아와서
	let imageView = cell.subviews.first(where: { $0.description.contains("Reorder") })?.subviews.first(where: { $0 is UIImageView }) as? UIImageView

    // image 변경
	imageView?.image = UIImage(named: "reorder")

    // imageView 의 frame 변경
	let size: CGFloat = 20
	imageView?.frame.size.width = size
	imageView?.frame.size.height = size
}
func tableView(_ tableView: UITableView, willDisplay cell: UITableViewCell, forRowAt indexPath: IndexPath) {
for view in cell.subviews {
if view.self.description.contains("UITableViewCellReorderControl") {
for sv in view.subviews {
if (sv is UIImageView) {
(sv as? UIImageView)?.image = UIImage(named: "reorder")
(sv as? UIImageView)?.contentMode = .center
sv.frame = CGRect(x: 0, y: 0, width: 20, height: 20)
}
}
}
}
}// willDisplay 안에서 cell 안의 subview 를 찾는 것과 같은 효과.
override func setEditing(_ editing: Bool, animated: Bool) {
super.setEditing(editing, animated: animated)
if editing {
for view in subviews where view.description.contains("Reorder") {
for case let subview as UIImageView in view.subviews {
subview.image = UIImage(named: "reorder")
subview.frmae = CGRect(x: 0, y: 0, width: 20, height: 20)
}
}
}
}결과

바뀐 reorder image 가 적용은 됐으나... 순서를 변경하려고 누르는 순간 기본이미지로 돌아가 버렸다. 위의 코드는 그나마 비율이라도 유지되긴 했으나... 그래도 이미지가 바뀌는 것은 마찬가지... 게다가 원하는 정확한 위치에 이미지가 들어가는 것이 아니었다.
두 코드가 코드는 다르지만 의미는 같아보이는데 바뀐 이미지가 하나는 비율이 유지되는 이유도 궁금하다.
위기 : reorder image '''위치''' 커스텀
방법 4. 위의 방법에서 image.frame.origin.x 로 위치 변경
출처 - https://tutorialmeta.com/question/change-reorder-controls-color-in-table-view-cell-for-ios-15
private myReorderImage: UIImage?

func tableView(_ tableView: UITableView, willDisplay cell: UITableViewCell, forRowAt indexPath: IndexPath) {
    for subView in cell.subviews {
      if (subView.classForCoder.description() == "UITableViewCellReorderControl") {
        for sv in subView.subviews {
          if (sv.isKind(of: UIImageView.classForCoder())) {

            // 위처럼 이미지를 수정하는게 아니라 그냥 원래 이미지를 아예 없애버리고
            sv.removeFromSuperview()
            let imageView = UIImageView()

            if (self.myReorderImage == nil) {
              let myImage = imageView.image
              myReorderImage = myImage?.withRenderingMode(.alwaysTemplate)
            }

            // 새로운 이미지로 세팅!
            var frame = imageView.frame
            frame.origin.x = -10
            frame.origin.y = 20
            frame.size = CGSize(width: 24, height: 24)
            self.myReorderImage = UIImage(named: "reorder") // set your image
            imageView.frame = frame
            imageView.image = self.myReorderImage
            subView.addSubview(imageView) // add imageView to reorder control
            break
          }
        }
        break
      }
    }
  }
하지만 이 코드에도 문제점이 있었으니.... 이제 클릭했을 때 이미지가 변한다거나 하는 것은 사라졌는데,
frame.origin 으로 이미지를 이동시켜서 0 이하로 만들어버리면 이미지가 의도한 곳에 위치하기는 하는데... reorder control 의 범위를 벗어나는 곳이 생겨서 그 부분으로 컨트롤을 하려고 하면 컨트롤이 안됐다... 이쯤 돼서는 그냥 디자인대로 안 맞출까 이미 한번 디자인 바꿨으면서.. 라는 생각을 하다가 그래도 여기까지 왔으면 뭔가 방법이 있을 것 같아서 구글링을 다시 시작했다.
절정 : reorder control 영역 셀 전체로 확장하고 숨김 == 원래 의도대로 동작하는 코드를 찾음
방법 5. reorder control 을 cell 전체로 확장
출처 - http://jike.in/?qa=816545/ios-reordering-uitableview-without-reorder-control
이 코드는 위의 willDisplay 코드를 setEditing 에 넣으면서 cell 안으로 가져간 것이다!! 거기서 reorder control ㅑㅡㅁㅎㄷ
weak var reorderControl: UIView?
override func layoutSubviews() {
        super.layoutSubviews()

        // Make the cell's `contentView` as big as the entire cell.
        contentView.frame = bounds

        // Make the reorder control as big as the entire cell
        // so you can drag from everywhere inside the cell.
        reorderControl?.frame = bounds
    }

override func setEditing(_ editing: Bool, animated: Bool) {
    super.setEditing(editing, animated: false)
    if !editing || reorderControl != nil {
        return
    }

    // Find the reorder control in the cell's subviews.
    for view in subviews {
        let className = String(describing: type(of:view))
        if className == "UITableViewCellReorderControl" {

            // Remove its subviews so that they don't mess up
            // your own content's appearance.
            for subview in view.subviews {
                subview.removeFromSuperview()
            }

            // Keep a weak reference to it for `layoutSubviews()`.
            reorderControl = view

            break
        }
    }
}
reorderControl 의 frame 을 바꿔버리는거다. 대신 cell 의 높이가 정확하게 정해져있지 않으면 테이블뷰를 스크롤 할 때 cell 들이 사라졌다 나타났다 하니까... 주의... tableView.rowHeight = 72 이렇게 정해줬다.
결과

처음 수영 cell 을 움직일 때 빼고는 다 스크롤 하려고 한건데.. cell 이 자꾸 움직이는 모습...
결과 : 어 ? 마지막 두개를 섞으면...?

방법 6. 진짜진짜 최종
    //  reorder control custom
    func tableView(_ tableView: UITableView, willDisplay cell: UITableViewCell, forRowAt indexPath: IndexPath) {
        for subView in cell.subviews {
            if (subView.classForCoder.description() == "UITableViewCellReorderControl") {

                // reorder control frame 을 변경해서 세부적인 위치를 맞춰준다. - 오른쪽 간격 맞추기 위해서
                let reorderControl = subView
                let frame = reorderControl.frame
                reorderControl.frame = CGRect(x: self.view.frame.width - 56, y: frame.minY, width: frame.width, height: frame.height)

                for subViewB in reorderControl.subviews {
                    if (subViewB.isKind(of: UIImageView.classForCoder())) {
                        // reorder control default image 제거
                        subViewB.removeFromSuperview()

                        let imageView = UIImageView()
                        if (self.myReorderImage == nil) {
                            let myImage = imageView.image
                            myReorderImage = myImage?.withRenderingMode(.alwaysTemplate)
                        }

                        // reorder control image 변경
                        var frame = imageView.frame
                        frame.origin.x = 0
                        frame.origin.y = 24
                        frame.size = CGSize(width: 20, height: 20)
                        self.myReorderImage = UIImage(named: "reorder") // set your image
                        imageView.frame = frame
                        imageView.image = self.myReorderImage
                        reorderControl.addSubview(imageView) // add imageView to reorder control

                        break
                    }
                }
                break
            }
        }
    }
완성!!!!!!
진짜.. 처음엔 그냥 복붙할 생각만 하고 대충 갖다 써보고 안되면 다른거 찾고 그랬는데... 뭔가 섞으면 될 것 같은 느낌에 코드를 이해해보려고 시도해보니까 엄청 어려운 코드는 아니었다.

이미지 출처 - https://docs.microsoft.com/en-us/dotnet/api/uikit.uitableviewcell?view=xamarin-ios-sdk-12
이 이미지를 보면, cell 안의 subview 중에 reorder control 이 있고 그 안에 image 가 있음을 짐작할 수 있다. 우리는 코드를 이용해서 그것을 찾고 수정한 것이다!!

노력에 경의를 표합니다.
다만... 저는 나름 국내 이 분야(iOS 앱 개발..)에서 상대를 찾기 힘든 선배로써, 이런 일이 있을 때마다 좀 안타까운 마음이 듭니다.
iOS 개발자로 커리어를 시작하려는 후배(혹은 선배 중 직종 변화 역시...)에게
'내가 조언이랍시고 별로 해줄 말은 없고, 매년 WWDC 꼭 챙겨봐라. 그리고 가능하면 지난 WWDC들도 시간내서 한번 봐라. 너의 인생에 큰 도움이 될 거다'
라고 말하곤 합니다.
UITableViewDragDelegate, UIDragSession 을 찾아보세요.
iOS11에 나온 기능으로, 원하시는 모든 기능이 디자인 제약 없이 구현 가능합니다.